
Overview
Welcome to this step-by-step guide on how to set up an All Mail folder in Outlook. If you find yourself constantly struggling to manage your email inbox and keep track of important messages, creating an All Mail folder can be a game-changer. This folder will gather all your incoming and outgoing emails from all your accounts into one central location, providing you with a comprehensive view of your email communication.
Having an All Mail folder eliminates the need to switch between different email accounts and folders, saving you time and effort. With just a few simple steps, you can set up this folder in Outlook and streamline your email management process.
In this guide, we will walk you through the process of creating and customizing an All Mail folder in Outlook. You will learn how to access and manage your emails within the folder, as well as troubleshoot common issues that may arise.
Whether you use Outlook for personal or professional purposes, the All Mail folder will help you stay organized and efficient. So, let’s get started and explore the steps to set up an All Mail folder in Outlook!
Step 1: Open Outlook
To begin setting up the All Mail folder in Outlook, you first need to open the application. Outlook is a part of Microsoft Office Suite and is widely used for managing emails, calendars, and contacts.
If you have Outlook installed on your computer, look for the Outlook icon on your desktop or in the Start menu. Double-click on the icon to launch the application. It may take a few seconds for Outlook to load, depending on your computer’s speed.
In case you don’t have Outlook installed, you can download it from the Microsoft website or purchase the Microsoft Office Suite, which includes Outlook as one of its applications. Follow the provided instructions to install Outlook on your computer.
Once Outlook is open and ready to use, you will see the main interface with different sections such as Mail, Calendar, People, and Tasks. The Mail section is where you can access and manage your emails.
If you’re using Outlook for the first time, you will need to set up your email account before proceeding to create the All Mail folder. Outlook supports various email providers, including Microsoft Exchange, Office 365, Gmail, Yahoo, and more. Simply follow the prompts to add your email account to Outlook.
Now that you have successfully opened Outlook, you are ready to move on to the next step and create the All Mail folder. Keep reading to find out how!
Step 2: Go to the Folder Tab
After opening Outlook, the next step is to navigate to the Folder tab. The Folder tab contains various options and settings related to managing folders in Outlook, including creating new folders and organizing existing ones.
To access the Folder tab, look at the top of the Outlook window. You will see a row of tabs, such as File, Home, Send/Receive, and more. Click on the tab labeled “Folder”.
By clicking on the Folder tab, a drop-down menu will appear with several options. This menu allows you to perform actions on folders, such as moving, deleting, or renaming them. Additionally, you can create new folders from this menu, which is what we will be doing in the next step to create the All Mail folder.
It’s important to note that the appearance and arrangement of the tabs in Outlook may vary slightly, depending on the version you are using. However, the Folder tab is usually prominently displayed at the top of the window, making it easy to find and access.
By clicking on the Folder tab, you are one step closer to setting up the All Mail folder in Outlook. In the next section, we will discuss the process of creating a new search folder, which will serve as the All Mail folder. Stay tuned!
Step 3: Click on “New Search Folder”
Now that you are on the Folder tab in Outlook, it’s time to create a new search folder, which will serve as the All Mail folder. The search folder functionality in Outlook allows you to gather specific types of emails or messages into a single folder without moving or copying them.
To create a new search folder, locate the “New Search Folder” option within the Folder tab. In most versions of Outlook, you will find it in the “New” group.
Clicking on the “New Search Folder” option will open a dialog box with different search folder options to choose from. These options are pre-defined by Outlook and cover a wide range of criteria, including unread messages, flagged messages, specific email folders, and more.
In our case, as we want to create an All Mail folder that includes emails from all accounts, we need to select the “Custom” option within the dialog box. It allows us to set up a search folder with specific criteria tailored to our needs.
After selecting the “Custom” option, click on the “Choose” button to proceed. This will open the “Custom Search Folder” dialog box, where you can define the search folder criteria in the next step.
Clicking on “New Search Folder” is an essential step to create the All Mail folder in Outlook. In the following section, we will discuss how to select “All Mail” as the search folder criteria and customize the folder settings. Keep reading!
Step 4: Select “All Mail” from the available options
Now that you have opened the “Custom Search Folder” dialog box, it’s time to select “All Mail” as the search folder criteria. This will ensure that all your incoming and outgoing emails from all your accounts are included in the All Mail folder.
In the “Custom Search Folder” dialog box, you will see a list of available options on the left side. Scroll through the list until you find the “All Mail” option. Usually, it is located under the “Mail” section.
Select the “All Mail” option by clicking on it. Once selected, the option will be highlighted, indicating that it is the chosen criteria for your search folder.
By selecting “All Mail”, you are specifying that you want to gather all your emails from all your accounts into this folder. It is an efficient way to have a centralized view of your email communication and simplifies the management process.
It’s important to note that the availability of the “All Mail” option may depend on the email providers you have configured in Outlook. Some providers use different terminology, such as “Archive” or “All Mail” folders. If you don’t see the “All Mail” option, look for similar alternatives that include all your email messages.
Now that you have selected “All Mail” as the search folder criteria, the next step is to customize the folder settings. In the following section, we will discuss how to customize the All Mail folder to suit your preferences. Keep reading!
Step 5: Customize the folder settings
After selecting “All Mail” as the search folder criteria, it’s time to customize the settings of the All Mail folder to suit your preferences and needs. Outlook provides various options to modify the appearance and behavior of the folder.
In the “Custom Search Folder” dialog box, you will find the “Browse” button. Click on it to open the “Browse” dialog box, which allows you to choose the location for your All Mail folder. By default, the All Mail folder will be created in your main mailbox, but you can change it to a different location if desired.
Once you have selected the location, you can modify the name of the All Mail folder by clicking on the “Name” field. Give it a descriptive and recognizable name, such as “All Mail” or “Unified Inbox”, to easily identify its purpose.
In addition to the location and name, you have the option to customize the All Mail folder’s appearance by clicking on the “Filter” button. This opens the “Filter” dialog box, where you can specify additional criteria to refine the emails that will be included in the folder.
For example, you can set filters based on senders, subjects, keyword searches, or specific date ranges. This allows you to create a more targeted view of your emails within the All Mail folder, making it easier to navigate and find specific messages.
After customizing the folder settings, review your selections and ensure they align with your requirements. Once you are satisfied with the settings, click on the “OK” button to create the All Mail folder according to your specifications.
By customizing the folder settings, you can create an All Mail folder that is tailored to your preferences and streamlines your email management process. In the next step, we will discuss how to access and manage your emails within the All Mail folder. Keep reading!
Step 6: Click on “OK” to create the All Mail folder
Once you have customized the settings for your All Mail folder in Outlook, it’s time to create the folder by clicking on the “OK” button. This final step will bring your custom All Mail folder to life and make it available for you to access and manage your emails.
After making all the desired modifications in the “Custom Search Folder” dialog box, review your choices one last time to ensure they meet your requirements. Double-check the folder’s name, location, and any applied filters to confirm they align with your preferences.
Once you are satisfied, click on the “OK” button to create the All Mail folder according to your settings. Outlook will process your selections and generate the All Mail folder within your mailbox.
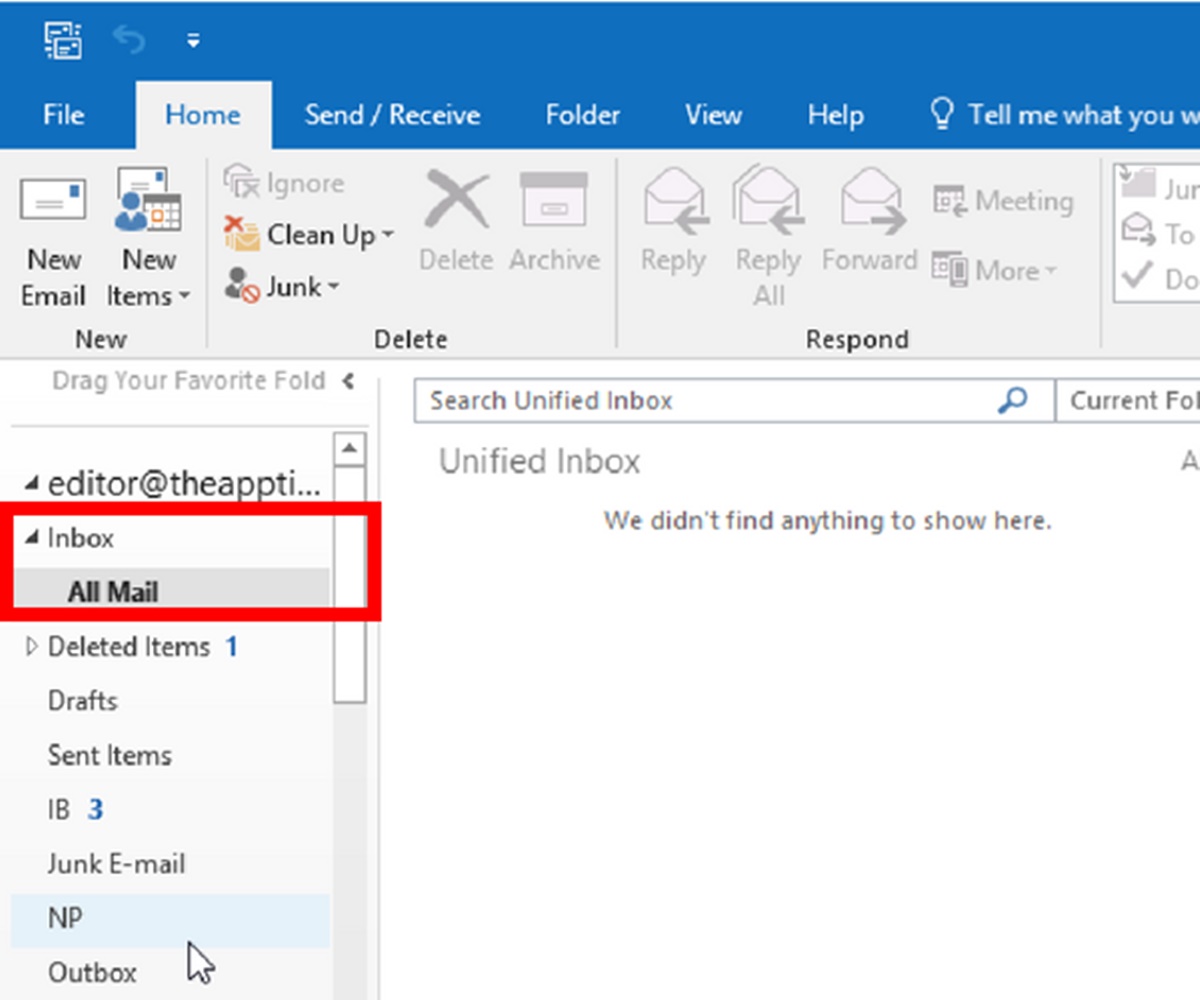
Once the folder creation process is complete, you will find the newly created All Mail folder listed in the left-hand panel of the Outlook interface, under your mailbox or chosen location. It might be displayed alongside other default folders like Inbox, Sent Items, and Drafts.
Now that you have successfully created the All Mail folder, you can begin utilizing it to access and manage all your emails from different accounts in one unified location. This saves you the hassle of switching between folders and accounts, providing convenience and efficiency.
Next, we will explore how to access and manage your emails within the All Mail folder. Read on to learn more about maximizing the benefits of this centralized email management approach!
Step 7: Access and manage your emails in the All Mail folder
Now that you have created the All Mail folder in Outlook, it’s time to start using it to access and manage your emails from all your accounts in one central location. With the All Mail folder, you can streamline your email management process and easily stay on top of your communication.
To access the All Mail folder, locate it in the left-hand panel of the Outlook interface, under your mailbox or the chosen location where you created it. Click on the folder name to open it.
Once you open the All Mail folder, you will see all your emails from all your accounts displayed in a unified view. This includes both incoming and outgoing messages, allowing you to have a comprehensive overview of your communication.
You can now perform various actions on your emails within the All Mail folder, just as you would in any other email folder in Outlook. This includes reading, replying, forwarding, moving, or deleting emails.
To open an email and view its contents, simply click on the email in the All Mail folder. Outlook will display the message in a new window, allowing you to read and interact with it as needed.
If you want to reply to or forward an email, use the options available in the email window to perform these actions. You can also use the buttons on the Outlook toolbar for quick access to common actions like Reply, Reply all, Forward, or Delete.
In addition to these actions, you can organize your emails within the All Mail folder by creating subfolders, applying categories, or using filters to sort them based on specific criteria. These customization options help you maintain a well-organized and efficient email management system.
By accessing and managing your emails in the All Mail folder, you can simplify the process of handling emails from multiple accounts. It provides a centralized hub for all your communication, allowing you to stay organized and efficient.
In the next step, we will discuss how to remove duplicates from the All Mail folder to further improve its functionality. Keep reading to learn this essential tip!
Step 8: Remove duplicates from the All Mail folder
With the All Mail folder set up and your emails consolidated in one place, you may encounter duplicate entries that can clutter your folder and make it challenging to navigate. Removing these duplicates is essential for maintaining a clean and organized All Mail folder.
To remove duplicates from the All Mail folder in Outlook, you can utilize the built-in tools provided by the application. Here’s how:
1. Open the All Mail folder in Outlook and make sure it is selected.
2. Go to the “Home” tab in the Outlook ribbon, where you will find different options for managing your emails.
3. Locate the “Clean Up” group and click on “Clean Up Folder”. This option will help you identify and remove duplicate entries within the selected folder.
4. In the submenu that appears, click on “Clean Up Folder” once again.
5. Outlook will analyze the All Mail folder and identify any duplicate entries. A dialog box will appear, prompting you to choose the criteria for determining duplicates. Select the desired criteria, such as “Sender, Subject, and Received Date”.
6. Click on “OK” to proceed. Outlook will scan the folder and remove the duplicates based on the chosen criteria.
7. Once the process is complete, Outlook will display a summary of the number of duplicates removed. Click on “OK” to close the dialog box.
By following these steps, you can effectively eliminate duplicate entries from your All Mail folder in Outlook. It’s important to note that Outlook’s duplicate removal tool is quite robust, but it’s still a good practice to review the results to ensure no important emails were mistakenly deleted.
Regularly removing duplicates from your All Mail folder will help keep it clean and organized, making it easier for you to find and manage your emails effectively.
In the next step, we will address some common issues that you may encounter when working with the All Mail folder and discuss troubleshooting methods to resolve them. Stay tuned!
Step 9: Troubleshooting common issues with the All Mail folder
While setting up and using the All Mail folder in Outlook can greatly improve your email management, you may face some common issues along the way. Here are a few troubleshooting methods to help you resolve such issues:
1. Folder not showing up: If you created the All Mail folder but cannot see it in Outlook, try restarting the application and checking again. If the issue persists, ensure that you have followed the steps correctly and that the folder is not mistakenly placed within another folder.
2. Syncing issues: In some cases, the All Mail folder may not sync properly across different devices. To resolve this, check that your Outlook account settings are properly configured for syncing and that you have a stable internet connection. If the issue continues, you may need to contact your email service provider for further assistance.
3. Missing emails: If you notice that certain emails are missing from the All Mail folder, ensure that they meet the search criteria you used during the setup. Double-check any applied filters and verify that the emails are not located in any other folders or have been accidentally deleted.
4. Slow performance: If you experience sluggish performance while interacting with the All Mail folder, it could be due to a large number of emails or a high volume of data. Try archiving older emails or moving them to different folders to lighten the load and improve performance. Additionally, regularly compacting your Outlook data file can help optimize performance.
5. Inconsistent email display: If you encounter issues with email formatting or inconsistent display within the All Mail folder, ensure that your Outlook settings are configured correctly. Check the options for displaying HTML or rich text emails and adjust them as needed.
If you have addressed these troubleshooting methods and the issues persist, it may be necessary to seek further assistance from Outlook support or your email service provider. They can provide additional guidance tailored to your specific situation.
By troubleshooting common issues, you can ensure that your All Mail folder in Outlook functions effectively, providing you with a streamlined and efficient email management experience.
Congratulations! You have now completed all the steps to set up an All Mail folder in Outlook and troubleshoot common issues. You can now enjoy the benefits of a centralized email management system and easily stay on top of your communication.