
What is Wininet.dll?
Wininet.dll (Windows Internet Extensions) is a dynamic-link library file commonly found in the Windows operating system. It plays a crucial role in providing various internet-related functionalities to applications and processes running on your computer. Wininet.dll facilitates communication between software and the internet, enabling tasks such as downloading files, accessing webpages, and handling internet protocols.
Wininet.dll is primarily used by web browsers, FTP clients, and other internet-dependent applications to establish and maintain internet connections. It contains essential functions and APIs (Application Programming Interfaces) that allow programs to communicate with internet servers, retrieve data, and perform various networking tasks.
Since Wininet.dll is a core component of the Windows operating system, it is loaded into memory when your computer starts up. Applications that require internet connectivity can use the functions provided by Wininet.dll to establish connections, send requests to servers, and receive responses.
Furthermore, Wininet.dll also handles the caching of web content, which helps to improve the browsing experience by storing temporary files locally. This caching mechanism enhances the performance of web browsers and reduces the need to download the same content repeatedly.
In summary, Wininet.dll is an essential system file responsible for providing internet-related functionalities to applications running on your computer. It allows programs to establish and maintain internet connections, download files, access webpages, and handle various internet protocols.
Common Causes of Wininet.dll Errors
Wininet.dll errors can occur due to various reasons, leading to issues with internet connectivity and the functioning of applications. Understanding the common causes behind these errors can help in diagnosing and resolving the issue effectively. Here are some of the common causes of Wininet.dll errors:
1. Corrupted or Missing Wininet.dll File: One of the primary causes of Wininet.dll errors is a corrupted or missing Wininet.dll file. This can happen due to malware infections, improper installation or uninstallation of applications, or system file corruption.
2. Outdated or Incompatible Internet Explorer: Since Wininet.dll is closely related to Internet Explorer, having an outdated or incompatible version of the browser can lead to Wininet.dll errors. It is important to keep your browser updated to ensure compatibility with Wininet.dll.
3. Issues with System Registry: Problems with the system registry can also result in Wininet.dll errors. The system registry contains important configuration settings for the operating system and applications. If registry entries related to Wininet.dll are corrupted or invalid, it can cause errors.
4. Malware Infections: Malware or viruses can infect Wininet.dll or modify its associated entries in the registry, leading to errors. Malware activity can disrupt the proper functioning of Wininet.dll and cause internet connectivity problems.
5. Hardware or Driver Issues: In some cases, hardware problems or incompatible drivers can trigger Wininet.dll errors. Faulty network adapters, outdated drivers, or conflicts between hardware components can interfere with the functioning of Wininet.dll.
6. Software Conflicts: Conflicts between different software or applications can also result in Wininet.dll errors. Certain programs or utilities may interfere with the functioning of Wininet.dll, causing connectivity issues and error messages.
It is important to identify the specific cause of the Wininet.dll error in order to apply the appropriate solution. By understanding the common causes, you can narrow down the troubleshooting process and resolve the issue effectively.
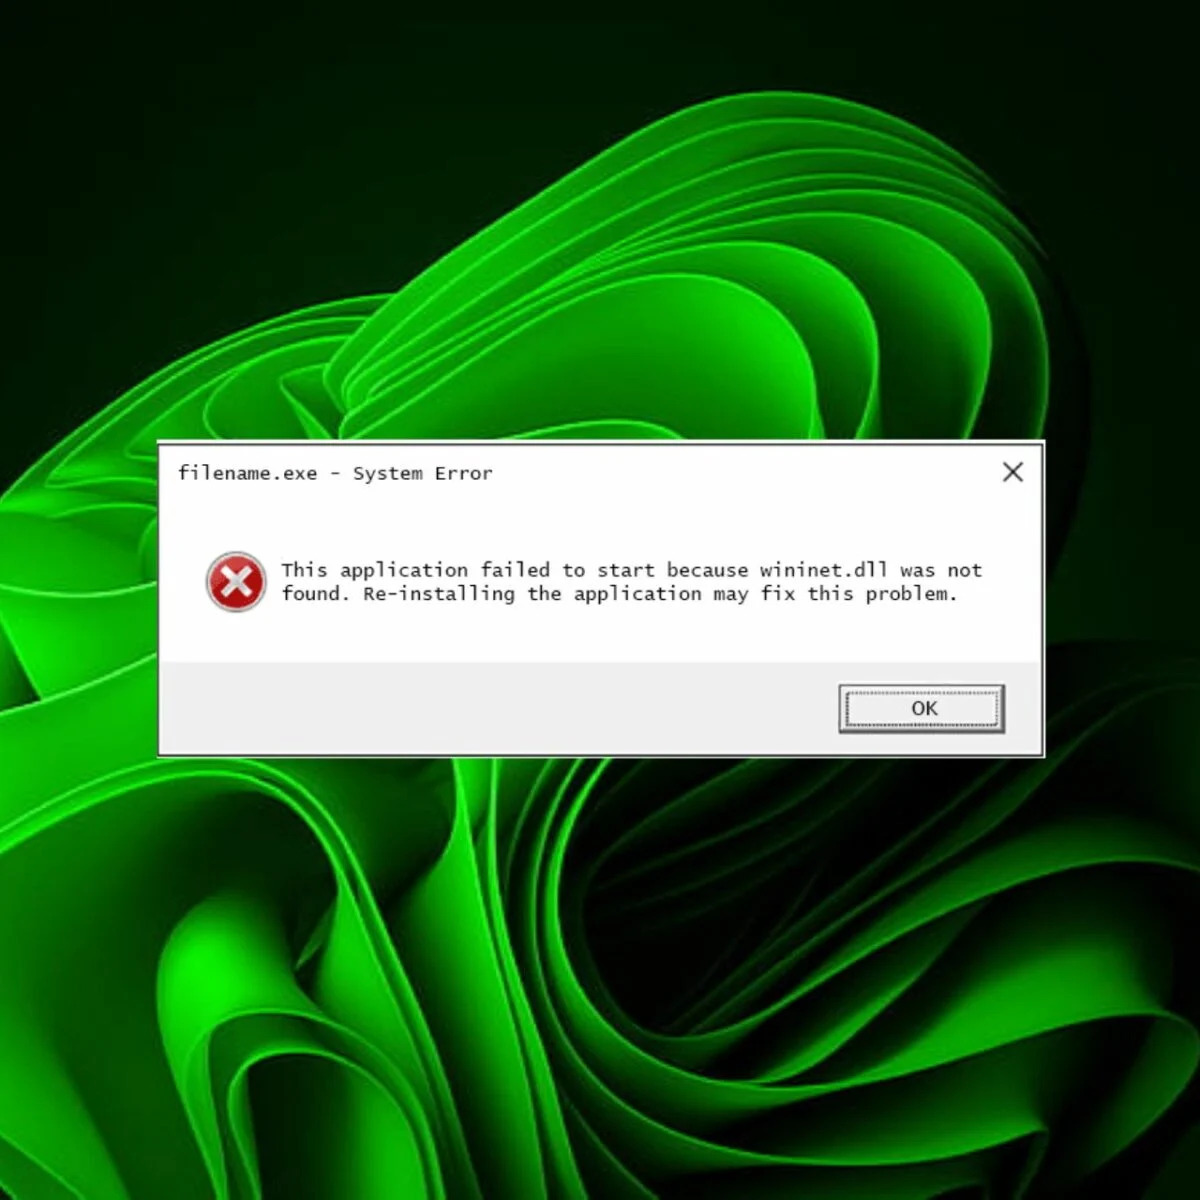
How to Fix Wininet.dll Is Missing or Not Found Errors
Encountering Wininet.dll missing or not found errors can be frustrating, but there are several solutions you can try to resolve the issue. Here are some methods to fix Wininet.dll errors:
1. Restart Your Computer: Sometimes, a simple restart can resolve temporary glitches and errors. Restart your computer and check if the Wininet.dll error persists.
2. Update Windows: Keeping your operating system up to date is crucial for the proper functioning of system files. Check for Windows updates and install any available updates that may include fixes for Wininet.dll-related issues.
3. Run a System File Checker Scan: The System File Checker (SFC) tool can scan and repair corrupted system files, including Wininet.dll. Open the command prompt as an administrator and run the command “sfc /scannow” to initiate the scan and repair process.
4. Reinstall the Program: If the Wininet.dll error is associated with a specific program, try reinstalling the program. Uninstall the program from the Control Panel, restart your computer, and then reinstall the program using the official installation files.
5. Perform a Clean Installation of Windows: If all other methods fail, performing a clean installation of Windows can help resolve Wininet.dll errors. This process involves reinstalling the operating system, which will replace all system files, including Wininet.dll.
6. Use System Restore: If the Wininet.dll error recently started occurring, you can try using System Restore to revert your computer’s settings to a previous state when Wininet.dll was functioning properly. Open the System Restore tool and select a restore point to initiate the restoration process.
7. Check for Malware: Malware infections can cause Wininet.dll errors. Use a reputable antivirus program to scan your computer for malware and remove any detected threats.
8. Update Device Drivers: Outdated or incompatible device drivers can trigger Wininet.dll errors. Update your device drivers to the latest versions from the manufacturer’s website or by using reliable driver update software.
9. Scan for Hard Drive Errors: Conduct a thorough scan of your computer’s hard drive to check for any errors or bad sectors. Use the built-in Windows utility, such as CHKDSK, to perform the scan and repair any detected issues.
10. Repair Windows Registry Entries: Issues with the Windows registry can cause Wininet.dll errors. Use a trusted registry cleaner tool to scan and repair any invalid or corrupted registry entries associated with Wininet.dll.
By following these methods, you can often resolve Wininet.dll missing or not found errors and restore the proper functioning of your computer. If the error persists even after trying these solutions, it is recommended to seek further assistance from a computer technician or support professional.
Method 1: Restart Your Computer
When encountering Wininet.dll missing or not found errors, one of the simplest and often effective methods to try is restarting your computer. Restarting can resolve temporary glitches or conflicts that may be causing the error. Here’s how you can perform this method:
1. Save your work and close any open applications on your computer.
2. Click on the “Start” menu and select the “Restart” option. Alternatively, you can use the shortcut by pressing the Windows key + R, then type “shutdown /r /t 0” in the Run dialog box and hit Enter.
3. Wait for your computer to shut down and start up again. This may take a few moments.
4. Once your computer has restarted, check if the Wininet.dll error is resolved.
Restarting your computer can help in situations where the error was triggered by a temporary issue. It allows the system to refresh and reload necessary files and services, which may resolve the missing or not found error related to Wininet.dll.
If the Wininet.dll error still persists after restarting your computer, proceed to the next methods to try alternative solutions.
Method 2: Update Windows
Updating your Windows operating system is essential for the proper functioning of system files, including Wininet.dll. Outdated versions of Windows may contain bugs or compatibility issues that can result in Wininet.dll errors. By updating Windows, you ensure that your system has the latest patches, bug fixes, and security updates. Here’s how you can update Windows:
1. Click on the “Start” menu and open “Settings.”
2. In the Settings window, select “Update & Security.”
3. Under the Windows Update section, click on the “Check for updates” button. Windows will automatically search for available updates.
4. If any updates are found, click on the “Download” or “Install updates” button to start the update process. Make sure you have a stable internet connection as the updates may be large in size.
5. Wait for Windows to download and install the updates. Your computer may need to restart during the process. Follow any on-screen prompts if necessary.
6. Once the updates are successfully installed, check if the Wininet.dll error is resolved.
Updating Windows can address known issues and provide compatibility improvements for system files like Wininet.dll. It ensures that your operating system functions optimally, reducing the chances of encountering errors related to outdated components. If the Wininet.dll error persists even after updating Windows, proceed to the next methods for further troubleshooting.
Method 3: Run a System File Checker Scan
Running a System File Checker (SFC) scan can help identify and repair corrupted or missing system files, including Wininet.dll. This method utilizes a built-in Windows tool to scan for and fix any issues with system files that might be causing the Wininet.dll error. Here’s how you can run an SFC scan:
1. Press the Windows key + R on your keyboard to open the Run dialog box.
2. Type “cmd” and press Ctrl + Shift + Enter to open an elevated Command Prompt. Alternatively, right-click on the Start menu, select “Command Prompt (Admin)”, or “Windows PowerShell (Admin)”.
3. In the Command Prompt window, type the command “sfc /scannow” and hit Enter to initiate the System File Checker scan.
4. The scan may take some time to complete, as it will check for and repair any corrupted or missing system files on your computer.
5. Once the scan is finished, you will receive a message indicating whether any issues were found and repaired. If the scan detects and resolves problems, it may ask you to restart your computer. Proceed with the restart if prompted.
6. After the restart, check if the Wininet.dll error is resolved.
Running a System File Checker scan can help fix any corrupted or missing components, ensuring the proper functioning of Wininet.dll and other system files. If the Wininet.dll error persists, continue to the next methods for further troubleshooting.
Method 4: Reinstall the Program
If the Wininet.dll error is associated with a specific program or application, reinstalling it can help resolve any issues related to the program’s files or configuration. Reinstalling the program ensures that all necessary files, including Wininet.dll, are properly installed and configured. Follow these steps to reinstall the program:
1. Open the Control Panel on your computer. You can access it by searching for “Control Panel” in the Start menu or by right-clicking on the Start button and selecting “Control Panel.”
2. In the Control Panel, navigate to “Programs” or “Programs and Features,” depending on your version of Windows.
3. Locate the program associated with the Wininet.dll error in the list of installed programs and select it.
4. Click on the “Uninstall” or “Remove” button at the top of the window to uninstall the program. Follow any on-screen prompts to complete the uninstallation process.
5. Once the program is successfully uninstalled, restart your computer to ensure that any leftover files or configurations are removed.
6. After restarting, download the latest version of the program from the official website or a trusted source.
7. Run the installation file and follow the on-screen instructions to reinstall the program. Make sure to choose the appropriate options and directories during the installation process.
8. Once the program is reinstalled, check if the Wininet.dll error is resolved when using the program.
Reinstalling the program can help fix any corrupt or missing files associated with the Wininet.dll error. It ensures a fresh installation of the program, including all necessary dependencies, which may resolve the issue. If the Wininet.dll error persists, proceed to the next methods for further troubleshooting steps.
Method 5: Perform a Clean Installation of Windows
If all other methods fail to resolve the Wininet.dll error, performing a clean installation of Windows may be necessary. A clean installation involves reinstalling the operating system from scratch, which can help ensure a fresh and error-free installation of system files, including Wininet.dll. Here’s how you can perform a clean installation of Windows:
Note: Performing a clean installation will erase all data on your hard drive. Make sure to back up your important files and create a restore point before proceeding.
1. Obtain a Windows installation media or create a bootable USB drive from a Windows ISO file.
2. Insert the installation media or plug in the bootable USB drive into your computer.
3. Restart your computer and boot from the installation media or USB drive. You may need to change the boot order in the BIOS settings to prioritize the installation media.
4. Follow the on-screen instructions to initiate the installation process. Choose the appropriate options for language, time zone, and keyboard layout.
5. When prompted, select the option to perform a clean installation and format your hard drive or partition.
6. Continue with the installation process, following the prompts and providing your Windows product key if required.
7. After completing the installation, reinstall your programs and restore your files from the backups you created earlier.
Performing a clean installation of Windows ensures that all system files, including Wininet.dll, are installed fresh and free from any corruption. However, it is a time-consuming process and should be considered as a last resort if other methods have failed to resolve the Wininet.dll error. If you are unsure about performing a clean installation yourself, it is recommended to seek assistance from a computer technician.
Method 6: Use System Restore
If you recently started experiencing the Wininet.dll error, using the System Restore feature can help revert your computer’s settings to a previous state when Wininet.dll was functioning properly. System Restore allows you to undo system changes without affecting your personal files. Here’s how you can use System Restore to fix the Wininet.dll error:
1. Press the Windows key + R on your keyboard to open the Run dialog box.
2. Type “rstrui.exe” and press Enter to open the System Restore window.
3. In the System Restore window, click on “Next” to proceed.
4. Select a restore point from the list that was created before the Wininet.dll error started occurring. If you don’t see any restore points, make sure to check the “Show more restore points” option.
5. Click on “Next” and then “Finish” to begin the restoration process. Review the confirmation message and verify that you want to proceed with the restore.
6. Wait for the system restore process to complete. Your computer will restart during this process and may take some time to restore to the selected restore point.
7. Once the restoration is finished, check if the Wininet.dll error is resolved.
Using the System Restore feature allows you to roll back your computer’s configurations, including system files, registry settings, and installed programs, to a previous state. This can help eliminate any changes or conflicts that may have triggered the Wininet.dll error. If the issue persists or if you don’t have any restore points available, proceed to the next methods for further troubleshooting steps.
Method 7: Check for Malware
Malware infections can cause Wininet.dll errors and disrupt the proper functioning of your computer. Therefore, it is essential to perform a thorough scan for malware and remove any detected threats. Here’s how you can check for malware and protect your system:
1. Update your antivirus software: Ensure that your antivirus software is up to date with the latest virus definitions. This will enable it to detect and remove the latest malware threats.
2. Run a full system scan: Initiate a comprehensive scan of your computer using your antivirus software. This will scan all files, including system files, to detect any malware infections.
3. Remove detected malware: If the scan identifies any malware, follow the prompts to remove or quarantine the threats. Make sure to restart your computer after removing malware.
4. Use anti-malware tools: Consider using additional anti-malware tools to perform a second opinion scan. These tools can help identify malware that may have gone undetected by your primary antivirus software.
5. Enable Windows Defender: If you do not have an antivirus software, ensure that Windows Defender, the built-in antivirus protection in Windows, is enabled. Keep it updated and perform regular scans.
6. Be cautious online: Practice safe online browsing and avoid downloading files or visiting suspicious websites that may contain malware. Be cautious when opening email attachments from unknown senders.
Checking for malware and removing any infections can help eliminate any potential threats that may be causing Wininet.dll errors. Regularly update your antivirus software and run scans to ensure continuous protection against malware. If the Wininet.dll error persists after checking for malware, proceed to the next methods for further troubleshooting steps.
Method 8: Update Device Drivers
Outdated or incompatible device drivers can often lead to Wininet.dll errors. Ensuring that your drivers are up to date can help resolve any compatibility issues and improve the overall stability and performance of your system. Here’s how you can update your device drivers:
1. Identify the device drivers to update: Start by identifying the devices that may be related to the Wininet.dll error. This can include network adapters, graphics cards, or any other hardware components associated with internet connectivity.
2. Visit the manufacturer’s website: Go to the website of the device manufacturer and navigate to the support or driver download section.
3. Locate and download the latest drivers: Search for the appropriate drivers for your specific device model and operating system version. Download the latest drivers available from the manufacturer’s website.
4. Install the updated drivers: Once the drivers are downloaded, run the installer and follow the on-screen instructions to install the updated drivers on your system.
5. Restart your computer: After installing the updated drivers, it is recommended to restart your computer to ensure that the changes take effect.
Updating device drivers can help resolve compatibility issues and ensure that the necessary components, including Wininet.dll, are properly functioning. By keeping your drivers up to date, you can enhance system performance and minimize the occurrence of Wininet.dll errors. If the Wininet.dll error persists after updating device drivers, proceed to the next methods for further troubleshooting steps.
Method 9: Scan for Hard Drive Errors
Hard drive errors can contribute to Wininet.dll errors and cause system instability. Performing a comprehensive scan for hard drive errors can often help identify and resolve such issues. Here’s how you can scan for hard drive errors:
1. Open File Explorer and navigate to “This PC” or “My Computer,” depending on your version of Windows.
2. Right-click on the hard drive you want to scan (usually the C: drive) and select “Properties” from the context menu.
3. In the Properties window, navigate to the “Tools” tab and click on the “Check” button under the “Error checking” section.
4. Select the option to scan for and attempt recovery of bad sectors or file system errors. You may need to provide administrative privileges to proceed.
5. Click on “Scan drive” or “Start” and wait for the scanning process to complete. This may take some time depending on the size of your hard drive.
6. If any errors are detected, follow the on-screen prompts to repair or fix the issues.
7. Once the scan is complete, restart your computer to allow any changes to take effect.
Scanning for hard drive errors helps identify and repair any issues that may be causing Wininet.dll errors. By resolving these errors, you can improve the overall stability and performance of your system. If the Wininet.dll error persists, proceed to the next methods for further troubleshooting steps.
Method 10: Repair Windows Registry Entries
Corrupted or invalid Windows registry entries can often lead to Wininet.dll errors. Repairing the registry can help resolve these issues and restore the proper functioning of Wininet.dll. However, it is important to approach registry modifications with caution as improper changes can cause system instability. Here’s how you can repair Windows registry entries:
Note: Before making any changes to the registry, it is strongly recommended to create a backup or a system restore point to revert back in case of any issues.
1. Press the Windows key + R on your keyboard to open the Run dialog box.
2. Type “regedit” and press Enter to open the Registry Editor. Provide administrative privileges if prompted.
3. In the Registry Editor, navigate to the following path:
HKEY_LOCAL_MACHINE\SOFTWARE\Microsoft\Windows NT\CurrentVersion\Windows
4. In the right pane, look for the “AppInit_DLLs” value. Double-click on it to modify its value data.
5. Clear the existing value and leave it blank. Click OK to save the changes.
6. Close the Registry Editor.
Modifying the AppInit_DLLs value can help resolve Wininet.dll errors caused by invalid or corrupted entries. It is advised to only modify the registry if you have a good understanding of what you are doing. If the Wininet.dll error persists after repairing the registry, it is recommended to seek further assistance from a computer technician.