
How to Find the IP Address of an Email Sender
When it comes to receiving emails, it’s not uncommon to encounter messages from unknown or suspicious senders. In such cases, being able to find the IP address of the email sender can be useful in determining the legitimacy of the message and ensuring your online safety. There are several methods you can employ to uncover the IP address of an email sender, and we will explore them in this article.
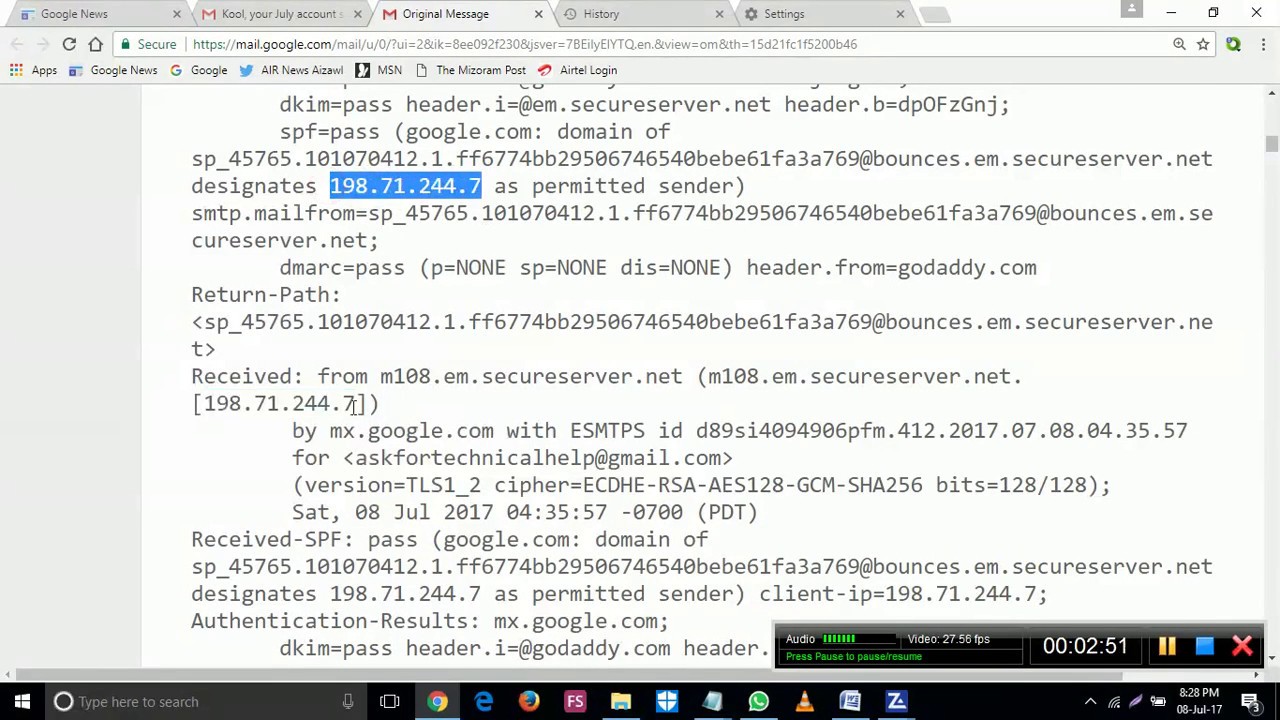
1. Examine the email header: The email header contains valuable information that can help you track down the IP address of the sender. Different email clients have different ways of accessing the email header, but generally, you can find it by looking for an option like “View Full Header” or “Message Source”. Once you have accessed the email header, search for the section that includes “Received: from” followed by an IP address. This IP address likely belongs to the sender.
2. Use a trace email tool: If examining the email header seems too technical or time-consuming, you can rely on trace email tools available online. These tools are specifically designed to extract the IP address of an email sender. Simply copy and paste the email header or the entire email into the tool, and it will provide you with the IP address details.
3. Utilize a VPN or proxy: If the first two methods do not yield the desired results, you can employ the help of a VPN (Virtual Private Network) or a proxy server. These tools can change your IP address and make it appear as if you are located in a different region. By masking your own IP address, you may be able to uncover additional information about the sender’s IP address.
4. Request assistance from your email service provider: If the email you received raises serious concerns or is part of a harassment campaign, don’t hesitate to reach out to your email service provider. They have the necessary resources and expertise to investigate the situation, including tracing the IP address of the sender.
5. Contact the authorities: In extreme cases where you believe the email may be involved in illegal activities or poses a serious threat, it is essential to contact the relevant authorities. Provide them with all the available information, such as the email contents and any discovered IP addresses, so they can take appropriate action.
By using one or more of these methods, you can successfully uncover the IP address of an email sender. Remember that this information should be handled responsibly and only used for legitimate purposes in order to protect your online security and privacy.
Why would you want to find the IP address of an email sender?
When you receive an email from an unknown source or suspect that the sender’s intentions may be malicious, finding the IP address of the email sender can provide valuable insights and help you make informed decisions. Here are a few reasons why you might want to uncover the IP address of an email sender:
1. Verify the legitimacy of the email: By examining the IP address, you can determine if the email is coming from the expected location or if it is originating from a suspicious or unauthorized source. This can be particularly helpful in identifying potential phishing attacks or fraudulent emails.
2. Enhance your online security: Knowing the IP address of the email sender can assist you in understanding the potential risks involved. It allows you to take appropriate measures to protect yourself, such as implementing stronger security measures, avoiding clicking on suspicious links, or refraining from providing sensitive information in response to the email.
3. Track down cyberbullies and spammers: If you are a victim of cyberbullying or receiving spam emails, locating the IP address can be crucial in tracing the source of the harassment. By providing this information to the authorities or your email service provider, you can take steps to prevent further unwanted contact and potentially put an end to the harassment.
4. Assist in legal investigations: In certain cases, where emails are involved in illegal activities or pose a serious threat, the IP address can be instrumental in providing vital evidence for legal investigations. By providing this information to the relevant authorities, you can help ensure that appropriate actions are taken to address the issue.
5. Protect your privacy: Understanding the IP address of an email sender can help you safeguard your personal information and maintain your online privacy. It allows you to be more vigilant and discerning when interacting with unknown senders, thereby reducing the chances of falling victim to scams or compromising your sensitive data.
By finding the IP address of an email sender, you can gain valuable insights into the origin and nature of the message, enabling you to make informed decisions about how to handle the email. Remember, however, to always use this information ethically and responsibly, and seek appropriate professional assistance if needed.
Method 1: Examine the email header
One of the most effective ways to find the IP address of an email sender is by examining the email header. The email header contains crucial information about the email’s journey from the sender to your inbox, including details about the sender’s IP address. Follow these steps to locate and analyze the email header:
Step 1: Open the email you wish to investigate in your email client or webmail service. Look for an option like “View Full Header” or “Message Source.” The location of this option varies depending on your email provider or client.
Step 2: Once you’ve found the option to view the full header, click on it. This will display the complete email header, including technical information about the email’s transmission.
Step 3: Look for the section that begins with “Received: from.” This section contains information about servers through which the email passed. It may appear multiple times, starting with the most recent server at the top.
Step 4: In this section, locate the IP address mentioned after “Received: from.” This IP address is likely to be associated with the sender’s email server or the server used to send the email.
Step 5: Take note of the IP address and any other relevant information in the email header. This information can assist you in further investigations, such as determining the sender’s location or identifying any suspicious patterns.
It’s worth mentioning that the email header can be complex and may contain numerous technical details. If you are not familiar with interpreting email headers, you can seek assistance from online resources or contact your email service provider for guidance. Additionally, keep in mind that sophisticated attackers can manipulate email headers to hide their true IP address. Therefore, it’s essential to consider other methods of verification and not solely rely on the IP address found in the email header.
By examining the email header, you can uncover valuable information about the sender’s IP address. This method is accessible to anyone and can be a useful starting point for your investigations. Remember to approach the information responsibly and use it for legitimate purposes while respecting privacy laws and regulations.
Method 2: Use a trace email tool
If examining the email header seems complex or time-consuming, you can rely on trace email tools available online to easily track down the IP address of an email sender. These tools are specifically designed to extract the necessary information from the email and provide you with the sender’s IP address. Follow these steps to use a trace email tool:
Step 1: Copy the email header or the entire email that you want to investigate. To copy the email header, right-click on the header section and select the “Copy” or “Copy All” option. If you prefer to copy the entire email, select the text and use the copy shortcut (Ctrl+C) or the right-click menu.
Step 2: Visit a reliable trace email tool website. There are several options available, such as “WhatIsMyIPAddress.com” or “IPTrackerOnline.com.” These websites provide tools specifically designed to trace email addresses.
Step 3: On the trace email tool website, locate the input field where you can paste the copied email header or email text. Right-click in the input field and select “Paste” or use the paste shortcut (Ctrl+V) to insert the copied content.
Step 4: Click on the “Trace” or “Submit” button to initiate the analysis process. The tool will then extract the relevant information from the email and display the IP address and other details associated with the sender.
Step 5: Take note of the IP address provided by the trace email tool. This IP address can give you valuable insights into the location and potential origin of the email.
Using trace email tools eliminates the need for manual analysis of email headers and provides a quick and straightforward way to find the IP address of an email sender. It is important to note that the accuracy and reliability of trace email tools can vary, so it is advisable to use reputable and trusted tools for accurate results.
Keep in mind that trace email tools may not always provide a precise location or detailed information about the sender. However, they can be a useful starting point for further investigations or for gathering additional evidence to assess the legitimacy of the email.
By utilizing trace email tools, you can efficiently extract the IP address of an email sender, saving you time and effort. Remember to use this information responsibly and respect the privacy of others, ensuring that it is used for legitimate purposes only.
Method 3: Utilize a VPN or proxy
If the previous methods have not yielded the desired results, another approach to find the IP address of an email sender is by utilizing a VPN (Virtual Private Network) or a proxy server. These tools can help mask your own IP address and simulate a different geographic location, potentially providing you with additional information about the sender’s IP address. Here’s how you can use a VPN or proxy:
Step 1: Choose and install a trustworthy VPN or proxy service. There are many options available, both free and paid. Ensure that the service you select offers reliable and secure connections.
Step 2: Launch the VPN or proxy software and connect to a server in a different location. By doing this, you will change your IP address and make it appear as if you are located in the chosen server’s region.
Step 3: Once your VPN or proxy connection is established, access your email client or webmail service and locate the email you wish to investigate.
Step 4: Analyze the email header or utilize the methods mentioned earlier to find the IP address of the sender. With your new IP address, consider any changes or discrepancies compared to the previous results.
Step 5: Collect and record any relevant information about the IP address, such as the location or any suspicious patterns associated with it.
By using a VPN or proxy, you can potentially gather additional insights about the IP address of an email sender. However, it’s important to understand that this method has limitations. Sophisticated attackers can also utilize VPNs or proxies to hide their true IP addresses. Therefore, while this method can provide some valuable information, it should not be solely relied upon as the definitive source.
Additionally, it’s crucial to choose a reputable VPN or proxy service to ensure your privacy and security. Be cautious when using free VPNs or proxies, as they may compromise your data or provide unreliable connections.
Utilizing a VPN or proxy can be a useful step in your investigation to uncover the IP address of an email sender. However, it’s essential to combine this method with other techniques and verify the information obtained to ensure its accuracy and reliability.
Remember to use this information ethically and responsibly, respecting the privacy of others and adhering to applicable laws and regulations.
Method 4: Request assistance from your email service provider
If you are facing serious concerns or encountering persistent issues with an email sender, one effective method to find the IP address is by seeking assistance from your email service provider. Email service providers have the necessary resources and expertise to investigate and trace the IP address of the sender. Here’s how you can request assistance:
Step 1: Document any pertinent information related to the email, such as the sender’s email address, the content of the email, and any other relevant details that may aid in the investigation.
Step 2: Contact your email service provider’s customer support. Look for the appropriate contact information on their official website or in your account settings. You may find options such as live chat, email support, or a dedicated helpline.
Step 3: Explain the situation to the customer support representative and provide them with the necessary details. Clearly communicate your concerns and explain why you are seeking assistance in identifying the IP address of the email sender.
Step 4: Follow any instructions provided by the customer support representative. They may require you to forward the email or provide additional information to aid in their investigation.
Step 5: Allow your email service provider the necessary time to investigate the matter. Depending on the complexity of the issue, it may take some time for them to trace the IP address and provide you with relevant information.
Step 6: Once your email service provider has completed their investigation, they will share any relevant findings with you. This may include information about the IP address, the service provider associated with it, and any other relevant details that can help you make informed decisions.
By requesting assistance from your email service provider, you get the advantage of their resources and expertise in dealing with such issues. They have specialized tools and processes to track and identify IP addresses. Moreover, they can take appropriate action against the sender if they deem it necessary, such as blocking or filtering future emails from the same source.
It’s important to note that while your email service provider can assist in tracing the IP address, they may have limitations in cases involving sophisticated attackers or certain legal constraints. However, they can still provide valuable guidance and support during your investigation.
Remember to cooperate fully with your email service provider, providing them with any relevant information they require, and respecting their guidelines and policies. By working together, you can increase the chances of successfully uncovering the IP address and resolving any issues you may be facing.
Method 5: Contact the authorities
In certain cases where you believe the email may be involved in illegal activities or poses a serious threat, it is essential to contact the relevant authorities. Reporting the incident to law enforcement can help initiate an investigation and potentially bring the responsible parties to justice. Here’s how you can contact the authorities:
Step 1: Document all relevant details about the email, including the sender’s email address, the content of the email, and any other information that may assist the authorities in their investigation.
Step 2: Contact your local law enforcement agency or the appropriate authorities that handle cybercrimes in your jurisdiction. Look for the contact information on their official website or reach out to their non-emergency helpline.
Step 3: Explain the situation to the authorities and provide them with the necessary information. Clearly communicate your concerns, emphasizing any potential threats or illegal activities you suspect may be associated with the email.
Step 4: Follow any instructions provided by the authorities. They may request additional details, such as forwarding the email or providing any related documents or evidence that can aid in their investigation.
Step 5: Provide the authorities with any updates or new information you may come across during your own investigation. Cooperate fully with their inquiries and provide any assistance they may require.
By involving the authorities, you are taking a proactive step in addressing potentially illegal or harmful activities. They have the expertise and resources to conduct a thorough investigation, trace the IP address, and hold the responsible parties accountable.
Keep in mind that the authorities may have limitations based on jurisdiction and the nature of the incident. However, by reporting the incident, you are contributing to building a case and potentially preventing similar incidents in the future.
When contacting the authorities, maintain open communication, and abide by their guidelines and procedures. Provide them with accurate and truthful information, and respect any legal processes that they require to be followed.
Remember, contacting the authorities should be reserved for serious cases where you believe there may be illegal activities or significant threats involved. In less severe situations, consider utilizing the other methods mentioned earlier to gather information and address your concerns.