
What are Email Headers?
Email headers are an essential part of every email you send or receive. They contain a wealth of information about the origin, destination, and routing of the email. While the body of the email is what most people focus on, the headers provide important details about how the email was transmitted and its authenticity.
Think of email headers as the envelope that surrounds your email message. They include a series of metadata that helps the email servers and clients understand how to handle the email. This metadata includes information such as the sender’s email address, the recipient’s email address, the subject line, the date and time of the email, and any email servers that the message passed through.
When you view an email message, you usually see the sender’s name, subject line, and the message content. However, to access the email headers, you need to take an extra step. Email headers are not typically visible by default, but they can offer valuable insights into the legitimacy and path of the email.
Understanding email headers can be particularly useful in identifying spam, phishing attempts, or email spoofing. By examining the headers, you can verify the sender’s IP address, check for suspicious server hops, and examine any DKIM or SPF signatures to determine if the email is genuine.
Email headers also come in handy when troubleshooting delivery issues or investigating suspicious activity. By analyzing the headers, you can track the email’s journey, identify any delays or errors, and trace back the source of the problem.
Overall, email headers are a crucial component of email communication. They provide valuable technical information that can help you make informed decisions about the legitimacy and reliability of an email. Now that you understand the importance of email headers, let’s explore how you can view them in Gmail.
Why would you want to view email headers?
While email headers may seem like a technical aspect of email communication, there are several reasons why you might want to view them. Here are a few scenarios where viewing email headers can be beneficial:
1. Verifying the source of an email: Email headers reveal the originating IP address and the path the email took to reach your inbox. By examining the headers, you can confirm if the email was actually sent by the claimed sender or if it’s a potential case of spoofing or phishing.
2. Investigating suspicious emails: If you receive an email that looks suspicious or contains spam, viewing the headers can provide valuable clues about its origin. It allows you to identify any suspicious server hops, check for signs of tampering, and potentially report the issue to your email provider.
3. Troubleshooting delivery issues: If you are experiencing problems with receiving or sending emails, inspecting the headers can help pinpoint where the issue lies. You can identify any delays, errors, or misconfigurations in the email’s route, allowing you to take appropriate actions to resolve the problem.
4. Validating email authentication: Email headers often include information about DKIM (DomainKeys Identified Mail) and SPF (Sender Policy Framework) signatures. These signatures serve as an authentication mechanism to verify the email’s legitimacy. By checking the headers, you can ensure that the email isn’t forged or modified.
5. Enhancing your privacy: Email headers may contain sensitive information like your IP address. By reviewing the headers, you can be aware of what information is being shared and take measures to protect your privacy, if necessary.
By taking the time to view email headers, you gain valuable insights into the authenticity, origin, and path of an email. This knowledge empowers you to make informed decisions about the emails you receive and helps protect your online security.
How to View Full Email Headers in Gmail on Desktop
Gmail provides a straightforward method to access and view the full email headers on the desktop version. Follow these step-by-step instructions to access the email headers in Gmail:
- Open Gmail and log in to your account.
- Open the email message you want to view the headers for. It can be an email from your inbox, sent mail, or any other folder.
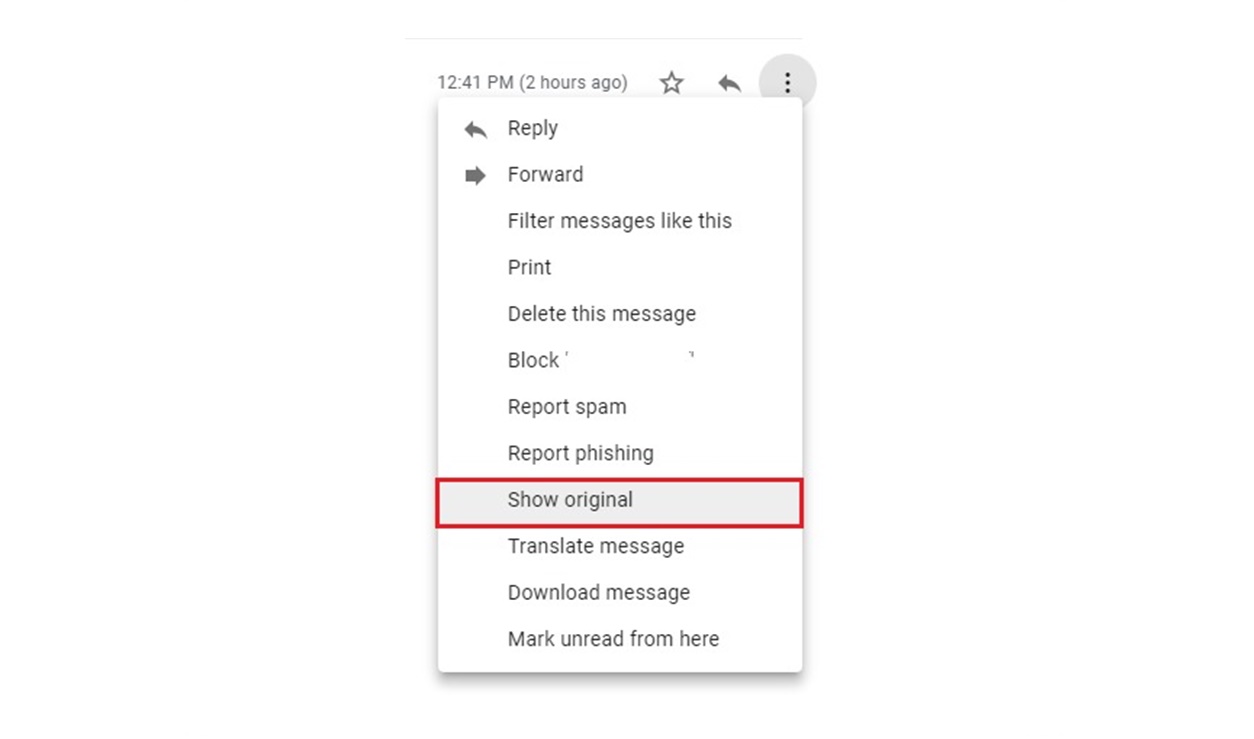
- Click on the three vertical dots (more options) located on the top-right corner of the email message.
- In the dropdown menu, select “Show original”.
- A new tab or window will open, displaying the complete email message with its headers.
- In the new tab or window, you will see a section labeled “Original message”. The email headers will be located in this section.
Within the email headers, you can find valuable information such as the sender’s email address, recipient’s email address, date and time of the email, subject line, email servers and IPs, and other routing details.
Additionally, Gmail provides a convenient option to download the email headers in a text file. Simply click on the “Download Original” button located at the top right of the email headers section. This allows you to save the headers for future analysis or to share with others for troubleshooting purposes.
Once you have finished reviewing the email headers, you can close the “Show original” tab or window and return to your regular Gmail interface.
By following these steps, you can easily access and view the full email headers in Gmail on desktop. This feature allows you to gather essential information about the email’s origins and route, which can be helpful in verifying its authenticity and investigating any potential issues.
How to View Full Email Headers in Gmail on Mobile
Accessing and viewing email headers in Gmail on mobile devices is slightly different from the desktop version. Follow these steps to view the full email headers on Gmail mobile:
- Open the Gmail app on your mobile device and sign in to your account.
- Find the email message you want to view the headers for and tap on it to open.
- In the top-right corner of the email screen, tap on the three dots (more options) icon.
- In the dropdown menu that appears, select “Show original”.
- A new screen will open, displaying the complete email message along with its headers.
In the email headers, you will find essential details such as the sender’s email address, recipient’s email address, date and time of the email, subject line, email servers and IPs, and other routing information.
Beneath the headers, you’ll find the actual email content. To exit the email headers view and return to the regular email view, simply press the back button on your mobile device.
While the process may vary slightly depending on your mobile device and the specific version of the Gmail app, the overall steps remain the same. It’s important to note that the mobile view of the email headers may be condensed for ease of use on a smaller screen. To view more detailed information, consider using the desktop version of Gmail on a computer.
By following these instructions, you can easily view the full email headers in Gmail on your mobile device. This allows you to access valuable information about the email’s origin and routing, which can be crucial for verifying its legitimacy and identifying any potential issues.
Understanding the Different Parts of an Email Header
An email header consists of various elements that provide important information about the email’s origin, transmission, and handling. While the specific details included in an email header may vary, here are some common components and their significance:
1. From: This field indicates the email address of the sender. It helps identify who sent the email.
To: The “To” field contains the recipient’s email address or addresses. It specifies who the email is intended for.
Date: The date and time the email was sent are displayed in this field. It helps provide a chronological context for the email.
Subject: The subject field displays the email’s subject line, which provides a brief summary or description of the email’s content.
Received: The “Received” field indicates the email servers that processed the email. It includes information about each server’s IP address, timestamp, and sometimes, the server’s name. By examining this field, you can trace the route the email took from the sender’s server to your email provider’s server.
Message-ID: This field contains a unique identifier assigned to the email by the sender’s mail server. It helps track and identify individual emails.
DKIM and SPF: DKIM (DomainKeys Identified Mail) and SPF (Sender Policy Framework) are email authentication mechanisms. DKIM provides a digital signature to verify the integrity and authenticity of the email, while SPF validates that the sender’s IP address is authorized to send emails on behalf of the domain.
Content-Type: This field specifies the format of the email, such as text/plain, text/html, or multipart. It helps the email client determine how to display the email content.
X-Mailer: The “X-Mailer” field indicates the email client or software used to send the email.
References and In-Reply-To: These fields are used for threading and indicate the relationship of the email to previous messages in a conversation.
Understanding the different parts of an email header allows you to gather valuable information about the email’s origin, route, and authenticity. By reviewing these elements, you can verify the sender, track the email’s path, detect potential issues or tampering, and make informed decisions about the email’s legitimacy.
Tips for Interpreting Email Headers
Interpreting email headers can be a complex task, but with some tips and knowledge, you can extract valuable information from them. Here are some tips to help you effectively interpret email headers:
1. Start from the top: When analyzing email headers, start from the top and work your way down. Pay attention to the “Received” fields, which provide a chronological record of the email’s path from the sender to your inbox.
2. Check the mail server IPs: Note the IP addresses mentioned in the “Received” fields. Verify if they belong to reputable email servers or if they seem suspicious. You can compare them with known IP ranges of legitimate email services to identify any discrepancies.
3. Look for anomalies: Suspicious email headers may contain unusual server hops, inconsistent timestamps, or strange domain names. These can be red flags for phishing attempts or email spoofing. Exercise caution when encountering such anomalies.
4. Verify email authentication: Check for DKIM (DomainKeys Identified Mail) and SPF (Sender Policy Framework) signatures in the email headers. Confirm that these signatures match the sender’s domain and validate the email’s authenticity.
5. Pay attention to reply paths: The “References” and “In-Reply-To” fields help trace email conversations. Compare them with the subject line and content to ensure consistency and identify any possible email thread manipulations.
6. Research suspicious IPs: If you come across unfamiliar IP addresses in the email headers, consider researching them using IP lookup tools or blacklisting databases. This can provide insights into their reputation and help identify potential threats.
7. Consult with email experts: If you encounter complex email headers or face difficulty in interpretation, don’t hesitate to seek assistance from email experts or online forums dedicated to email security. They can provide guidance and help you navigate the complexities of email headers.
Remember that email headers alone may not provide all the answers, but they offer valuable clues about the email’s legitimacy and origins. By employing these tips, you can enhance your ability to interpret and analyze email headers effectively, helping you make informed judgments about the emails you receive.
FAQs about Email Headers in Gmail
Here are some frequently asked questions about email headers in Gmail:
1. Can I view email headers for all emails in Gmail?
You can view email headers for individual emails in Gmail, but not all emails. The process of accessing email headers is specific to each email message.
2. How can I tell if an email is legitimate based on the headers?
Examining email headers can help you verify the legitimacy of an email. Look for consistent and reputable email servers in the “Received” fields, valid DKIM or SPF signatures, and no signs of email spoofing or tampering.
3. Can I change or modify email headers in Gmail?
No, as an end-user, you cannot change or modify email headers in Gmail. Email headers are generated by the email servers as the email is transmitted.
4. Are email headers always reliable?
Email headers can provide valuable information, but they are not foolproof. Skilled individuals can manipulate headers to mask their true identity or hide their actions. Therefore, it’s important to consider other factors, such as the email’s content and attachments, when assessing the legitimacy of an email.
5. Can I view email headers on the Gmail mobile app?
Yes, you can view email headers in the Gmail mobile app. Follow the instructions mentioned earlier in this guide to access and view email headers on your mobile device.
6. Can I download email headers from Gmail?
Yes, Gmail allows you to download email headers in a text file format. You can do this by clicking the “Download Original” button located in the email headers view.
7. Does Gmail automatically show email headers?
No, Gmail does not automatically display email headers. You need to take additional steps to access and view the email headers using the “Show original” option.
8. Are email headers the same as email footers?
No, email headers and email footers are different. Email headers provide technical information about the email’s transmission and origin, while email footers typically include additional content, such as legal disclaimers or contact information, appended at the end of the email.
By understanding the basics of email headers and how to interpret them, you can navigate Gmail more effectively and make more informed decisions about the emails you receive.