
Why Send a Fax From Gmail?
Despite the rise of digital communication, faxing remains a relevant and essential method of transferring documents securely and reliably. However, the traditional fax machines and dedicated phone lines can be inconvenient and costly to maintain. That’s where sending a fax from Gmail comes in. It combines the convenience of email with the efficiency of faxing, allowing you to send important documents easily from your Gmail account.
By utilizing Gmail for faxing, you can streamline your communication process and eliminate the need for physical fax machines and paper documents. Sending a fax from Gmail offers several benefits:
- Cost-effectiveness: Faxing through Gmail eliminates the expenses associated with dedicated phone lines, paper, ink, and maintenance of traditional fax machines. You only need an internet connection and a Gmail account, making it a more affordable option.
- Convenience: With Gmail, you can send faxes from anywhere, as long as you have an internet connection. There’s no need to be tied to an office or a fax machine. You can send faxes from your computer, tablet, or even your smartphone.
- Speed and efficiency: Sending a fax from Gmail is faster and more efficient compared to traditional faxing methods. You can compose and send faxes with just a few clicks, eliminating the need for a physical document and the time-consuming process of waiting for confirmation.
- Document management: By sending faxes through Gmail, you can easily keep track of your communication history. Gmail automatically saves sent faxes, allowing you to access, search, and manage them, making it convenient and organized.
- Security: Gmail encrypts your emails, ensuring that the confidential information in your faxed documents remains secure. This provides an added layer of protection compared to traditional faxing, where sensitive information can be easily intercepted.
By harnessing the power of Gmail’s features and the reliability of faxing, you can modernize your communication workflow. Sending a fax from Gmail is an innovative solution that combines the best of both worlds, making it a versatile and efficient method for transmitting important documents.
Setting Up a Fax-to-Email Service
In order to send a fax from Gmail, you need to set up a fax-to-email service. This service acts as a bridge between your Gmail account and the traditional faxing system, enabling you to send and receive faxes directly from your email. Here are the steps to set up a fax-to-email service:
- Choose a fax-to-email provider: There are several fax-to-email service providers available, such as HelloFax, eFax, and MyFax. Research and choose a provider that offers the features and pricing that best suit your needs.
- Sign up for an account: Visit the website of your chosen provider and sign up for an account. You may need to provide your personal information and select a plan that aligns with your faxing requirements.
- Link your email account: Once you have created an account, you will be prompted to link your Gmail account to the fax-to-email service. Follow the instructions provided by the provider to complete the integration.
- Set up your fax number: Most fax-to-email services allow you to choose a fax number. Select a number that is convenient for you or opt for a toll-free number if you anticipate receiving faxes from a wide range of clients.
- Configure fax settings: Access the settings of the fax-to-email service and configure the settings according to your preferences. This may include options such as fax resolution, confirmation receipts, and notification preferences.
- Test the service: Before sending your first fax, it is advisable to send a test fax to ensure that the service is set up correctly. Follow the instructions provided by the provider to send a test fax to your email.
Once you have successfully set up the fax-to-email service, you can begin sending and receiving faxes directly from your Gmail account. Take the time to familiarize yourself with the features and capabilities of the service to make the most of this convenient and efficient method of faxing.
Composing a Fax in Gmail
Once you have set up the fax-to-email service, composing a fax in Gmail is as simple as composing an email. Follow these steps to compose and send a fax:
- Open Gmail: Access your Gmail account by signing in to your email address.
- Click on ‘Compose’: In the top left corner of your Gmail inbox, click on the “Compose” button to start a new email.
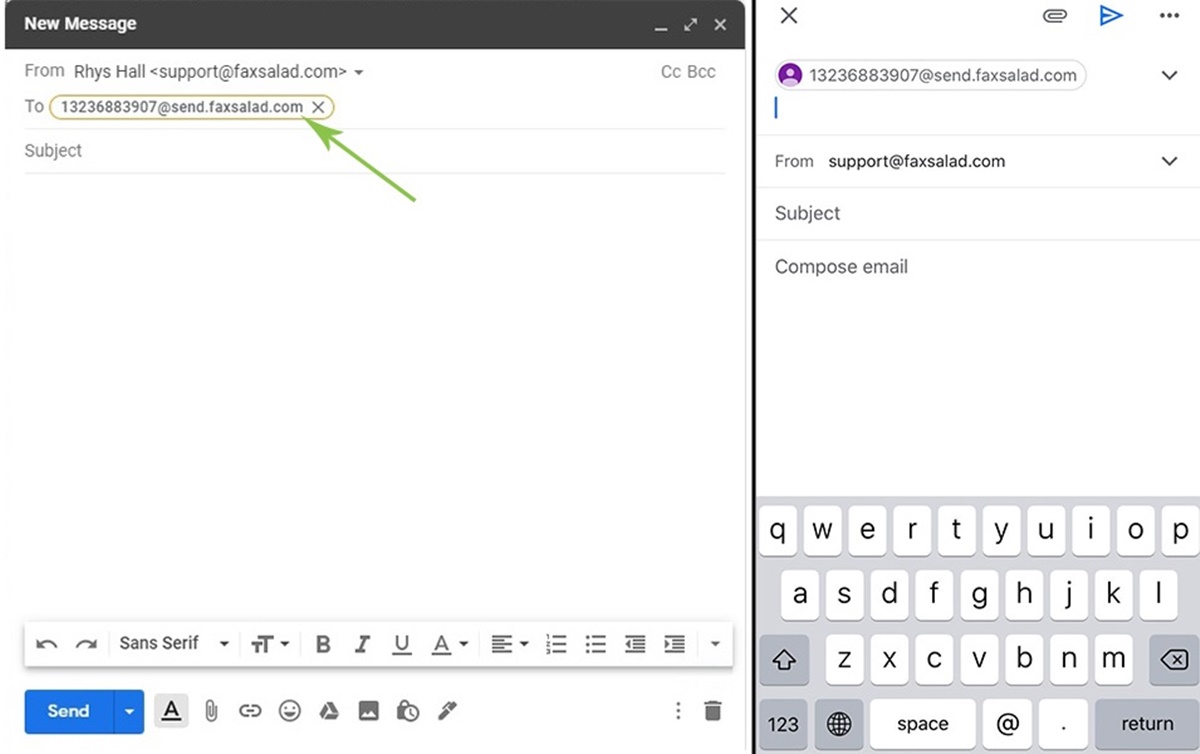
- Enter the recipient’s fax number: Instead of entering an email address, you will enter the recipient’s fax number in the “To” field. Be sure to include the fax extension if applicable.
- Compose the fax: In the body of the email, enter the content you wish to fax. You can type the information directly or copy and paste it from a document or another source.
- Attach documents: If you need to send attachments, such as PDFs or Word documents, you can easily attach them by clicking on the paperclip icon or using the “Attach Files” option in the toolbar.
- Add a cover page: If desired, you can add a cover page to your fax by including a separate document at the beginning of the email. This can include a brief message, sender and recipient information, and any other relevant details.
- Review and send: Before sending the fax, review the content and attachments to ensure everything is correct. Once verified, click on the “Send” button to transmit the fax to the recipient’s fax machine.
It is important to note that the recipient’s fax machine must have paper and be turned on to receive your fax. Additionally, the quality of the fax may vary depending on the recipient’s machine and the quality of the phone line connection.
Once your fax is sent, you will receive a confirmation notification from the fax-to-email service, indicating the status of the transmission. This allows you to have peace of mind knowing that your fax has been successfully delivered.
By following these steps, you can easily compose and send faxes directly from your Gmail account, eliminating the need for physical fax machines and simplifying your communication process.
Attaching Documents to a Fax
Sending a fax from Gmail allows you to attach various types of documents to your fax, making it a versatile and convenient method for transmitting important files. Here’s how you can attach documents to a fax:
- Compose a new fax: Open Gmail and click on the “Compose” button to create a new email/fax.
- Enter recipient details: In the “To” field, enter the recipient’s fax number.
- Compose the fax content: Type the content of your fax in the main body of the email, including any necessary text or information.
- Attach documents: To attach a document, click on the paperclip icon in the composing menu, or use the “Attach Files” option. This will open a file browser allowing you to select the document you want to attach.
- Choose the file: Locate the document on your computer and click “Open” to attach it to the email/fax. You can attach multiple documents by repeating this step.
- Review and send: Double-check that the attached documents are correct and click “Send” to transmit the fax and attached files to the recipient’s fax machine.
When attaching documents to your fax, it is important to keep a few things in mind:
- File compatibility: Ensure that the files you attach are in a compatible format, such as PDF, Microsoft Word, or image files. If necessary, convert the files to an acceptable format before attaching them.
- File size limitations: Some fax-to-email services impose maximum file size limits. If your file exceeds the limit, consider compressing it or splitting it into smaller parts before attaching.
- Document order: If you attach multiple documents, be mindful of the order in which they appear. The recipient will receive them in the same order they are attached to the fax.
- Document quality: Keep in mind that the quality of the attached documents may vary when faxed. Graphics, images, or small text may not reproduce as clearly on the recipient’s fax machine.
By attaching documents to your fax, you can easily share important files with the recipient in a convenient and secure manner. Whether it’s contracts, reports, or other essential documents, sending them as attachments in your Gmail fax allows for efficient and professional communication.
Checking the Fax Settings
Before sending a fax from Gmail, it is important to review and configure the fax settings to ensure a smooth and successful transmission. Here are the key fax settings to check:
- Fax resolution: Determine the desired resolution for your fax. Generally, standard resolution (usually 200×200 dpi) is sufficient for most documents. However, you may choose a higher resolution for documents with intricate details or images.
- Confirmation receipts: Decide whether you want to receive confirmation receipts for your sent faxes. These receipts provide acknowledgment that the fax has been successfully delivered to the recipient’s fax machine.
- Notification preferences: Set up your preferred notification method for incoming faxes. Depending on the service, you can choose to receive notifications via email, SMS, or both.
- Cover page options: Configure your cover page preferences, including the inclusion of a cover page and the customization options available. A cover page can provide additional information about the fax, such as sender and recipient details, a subject line, and any necessary remarks.
- Fax header: Decide whether you want to include a fax header, which typically contains your company name, logo, and contact information, at the top of each fax page. This adds a professional touch to your faxes.
- Time zone settings: Confirm that the time zone is correctly set according to your location. This ensures that scheduled faxes are sent at the desired time based on your time zone.
Accessing and adjusting these settings may vary depending on the fax-to-email service you are using. Most of these settings can be found in the account or settings section of your fax service provider’s website.
Reviewing and customizing these settings allows you to tailor your faxing experience to your specific needs and preferences. By ensuring that the settings match your requirements, you can increase the efficiency and effectiveness of your fax communication through Gmail.
Adding a Cover Page to Your Fax
When sending a fax from Gmail, you have the option to include a cover page along with your fax. A cover page provides important information about the fax and serves as an introduction to the recipient. Here’s how you can add a cover page to your fax:
- Compose a new fax: Open Gmail and click on the “Compose” button to create a new fax.
- Enter recipient details: In the “To” field, enter the recipient’s fax number.
- Compose the cover page: In the body of the email, enter the content for your cover page. Typically, a cover page includes sender and recipient information, the subject of the fax, and any additional remarks or instructions.
- Add attachments (optional): If you have any additional documents to include with your fax, attach them as usual by using the paperclip icon or the “Attach Files” option in the composing menu.
- Review and send: Double-check the content of the cover page and attached documents, then click “Send” to transmit the fax and the cover page to the recipient’s fax machine.
When creating a cover page, keep these tips in mind:
- Be concise: Keep the cover page brief and to the point. Include only the necessary information, ensuring that it fits within one page.
- Professional layout: Use a professional format for your cover page. Consider including your company’s logo, address, and contact information for a polished presentation.
- Subject line: Clearly indicate the subject of the fax in the cover page’s subject line. This helps the recipient to quickly identify the purpose of the fax.
- Sender and recipient information: Include the full name, company name, and contact details of both the sender and recipient for reference.
- Additional remarks: If there are any specific instructions, notes, or remarks that you want to convey to the recipient, include them in the cover page.
Adding a cover page to your fax provides a professional touch and ensures that the recipient has all the necessary information about the fax. It helps to establish context, enhance communication clarity, and maintain a professional appearance for your faxed documents.
Scheduling a Fax to Be Sent at a Later Time
When sending a fax from Gmail, you have the flexibility to schedule the delivery of your fax at a later time. This allows you to prepare your fax in advance and have it sent automatically at a desired date and time. Here’s how you can schedule a fax to be sent at a later time:
- Compose your fax: Create a new email/fax in Gmail by clicking on the “Compose” button.
- Enter recipient details and compose content: Enter the recipient’s fax number in the “To” field and type the content of your fax in the body of the email, including any necessary attachments.
- Access the scheduling feature: Instead of clicking the “Send” button, look for the option that allows you to schedule the delivery of the fax. This feature may be named “Schedule Send,” “Send Later,” or something similar.
- Select the date and time: Choose the desired date and time for the fax to be sent. Some services may offer preset time options, while others may allow you to customize the exact time.
- Review and confirm: Double-check that the scheduled date and time are correct, and review the content of your fax. Once verified, confirm the scheduling and save your fax as a scheduled item.
It is important to note that the exact steps for scheduling a fax may vary depending on the fax-to-email service you are using. Some services may have the scheduling feature built into the Gmail interface, while others may require you to access the service’s website or dashboard to schedule the fax.
Scheduling a fax allows you to send it at a time that is most convenient for you and the recipient. It can be helpful when working with different time zones, ensuring that your fax arrives during business hours or at a specific time when it will receive immediate attention.
Once your fax is scheduled, it will be automatically sent by the fax-to-email service at the specified date and time. You can rest assured knowing that your fax will be delivered on time without requiring your presence or manual intervention.
Take advantage of the scheduling feature to streamline your faxing process and increase efficiency in your communication workflow.
Sending a Fax from Gmail
Sending a fax from Gmail is a straightforward process that combines the convenience of email with the reliability of faxing. Follow these steps to successfully send a fax from your Gmail account:
- Compose a new fax: Open Gmail and click on the “Compose” button to create a new email.
- Enter the recipient’s fax number: Instead of entering an email address in the “To” field, input the recipient’s fax number. Include the appropriate country and area codes, as well as any necessary extensions.
- Compose the fax content: In the body of the email, type the content of your fax. Include any necessary text, details, or instructions.
- Add attachments (optional): Attach any documents or files you would like to send with your fax by using the paperclip icon or the “Attach Files” option in the composing menu.
- Review and send the fax: Double-check the fax content, attachments, and recipient details. Once everything is verified, click on the “Send” button to transmit the fax to the recipient’s fax machine.
It is important to note that the recipient’s fax machine must be turned on and have paper loaded in order to receive your fax. Additionally, the quality of the fax may vary depending on the recipient’s machine and the quality of the phone line connection.
After sending the fax, you will receive a confirmation notification from the fax-to-email service, indicating the status of the transmission. This confirmation provides peace of mind, knowing that your fax has been successfully delivered.
Sending a fax from Gmail offers numerous advantages, including cost-effectiveness, convenience, and speed. By leveraging the power of Gmail’s features and integrating faxing capabilities, you can streamline your communication workflow and modernize your faxing process.
Whether it’s sending contracts, legal documents, or other important files, Gmail’s faxing functionality allows you to efficiently transmit information while eliminating the need for physical fax machines and paper documents.
Receiving a Fax in Gmail
With fax-to-email services, you can also receive faxes directly in your Gmail inbox, eliminating the need for a physical fax machine. Here’s what you need to know about receiving a fax in Gmail:
- Set up a fax number: When signing up for a fax-to-email service, you will be assigned a dedicated fax number. This number is used by others to send faxes to your Gmail account.
- Configure fax settings: Access the settings of your fax-to-email service to customize various options, such as notification preferences, file formats, and organizing incoming faxes.
- Monitor your Gmail inbox: Incoming faxes will appear in your Gmail inbox just like regular emails. They will be labeled or marked as faxes, making them easy to identify.
- Open and view the fax: To view a received fax, simply open the email in your Gmail inbox. Fax attachments are typically PDF files or images that can be previewed directly in Gmail or downloaded to your device.
- Save and organize your faxes: To keep your fax communications organized, you can create folders or labels in Gmail to store and categorize incoming faxes. This makes it easy to search for specific faxes in the future.
- Respond or take action: Depending on the content of the fax, you can choose to respond directly via email or take any necessary actions based on the information received.
Receiving faxes in Gmail provides several benefits, including easy access, centralized storage, and efficient organization. It allows you to manage all your incoming faxes alongside your regular email communications, making it a convenient solution for document management.
Keep in mind that fax-to-email services convert incoming faxes into digital format, which means that the quality of the received fax may vary depending on the transmission and converting process. However, the majority of fax-to-email services aim to maintain the integrity of the original document as much as possible.
By using Gmail to receive faxes, you can streamline your communication process, reduce paper waste, and have all your important documents in a digital format that can be easily accessed and managed.
Troubleshooting Common Issues
While sending and receiving faxes from Gmail is generally a smooth process, there are a few common issues that may arise. Here are some troubleshooting tips for addressing these issues:
- Incorrect fax number: Double-check that you have entered the correct fax number of the recipient. An incorrect fax number can result in the fax not being received or being sent to the wrong recipient.
- Poor image or document quality: If the quality of the received fax is low, check the resolution settings in your fax-to-email service account. Adjust the settings to a higher resolution, if available, for better image and document quality.
- Attachment issues: Ensure that the attachments you include with your fax are in supported file formats. Common formats include PDF, Microsoft Word, and image files. If the recipient is unable to open the attachments, consider converting them to a different format before sending.
- Delivery confirmation issues: If you are not receiving confirmation notifications for your sent faxes, confirm that you have enabled this feature in your fax settings. Additionally, check your email spam folder to ensure that confirmation emails are not being filtered out.
- Overcoming size limitations: Some fax-to-email services have file size limitations for attachments. If your attachment exceeds these limitations, consider compressing the file or splitting it into smaller parts using file compression software or online tools.
- Poor phone line connection: If you or the recipient experience poor fax quality or transmission failures, it may be due to a weak phone line connection. Try resending the fax or contact your fax service provider for assistance.
- Service downtime or outages: Occasionally, fax-to-email services may experience downtime or outages. If you are unable to send or receive faxes, check the service provider’s website or social media channels for any reported issues.
If you encounter any persistent problems or issues that you cannot resolve, it is recommended to contact your fax-to-email service provider’s support team. They can provide specific guidance and assistance based on the service you are using.
By being aware of these common issues and following the troubleshooting steps, you can resolve any obstacles that may arise when sending or receiving faxes through Gmail.
Security and Privacy Considerations
When sending and receiving faxes from Gmail, it is essential to prioritize security and privacy to protect sensitive information. Here are some key considerations to keep in mind:
- Encryption: Ensure that your fax-to-email service provider uses encryption protocols to secure your faxes during transmission. Encryption helps to protect the content of your fax from unauthorized access and interception.
- Data storage: Understand how your fax-to-email service provider handles the storage of your fax data. Look for providers that employ secure data centers and have comprehensive data protection measures in place.
- Compliance with regulations: If you handle confidential or personally identifiable information, such as medical or financial records, ensure that your faxing practices comply with relevant regulations, such as HIPAA or GDPR.
- User access controls: Regularly review and update your account access controls to prevent unauthorized access to your faxing service. Use strong and unique passwords, and enable two-factor authentication if available.
- Virus and malware protection: Install and maintain up-to-date antivirus and malware protection software on the devices you use to access your Gmail account. This helps to minimize the risk of malware compromising your fax communications.
- Phishing awareness: Be cautious of phishing attempts that may target your Gmail account. Avoid clicking on suspicious links or providing personal information in response to unsolicited emails.
- Secure communication: If you are transmitting highly sensitive faxes, consider using additional secure communication methods, such as secure email protocols or encrypted file sharing services, in conjunction with your fax-to-email service.
While faxing from Gmail offers convenience and efficiency, it is important to be mindful of the security and privacy implications. Always prioritize the protection of sensitive information and take the necessary precautions to minimize risks.
Regularly reviewing the security measures implemented by your fax-to-email service provider and staying informed about the latest security practices can help ensure the confidentiality and integrity of your fax communications.
Alternatives to Faxing from Gmail
While faxing from Gmail offers convenience and efficiency, there are alternative methods of transmitting documents that may better suit your needs. Consider the following alternatives to faxing:
- Email attachments: If security and privacy are not a concern, consider sending documents as email attachments. This method eliminates the need for a separate fax-to-email service and allows for easy sharing of digital files.
- Electronic signatures: Instead of printing, signing, and faxing documents, explore electronic signature solutions. These platforms provide a secure and legally binding way to sign documents digitally, streamlining the signing process.
- Secure file sharing: Use secure file sharing services that allow you to upload and share files with specific recipients. This method ensures secure transmission and eliminates the need for physical fax machines.
- Online platforms: Explore online platforms that specialize in document management and collaboration. These platforms offer features such as document sharing, version control, and real-time collaboration.
- Virtual fax services: Consider using virtual fax services that allow you to send and receive faxes online without the need for physical fax machines. Virtual fax services often provide features such as fax numbers, fax-to-email, and cloud storage.
When choosing an alternative to faxing, consider factors such as document security, ease of use, cost, and the specific requirements of your workflow. It’s essential to select a method that best aligns with your communication needs and the nature of the documents you frequently transmit.
Ultimately, the right alternative will depend on your individual circumstances and preferences. Evaluating the pros and cons of different methods will help you find the most efficient and effective approach to document transmission outside of traditional faxing.