
Whitelisting Known Senders in Apple Mail
Having important emails from known senders end up in the spam folder can be frustrating. If you’re experiencing this issue in Apple Mail, you can take proactive steps to whitelist these senders and ensure that their messages always go to your inbox. Here’s what you can do:
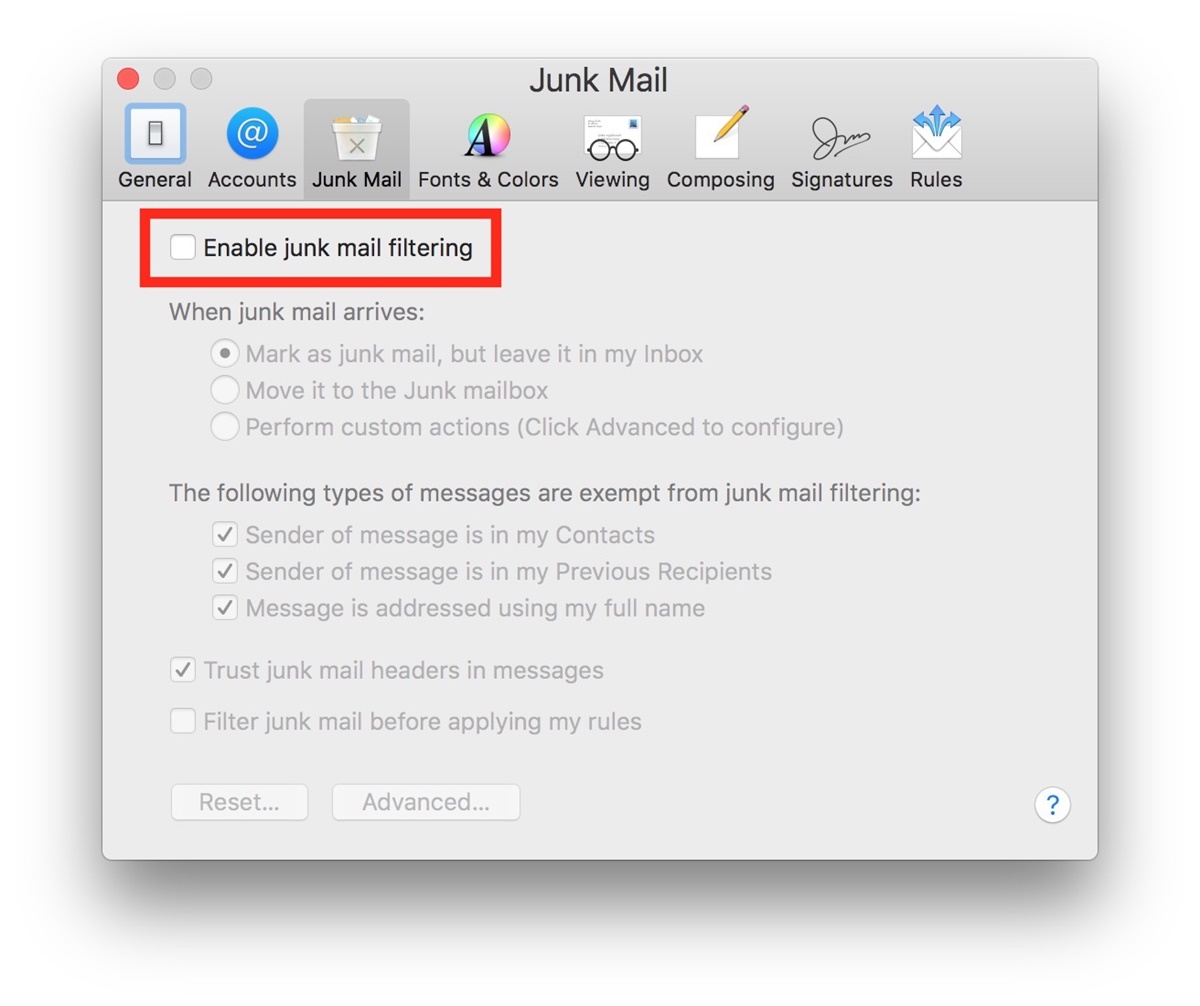
1. Checking the Junk Mail settings: First, verify your Junk Mail settings in Apple Mail. Go to the Preferences menu, click on Junk Mail, and make sure the “Enable junk mail filtering” option is selected. Uncheck the “Mark as junk mail, but leave it in my Inbox” option. This will prevent potentially important emails from being mistakenly marked as spam.
2. Whitelisting senders manually: To whitelist known senders in Apple Mail, right-click on an email from the desired sender in your Junk mailbox or spam folder. From the contextual menu, select “Mark as Not Junk” to teach Apple Mail that these messages are not spam. This action will move the email to your inbox and add the sender’s email address to your whitelist.
3. Creating a rule to prevent email from going to spam: Apple Mail allows you to create rules to manage incoming messages. To prevent emails from specific senders from being marked as spam, go to the Preferences menu, select Rules, and click on Add Rule. Enter the sender’s email address in the “From” field and set the condition to “Move Message” to a selected mailbox or the inbox.
4. Using VIP Contacts feature: Apple Mail has a feature called VIP Contacts, which allows you to designate specific contacts as VIPs. Emails from these VIP senders are automatically sent to your VIP mailbox, bypassing the spam filter. To add a contact as a VIP, open an email from them, click on their name or email address, and select “Add to VIPs.”
Remember, Apple Mail’s spam filtering system is designed to keep your inbox free from unwanted messages, but occasionally, it can mistakenly categorize legitimate emails as spam. By manually whitelisting known senders and creating rules to prevent their emails from being marked as spam, you can ensure that important messages always reach your inbox.
Furthermore, regularly reviewing your spam and junk folders to check for any false positives will help you identify any patterns or trends in the filtering system and take appropriate action.
Why is Apple Mail marking known senders as spam?
If you find that Apple Mail is marking emails from known senders as spam, you might be wondering why this is happening. Apple Mail utilizes a sophisticated spam filtering system that analyzes various factors to determine whether an email is legitimate or spam. Here are a few possible reasons why this might occur:
1. Inaccurate spam filtering: While Apple Mail’s spam filter is highly effective, it may not be 100% accurate. Occasionally, it might mistakenly categorize legitimate emails as spam due to the complexity of distinguishing between genuine and spam messages.
2. Spam-like characteristics: Sometimes, even legitimate emails can exhibit certain characteristics that resemble spam. This can include the use of excessive capital letters, suspicious links, or certain keywords that trigger spam filters. As a result, these emails may end up in the spam folder instead of the inbox.
3. Sender’s IP reputation: Apple Mail’s spam filter takes into account the reputation of the sender’s IP address. If the sender’s IP has a poor reputation or is known for sending spam emails, their messages are more likely to be marked as spam and filtered accordingly.
4. Changing email patterns: If a known sender suddenly changes their email behavior, such as sending a high volume of emails in a short period or using a new email address, Apple Mail’s spam filter might flag these emails as suspicious and mark them as spam.
5. User-defined filters: Apple Mail allows users to create their own filters and rules. If you have set up any filters that unintentionally mark emails from known senders as spam, it can result in these messages being filtered to the spam folder.
6. Lack of interaction: Apple Mail’s spam filter also considers the user’s interaction with emails. If you rarely open or reply to emails from a specific sender, it might interpret this lack of interaction as a sign that those messages are not important and relegate them to the spam folder.
While Apple Mail’s spam filtering system works tirelessly to keep unwanted emails at bay, it is not perfect. However, by understanding why known senders might be marked as spam, you can take proactive steps to ensure that their emails reach your inbox and avoid being mistakenly filtered as unwanted messages.
Checking the Junk Mail settings
When Apple Mail marks known senders’ emails as spam, it’s essential to review and adjust the Junk Mail settings to ensure that legitimate emails are not falsely flagged. Here’s how you can check and modify your Junk Mail settings in Apple Mail:
1. Open Preferences: To access the Junk Mail settings, open Apple Mail and click on the “Mail” tab in the top menu bar. From the drop-down menu, select “Preferences.”
2. Go to Junk Mail: In the Preferences window, navigate to the “Junk Mail” tab, usually found towards the right side of the window.
3. Enable junk mail filtering: Make sure that the “Enable junk mail filtering” option is checked. This allows Apple Mail to analyze incoming emails and decide whether they should be classified as spam.
4. Adjust mark as junk mail option: By default, Apple Mail is set to mark spam emails and leave them in your inbox. To prevent potentially important emails from being mistakenly marked as spam, uncheck the “Mark as junk mail, but leave it in my Inbox” option.
5. Whitelist known senders: Apple Mail’s filtering system learns from your actions. By manually marking emails from known senders as “Not Junk,” you can train the system to recognize these senders as safe. Right-click on an email from a known sender in your Junk mailbox or spam folder, and select “Mark as Not Junk” from the contextual menu.
6. Adjust other options: Take a moment to review the additional options available in the Junk Mail settings. You can customize the level of spam filtering by moving the slider towards “More Mark As Junk” or “Less Mark As Junk” based on your preferences.
By checking and adjusting the Junk Mail settings in Apple Mail, you can optimize the spam filtering system to minimize the chances of legitimate emails being marked as spam. It’s important to also periodically review your Junk mailbox to identify any false positives and manually mark them as “Not Junk” to improve the accuracy of the spam filter.
Whitelisting Senders Manually
One effective way to ensure that emails from known senders aren’t marked as spam in Apple Mail is to whitelist them manually. By adding senders to your whitelist, you’re instructing Apple Mail to always deliver their messages to your inbox. Here’s how you can whitelist senders manually:
1. Open your spam folder or Junk mailbox: Start by opening the spam folder or Junk mailbox in Apple Mail where you usually find emails from known senders being mistakenly marked as spam.
2. Identify emails from known senders: Look for emails from senders that you want to whitelist. These might be senders whose emails you frequently receive and consider important.
3. Right-click and mark as “Not Junk”: Right-click on an email from a known sender and select the “Mark as Not Junk” option from the contextual menu. This action tells Apple Mail that these emails are not spam.
4. Check your inbox: After marking an email as “Not Junk,” Apple Mail will move it from the spam folder to your inbox. Additionally, any future emails from the same sender will also be delivered to your inbox.
5. Repeat for other known senders: Go through your spam folder or Junk mailbox and repeat the process for other senders whose emails you want to whitelist. Mark their emails as “Not Junk” to ensure they always land in your inbox.
Note: Fine-tuning your spam filters: While manually whitelisting senders is a great solution, it’s worth periodically reviewing emails in your spam folder for false positives. If you notice a trend where certain types of emails are consistently being flagged as spam, you may need to adjust your spam filter settings or create customized rules for those specific types of emails.
By manually whitelisting senders in Apple Mail, you take control over which emails are considered spam and ensure that important messages always reach your inbox. Remember to regularly review and update your whitelist to accommodate any new known senders or changes in their email addresses.
Creating a Rule to Prevent Email from Going to Spam
If you consistently receive emails from known senders that get marked as spam in Apple Mail, creating a rule can be an effective solution. By setting up a rule, you can instruct Apple Mail to automatically direct emails from specific senders to your inbox instead of the spam folder. Here’s how you can create a rule to prevent email from going to spam:
1. Open Apple Mail Preferences: Start by opening Apple Mail and clicking on the “Mail” tab in the top menu bar. From the drop-down menu, select “Preferences.”
2. Navigate to the Rules tab: In the Preferences window, click on the “Rules” tab, typically located towards the right side of the window.
3. Add a new rule: Click on the “Add Rule” button to create a new rule.
4. Specify the rule conditions: In the new rule window, enter the sender’s email address or name in the “From” field. You can also use other conditions to further customize the rule, such as the subject or content of the email.
5. Set the action to move to inbox: Choose the action you want the rule to perform when it identifies an email from the specified sender. In this case, select the “Move Message” action, and choose your inbox or a designated mailbox where you want these emails to be directed.
6. Test the rule: Before saving the rule, you can click on the “Test” button to see how it functions. This will show you a preview of what the rule will do when applied to existing emails in your mailbox.
7. Save the rule: Once you are satisfied with the rule’s settings and its test results, click “OK” to save the rule. Apple Mail will now automatically apply this rule to incoming messages, preventing emails from the specified sender from being marked as spam.
Note: Updating rules for new senders: Keep in mind that if you add a new sender to your list of known senders, you may need to update the rule accordingly to ensure their emails continue to bypass the spam filter.
By creating a rule to prevent email from going to spam in Apple Mail, you can streamline your inbox, ensuring that important messages from known senders are readily accessible without being misclassified as spam.
Using VIP Contacts Feature to Prevent Emails from Going into the Spam Folder
If you want to ensure that emails from specific senders never end up in the spam folder in Apple Mail, utilizing the VIP Contacts feature can be a helpful solution. By designating certain contacts as VIPs, you can instruct Apple Mail to prioritize their emails and send them directly to your VIP mailbox. Here’s how you can use the VIP Contacts feature:
1. Identify the contacts to add as VIPs: Start by identifying the senders whose emails you want to prevent from going into the spam folder. These might be individuals or organizations whose messages hold high importance for you.
2. Open an email from the sender: Open an email from one of the selected senders in Apple Mail. It can be an email that you have recently received or an existing email in your mailbox.
3. Access the contact information: Click on the sender’s name or email address in the email header. This action will open a pop-up window displaying the contact’s information.
4. Add the contact as a VIP: In the contact information pop-up window, click on “Add to VIPs.” This action designates the contact as a VIP in Apple Mail, ensuring that their emails bypass the spam filter and are sent directly to your VIP mailbox.
5. Repeat for other selected senders: Go through your list of selected senders and repeat the process for each, adding them as VIPs in Apple Mail.
6. Access the VIP mailbox: To access the VIP mailbox in Apple Mail, look for the VIPs section in the sidebar. Clicking on it will display all the emails from your designated VIP senders.
Note: Fine-tuning VIP settings: Apple Mail allows you to further customize the behavior of VIPs. To access the VIP settings, go to Preferences, select the VIPs tab, and make adjustments such as changing the VIP mailbox appearance or choosing to receive notifications for VIP emails.
By utilizing the VIP Contacts feature in Apple Mail, you can ensure that emails from your designated VIP senders are never mistakenly flagged as spam. This feature provides a convenient way to prioritize and access important messages without the worry of them getting lost in the spam folder.
Additional Steps to Consider to Prevent Emails from Being Marked as Spam in Apple Mail
While whitelisting known senders, adjusting Junk Mail settings, creating rules, and utilizing the VIP Contacts feature can significantly reduce the chances of legitimate emails being marked as spam in Apple Mail, there are additional steps you can take to further enhance the accuracy of the spam filtering system. Here are some recommendations:
1. Regularly review your spam folder: It’s a good practice to periodically review your spam folder to check for any false positives. Look for emails that shouldn’t be marked as spam and manually mark them as “Not Junk.” This action helps train the spam filter and improves its accuracy over time.
2. Avoid clicking on suspicious links: Spam emails often contain malicious links. Be cautious and refrain from clicking on any suspicious links, even if the email appears to be from a trusted sender. This will help minimize the chances of accidentally triggering the spam filter.
3. Maintain an updated contact list: Keep your contact list up to date by regularly adding new contacts and removing old or unused ones. Apple Mail’s spam filter takes into account the sender’s reputation and email history, and having an accurate contact list can enhance the filter’s ability to identify legitimate senders.
4. Use a reliable spam filter: Consider utilizing a trusted third-party spam filter in addition to Apple Mail’s built-in spam filter. These filters often provide advanced features and more robust spam detection algorithms, reducing the chances of false positives and false negatives.
5. Be cautious with email subscriptions: Exercise caution when subscribing to newsletters or promotional emails. If you receive emails from these sources that you no longer wish to receive, it’s best to unsubscribe rather than marking them as spam. This helps maintain a clean and accurate spam filter.
6. Report spam emails: If you come across spam emails, make sure to report them as spam within Apple Mail. This action helps Apple improve their spam filtering system and protects other users from similar spam messages.
7. Stay updated with software updates: Keep your Apple Mail and macOS up to date with the latest software updates. These updates often include improvements and bug fixes, including enhancements to the spam filtering system.
Implementing these additional steps alongside the methods mentioned earlier can significantly reduce the chances of legitimate emails being marked as spam in Apple Mail. By being proactive and staying vigilant, you can enjoy a more accurate and reliable email experience.