
What is Email Whitelisting?
Email whitelisting is a process that allows you to specify certain email addresses or domains that you trust and want to receive emails from. When you whitelist an email address, it ensures that emails from that address are delivered to your inbox without being marked as spam or sent to your spam folder.
By default, email providers use complex algorithms to filter incoming emails and classify them as spam or legitimate messages. Unfortunately, legitimate emails can sometimes end up in the spam folder, leading to missed important communications.
With email whitelisting, you take control of which email addresses and domains are considered safe and trusted, so that emails from these sources are never mistakenly marked as spam.
When you whitelist an email address or domain, you are essentially telling your email provider that you trust the sender and want to receive their emails directly in your inbox. This ensures that you never miss important updates, newsletters, or any other type of communication from trusted sources.
Using email whitelisting can be particularly useful for businesses and individuals who rely on timely and accurate communication. It helps to maintain strong email deliverability and ensures that important information is not lost in the chaos of spam folders.
Now that you understand the concept of email whitelisting, let’s explore why it is important to whitelist certain email addresses.
Why Whitelist Email Addresses?
Whitelisting email addresses is crucial for ensuring smooth communication and avoiding the frustration of missing important emails. Here are some key reasons why you should consider whitelisting email addresses:
- Prevent Emails from Going to Spam: By whitelisting email addresses, you can ensure that emails from trusted senders always make it to your inbox, rather than being mistakenly classified as spam and ending up in the spam folder.
- Receive Important Updates: Many organizations, such as banks, government agencies, and subscription-based services, send important updates and notifications via email. By whitelisting their email addresses, you can guarantee that you never miss critical information or deadlines.
- Ensure Timely Responses: If you frequently receive emails from clients, colleagues, or customers, whitelisting their email addresses can help you stay on top of your inbox and provide prompt responses. This can enhance professional relationships and improve your overall productivity.
- Stay Informed about Newsletters: If you subscribe to newsletters or industry updates, whitelisting the corresponding email addresses ensures that these emails are delivered directly to your inbox. This way, you can conveniently access the information and stay up to date with the latest trends and developments.
- Avoid Missing Important Emails: Whether you’re expecting job offers, interview invitations, or time-sensitive communications, whitelisting email addresses gives you peace of mind, knowing that you won’t miss any vital messages that could impact your professional or personal life.
By whitelisting email addresses, you have control over the flow of your inbox and can prioritize the emails that matter most to you. It helps reduce the risk of important messages getting lost among the clutter or being mistakenly marked as spam.
Now that we understand the significance of whitelisting email addresses, let’s dive into how you can whitelist email addresses on popular email platforms, starting with Gmail.
How to Whitelist Email Addresses on Gmail
Whitelisting email addresses on Gmail is a straightforward process. Follow these steps to ensure that emails from specific senders are always delivered to your inbox:
- Login to your Gmail account and navigate to your inbox.
- Click on the gear icon at the top right corner of the screen, and select “Settings” from the dropdown menu.
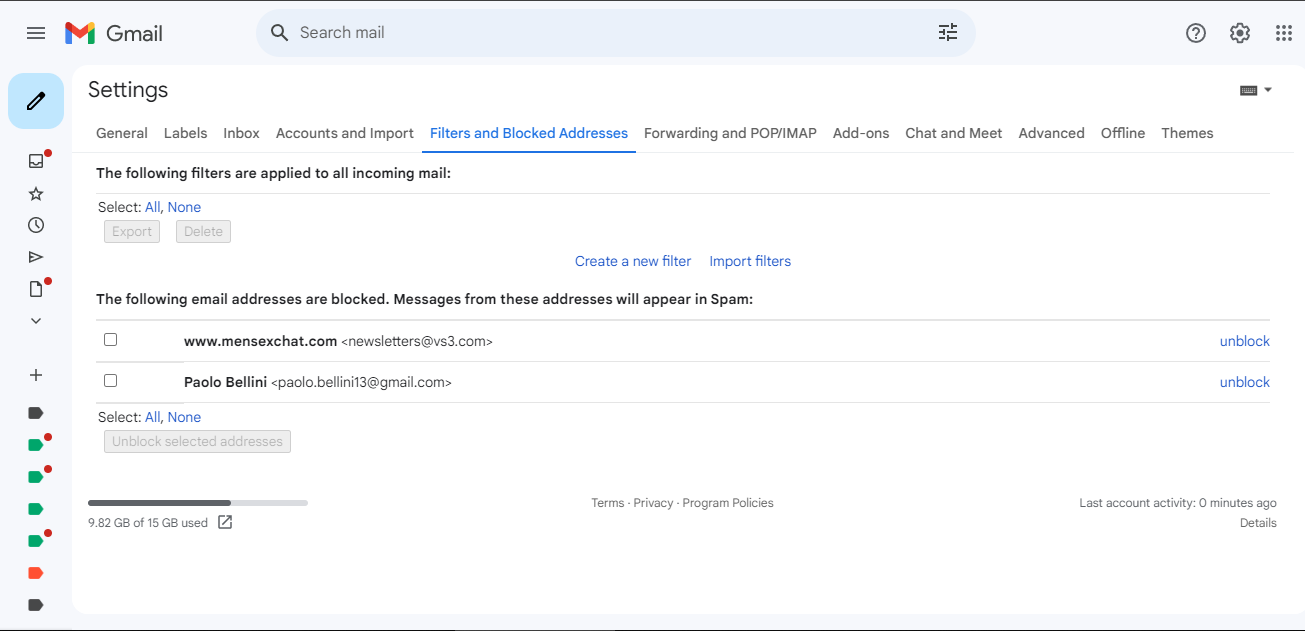
- Go to the “Filters and Blocked Addresses” tab.
- Scroll down and click on “Create a new filter”.
- In the “From” field, enter the email address or domain that you want to whitelist. For example, if you want to whitelist emails from example@example.com, simply type “example@example.com” in the field.
- Click on the “Create filter” button located at the bottom right corner of the popup window.
- Check the box next to “Never send it to Spam”.
- Click on the “Create filter” button to save the changes.
That’s it! Any future emails from the whitelisted email address or domain will be delivered straight to your inbox, ensuring you never miss any important communications.
It’s important to note that Gmail’s filters are not retroactive, which means that this filter will only apply to emails received after you’ve created it. If you want to whitelist existing emails from a specific sender, you can manually move them to your inbox or mark them as “Not Spam”.
Now that you know how to whitelist email addresses on Gmail, let’s explore how you can do the same on other popular email platforms.
How to Whitelist Email Addresses on Yahoo Mail
If you use Yahoo Mail as your primary email provider, you can easily whitelist email addresses to ensure that important messages are delivered directly to your inbox. Follow these steps:
- Login to your Yahoo Mail account and navigate to your inbox.
- Click on the gear icon located at the top right corner of the screen, and select “Settings” from the dropdown menu.
- In the Settings menu, click on “More Settings”.
- Select “Filters” from the left-hand sidebar.
- Click on the “Add new filters” button.
- Give your filter a name to help you identify it, such as “Whitelist”.
- In the “Sender” field, enter the email address or domain that you want to whitelist. For example, if you want to whitelist emails from example@example.com, type “example@example.com” in the field.
- Choose the option “Inbox” from the “Then move the message to this folder” dropdown menu.
- Click on the “Save” button to create the filter and whitelist the email address.
That’s it! From now on, any emails received from the whitelisted email address will be delivered straight to your inbox in Yahoo Mail.
Remember that if you have multiple email addresses associated with your Yahoo Mail account, you’ll need to repeat these steps for each email address that you want to whitelist.
Now that you know how to whitelist email addresses on Yahoo Mail, let’s move on to how you can do the same on Outlook (Hotmail).
How to Whitelist Email Addresses on Outlook (Hotmail)
If you use Outlook (formerly known as Hotmail) for your email, you can easily whitelist specific email addresses or domains to ensure that important messages are not treated as spam. Here’s how you can do it:
- Login to your Outlook account and go to your inbox.
- Click on the gear icon located at the top right corner of the screen, and select “View all Outlook settings” from the dropdown menu.
- In the Settings menu, click on “Junk email” in the left-hand sidebar.
- Under the “Safe senders and domains” section, click on the “+ Add” button.
- In the text field, enter the email address or domain that you want to whitelist. For example, if you want to whitelist emails from example@example.com, simply type “example@example.com” in the field.
- Click on the “Save” button to add the email address to your safe senders list.
That’s it! Outlook will now treat any future emails received from the whitelisted email address or domain as safe and deliver them directly to your inbox.
If you want to whitelist an entire domain, such as example.com, you can simply add “@example.com” without quotation marks to the safe senders list. This ensures that all emails coming from that domain are treated as safe and bypass the spam folder.
Keep in mind that occasionally, legitimate emails may still end up in your junk mail folder. To avoid this, remember to check your junk mail folder regularly and mark any wrongly classified emails as “Not junk” or move them to your inbox.
Now that you know how to whitelist email addresses on Outlook, let’s move on to how you can do the same on Apple Mail.
How to Whitelist Email Addresses on Apple Mail
If you use Apple Mail as your email client, you can easily whitelist specific email addresses or domains to ensure that important emails are always delivered to your inbox. Follow these steps to whitelist email addresses on Apple Mail:
- Open the Apple Mail application on your device.
- In the menu bar at the top, click on “Mail” and select “Preferences” from the dropdown menu.
- In the Preferences window, click on the “Rules” tab.
- Click on the “+ Add Rule” button to create a new rule.
- In the “Description” field, give your rule a name, such as “Whitelist”.
- In the first dropdown menu, select “Sender” from the options.
- In the second dropdown menu, select “Contains” from the options.
- In the text field next to the dropdown menus, enter the email address or domain that you want to whitelist. For example, if you want to whitelist emails from example@example.com, type “example@example.com” in the field.
- In the “Perform the following actions” section, select “Move Message” and choose “Inbox” as the destination folder.
- Click on the “OK” button to save the rule and whitelist the email address.
That’s it! Any future emails received from the whitelisted email address will now be delivered straight to your inbox in Apple Mail.
You can create multiple rules to whitelist different email addresses or domains. Simply repeat the steps and add the relevant email addresses or domains to each rule.
Apple Mail’s rules feature gives you the flexibility to customize your email filtering preferences according to your needs.
Now that you know how to whitelist email addresses on Apple Mail, let’s explore how you can do the same on AOL Mail.
How to Whitelist Email Addresses on AOL Mail
If you use AOL Mail as your email service, you can easily whitelist specific email addresses or domains to ensure that important emails are not mistakenly marked as spam. Follow these steps to whitelist email addresses on AOL Mail:
- Login to your AOL Mail account and go to your inbox.
- Open an email from the sender you want to whitelist or create a new email.
- In the email message, click on the sender’s email address.
- A popup menu will appear. Click on “Add to Contacts” from the options.
- A new window will open where you can add contact details for the sender. Verify that the email address is correct and click on the “Add Contact” button.
- That’s it! The email address is now added to your contacts, which effectively whitelists the sender.
By adding the email address to your contacts, AOL Mail recognizes that emails from this address are trusted and should not be treated as spam.
If you receive emails from different email addresses under the same domain that you want to whitelist, you can add the entire domain to your contacts as well. For example, if you want to whitelist all emails from example.com, add “@example.com” without the quotation marks as a contact.
Now, any future emails received from the whitelisted email addresses or domains will be delivered directly to your AOL Mail inbox, ensuring that you don’t miss any important communications.
Now that you know how to whitelist email addresses on AOL Mail, let’s move on to how you can do the same on Mozilla Thunderbird.
How to Whitelist Email Addresses on Thunderbird
If you use Mozilla Thunderbird as your email client, you can easily whitelist specific email addresses or domains to ensure that important emails are always delivered to your inbox. Follow these steps to whitelist email addresses on Thunderbird:
- Open the Thunderbird application on your computer.
- In the menu bar, click on “Tools” and select “Message Filters” from the dropdown menu.
- In the Message Filters window, click on the “New” button to create a new filter.
- In the “Filter name” field, give your filter a name, such as “Whitelist”.
- In the “Match all of the following” section, select “Sender” from the dropdown menu.
- In the “Contains” field, enter the email address or domain that you want to whitelist. For example, if you want to whitelist emails from example@example.com, type “example@example.com” in the field.
- In the “Perform these actions” section, select “Move Message to” and choose “Inbox” as the destination folder.
- Click on the “OK” button to save the filter and whitelist the email address.
That’s it! Any future emails received from the whitelisted email address or domain will be delivered straight to your Inbox in Thunderbird.
You can create multiple filters to whitelist different email addresses or domains. Simply repeat the steps and add the relevant email addresses or domains to each filter.
Thunderbird’s message filters allow you to customize your email preferences and ensure that important messages are always received without being marked as spam.
Now that you know how to whitelist email addresses on Thunderbird, let’s explore how you can do the same on Android devices.
How to Whitelist Email Addresses on Android
If you access your email on an Android device, you can easily whitelist specific email addresses or domains to ensure that important emails are not treated as spam. Follow these steps to whitelist email addresses on Android:
- Open the email app on your Android device.
- Find an email from the sender you want to whitelist or create a new email.
- Tap and hold the sender’s email address to select it.
- In the popup menu that appears, tap on “Add to contacts” or “Add to address book”.
- A new window will open where you can add contact details for the sender. Verify that the email address is correct and tap on the “Save” button.
By adding the email address to your contacts or address book, your Android device recognizes that emails from this address are trusted and should not be treated as spam.
If you receive emails from different email addresses under the same domain that you want to whitelist, you can add the entire domain to your contacts as well. Simply add an entry with the domain name without the ‘@’ symbol.
Now, any future emails received from the whitelisted email addresses or domains will be delivered directly to your Android device’s inbox, ensuring that you don’t miss any important communications.
Now that you know how to whitelist email addresses on Android, let’s move on to how you can do the same on iPhone’s iOS Mail.
How to Whitelist Email Addresses on iPhone (iOS Mail)
If you use the iOS Mail app on your iPhone, you can easily whitelist specific email addresses or domains to ensure that important emails are not mistakenly marked as spam. Follow these steps to whitelist email addresses on iPhone:
- Open the Mail app on your iPhone and go to your inbox.
- Find an email from the sender you want to whitelist or create a new email.
- Tap the sender’s name or email address to view their contact information.
- Tap on “Create New Contact” or “Add to Existing Contact” to add the sender to your contact list.
- Verify that the email address is correct and add any additional information if desired.
- Tap on the “Done” button to save the contact.
By adding the email address to your contacts, your iOS Mail app recognizes that emails from this address are trusted and should not be treated as spam.
If you receive emails from different email addresses under the same domain that you want to whitelist, you can add the entire domain to your contacts as well. Simply add a new contact with the domain name without the ‘@’ symbol.
Now, any future emails received from the whitelisted email addresses or domains will be delivered directly to your iPhone’s inbox, ensuring that you don’t miss any important communications.
Now that you know how to whitelist email addresses on iPhone’s iOS Mail app, you can ensure that important emails are always delivered to your inbox.
Lastly, let’s explore some additional tips and tricks for whitelisting email addresses.
Additional Tips and Tricks for Whitelisting Email Addresses
Whitelisting email addresses is a powerful tool for ensuring that important emails reach your inbox. Here are some additional tips and tricks to enhance your email whitelist:
- Regularly Review Your Whitelist: Periodically check your whitelist to ensure it is up to date. Remove any email addresses or domains that you no longer trust or want to whitelist.
- Use Filters for Organizing: Take advantage of email filters to organize your inbox. Create separate folders or labels for different senders or types of emails to keep your inbox clutter-free.
- Verify Email Addresses: Double-check email addresses before adding them to your whitelist. Typos or incorrect addresses can lead to unintended consequences.
- Consider Domain Whitelisting: If you frequently receive emails from different addresses within a specific domain, consider whitelisting the entire domain to ensure all emails from that domain reach your inbox.
- Check Spam/Junk Folders: Despite whitelisting, occasionally check your spam or junk folders for any missed emails, especially if you are still receiving emails from familiar senders in those folders.
- Update Whitelist When Changing Email Providers: If you switch email providers, ensure that you update your whitelist to include the email addresses or domains you want to continue whitelisting.
- Exercise Caution: Be careful when whitelisting email addresses or domains. Avoid whitelisting unfamiliar or suspicious email addresses, as this may expose you to phishing attempts or other security risks.
Remember, while whitelisting email addresses is effective in ensuring the delivery of important emails, it is just one aspect of email management. Regularly review your inbox, unsubscribe from unwanted mailing lists, and utilize other tools provided by your email provider to maintain an organized and secure email experience.
By implementing these tips and tricks, you can optimize your email whitelist and improve your overall email management.
Now that you have learned some valuable tips and tricks for whitelisting email addresses, you are well-equipped to prioritize your inbox and never miss important communications.