
Reasons to Factory Reset a Lenovo Laptop
A factory reset is a useful troubleshooting method for Lenovo laptops that can help resolve various issues. Here are some of the common reasons why you might consider performing a factory reset on your Lenovo laptop:
- Operating System Issues: Over time, the operating system of your Lenovo laptop may start experiencing problems such as frequent crashes, slow performance, or unresponsive applications. Performing a factory reset can eliminate these issues by restoring the operating system to its original state.
- Virus or Malware Attacks: If your Lenovo laptop has been infected with viruses or malware, a factory reset can help remove these malicious entities. This is especially crucial if your antivirus software is unable to completely eradicate the threats.
- Unwanted Software: Over time, unnecessary applications and bloatware can accumulate on your Lenovo laptop, occupying valuable storage space and potentially affecting system performance. Performing a factory reset will remove all installed applications and provide a clean slate.
- System Optimization: If your Lenovo laptop is running sluggish and has accumulated temporary files, caches, and unnecessary background processes, a factory reset can help optimize system performance by clearing out these excess files and processes.
- Selling or Donating: If you plan on selling or donating your Lenovo laptop, performing a factory reset is essential to protect your personal data and ensure that the new owner starts with a clean system.
It is important to note that performing a factory reset will delete all data on your Lenovo laptop, so it is crucial to back up your important files before proceeding with the reset. Additionally, some Lenovo laptops may offer alternative methods to factory reset, such as using the OneKey Recovery System or accessing the Recovery Partition.
In the next sections, we will explore different methods of performing a factory reset on a Lenovo laptop, including resetting through Windows, using the recovery partition, creating a USB recovery drive, and utilizing the OneKey Recovery System.
Backup Your Files
Before proceeding with a factory reset on your Lenovo laptop, it is crucial to back up your important files to prevent data loss. A factory reset will erase all the data on your laptop’s hard drive, so it is essential to create a backup to ensure that your cherished photos, important documents, and other valuable files are safe.
Here are a few methods you can use to back up your files:
- External Hard Drive: Connect an external hard drive to your Lenovo laptop and manually copy and paste your files onto the hard drive. Organize your files into folders for easier retrieval later.
- Cloud Storage: Use cloud storage services like Google Drive, Dropbox, or Microsoft OneDrive to upload and store your files. These services often provide a limited amount of free storage, and you can choose to upgrade to a premium plan for more space if needed.
- USB Flash Drive: If you have a large enough USB flash drive, you can transfer your important files onto it. Keep in mind that USB drives have limited storage capacity, so consider using multiple USB drives if necessary.
- Network Storage: If you have a network-attached storage (NAS) device at home or access to shared network drives, you can copy your files to these storage locations over your local network.
When backing up your files, ensure that you double-check for any hidden or important files in directories that you may have overlooked. It is recommended to create multiple copies of your backup, storing them in different locations for added security.
Remember to also back up any browser bookmarks, email contacts, and other personal settings or preferences that you may want to restore after the factory reset. Most web browsers have built-in syncing features that can help you easily retrieve your bookmarks and settings on a fresh system.
Once you have successfully backed up your files, you can proceed with the factory reset on your Lenovo laptop. The next sections will guide you through different methods of performing a factory reset based on your specific Lenovo laptop model and available options.
Resetting Through Windows
If your Lenovo laptop is still operational and you can access the Windows operating system, resetting your laptop through Windows is a relatively simple process. Here’s how you can do it:
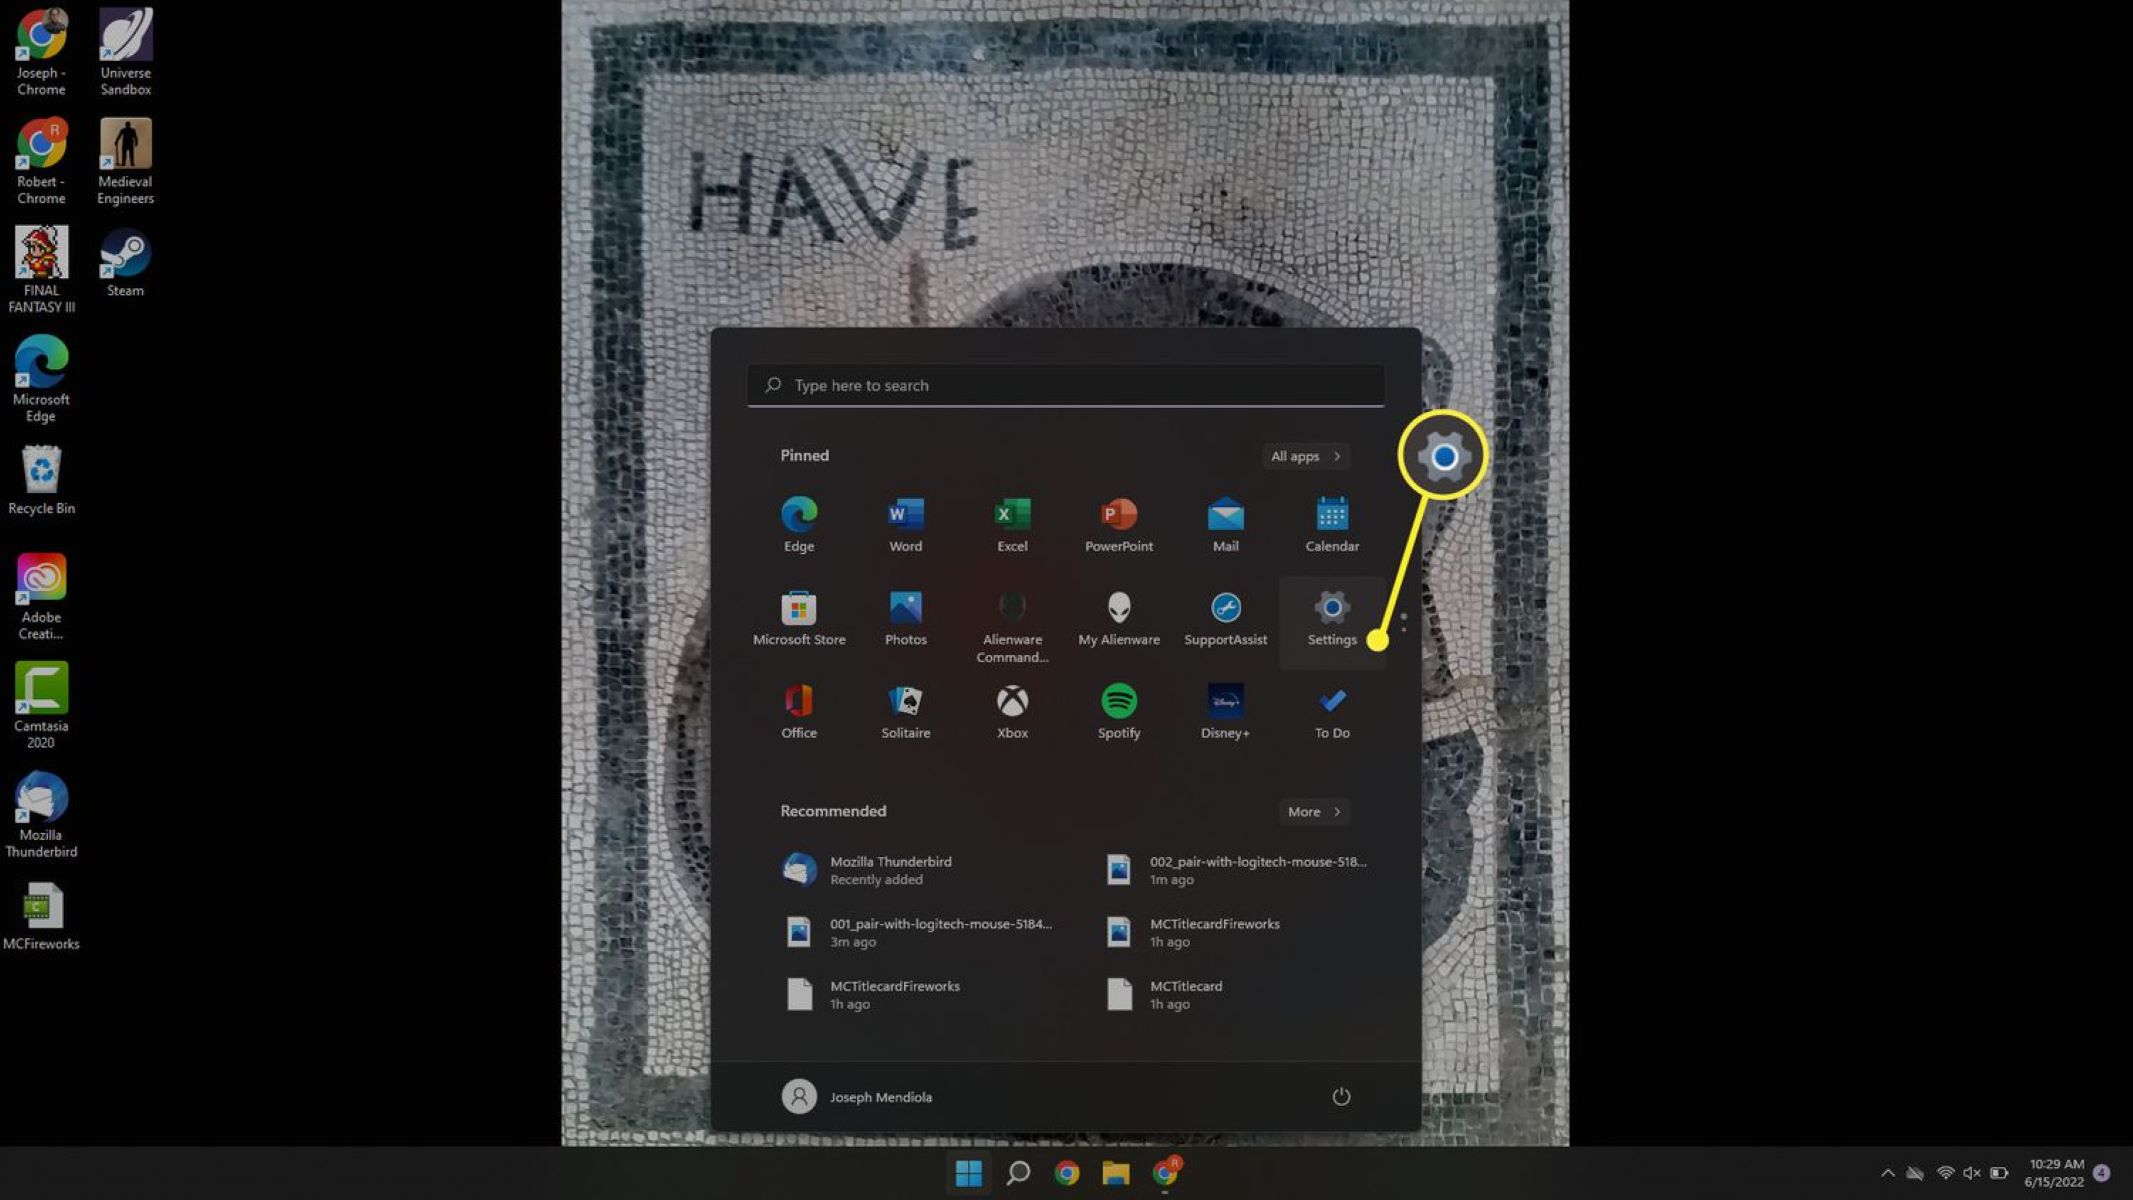
- Click on the “Start” menu and open the “Settings” app.
- In the Settings app, select the “Update & Security” option.
- In the left-hand menu, choose the “Recovery” option.
- Under the “Reset this PC” section, click on the “Get started” button.
- You will be prompted to choose between keeping your files or removing everything. Select the option that suits your needs. Keep in mind that selecting the “Remove everything” option will erase all data on your laptop, so make sure you have backed up your important files beforehand.
- Follow the on-screen instructions to complete the reset process. It may take some time, and your laptop may restart multiple times during the process.
Once the reset process is complete, your Lenovo laptop will be restored to its original factory settings. You can then set up your laptop as if it were a new device, reinstalling your preferred applications and restoring your files from the backup you created.
It’s important to note that resetting through Windows may vary slightly depending on the version of Windows you are using. The steps provided are for Windows 10, but they should be similar for other versions as well.
In the next sections, we will explore alternative methods of factory resetting a Lenovo laptop, including using the recovery partition, creating a USB recovery drive, and utilizing the OneKey Recovery System.
Resetting Using the Recovery Partition
If your Lenovo laptop came with a pre-installed recovery partition, you can use it to perform a factory reset. The recovery partition contains the necessary files and tools to restore your laptop to its original factory settings. Here’s how you can do it:
- Make sure your Lenovo laptop is turned off.
- Press the power button to turn on your laptop and immediately press the Novo button (or the appropriate key combination) to access the Novo Button Menu. The Novo button is usually located near the power button or on the side of the laptop.
- In the Novo Button Menu, select the “System Recovery” option using the arrow keys on your keyboard, and press Enter.
- You may be prompted to choose a language and select a keyboard layout. Follow the on-screen instructions to make your selections.
- Select the “Troubleshoot” option, and then choose “Reset this PC” or “Factory Reset”.
- You will be given the option to keep your files or remove everything. Choose the option that suits your needs. Remember to back up your important files before proceeding with the reset.
- Follow the on-screen instructions to initiate the factory reset process. This may take some time, and your laptop may restart multiple times.
Once the factory reset process is complete, your Lenovo laptop will be restored to its original factory settings. You can then proceed with setting up your laptop as you would with a new device, reinstalling applications, and restoring your files from the backup you created.
Please note that the steps and options mentioned above may vary depending on the specific Lenovo laptop model and the version of the recovery partition. It’s always recommended to refer to your laptop’s user manual or the Lenovo support website for detailed instructions specific to your device.
In the next sections, we will explore additional methods of factory resetting a Lenovo laptop, including creating a USB recovery drive and utilizing the OneKey Recovery System.
Resetting With a USB Recovery Drive
If your Lenovo laptop does not have a recovery partition or if you prefer a more flexible and portable option, you can create a USB recovery drive to perform a factory reset. Here’s how:
- Connect a USB flash drive to another computer with internet access.
- On the other computer, search for the “Create a recovery drive” tool and open it. This tool is typically found in the Control Panel or by searching in the Start menu.
- Follow the on-screen instructions in the recovery drive creation tool, selecting your USB flash drive as the destination for the recovery drive.
- Once the recovery drive is created, safely eject the USB flash drive from the other computer.
- Insert the USB recovery drive into your Lenovo laptop.
- Turn on your laptop and access the boot menu by pressing the appropriate key. The key to enter the boot menu varies depending on the laptop model and may be displayed during the startup process. Common keys include F12, ESC, or Del.
- In the boot menu, select the option to boot from the USB drive. This option may be labeled as “USB HDD,” “USB Device,” or a similar name.
- Follow the on-screen instructions to proceed with the factory reset. You may be prompted to choose a language, select a keyboard layout, and confirm the reset process.
- Choose whether you want to keep your files or remove everything. It’s important to note that selecting the “Remove everything” option will erase all data on your laptop, so ensure that you have backed up your important files beforehand.
- Continue following the on-screen instructions to initiate the factory reset process. Your Lenovo laptop may restart multiple times during this process.
Once the factory reset is complete, your Lenovo laptop will be restored to its original factory settings. You can then proceed with the initial setup, reinstalling applications, and retrieving your files from the backup you created.
Please note that the steps provided may vary slightly depending on your specific Lenovo laptop model and the version of the operating system. It’s recommended to refer to your laptop’s user manual or the Lenovo support website for detailed instructions tailored to your device.
In the next section, we will explore another method of factory resetting a Lenovo laptop, by utilizing the OneKey Recovery System.
Resetting Using the OneKey Recovery System
If your Lenovo laptop is equipped with the OneKey Recovery System, you can reset your laptop to its factory settings using this built-in feature. The OneKey Recovery System provides a convenient way to restore your laptop to its original state. Here’s how you can use it:
- Ensure that your Lenovo laptop is turned off.
- Press the Novo button (or the appropriate key combination) to access the Novo Button Menu. The Novo button is usually located near the power button or on the side of the laptop.
- Once the Novo Button Menu appears, select the “System Recovery” option using the arrow keys on your keyboard, and press Enter.
- You may be prompted to choose a language and select a keyboard layout. Follow the on-screen instructions to make your selections.
- Next, select the “Restore from Initial Backup” or “System Recovery” option.
- Choose whether you want to keep your files or remove everything. It’s important to note that selecting the “Remove everything” option will erase all data on your laptop, so ensure that you have backed up your important files beforehand.
- Follow the on-screen instructions to proceed with the factory reset. This process may take some time, and your laptop may restart multiple times.
Once the factory reset is complete, your Lenovo laptop will be restored to its original factory settings. You can then set up your laptop as if it were a new device, reinstalling your preferred applications and restoring your files from the backup you created.
The steps provided above may vary slightly depending on the specific Lenovo laptop model and the version of the OneKey Recovery System. It is recommended to refer to your laptop’s user manual or visit the Lenovo support website for detailed instructions specific to your device.
In the next section, we will discuss some important considerations to keep in mind before performing a factory reset on your Lenovo laptop.
Resetting From the BIOS Setup Menu
In some cases, you may need to reset your Lenovo laptop from the BIOS (Basic Input/Output System) setup menu. This method allows you to access advanced system settings, including the option to perform a factory reset. Here’s how you can do it:
- Restart your Lenovo laptop.
- During the startup process, look for the key combination to access the BIOS setup menu. The key to enter the BIOS setup menu may vary depending on the model of your laptop but is often displayed on the startup screen. Common keys to enter the BIOS setup include F2, F10, or Del.
- Once you are in the BIOS setup menu, navigate to the “Setup Defaults” or “Reset to Default” option using the arrow keys on your keyboard.
- Select the “Setup Defaults” option and confirm the reset when prompted.
- Save the changes and exit the BIOS setup menu. The laptop will restart.
- After the restart, your Lenovo laptop will be restored to its default factory settings, similar to performing a factory reset.
It’s important to note that resetting from the BIOS setup menu may vary depending on the specific Lenovo laptop model and the version of the BIOS. The steps provided above are general guidelines, and it’s recommended to consult your laptop’s user manual or the Lenovo support website to find accurate instructions tailored to your device.
Before proceeding with a factory reset from the BIOS setup menu, ensure that you have backed up all your important files as this method may delete all data on your laptop’s hard drive.
In the next section, we will discuss some important considerations to keep in mind before performing a factory reset on your Lenovo laptop.
Important Considerations Before Resetting
Before proceeding with a factory reset on your Lenovo laptop, there are a few important considerations to keep in mind:
- Back up your files: It cannot be stressed enough – make sure you have backed up all your important files before initiating a factory reset. This will ensure that you don’t lose any valuable data during the process.
- Understand the consequences: Performing a factory reset will erase all data on your Lenovo laptop’s hard drive. This includes installed applications, personal files, and settings. Ensure that you have taken note of any crucial information or settings that you need to save or document before proceeding.
- Prepare installation media: If your Lenovo laptop did not come with a recovery partition or the recovery partition is inaccessible, you may need to create a USB recovery drive or have installation media ready to reinstall the operating system after the reset.
- Update drivers and software: Before resetting, it is a good idea to ensure that your Lenovo laptop’s drivers and software are up to date. This will help ensure smooth functioning of your laptop after the reset.
- Disconnect external devices: Before initiating the factory reset, it is recommended to disconnect all external devices such as printers, USB drives, and external hard drives. This will prevent any potential conflicts during the reset process.
- Have a stable power source: Ensure that your Lenovo laptop is connected to a stable power source during the factory reset process. It is not advisable to perform a reset with low battery power, as it may lead to interruptions and potential data loss.
- Follow instructions specific to your model: Lenovo laptops may have different methods and options for performing a factory reset based on the specific model and operating system versions. It is essential to refer to your laptop’s user manual or the official Lenovo support website for accurate and detailed instructions.
By keeping these considerations in mind and taking the necessary precautions, you can successfully perform a factory reset on your Lenovo laptop and resolve various issues or prepare it for a new user.
In the next section, we will address some frequently asked questions about factory resetting Lenovo laptops to provide further guidance.
Frequently Asked Questions (FAQs)
Here are some frequently asked questions regarding factory resetting Lenovo laptops:
- Can I undo a factory reset on my Lenovo laptop?
No, a factory reset permanently erases all data and settings on your laptop. It is crucial to back up your files before initiating the reset. - Will a factory reset remove viruses from my Lenovo laptop?
Yes, a factory reset will remove viruses and malware from your Lenovo laptop. However, it is recommended to use reliable antivirus software to prevent future infections. - Do I need a product key to reinstall Windows after a factory reset?
If your Lenovo laptop came with original pre-installed Windows, it should automatically activate without the need for a product key when reinstalling after a factory reset. However, if you purchased a separate copy of Windows, you may need the product key. - Can I perform a factory reset without a recovery partition or USB recovery drive?
Without a recovery partition or USB recovery drive, you may be able to use installation media to reinstall the operating system. It is recommended to create a USB recovery drive as a backup option. - Will a factory reset remove pre-installed software on my Lenovo laptop?
Yes, a factory reset will remove all pre-installed software, also known as bloatware, from your Lenovo laptop. This can help optimize system performance and free up storage space. - Will a factory reset improve the performance of my Lenovo laptop?
Yes, a factory reset can improve the performance of your Lenovo laptop by removing unnecessary files, applications, and background processes that may be slowing it down. However, if the performance issues persist, it may indicate a hardware problem.
If you have further questions or encounter any difficulties during the factory reset process, it is recommended to consult the Lenovo support website or reach out to their customer support for assistance.