
Reasons to Export Emails From Outlook
Outlook is a widely used email client that offers a range of powerful features for managing your emails. However, there may come a time when you need to export your emails from Outlook. Whether it’s for backup purposes, transferring to a different email client, or simply organizing your emails more efficiently, there are several compelling reasons to consider exporting your emails from Outlook. In this article, we will discuss some of the top reasons why you may want to export your emails from Outlook.
1. Backup and Disaster Recovery: One of the most important reasons to export your emails from Outlook is to create a backup of your valuable email data. In the event of a computer crash, accidental deletion, or system failure, having a backup of your emails ensures that you can easily restore them and prevent any data loss. By exporting your emails, you can store them on an external storage device or cloud storage service, providing an extra layer of protection for your important communication.
2. Email Migration: If you decide to switch to a different email client or service provider, exporting your emails from Outlook is essential. By exporting your emails, you can easily transfer them to the new email client or service, ensuring a seamless transition. This is especially useful if you have a large number of emails and folders that you want to keep intact during the migration process.
3. Archiving and Compliance: Some companies and industries have strict data retention policies or legal requirements that necessitate archiving emails for a certain period of time. By exporting your emails, you can create an archive of your communication history and ensure compliance with regulatory standards. This is particularly crucial for businesses that need to keep track of important communications for auditing or legal purposes.
4. Organizational Efficiency: Over time, your Outlook mailbox can become cluttered with a large number of emails. Exporting your emails allows you to organize and manage them more effectively. You can create separate folders, classify emails by categories, or store them in a different email management system. By exporting your emails and restructuring them, you can improve your productivity and find specific emails more quickly when needed.
5. Collaboration and Sharing: Exporting your emails from Outlook can also facilitate collaboration and sharing of important information. By exporting emails to formats like PDF or HTML, you can easily share them with colleagues, clients, or partners. This ensures that everyone involved has access to the required information and promotes efficient communication within your organization.
These are just a few of the top reasons why exporting emails from Outlook can be beneficial. Whether it’s for backup, migration, compliance, organization, or collaboration purposes, the ability to export your emails provides flexibility and control over your email data. So if you find yourself in a situation where you need to export your emails from Outlook, follow the methods outlined in this guide to ensure a smooth and successful process.
Exporting Emails from Outlook: Step-by-Step Guide
Exporting emails from Outlook is a straightforward process that can be done in a few simple steps. Whether you’re looking to create a backup, migrate to a different email client, or organize your emails more efficiently, this step-by-step guide will help you export your emails from Outlook with ease.
Step 1: Open Outlook: Launch Microsoft Outlook on your computer and make sure you’re logged in to your email account.
Step 2: Navigate to the File Menu: In the top left corner of the Outlook window, click on the “File” tab to access the different options and settings.
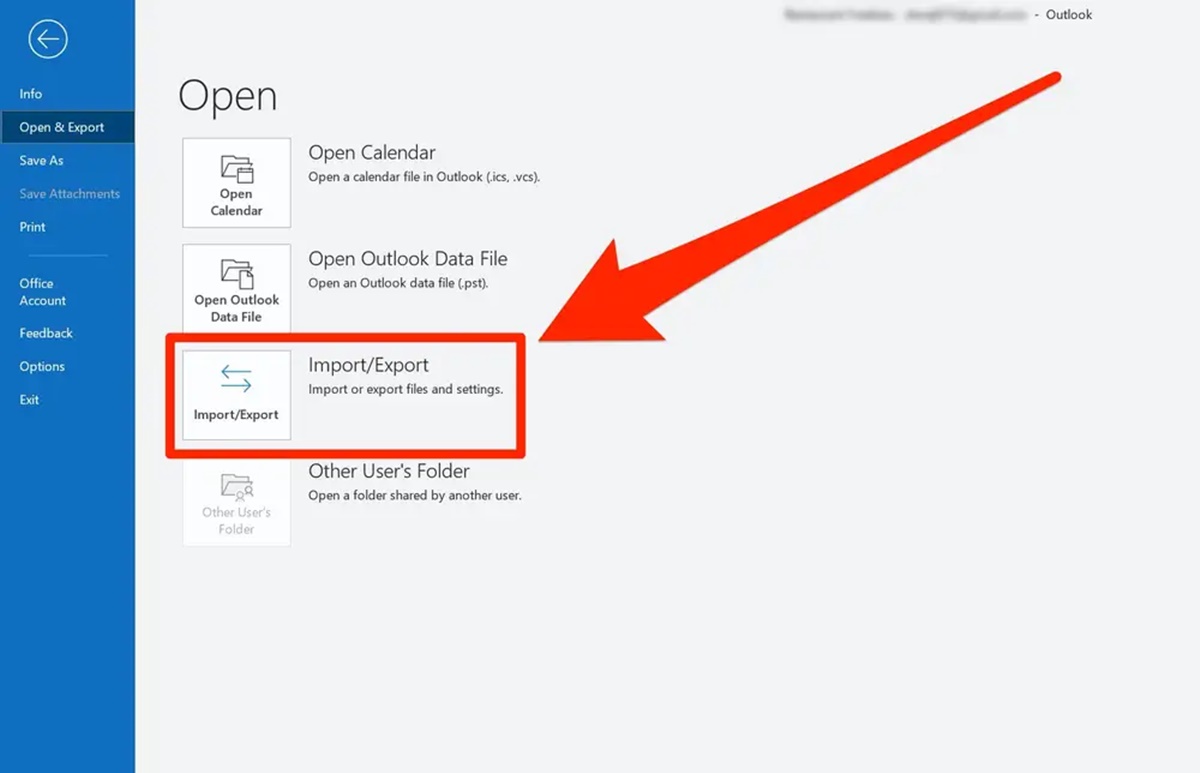
Step 3: Select “Open & Export” Option: From the dropdown menu, select “Open & Export” to reveal more options related to managing your Outlook data.
Step 4: Choose “Import/Export” Option: Under the “Open & Export” section, click on the “Import/Export” button. This will open a new window with various import and export options.
Step 5: Select “Export to a File”: In the “Import and Export Wizard” window, choose the “Export to a file” option and click “Next.”
Step 6: Select “Outlook Data File (.pst)”: In the next window, select “Outlook Data File (.pst)” and click “Next.” This is the most common file format for exporting emails from Outlook.
Step 7: Choose the Email Account: On the following screen, select the specific email account or folder that you want to export. You can choose to export your entire mailbox or specific folders.
Step 8: Specify the Destination: Click on the “Browse” button to choose the location where you want to save the exported file. Select a location and provide a name for the file, then click “Finish.”
Step 9: Set a Password (Optional): If you want to protect the exported file with a password, you can choose to do so in the next window. Set a password and confirm it if desired, then click “OK.”
Step 10: Export Process Completion: Outlook will now start the export process, creating a copy of your selected emails and saving them as a .pst file. The time taken for the export process will depend on the number of emails being exported.
Step 11: Verify Exported File: Once the export process is complete, go to the location where you saved the .pst file. Double-click on it to open it in Outlook and verify that your emails have been successfully exported.
By following these step-by-step instructions, you can easily export your emails from Outlook. Remember to choose the appropriate export options based on your specific requirements, whether it’s creating a backup, migrating to a new email client, or organizing your emails more effectively.
Method 1: Exporting Emails to a PST File
Exporting emails to a PST (Personal Storage Table) file format is one of the most common methods used to export emails from Outlook. A PST file is essentially a container that holds all your Outlook data, including emails, contacts, calendar entries, and more. By exporting your emails to a PST file, you can easily create a backup or transfer your emails to another Outlook installation. Follow these steps to export emails to a PST file:
Step 1: Open Outlook: Launch Microsoft Outlook on your computer and log in to your email account if necessary.
Step 2: Navigate to the File Menu: Click on the “File” tab located in the top left corner of the Outlook window.
Step 3: Select “Open & Export” Option: From the dropdown menu, choose “Open & Export” to access additional options related to managing your Outlook data.
Step 4: Choose “Import/Export” Option: Under the “Open & Export” section, click on the “Import/Export” button. This will open a new window called the “Import and Export Wizard.”
Step 5: Select “Export to a File”: In the “Import and Export Wizard” window, choose the “Export to a file” option and click “Next.”
Step 6: Select “Outlook Data File (.pst)”: In the next window, select the option for “Outlook Data File (.pst)” and click “Next.” This format will allow you to export your emails and other Outlook data to a PST file.
Step 7: Choose the Email Account or Folder: On the following screen, select the specific email account or folder that you want to export. You can choose to export your entire mailbox or select specific folders.
Step 8: Specify the Destination: Click on the “Browse” button to choose the location where you want to save the exported PST file. Select a location and provide a name for the file, then click “Finish.”
Step 9: Set a Password (Optional): If you want to protect the exported PST file with a password, you can do so by setting a password in the next window. Enter your desired password and confirm it, then click “OK.”
Step 10: Export Process Completion: Outlook will now start the export process, creating a copy of your selected emails and saving them as a PST file. The time taken for the export process will depend on the number of emails being exported.
Step 11: Verify Exported PST File: Once the export process is complete, navigate to the location where you saved the PST file. Double-click on it to open it in Outlook and ensure that your emails and other data have been successfully exported.
Exporting emails to a PST file provides a convenient way to back up and transfer your Outlook data. You can easily import the PST file into another Outlook installation or use it as a backup for restoring your emails in the event of accidental deletion or system failure. Remember to choose the appropriate email account or folders and set a password if necessary. Follow these steps, and you’ll be able to export your emails to a PST file with ease.
Method 2: Saving Emails as Individual Message Files
Another method to export emails from Outlook is by saving them as individual message files. This method allows you to export emails in a format that can be easily accessed and viewed outside of Outlook. Saving emails as individual message files is useful when you want to share specific emails or archive them in a more flexible format. Follow these steps to save emails as individual message files:
Step 1: Open Outlook: Launch Microsoft Outlook on your computer and log in to your email account if needed.
Step 2: Select the Emails to Export: Navigate to the folder containing the emails you want to export. Select the emails by holding down the “Ctrl” key and clicking on each email you want to save as an individual file. You can also use “Ctrl + A” to select all emails in the folder.
Step 3: Right-click and Choose “Save As”: Right-click on one of the selected emails and choose the “Save As” option from the context menu.
Step 4: Specify the Destination Folder: In the “Save As” dialog box, choose the location on your computer where you want to save the individual message files. Create a new folder or select an existing one to keep the files organized.
Step 5: Choose the File Format: In the “Save as type” dropdown menu, select the desired file format. The most commonly used file format for saving individual messages is “MSG” (Microsoft Outlook Message).
Step 6: Customize the File Name: Optionally, you can customize the file name of each exported email. By default, Outlook will use the subject line of the email as the file name, but you can change it to be more descriptive if desired.
Step 7: Click “Save”: Once you’ve specified the destination folder, file format, and customized the file name (if necessary), click the “Save” button to export the selected emails as individual message files.
Step 8: Verify Exported Message Files: Navigate to the destination folder you selected in Step 4 and verify that the individual message files have been successfully saved. You can double-click on each file to open it in Outlook or another email client that supports the MSG file format.
Saving emails as individual message files provides a convenient way to export and organize your emails outside of Outlook. It allows for easy sharing, archiving, and accessing of specific emails. Remember to select the desired emails, choose the appropriate file format (e.g., MSG), and specify the destination folder where the message files will be saved. By following these steps, you can successfully export your emails as individual message files using Microsoft Outlook.
Method 3: Exporting Emails to Another Email Service Provider
If you’re considering switching to a different email service provider, you may need to export your emails from Outlook and import them into the new service. This method is especially useful when you want to migrate all your emails, folders, and contacts to the new email provider while ensuring a smooth transition. Here’s a step-by-step guide on how to export emails from Outlook to another email service provider:
Step 1: Open Outlook: Launch Microsoft Outlook on your computer and log in to your email account.
Step 2: Navigate to the File Menu: Click on the “File” tab located in the top left corner of the Outlook window.
Step 3: Select “Open & Export” Option: From the dropdown menu, choose “Open & Export” to access additional options related to managing your Outlook data.
Step 4: Choose “Import/Export” Option: Under the “Open & Export” section, click on the “Import/Export” button. This will open the “Import and Export Wizard.”
Step 5: Select “Export to a File”: In the “Import and Export Wizard” window, choose the “Export to a file” option and click “Next.”
Step 6: Select “Outlook Data File (.pst)”: In the next window, select the option for “Outlook Data File (.pst)” and click “Next.” This format will allow you to export your emails and other Outlook data to a PST file.
Step 7: Choose the Email Account or Folder: On the following screen, select the specific email account or folder that you want to export. You can choose to export your entire mailbox or select specific folders.
Step 8: Specify the Destination: Click on the “Browse” button to choose the location where you want to save the exported PST file. Select a location and provide a name for the file, then click “Finish.”
Step 9: Import the PST File to the New Email Service Provider: Sign in to your new email service provider’s account and navigate to the import or migration settings. Follow the specific instructions provided by the email service provider to import the PST file you exported from Outlook.
Step 10: Verify Import Completion: Once the import process is complete, ensure that all your emails, folders, and contacts have been successfully migrated to the new email service provider. Double-check the imported data to ensure everything is intact and matches what you had in Outlook.
By following these steps, you can easily export your emails from Outlook and import them into another email service provider. This method allows for a seamless transition and ensures that you don’t lose any crucial data during the migration process. Remember to choose the appropriate email account or folders to export, specify the destination for the exported PST file, and follow the import instructions provided by the new email service provider. With careful execution, you can successfully export your emails to another service provider and continue your email communications without any disruptions.
Method 4: Exporting Emails to Excel
Exporting emails from Outlook to Excel can be a practical way to analyze, organize, and manipulate your email data. By exporting emails to an Excel spreadsheet, you can easily sort, filter, and perform various data operations that are not readily available within Outlook. Follow these steps to export emails from Outlook to Excel:
Step 1: Open Outlook: Launch Microsoft Outlook on your computer and log in to your email account if needed.
Step 2: Select the Emails to Export: Navigate to the folder containing the emails you want to export. Select the emails by holding down the “Ctrl” key and clicking on each email you want to include in the Excel export. You can also use “Ctrl + A” to select all emails in the folder.
Step 3: Copy the Selected Emails: Right-click on one of the selected emails and choose “Copy” from the context menu, or use the keyboard shortcut “Ctrl + C” to copy the emails to your clipboard.
Step 4: Open Excel: Launch Microsoft Excel on your computer. If you don’t have Excel installed, you can use alternative spreadsheet software that supports CSV (Comma-Separated Values) file import.
Step 5: Paste the Emails: In Excel, select the cell where you want the emails to start, and then right-click and choose “Paste” from the context menu. Alternatively, you can use the keyboard shortcut “Ctrl + V” to paste the emails into Excel.
Step 6: Adjust the Excel Layout: Format the Excel spreadsheet as desired. You can resize columns, apply formatting, and add headers to organize the exported email data effectively.
Step 7: Save the Excel Spreadsheet: Click on the “File” tab in Excel and choose “Save As.” Specify the desired location to save the Excel file and provide a name. Select the appropriate format, such as XLSX, for the Excel file, and click “Save.”
Step 8: Verify Exported Data: Navigate to the location where you saved the Excel file and open it to verify that the emails have been successfully exported and retained in the desired format.
Exporting emails from Outlook to Excel provides a flexible way to work with and analyze your email data. By copying and pasting the selected emails into Excel, you can leverage the powerful data manipulation and analysis functionalities Excel offers. Remember to select the desired emails, copy them to your clipboard, paste them into Excel, adjust the layout as needed, and save the Excel file in the appropriate format. By following these steps, you can easily export your emails from Outlook to Excel and unlock new possibilities for analyzing and organizing your email data.
Tips for a Successful Email Exportation Process
Exporting emails from Outlook is a task that requires attention to detail to ensure a successful process. Whether you’re exporting emails for backup purposes, migrating to a new email client, or organizing your data more efficiently, these tips will help you achieve a smooth and error-free email exportation process:
1. Plan and Organize: Before starting the exportation process, plan and organize your emails. Determine which emails or folders you need to export and create a system for categorizing and selecting the necessary data.
2. Check Folder Sizes: Be mindful of the size of the folders you’re exporting. Large folders with a high number of emails may take longer to export, and it’s essential to ensure you have enough storage space for the exported files.
3. Select the Appropriate Export Format: Depending on your requirements, choose the appropriate export format. Whether it’s a PST file, individual message files, or another format, ensure it aligns with your intended use for the exported emails.
4. Consider Email Attachments: Prioritize the handling of email attachments during the exportation process. Make sure attachments are included when exporting emails, or determine if you want to exclude them to reduce file sizes and simplify the exportation process.
5. Password Protect Exported Files: For added security, consider password protecting the exported files, especially if they contain sensitive or confidential information. This will help protect the integrity and privacy of your exported emails.
6. Regularly Backup Your Outlook Data: Implement a consistent backup strategy for your Outlook data, including emails, contacts, calendars, and settings. Regularly backing up your data will ensure you have accessible copies of your emails in case of data loss or system failures.
7. Test the Exported Data: After completing the exportation process, test the exported data to ensure its accuracy and integrity. Verify that all emails, attachments, and folder structures are correctly exported, especially if you’re migrating to a new email client or service provider.
8. Follow Instructions Carefully: When using third-party tools or services for email exportation, carefully follow the instructions provided by the software or provider. Ensure you understand each step and any custom settings or configurations required for a successful exportation process.
9. Keep Original Emails Intact: Unless you specifically need to delete or remove the original emails after exporting, it’s recommended to keep them intact to maintain a backup and prevent accidental data loss during the exportation process.
10. Document and Update Policies: If you’re exporting emails for compliance or legal reasons, document and update your organization’s policies to ensure you’re adhering to relevant regulations. This will help maintain transparency and ensure proper handling of exported email data.
By following these tips, you can ensure a successful email exportation process from Outlook. Whether it’s for backup, migration, or organization purposes, taking the necessary precautions and following best practices will help preserve your email data integrity and accessibility.