
How to Delay an Email in Outlook for Windows
Have you ever wished you could delay sending an email in Outlook for Windows? Whether you need a few more minutes to review your message or want to schedule it to be sent at a specific time, Outlook offers a convenient feature called “Delay Delivery” that allows you to do just that.
Here’s how you can delay an email in Outlook for Windows:
- Compose your email as usual in the Outlook application.
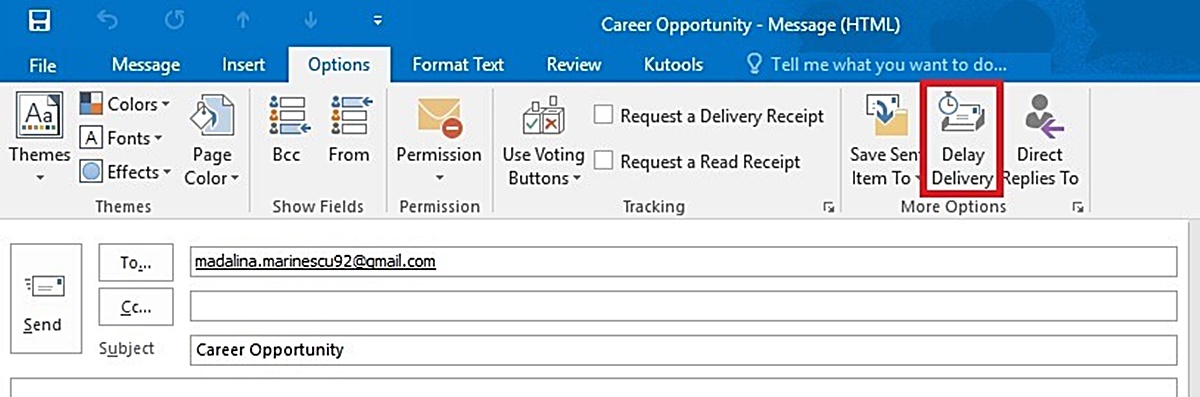
- Click on the “Options” tab at the top of the screen.
- In the “More Options” group, click on “Delay Delivery”.
- A dialog box will appear with the “Do not deliver before” option. Select the date and time you want the email to be sent.
- Click “Close” to save the changes.
- Finish composing your email and click “Send”.
Your email will now be held in the Outlook’s Outbox folder until the specified time, at which point it will be sent automatically. This allows you to review the email once more before it’s sent or ensure that it reaches the recipient at the desired time.
It’s important to note that your computer must be connected to the internet at the scheduled time for the email to be sent. If your computer is turned off or not connected to the internet, the email will be sent when it next connects to the internet.
Additionally, it’s worth mentioning that the “Delay Delivery” feature works for both individual emails and recurring emails, such as those set up with Outlook’s “Rules and Alerts” feature.
And if you ever wish to cancel or edit a delayed email, simply locate it in the Outbox folder, open it, and make the necessary changes or delete it before the scheduled send time.
By utilizing the “Delay Delivery” feature in Outlook for Windows, you have greater control over when your emails are sent, ensuring better accuracy and timing in your communication.
How to Schedule an Email in Outlook for Windows
If you prefer to set a specific time for an email to be sent in Outlook for Windows, you can take advantage of the “Schedule Email” feature. This convenient function allows you to compose your email in advance and have it automatically sent at a later date and time.
Here’s how you can schedule an email in Outlook for Windows:
- Open the Outlook application and go to the “Home” tab.
- Click on the “New Email” button to start composing your email.
- Write your message, add any attachments or formatting as needed.
- Instead of clicking “Send” right away, go to the “Options” tab at the top of the screen.
- In the “More Options” group, click on “Delay Delivery”.
- A dialog box will appear with the “Do not deliver before” option. Select the specific date and time you want the email to be sent.
- Click “Close” to save the changes.
- Finish composing your email and click “Send”.
Now your email will be scheduled to be sent at the predetermined time and date you have set. It will stay in your Outlook application until the scheduled time arrives.
Similar to the “Delay Delivery” feature, it’s important to note that your computer must be connected to the internet at the scheduled time for the email to be sent. If your computer is turned off or not connected to the internet, the email will be sent when it next connects to the internet.
Should you need to cancel or make changes to a scheduled email, locate it in your “Outbox” folder before the scheduled send time. Once you find it, you can edit the email or delete it entirely before it is sent.
With the ability to schedule emails in Outlook for Windows, you can plan and time your communication more effectively, ensuring that important messages are delivered precisely when needed.
How to Delay an Email in Outlook for Mac
Wouldn’t it be helpful if you could delay sending an email in Outlook for Mac? Fortunately, Outlook offers a feature called “Delay Delivery” that allows you to hold an email and schedule it to be sent at a later time. This can ensure that you have a chance to review your message or that it reaches the recipient at a more convenient moment.
Here’s how you can delay an email in Outlook for Mac:
- Open Outlook on your Mac and compose a new email.
- Click on the “Options” tab in the email composition window.
- Look for the “Delay Delivery” option and click on it.
- In the dialog box that appears, you will see the “Do not deliver before” option. Select the date and time when you want the email to be sent.
- Click “Close” to save the changes.
- Continue with your email composition and click “Send”.
By following these steps, your email will remain in the outbox until the scheduled time arrives, and Outlook will automatically send it at that time. This feature allows you to have more control over the timing of your emails and gives you the opportunity to review and make any necessary changes before they are sent.
It’s essential to note that your Mac must be connected to the internet at the scheduled time for the email to be sent successfully. If your Mac is offline, the email will be sent as soon as it reconnects to the internet.
If you need to edit or delete a delayed email, you can find it in the outbox folder before the scheduled send time. Simply make the necessary changes or delete the email altogether.
The “Delay Delivery” feature in Outlook for Mac provides added convenience and flexibility, ensuring that your emails are sent at the optimal time for both you and the recipient.
How to Schedule an Email in Outlook for Mac
If you want to schedule an email to be sent at a specific date and time in Outlook for Mac, you can take advantage of the “Schedule Email” feature. With this handy functionality, you can compose your email in advance and have it automatically sent at your desired time.
Here’s how you can schedule an email in Outlook for Mac:
- Open Outlook on your Mac and start composing a new email.
- Write your email content, add any attachments or formatting as needed.
- Instead of sending the email right away, go to the “Options” tab in the email composition window.
- Look for the “Delay Delivery” option and click on it.
- In the dialog box that appears, you will find the “Do not deliver before” option. Select the specific date and time you want the email to be sent.
- Click “Close” to save the changes.
- Finish composing your email and click “Send”.
With this process, your email will be scheduled to be sent at the specified time and date. It will stay in your Outlook application until the scheduled time arrives.
It’s important to note that for the scheduled email to be sent successfully, your Mac needs to be connected to the internet at the scheduled time. If your Mac is offline, the email will be sent as soon as it reconnects to the internet.
If you need to cancel or make changes to a scheduled email, you can easily locate it in the outbox folder of your Outlook application before the scheduled send time. From there, you can edit the email or delete it altogether.
By utilizing the “Schedule Email” feature in Outlook for Mac, you can plan and automate the sending of your emails, ensuring they are delivered precisely when you want them to be.
How to Use the “Delay Delivery” Feature in Outlook for Windows
Outlook for Windows offers a powerful feature called “Delay Delivery,” allowing you to schedule when an email should be sent. This feature comes in handy when you want to compose an email ahead of time but delay its delivery until a specific date and time. Here’s how you can use the “Delay Delivery” feature in Outlook for Windows:
- Open Outlook on your Windows computer.
- Click on “New Email” to start composing your email.
- Write the email content and add any necessary attachments or formatting.
- On the top menu, click on the “Options” tab.
- In the “More Options” group, you’ll find the “Delay Delivery” button. Click on it.
- A dialog box will appear with the option “Do not deliver before.” Select the date and time you want the email to be sent.
- Click “Close” to save the changes.
- Finish composing your email and click “Send”.
Once you complete these steps, your email will be assigned a delivery date and time in Outlook’s Outbox. It will be held there until the scheduled time, and then automatically sent.
It is important to note that your computer must be connected to the internet at the scheduled send time for the email to be delivered. If your computer is turned off or not connected to the internet, the email will be sent once the connection is established.
If you need to modify or cancel a delayed email, you can find it in the Outbox folder before the scheduled send time. Open the email, make the necessary changes, or delete it completely.
The “Delay Delivery” feature in Outlook for Windows offers you greater control over email scheduling, allowing you to compose and send messages at the most appropriate times for both you and the recipient.
How to Use the “Delay Delivery” Feature in Outlook for Mac
If you use Outlook for Mac and want to have more control over the timing of your emails, the “Delay Delivery” feature is a valuable tool. This feature allows you to schedule when an email should be sent, giving you the flexibility to compose messages in advance and have them sent at a later date and time. Here’s how you can use the “Delay Delivery” feature in Outlook for Mac:
- Open Outlook on your Mac.
- Create a new email by clicking on “New Email”.
- Compose your email by adding the recipients, subject, and content.
- In the email composition window, go to the top menu and click on “Options”.
- Locate and click on the “Delay Delivery” option.
- A dialog box will appear with the “Do not deliver before” option. Select the desired date and time.
- Click “Close” to save the changes.
- Complete the email composition and click “Send”.
After following these steps, your email will be held in the Outbox folder until the scheduled time, at which point it will be automatically sent.
It’s important to ensure that your Mac is connected to the internet at the scheduled send time for the email to be delivered. If your Mac is offline, the email will be sent once it is connected to the internet again.
If you need to make any changes or cancel a delayed email, locate it in the Outbox folder before the scheduled send time. From there, you can edit the email or delete it entirely.
By utilizing the “Delay Delivery” feature in Outlook for Mac, you can have more flexibility in managing your emails, ensuring they are sent at the most suitable time for both you and the recipient.
How to Use the “Send Later” Feature in Outlook for Windows
If you are using Outlook for Windows, you have the convenience of the “Send Later” feature. This feature allows you to schedule emails to be sent at a later time, giving you more control over the timing of your communication. Here’s how you can use the “Send Later” feature in Outlook for Windows:
- Open Outlook on your Windows computer.
- Compose a new email by clicking on “New Email”.
- Write your email content, add recipients, and set the subject.
- Instead of clicking on “Send”, go to the top menu and click on the “Options” tab.
- In the “More Options” group, you’ll find the “Delay Delivery” button. Click on it.
- A dialog box will appear where you can select the date and time when you want the email to be sent.
- Click “Close” to save the changes.
- Finish composing your email and close the message window.
Now, your email will stay in your Outlook application until the scheduled time arrives. At that time, Outlook will automatically send the email without any further action required from you.
It’s important to keep in mind that for the “Send Later” feature to work, your computer must be connected to the internet at the scheduled send time. If your computer is offline, the email will be sent once you connect to the internet.
If you need to edit or cancel a scheduled email, you can find it in the Outbox folder. From there, you can make the necessary changes or delete the email before the scheduled send time.
By utilizing the “Send Later” feature in Outlook for Windows, you can schedule your emails to be sent at the optimal time, improving your productivity and ensuring your messages reach recipients at the right moment.
How to Use the “Send Later” Feature in Outlook for Mac
If you use Outlook for Mac, you can take advantage of the convenient “Send Later” feature. This feature allows you to schedule emails to be sent at a later time, providing you with more flexibility and control over your communication. Here’s how you can use the “Send Later” feature in Outlook for Mac:
- Open Outlook on your Mac.
- Compose a new email by clicking on “New Email”.
- Write your email content and fill in the recipients and subject.
- Instead of clicking “Send”, go to the top menu and click on “Options”.
- Click on “Send Later”.
- A menu will appear where you can choose from various scheduling options, such as “Later Today”, “Tomorrow”, or “Custom”.
- Select the desired scheduling option.
- Finish composing your email and close the message window.
After following these steps, your email will be scheduled to be sent at the designated time. Outlook for Mac will automatically send the email without any further action required from you.
It’s important to note that for the “Send Later” feature to work, your Mac must be connected to the internet at the scheduled send time. If your Mac is offline, the email will be sent once it is connected to the internet.
If you need to make any changes or cancel a scheduled email, you can find it in the Outbox folder. From there, you can edit the email or delete it entirely before the scheduled send time.
By using the “Send Later” feature in Outlook for Mac, you can schedule your emails to be sent at the most appropriate time, ensuring your messages reach recipients when it’s most convenient for them and maximizing your productivity.
How to Set a Specific Date and Time for the Delayed or Scheduled Email in Outlook for Windows
If you want to set a specific date and time for a delayed or scheduled email in Outlook for Windows, you can easily do so using the “Delay Delivery” or “Send Later” feature. Here’s how you can set a specific date and time for a delayed or scheduled email:
- Open Outlook on your Windows computer.
- Create a new email by clicking on “New Email”.
- Compose the email content, add recipients, and set the subject.
- Go to the top menu and click on the “Options” tab.
- In the “More Options” group, you’ll find either the “Delay Delivery” or “Send Later” button, depending on your version of Outlook.
- Click on the corresponding button for your chosen feature.
- A dialog box will appear where you can select the date and time you want the email to be sent. In some versions, you may need to click on “More Options” to find the scheduling options.
- Choose the desired date and time for the email to be sent.
- Click “Close” or “Send Later” to save the changes and schedule the email.
- Finish composing your email and either click “Send” or close the message window.
By following these steps, you can set a specific date and time for the delayed or scheduled email in Outlook for Windows. Whether you’re using the “Delay Delivery” or “Send Later” feature, the email will be sent automatically at the designated time and date.
It’s important to ensure that your computer is connected to the internet at the scheduled send time to guarantee successful delivery of the email. If your computer is offline, the email will be sent as soon as it reconnects to the internet.
If you need to make any changes or cancel a scheduled email, you can locate it in the Outbox folder before the scheduled send time. From there, you can edit the email or remove it entirely.
By setting a specific date and time for delayed or scheduled emails in Outlook for Windows, you can have greater control over your communication and ensure your messages are sent at the optimal moment.
How to Set a Specific Date and Time for the Delayed or Scheduled Email in Outlook for Mac
If you want to set a specific date and time for a delayed or scheduled email in Outlook for Mac, you can easily do so using the “Delay Delivery” or “Send Later” feature. Here’s how you can set a specific date and time for a delayed or scheduled email:
- Open Outlook on your Mac machine.
- Create a new email by clicking on “New Email”.
- Compose your email, including the recipient’s email address, subject, and message.
- Go to the top menu and click on “Options”.
- Click on either the “Delay Delivery” or “Send Later” button, depending on your version of Outlook.
- A dialog box will appear where you can set the date and time for the email to be sent. In some versions, you may need to click on “More Options” to access the scheduling options.
- Select the desired date and time for the email to be sent.
- Click “Close” or “Send Later” to save the changes.
- Finish composing your email and either click “Send” or close the message window.
By following these steps, you can set a specific date and time for the delayed or scheduled email in Outlook for Mac. Whether you’re using the “Delay Delivery” or “Send Later” feature, the email will be sent automatically at the designated time and date.
It’s important to ensure that your Mac is connected to the internet at the scheduled send time to ensure successful delivery of the email. If your Mac is offline, the email will be sent as soon as it reconnects to the internet.
If you need to make any changes or cancel a scheduled email, you can locate it in the Outbox folder before the scheduled send time. From there, you can edit the email or delete it entirely.
By setting a specific date and time for delayed or scheduled emails in Outlook for Mac, you have greater control over the timing of your communication, allowing you to send messages at the most appropriate moments.
How to Cancel or Edit a Delayed or Scheduled Email in Outlook for Windows
If you have scheduled a delayed or scheduled email in Outlook for Windows but need to make changes or cancel it altogether, you can easily do so. Here’s how you can cancel or edit a delayed or scheduled email in Outlook for Windows:
- Open Outlook on your Windows computer.
- Go to the “Outbox” folder. You can find this folder in the left sidebar of the Outlook application.
- Locate the delayed or scheduled email you wish to cancel or edit.
- If you want to cancel the email, simply select it and press the “Delete” key on your keyboard or right-click and choose “Delete” from the context menu.
- If you want to edit the email, double-click on it to open it for editing.
- Make the necessary changes to the email, such as modifying the content, recipients, or attachments.
- Click “Send” to send the updated email.
By following these steps, you can easily cancel or edit a delayed or scheduled email in Outlook for Windows. If you choose to cancel the email, it will be permanently deleted from the Outbox and won’t be sent.
It’s important to note that if you edit a scheduled email, the updated version will replace the original one. The new send time will depend on the settings you have chosen for delayed delivery or send later.
If you can’t find the email in the Outbox folder, it’s possible that it has already been sent. In such cases, you won’t be able to cancel or edit it anymore.
By knowing how to cancel or edit a delayed or scheduled email in Outlook for Windows, you have the flexibility to make adjustments or prevent the email from being sent if needed.
How to Cancel or Edit a Delayed or Scheduled Email in Outlook for Mac
If you have scheduled a delayed or scheduled email in Outlook for Mac but need to make changes or cancel it, you can easily do so. Here’s how you can cancel or edit a delayed or scheduled email in Outlook for Mac:
- Open Outlook on your Mac.
- Go to the “Outbox” folder. You can find this folder in the left sidebar of the Outlook application.
- Locate the delayed or scheduled email you wish to cancel or edit.
- If you want to cancel the email, right-click on it and select “Delete”. Alternatively, you can select the email and press the “Delete” key on your keyboard.
- If you want to edit the email, double-click on it to open it.
- Make the necessary changes to the email, such as modifying the content, recipients, or attachments.
- Click “Send” to update and send the email again.
By following these steps, you can easily cancel or edit a delayed or scheduled email in Outlook for Mac. If you choose to cancel the email, it will be permanently deleted from the Outbox and won’t be sent.
It’s important to note that if you edit a scheduled email, the updated version will replace the original one. The new send time will depend on the settings you have chosen for delayed delivery or send later.
If you can’t find the email in the Outbox folder, it’s possible that it has already been sent. In such cases, you won’t be able to cancel or edit it anymore.
By knowing how to cancel or edit a delayed or scheduled email in Outlook for Mac, you have the flexibility to make adjustments or prevent the email from being sent if needed.
Tips and Best Practices for Using the Delay or Schedule Email Feature in Outlook
The delay or schedule email feature in Outlook provides you with valuable control over when your emails are sent. To make the most of this feature, here are some tips and best practices to keep in mind:
- Double-check your email before scheduling: Take advantage of the delayed send time to review your email one last time before it is sent. Make sure that the content is accurate, properly formatted, and free of any errors.
- Consider different time zones: If you’re scheduling an email to be sent to recipients in different time zones, consider their local time when choosing the send time. This way, you can ensure that your email is received at a convenient time for the recipient.
- Be mindful of holidays and weekends: Keep in mind that if you schedule an email to be sent during holidays or weekends, it may not receive immediate attention. Consider the appropriate timing for your message to ensure it receives the desired response.
- Test the feature: Before relying heavily on the delay or schedule email feature, send a test email to yourself or a trusted colleague to confirm that it is working as expected. This way, you can catch any issues or unexpected behavior before sending important emails.
- Be cautious with confidential or time-sensitive information: If you’re scheduling an email with sensitive or time-critical information, double-check that the email will be sent at the desired time. Make sure to avoid any potential delays or technical issues that may impact the timely delivery of the message.
- Have a backup plan: While the delay or schedule email feature is reliable, occasional technical glitches can occur. It’s a good practice to have a backup plan in case the email doesn’t send as expected. Consider following up with recipients through alternative means if the email isn’t received.
By following these tips and best practices, you can maximize the effectiveness and convenience of the delay or schedule email feature in Outlook. It allows you to have greater control over your communication and ensures that your emails are sent at the most appropriate times.