
Types of Groupings
When it comes to creating groups with Philips Hue, there are several types of groupings you can utilize. These groupings allow you to control multiple bulbs or rooms simultaneously, providing a convenient and streamlined experience. Let’s explore the different types of groupings you can set up:
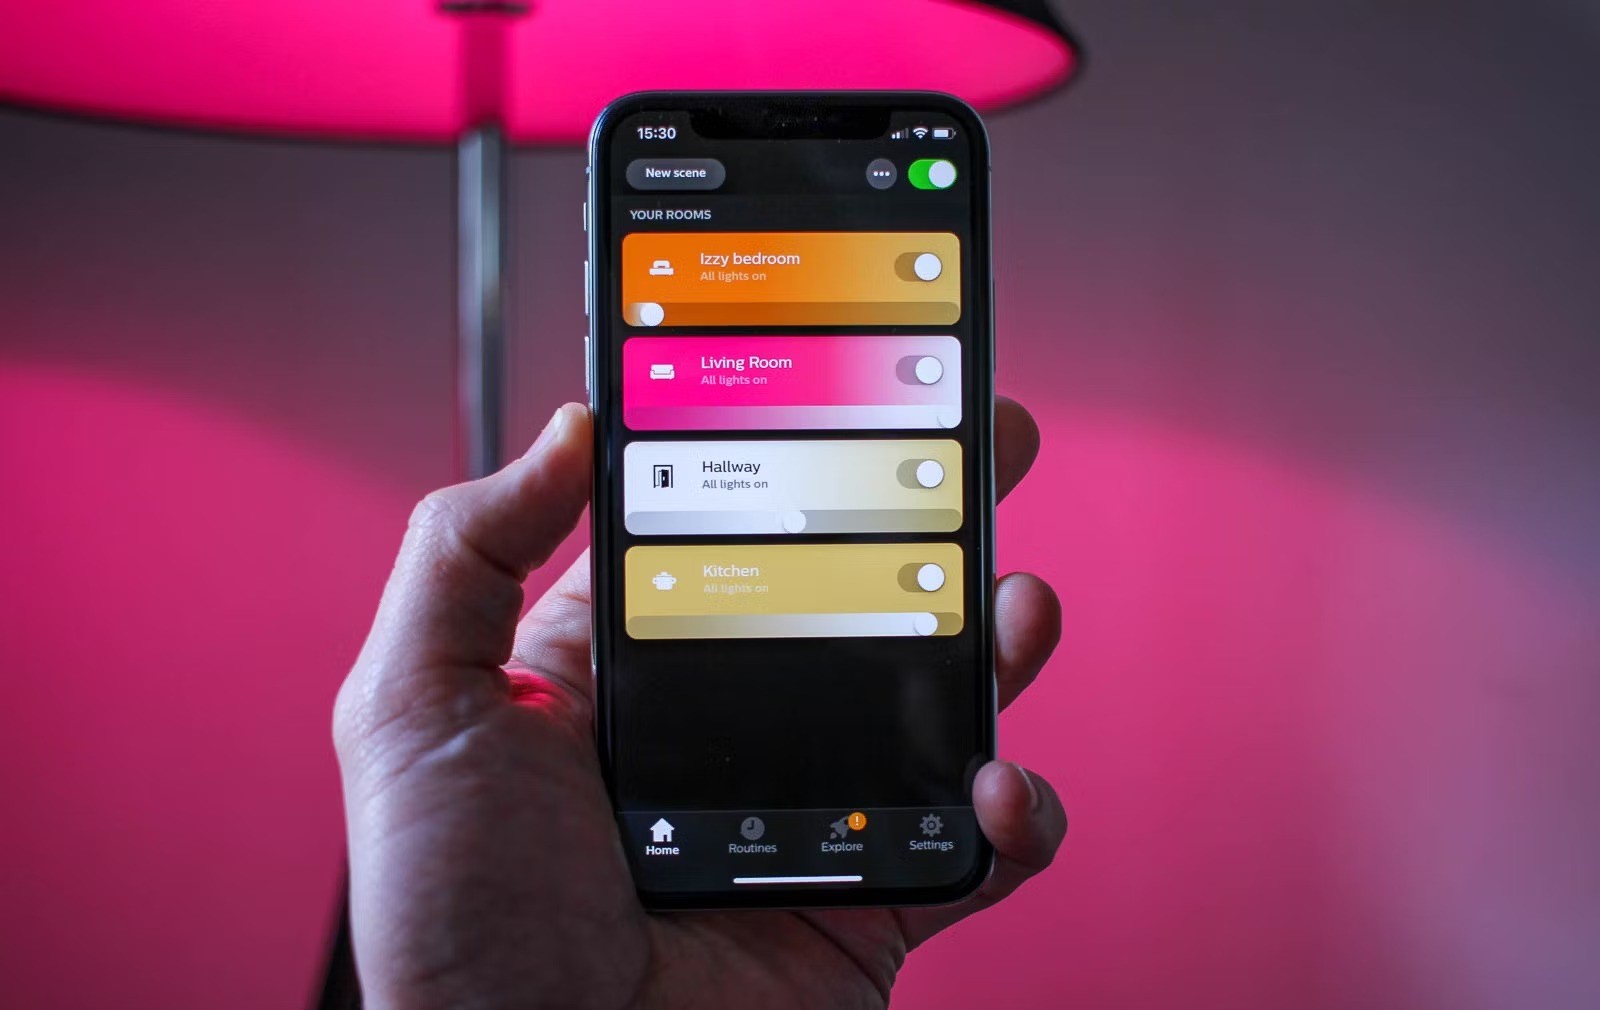
1. Room Groups: Room groups allow you to group together bulbs that are located in the same room. This is particularly useful if you want to control the lights in a specific area with a single command. For example, you can create a “Living Room” group that includes the lights in your living room, including the ceiling light and the lamps.
2. Zone Groups: Zone groups take grouping to the next level by allowing you to combine bulbs from different rooms. This is ideal for creating groups that span across multiple rooms or areas in your home. For instance, you can create a “Downstairs” zone group that includes the lights in your living room, kitchen, and hallway.
3. Entertainment Area Groups: Entertainment area groups are specifically designed for creating immersive lighting experiences while watching movies, playing games, or listening to music. These groups sync the lights with the media you’re enjoying, enhancing the overall ambiance and immersion. You can create an “Entertainment Area” group that includes the lights in your TV room and set it to sync with your favorite movie for a truly captivating experience.
4. Functionality-based Groups: Another way to group your lights is based on their functionality. You can create groups such as “Task Lighting” or “Ambient Lighting” to easily control specific types of lighting in your home. This allows you to adjust the brightness and color of different groups according to your needs.
With these different types of groupings, you can customize your lighting setup to suit your preferences and lifestyle. Whether you want to control lights in a single room, create zones across multiple rooms, set up an entertainment area, or group lights based on functionality, Philips Hue offers a versatile and intuitive solution.
Now that you’re familiar with the types of groupings available, let’s dive into the process of setting up a bridge and bulbs in the next section.
Setting up a Bridge and Bulbs
Before you can start creating groups with Philips Hue, you’ll need to set up a bridge and connect your bulbs to it. The bridge acts as the central hub, allowing you to control all your connected bulbs using the Hue app or voice commands. Here’s a step-by-step guide on how to set up a bridge and bulbs:
1. Install the Philips Hue Bridge: Begin by connecting the Hue Bridge to your home’s Wi-Fi router using the provided Ethernet cable. Then, plug in the power adapter to turn on the bridge. Make sure the bridge’s indicator lights are solid before moving on to the next step.
2. Download the Hue App: Install the Philips Hue app on your smartphone or tablet from the App Store or Google Play Store. Open the app once it’s installed.
3. Add Bulbs to the Bridge: On the app’s home screen, tap the “Set up new devices” option. Follow the on-screen instructions to search for and connect your bulbs to the bridge. Make sure the bulbs are turned on and in proximity to the bridge during this process.
4. Assign Locations: Once the bulbs are connected, you’ll be prompted to assign each bulb to a specific location or room in your home. This step is crucial for later grouping purposes.
5. Test the Setup: After assigning locations, the app will ask you to test the setup by turning the bulbs on and off. Confirm that each bulb responds correctly to the app’s commands.
6. Repeat for Additional Bulbs: If you have more bulbs to add, simply repeat steps 3 to 5 until all your bulbs are connected and assigned to their respective locations.
With your bridge set up and bulbs connected, you now have the foundation to start creating groups with Philips Hue. In the next sections, we’ll explore how to create different types of groups, customize group settings, and utilize third-party apps for advanced grouping features.
Creating a Room Group
Creating a room group with Philips Hue allows you to conveniently control the lights in a specific room or area of your home as a single entity. This makes it easy to turn on/off, adjust brightness, and change colors for all bulbs in the room with just a few taps. Here’s how you can create a room group:
1. Open the Hue App: Launch the Philips Hue app on your smartphone or tablet. Make sure you’re connected to the same Wi-Fi network as your Hue Bridge.
2. Navigate to the Rooms Section: In the app, go to the “Rooms” section, usually located in the bottom navigation menu. Here, you’ll see a list of available rooms or the option to create a new one.
3. Create a New Room: If you haven’t set up any rooms yet, tap the “New Room” button. Enter a name for the room, such as “Living Room” or “Kitchen”, and select the bulbs you want to include in the room group.
4. Select Existing Room: If you already have rooms set up, choose the room you want to turn into a room group. Tap on the room name to enter its settings.
5. Add Bulbs to the Room Group: In the room settings, you’ll find an option to add bulbs or lights. Tap on it and select the bulbs you want to include in the room group. You can choose from the list of available bulbs connected to your Hue Bridge.
6. Customize Room Group Settings: Within the room settings, you can further customize the behavior of the room group. This includes options such as adjusting default brightness, setting up color scenes, enabling or disabling color temperature changes, and more.
7. Save and Test the Room Group: Once you’ve added the desired bulbs and customized the settings, save the changes. Test the room group by using the on/off, brightness, and color controls in the app to ensure all the included bulbs respond correctly.
With your room group created, you can now easily control the lights in that specific area with a single tap. This provides convenience and efficiency when it comes to managing the lighting ambiance in each room of your home. In the next sections, we’ll explore how to create zone groups, customize group settings, and utilize third-party apps for advanced grouping features.
Adding Bulbs to a Room Group
Once you have created a room group with Philips Hue, you may want to add or remove bulbs from the group to customize your lighting setup. Whether you want to include new bulbs you’ve acquired or exclude bulbs that are no longer needed, adding or removing bulbs from a room group is a straightforward process. Here’s how you can add bulbs to a room group:
1. Open the Hue App: Launch the Philips Hue app on your smartphone or tablet. Ensure that you are connected to the same Wi-Fi network as your Hue Bridge.
2. Navigate to the Rooms Section: In the app, go to the “Rooms” section, typically found in the bottom navigation menu. Here, you’ll see a list of available rooms or the option to create a new one.
3. Select the Room Group: Choose the room group to which you want to add bulbs. Tap on the room name to enter its settings.
4. Edit the Room Group: Within the room settings, look for an option to edit or modify the room group. This option might be represented by an icon or a menu with additional settings.
5. Add New Bulbs: In the room group settings, you’ll find an option to add bulbs or lights. Tap on it, and a list of available bulbs connected to your Hue Bridge will appear. Select the bulbs you want to include in the room group.
6. Remove Bulbs: If you want to remove a bulb from the room group, you can do so by selecting the specific bulb in the room group settings. Look for an option to remove or exclude the bulb from the group.
7. Save Changes: Once you have added or removed the desired bulbs from the room group, save the changes made to the settings.
Adding or removing bulbs is a simple way to customize your room group according to your evolving lighting needs. Whether you want to expand the group’s coverage or fine-tune the ambiance, the flexibility of Philips Hue allows you to easily adjust your lighting setup. In the next sections, we’ll explore how to customize room group settings, create zone groups, and utilize third-party apps for advanced grouping features.
Customizing Room Group Settings
One of the key benefits of creating room groups with Philips Hue is the ability to customize their settings. By customizing room group settings, you can tailor the lighting experience in each room to suit your preferences and create the desired ambiance. Here are some ways to customize your room group settings:
1. Default Brightness: Adjust the default brightness level for all the bulbs in the room group. You can set a specific brightness percentage that will be applied whenever you turn on the room group.
2. Color Scenes: Create and save custom color scenes for your room group. This allows you to easily switch between different lighting moods or presets with a single tap. For example, you can have a “Relaxation” scene with warm, soothing colors and a “Productivity” scene with bright, cool colors tailored to specific activities.
3. Color Temperature Changes: Enable or disable automatic color temperature changes. With this feature, the bulbs in the room group will adjust their color temperature depending on the time of day. This can help create a more natural and comfortable lighting experience throughout the day.
4. Dimming Options: Customize the dimming behavior of the bulbs when adjusting brightness. You can choose between gradual dimming or instantaneous changes based on your preference.
5. Grouping Behavior: Fine-tune how the bulbs in the room group behave together. Options may include synchronized on/off, synchronized color changes, or independent control for each bulb.
6. Voice Assistant Integration: If you have a voice assistant device, such as Amazon Echo or Google Home, you can integrate it with your Philips Hue system. This allows you to control the room group using voice commands, making it even more convenient to change the lighting settings.
7. Advanced Settings: Depending on the specific features of your Philips Hue system, you may have access to additional advanced settings for room groups. Explore the app’s settings menu to discover options like dynamic scenes, color looping, or synchronization with other smart home devices.
By customizing your room group settings, you can create a personalized and immersive lighting experience in each room of your home. Experiment with different settings to find the perfect ambiance for relaxation, productivity, or any other purpose. In the next sections, we’ll explore how to create zone groups, set up an entertainment area group, and utilize third-party apps for advanced grouping features.
Using the Hue App to Create a Group
The Philips Hue app offers a user-friendly interface that allows you to easily create and manage groups for your smart lighting setup. With just a few taps, you can create groups to control multiple bulbs or rooms simultaneously. Here’s how to use the Hue app to create a group:
1. Launch the Hue App: Open the Philips Hue app on your smartphone or tablet. Ensure that you are connected to the same Wi-Fi network as your Hue Bridge.
2. Navigate to the Groups Section: In the app, go to the “Groups” section, usually located in the bottom navigation menu. Here, you’ll find the option to create a new group or manage existing ones.
3. Create a New Group: If you haven’t set up any groups yet, tap the “New Group” button. Enter a name for the group, such as “Living Room” or “Bedroom”, to easily identify it.
4. Select Bulbs or Rooms: In the group creation screen, you’ll be prompted to select the bulbs or rooms you want to include in the group. You can choose from the list of available bulbs connected to your Hue Bridge or select entire rooms that you have previously set up.
5. Customize Group Settings: Once you’ve chosen the bulbs or rooms to include, you can further customize the group settings. Adjust the group’s default brightness, set up color scenes, or enable specific behaviors for the group, such as synchronized on/off or simultaneous color changes.
6. Save the Group: After customizing the group settings, save the group by tapping the “Save” or “Done” button. The newly created group will now appear in your list of groups in the Hue app’s “Groups” section.
7. Test and Control the Group: Test the group by using the app’s controls to turn the bulbs on/off, adjust brightness, or change colors. You can also use voice commands with compatible voice assistant devices to control the group.
Using the Hue app to create a group provides a convenient way to control multiple bulbs or rooms with ease. Whether you want to control the lights in a specific area or synchronize the lighting throughout your home, the Hue app empowers you to customize and manage your groups effortlessly. In the next sections, we’ll explore how to create zone groups, set up an entertainment area group, and utilize third-party apps for advanced grouping features.
Creating a Zone Group
In addition to room groups, Philips Hue also allows you to create zone groups, which enable you to combine bulbs from different rooms. This provides a convenient way to control multiple rooms or areas of your home simultaneously. To create a zone group with Philips Hue, follow these steps:
1. Open the Hue App: Launch the Philips Hue app on your smartphone or tablet. Ensure that you are connected to the same Wi-Fi network as your Hue Bridge.
2. Navigate to the Groups Section: In the app, go to the “Groups” section, typically located in the bottom navigation menu. Here, you can manage your existing groups or create a new one.
3. Create a New Group: If you haven’t set up any zone groups yet, tap the “New Group” button. Enter a name for the zone group to identify it easily, such as “Downstairs” or “Upstairs”.
4. Select Bulbs or Rooms: In the group creation screen, you have the option to select the bulbs or rooms to include in the zone group. You can choose individual bulbs from different rooms or select entire rooms that you have already set up.
5. Customize Group Settings: Once you’ve chosen the bulbs or rooms to include, you can customize the settings for the zone group. Adjust the default brightness, set up color scenes, or enable specific behaviors for the group to create the desired lighting experience.
6. Save the Group: After customizing the settings, save the zone group by tapping the “Save” or “Done” button. The newly created zone group will now appear in your list of groups in the Hue app’s “Groups” section.
7. Control the Zone Group: Test the zone group by using the app’s controls to turn the included bulbs on or off, adjust brightness, or change colors. You can also use voice commands with compatible voice assistant devices to control the zone group.
With zone groups, you can seamlessly control multiple rooms or areas of your home, allowing for a cohesive lighting experience. Whether you want to create an “Upstairs” zone group or a “Whole House” zone group, Philips Hue provides the flexibility to customize your lighting setup according to your needs. In the next sections, we’ll explore how to configure zone group settings, group lights based on functionality, and create an entertainment area group.
Configuring Zone Group Settings
Once you’ve created a zone group with Philips Hue, you can further customize its settings to enhance the lighting experience across multiple rooms or areas of your home. Configuring zone group settings allows you to fine-tune the behavior and characteristics of the grouped bulbs. Here are some key settings you can adjust for your zone group:
1. Default Brightness: Set the default brightness level for all the bulbs in the zone group. You can choose a specific brightness percentage that will be applied when the zone group is turned on.
2. Color Scenes: Create and save custom color scenes for your zone group. These scenes enable you to easily switch between different lighting moods or presets with a single tap. For example, you can have a “Party” scene with vibrant colors or a “Movie Night” scene with dimmed lighting.
3. Color Temperature Changes: Enable or disable automatic color temperature changes for the bulbs in the zone group. With this setting, the bulbs adjust their color temperature based on the time of day, providing a more natural lighting experience.
4. Dimming Behavior: Customize how the bulbs in the zone group dim or brighten. You can choose between gradual dimming, which simulates the transition of natural sunlight, or instant changes for immediate adjustments in lighting levels.
5. Grouping Behavior: Fine-tune how the bulbs in the zone group behave together. This includes options such as synchronized on/off, synchronized color changes, or independent control for each bulb in the group.
6. Voice Assistant Integration: Integrate your zone group with a compatible voice assistant device, such as Amazon Echo or Google Home. This allows you to control the zone group with voice commands for hands-free convenience.
7. Advanced Settings: Explore additional advanced settings, if available, for your zone group. These settings may include features such as dynamic scenes, color looping, or integration with other smart home devices.
By configuring the zone group settings, you can create a customized and immersive lighting experience that spans multiple rooms or areas of your home. Experiment with different settings to find the perfect atmosphere for various activities or moods. In the next sections, we’ll explore how to group lights based on functionality, create an entertainment area group, and troubleshoot grouping issues.
Grouping Lights based on Functionality
Besides grouping lights by rooms or zones, Philips Hue also allows you to create groups based on functionality. This means you can group lights together based on their specific purpose or the desired lighting effect. Grouping lights based on functionality offers greater flexibility and control over your lighting setup. Here’s how you can group lights based on their functionality:
1. Identify Functional Categories: Start by identifying the different functional categories for your lights. Consider the specific purposes or effects you want to achieve. For example, you may have lights for task lighting, ambient lighting, accent lighting, or outdoor lighting.
2. Create Functional Groups: In the Philips Hue app, navigate to the “Groups” section and select the option to create a new group. Give the group a name that reflects its functionality, such as “Task Lighting” or “Ambient Lighting.”
3. Select Bulbs for the Group: Choose the bulbs you want to include in the functional group. You can select individual bulbs from different rooms or zones to customize the lighting setup according to your needs.
4. Customize Group Settings: Adjust the settings for the functional group, such as brightness, color, and color temperature. This allows you to fine-tune the lighting characteristics to achieve the desired effect for each functional group.
5. Save the Group: Once you’ve customized the settings, save the group. The functional group will now appear in your list of groups, and you can access it to control the lights within that specific category.
6. Control and Automate: Use the app’s controls to turn on/off, adjust brightness, or change colors for the functional group. Additionally, you can automate the group’s behavior by setting up routines or schedules to activate the lights at specific times or trigger them based on other events.
Grouping lights based on functionality allows you to create a tailored lighting experience for different activities or moods. Whether you want focused lighting for work, subtle ambient lighting for relaxation, or vibrant accent lighting to highlight certain areas, Philips Hue enables you to customize your lighting setup according to your needs. In the next sections, we’ll explore how to create an entertainment area group, sync lights with music or video, and automate group actions with routines.
Creating an Entertainment Area Group
Creating an entertainment area group with Philips Hue allows you to sync your lights with music, movies, or video games, elevating your viewing or gaming experience to a whole new level. By creating an entertainment area group, you can immerse yourself in dynamic and synchronized lighting effects that complement the media you’re enjoying. Here’s how you can create an entertainment area group:
1. Open the Hue App: Launch the Philips Hue app on your smartphone or tablet. Ensure that you are connected to the same Wi-Fi network as your Hue Bridge.
2. Navigate to the Rooms or Groups Section: In the app, go to either the “Rooms” or “Groups” section, depending on whether you want to create the entertainment area within a specific room or across multiple rooms.
3. Create a New Room or Group: If you haven’t set up the room or group for the entertainment area yet, tap the “New Room” or “New Group” button to create the desired space.
4. Customize the Room or Group Settings: Within the room or group settings, you’ll find options to enable entertainment features. Look for options that allow you to sync lights with music, movies, or games. Depending on the capabilities of your Hue system, you might also have additional effects or settings to choose from.
5. Test the Configuration: After customizing the settings, test the entertainment area group by playing music, a movie, or a video game. Observe how the lights respond and synchronize with the media. Make adjustments to the settings as necessary to achieve the desired effect.
6. Save the Configuration: Once you’re satisfied with the setup, save the configuration for the entertainment area group. The group will now be available for you to control and enjoy synchronized lighting effects with your media.
Creating an entertainment area group with Philips Hue adds a new dimension to your media viewing or gaming experience. Whether you’re hosting a movie night, setting the mood for a party, or simply enjoying your favorite tunes, the synchronized lighting effects enhance the ambiance and immersion. In the next sections, we’ll explore how to sync lights with music or video, automate group actions with routines, and troubleshoot grouping issues if they arise.
Syncing Lights with Music or Video
Syncing your Philips Hue lights with music or video allows you to create a captivating and immersive lighting experience that is synchronized with the audio or visual content you’re enjoying. By syncing your lights, you can enhance the mood, rhythm, and atmosphere of your music or video playback. Here’s how you can sync your Philips Hue lights with music or video:
1. Choose a Sync App: There are several third-party apps available that specialize in syncing your Philips Hue lights with music or video. Explore the app store on your smartphone or tablet to find apps that offer this functionality, such as “Hue Sync” or “Hue Disco”.
2. Install and Set Up the Sync App: Download and install the sync app of your choice on your device. Follow the app’s instructions to set it up, ensuring that it is connected to your Philips Hue Bridge and has the necessary permissions to control your lights.
3. Select the Lights and Effects: In the sync app, choose the specific Philips Hue lights you want to sync with the music or video. You can select individual lights or groups that you have previously set up.
4. Set the Sync Mode: Depending on the app you’re using, you may have different options for sync modes. These can include rhythm-based syncing, where the lights respond to the beat of the music, or color gradients that change based on the visuals in the video.
5. Start Playing Music or Video: Begin playing your music or video content through the sync app or your preferred media player. The sync app will analyze the audio or video feed and generate lighting effects that sync with the content.
6. Enjoy the Synchronized Lighting: Sit back and enjoy the synchronized lighting effects as they change and adapt in real-time with the music or video. Notice how the lights enhance the mood and create a more immersive experience.
Syncing your Philips Hue lights with music or video amplifies the sensory experience and brings an extra element of excitement to your music listening or video viewing. Whether you’re hosting a party, relaxing with your favorite movie, or simply enjoying a dance session, the synchronized lighting effects add a dynamic and engaging touch to your entertainment. In the next sections, we’ll explore how to automate group actions with routines, troubleshoot grouping issues, and expand groupings with additional bridges if needed.
Automating Group Actions with Routines
With Philips Hue, you can automate group actions using routines. Routines allow you to create a predefined set of actions or behaviors for your groups based on specific triggers or schedules. This automation feature enhances your smart lighting setup by making it effortless to control and manage your groups. Here’s how you can automate group actions with routines:
1. Open the Hue App: Launch the Philips Hue app on your smartphone or tablet. Make sure you are connected to the same Wi-Fi network as your Hue Bridge.
2. Navigate to the Routines Section: In the app, go to the “Routines” or “Automations” section, typically located in the bottom navigation menu. Here, you can create and manage your routines.
3. Create a New Routine: Tap on the option to create a new routine. Enter a name for the routine to help you identify its purpose, such as “Morning Wake-Up” or “Goodnight Routine”.
4. Select the Trigger: Choose the trigger that will activate the routine. Triggers can include specific times of the day, sunrise or sunset, physical switches, voice commands, or even presence detection using motion sensors.
5. Set the Actions: Define the actions you want the routine to perform on the group. This may include turning on or off the lights, adjusting brightness, changing colors, or activating specific scenes. You can choose to apply the actions to a single group or multiple groups simultaneously.
6. Customize Additional Settings: Depending on the routine, you may have additional settings to customize. This can include setting a duration for the routine, adding delay periods between actions, or specifying which days of the week the routine should run.
7. Save and Activate the Routine: Once you’re satisfied with the routine’s settings, save it. You can then activate the routine manually or set it to run automatically based on the trigger you defined.
Automating group actions with routines not only simplifies the process of controlling your lights but also adds a layer of convenience to your daily routine. Whether it’s to gradually wake you up in the morning or create a cozy atmosphere in the evening, routines allow you to effortlessly set the desired lighting ambiance for different moments of the day. In the next sections, we’ll explore how to troubleshoot grouping issues, expand groupings with additional bridges, and utilize third-party apps for advanced grouping features.
Troubleshooting Grouping Issues
While creating and managing groups with Philips Hue is generally a seamless process, you may encounter occasional grouping issues that can disrupt the functionality of your smart lighting setup. Fortunately, there are several troubleshooting steps you can take to resolve these issues. Here are some common grouping issues and their solutions:
1. Unresponsive Bulbs: If you have bulbs within a group that are unresponsive or not performing as expected, try the following steps:
– Ensure that the bulbs are properly connected to your Hue Bridge and have power.
– Check for any firmware updates for your bulbs and bridge and install them if available.
– Perform a reboot of your Hue Bridge by disconnecting and reconnecting the power.
– Reset the unresponsive bulbs by turning them off and on several times, or follow the specific reset instructions provided by Philips Hue.
– Remove and re-add the bulbs to the group, ensuring they are properly assigned.
2. Grouping Errors: If you encounter errors while creating or editing groups, follow these troubleshooting steps:
– Check your mobile device’s connection to the same Wi-Fi network as your Hue Bridge.
– Ensure that your Hue Bridge is properly connected to your home’s Wi-Fi network.
– Restart the Philips Hue app and attempt to create or edit the group again.
– If the issue persists, try uninstalling and reinstalling the Philips Hue app.
3. Syncing or Delay Issues: If you experience syncing or delay issues with your grouped lights, consider the following solutions:
– Verify that all bulbs are within close proximity to the Hue Bridge and have a strong connection.
– Check for any interference from other wireless devices that may affect communication between the bulbs and the bridge.
– Ensure that your Hue Bridge is up to date with the latest firmware to optimize communication and synchronization.
– Adjust the settings for syncing or delays within the relevant app or routine if available.
4. Bridge Connectivity Problems: If you’re facing connectivity problems with your Hue Bridge, try these troubleshooting steps:
– Check the power and Ethernet connections of your Hue Bridge to ensure they are secure.
– Verify that your home Wi-Fi network is functioning properly and try resetting your router if necessary.
– Restart your smart home hub, if applicable, as it may assist in re-establishing connectivity with the Hue Bridge.
If the aforementioned troubleshooting steps do not resolve your grouping issues, consult the Philips Hue support documentation or reach out to their customer support for further assistance. By addressing and resolving these grouping issues, you can ensure a smooth and optimized lighting experience with your Philips Hue system.
Expanding Groupings with Additional Bridges
As your smart lighting setup with Philips Hue grows, you may find the need to expand your groupings beyond the capabilities of a single Hue Bridge. Fortunately, Philips Hue allows you to add additional bridges to your system, providing a seamless way to extend your grouping capabilities. Here’s how you can expand your groupings with additional bridges:
1. Assess the Need for Additional Bridges: Evaluate your grouping needs and determine if the current capabilities of your Hue Bridge are sufficient. Consider factors such as the number of bulbs, rooms, or zones you want to include in your groupings.
2. Obtain and Set Up Additional Bridges: Purchase additional Hue Bridges as needed and follow the setup instructions provided by Philips Hue. This typically involves connecting the bridge to your home’s Wi-Fi router and configuring it using the Philips Hue app.
3. Divide the Groupings: Once you have multiple bridges set up, divide your existing groupings among them. This can be done by assigning specific bulbs, rooms, or zones to different bridges, ensuring an even distribution based on your preferences or the proximity of the bulbs to each bridge.
4. Create Bridge-specific Groups: In the Philips Hue app, create separate groups for each bridge. This ensures that you can control the bulbs connected to each bridge individually and as part of their respective groups.
5. Customize and Control: Customize the settings and behavior for the groups associated with each bridge. You can set specific brightness levels, color scenes, or other features to create the desired ambiance for each bridge-specific grouping.
6. Utilize App Controls: Use the Philips Hue app to control and manage each bridge-specific group. You can turn the groups on or off, adjust brightness, change colors, and other operations directly from the app.
7. Consider Third-Party Apps: Explore third-party apps that offer advanced grouping features and bridge compatibility. These apps may provide additional capabilities, such as syncing lights across multiple bridges or creating unified scenes across all bridges.
By adding additional bridges to your Philips Hue system, you can expand your groupings and seamlessly control a larger number of bulbs, rooms, or zones. This ensures a more versatile and comprehensive smart lighting setup to suit your evolving needs. In the next section, we’ll explore how to utilize third-party apps for advanced grouping features and experiences.
Utilizing Third-Party Apps for Advanced Grouping Features
Besides the native Philips Hue app, there are various third-party apps available that offer advanced grouping features and functionalities to enhance your smart lighting experience. These apps provide additional options for creating and managing groups, as well as offering advanced controls and customization. Here’s how you can utilize third-party apps to unlock advanced grouping features:
1. Explore App Options: Browse through the app store on your smartphone or tablet to discover third-party apps specifically designed for Philips Hue. These apps may offer a range of features and capabilities for creating and managing groups beyond what is available in the native Philips Hue app.
2. Install and Set Up: Download and install the third-party app of your choice. Follow the app’s instructions to set it up, ensuring it is connected to your Philips Hue Bridge and has the necessary permissions to control your lights.
3. Discover Advanced Grouping Features: Explore the additional features and capabilities offered by the third-party app. This may include options for creating more complex group structures, advanced synchronization with music or video, or the ability to create custom rules and actions for your groups.
4. Create Customized Groupings: Utilize the advanced grouping features of the app to create personalized and intricate groupings. These may include custom scenes, dynamic effects, or specialized group behaviors that go beyond the standard options available in the native Philips Hue app.
5. Sync with Other Smart Home Devices: Some third-party apps may offer integration with other smart home devices and platforms. This allows you to create cross-device/group automations or synchronize your Philips Hue groupings with other systems or routines.
6. Experience Enhanced Controls: Take advantage of the advanced controls and customization options provided by the third-party app. This may include finer control over color settings, transitions, brightness adjustments, or the ability to create complex lighting scenes with multiple groups or zones.
7. Stay Updated: Keep an eye out for updates and new features released by the app developers. Third-party apps are continually evolving, and new enhancements may become available that further expand your grouping capabilities and improve your smart lighting experience.
Using third-party apps can elevate your Philips Hue grouping experience by offering unique features and functionalities not found in the native app. These apps provide a platform for advanced customization, synchronization with other devices, and greater control over your lighting setup. By exploring and utilizing these apps, you can unlock a whole new world of possibilities for your smart lighting system.
Tips and Tricks for Grouping with Philips Hue
When it comes to grouping with Philips Hue, these tips and tricks can help you optimize your smart lighting setup and enhance your overall experience:
1. Plan Your Groupings: Before creating groups, plan out the different areas or functionalities you want to control. Consider how you want to interact with your lights and organize them accordingly.
2. Assign Clear and Descriptive Names: Give your groups meaningful and descriptive names that make it easy to identify their purpose. This will simplify navigation and control when managing multiple groups.
3. Experiment with Scenes: Take advantage of scene functionality to create preset lighting combinations for different groupings. Experiment with different colors, brightness levels, and effects to set the mood for various activities or occasions.
4. Fine-Tune Brightness Levels: Adjust the default brightness levels for your groups to suit your preferences. Consider setting lower default brightness levels for nighttime or relaxation areas, and higher levels for task-oriented areas.
5. Automate with Sensors: Incorporate motion sensors or other smart home devices into your groups to automate lighting based on occupancy or time of day. This can help save energy and create a seamless lighting experience.
6. Sync with Voice Assistants: Integrate your groups with voice assistant devices, such as Amazon Echo or Google Home, to control your lighting with simple voice commands. This adds convenience and hands-free control to your smart lighting setup.
7. Utilize Scheduling: Set up schedules to automatically turn groups on or off at specific times. This is particularly useful for creating routines for waking up, winding down, or leaving the house.
8. Combine Groups for Synced Effects: Combine multiple groups and sync their lighting effects for a unified and immersive experience. This can be especially effective when creating entertainment areas or when using music or video syncing apps.
9. Seek Inspiration from the Community: Explore online forums, social media groups, or Philips Hue’s official community to gather inspiration and tips from other users. Share your own experiences and learn from the creative approaches of fellow smart lighting enthusiasts.
10. Regularly Update Firmware: Ensure that your Hue Bridge, bulbs, and any other related devices are kept up to date with the latest firmware. This helps ensure compatibility, stability, and access to the latest features and improvements.
By implementing these tips and tricks, you can take full advantage of the grouping capabilities offered by Philips Hue. Whether it’s creating personalized lighting scenes, automating with sensors, or syncing with voice assistants, these optimizations will help you create a truly immersive and tailored smart lighting experience in your home.