
Why Email Signatures Are Important
Email signatures may seem like a small detail, but they play a significant role in personal and professional communication. An email signature is a block of text that is appended to the end of an email message. It typically contains your name, job title, contact information, and other relevant details.
One of the main reasons why email signatures are important is that they provide a professional and polished appearance. By including a well-designed signature, you can make a positive impression on your recipients and convey a sense of professionalism. It shows that you take your communication seriously and pay attention to the details.
Another benefit of email signatures is that they serve as a digital business card. They provide a convenient way for your contacts to find your contact information with just a glance. Instead of having to search through their inbox or contact list for your details, they can easily find your name, phone number, and website right in the signature. This saves time and effort for both parties involved.
Email signatures also offer a platform for personal branding. By including links to your social media profiles or website, you can promote your personal or professional brand. This allows recipients to learn more about you or your business and potentially connect with you on other platforms.
Furthermore, email signatures can improve communication efficiency. By including important information in the signature, such as your phone number or office hours, you can reduce back-and-forth emails asking for basic details. This can help streamline communication and facilitate quick and efficient responses.
In addition, email signatures can be used as a marketing tool. If you have a company logo or banner, including it in your signature can help enhance brand recognition and awareness. You can also leverage your signature to promote upcoming events, product launches, or special offers. By adding a call-to-action or a link to your latest blog post, you can drive traffic to your website or increase engagement with your content.
In summary, email signatures are a crucial component of professional communication. They provide a polished appearance, serve as a convenient digital business card, allow for personal branding, improve communication efficiency, and can be used for marketing purposes. By creating a well-crafted signature, you can make a positive impression and enhance your overall email communication.
Step 1: Open the Mail App
If you’re using an iOS device, such as an iPhone or iPad, the first step in creating an email signature is to open the Mail app. This app comes pre-installed on your device and is the default email client for iOS.
To open the Mail app, simply locate the app icon on your home screen. The icon features a white envelope against a blue background. Tap on the icon to launch the app.
Once you open the Mail app, you will be taken to your inbox, where you can see all your received emails. From here, you can access the settings and make the necessary changes to create your email signature.
It’s important to note that the steps mentioned below may vary slightly depending on the version of iOS you’re using, but the general process remains the same.
If you’re using an older version of iOS, you may need to tap on the “Settings” icon on your home screen to access the Mail settings. From there, you can follow the steps outlined below.
Note: If you haven’t set up your email account on your iOS device yet, you will need to do so before proceeding with creating an email signature. Make sure you have added the relevant email account to the Mail app before continuing.
With the Mail app open and your email account set up, you’re ready to move on to the next step to create your email signature.
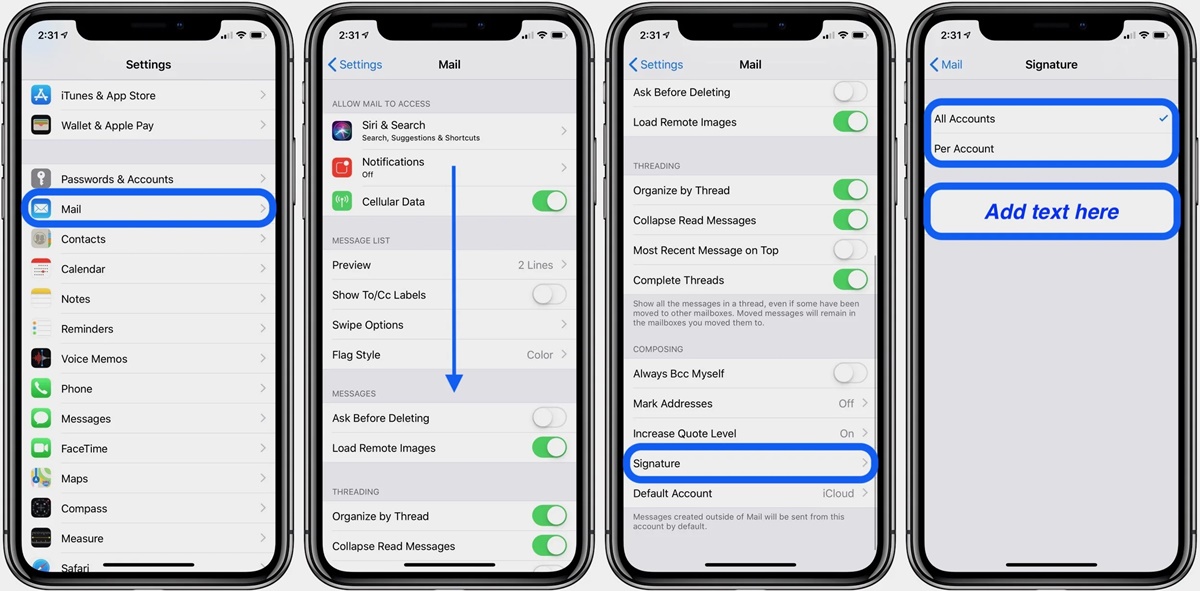
Step 2: Access the Settings
In order to customize your email signature in the iOS Mail app, you’ll need to access the settings specific to the email account you wish to modify. Here’s how you can access the settings:
1. Launch the Mail app on your iOS device.
2. At the bottom right corner of the screen, tap on the “Mailboxes” option. This will take you to the main mailboxes view.
3. Next, tap on the “Back” button located at the top left corner of the screen. This will reveal the menu options for your different email accounts.
4. Tap on the name of the email account for which you want to create or modify the signature. This will take you to the inbox for that specific account.
By accessing the settings of a specific email account, you can make changes to its individual preferences, including the email signature. It’s worth noting that each email account on your iOS device can have a unique signature, allowing you to customize the signature for your personal and professional accounts separately.
Once you’ve accessed the settings for the desired email account, you’re ready to proceed to the next step – selecting the “Signature” option.
Step 3: Select “Mail”
After accessing the settings of the specific email account in the iOS Mail app, the next step is to select the “Mail” option. This will allow you to customize various settings related to your email account, including the email signature. To select “Mail”, follow these steps:
1. On the account-specific settings page, scroll down until you find the section labeled “Mail Settings” or simply “Mail” (depending on your iOS version).
2. Tap on the “Mail” option to enter the settings for your email account.
3. You will now see a list of different settings related to your email account. These settings may include options such as “Preview”, “Swipe Options”, and more.
4. Look for the option labeled “Signature” and tap on it. This is where you can create and customize your email signature for this specific account.
By selecting the “Mail” option, you are accessing the settings that are specific to the email functionality of your account. This allows you to make modifications to your email signature, configure other email-related options, and personalize your email settings to suit your preferences.
Once you have selected “Mail”, you are now ready to move on to the next step and create a new signature or edit an existing one.
Step 4: Choose “Signature”
After selecting “Mail” in the settings of your specific email account in the iOS Mail app, the next step is to choose the “Signature” option. This step allows you to create, modify, and manage your email signature. Follow these steps to choose “Signature”:
1. Once you have entered the settings for your email account, scroll down until you find the section labeled “Signature.” This section is where you can customize your email signature.
2. Tap on the “Signature” option to enter the signature settings for your email account. This will open a new screen dedicated to managing your email signature.
3. On this screen, you will see the current signature, if one has already been created. You can choose to edit this existing signature or create a new one by tapping on the “New Signature” or “Edit” option.
By choosing the “Signature” option, you are accessing the specific settings related to your email signature. This is where you can customize the text, format, and style of your signature to make it unique and personalized. In this step, you have the flexibility to create multiple signatures for different purposes, such as personal and professional emails.
Once you’ve chosen “Signature,” you’re ready to proceed to the next step – creating or modifying your email signature to reflect your desired information and branding.
Step 5: Create a New Signature
After choosing the “Signature” option in the settings of your specific email account in the iOS Mail app, the next step is to create a new signature. This allows you to customize the content and layout of your email signature. Here’s how you can create a new signature:
1. If you have chosen the “New Signature” option, you will be prompted to enter a name for your new signature. This name is for your reference and can be anything you like, such as “Personal” or “Work”.
2. Once you have entered a name, tap on the “OK” or “Save” button to proceed.
3. Now, you will be taken to a text editing screen where you can compose your new email signature. Use the on-screen keyboard to enter the desired text for your signature.
4. You can include various details in your signature, such as your name, job title, company name, contact information, website URL, and social media handles. Ensure that the information you include is relevant and professional.
5. To format the text, you can use the options available on the text editing toolbar. These options allow you to change the font, size, style (bold, italic, etc.), and alignment of the text.
6. If you want to add a horizontal line or separator, you can do so by using the available options in the text editing toolbar or by typing a series of dashes or asterisks followed by a new line.
7. It’s also possible to add a personal touch to your signature by adding a quote or a short message that reflects your personality or brand.
8. Once you have finished creating your new signature, tap on the “Save” or “Done” button to save it.
By creating a new signature, you have the freedom to express your personal or professional identity in your email communications. Take the time to craft a signature that is informative, visually appealing, and reflects your unique style.
In the next step, you will learn how to customize your signature by adding images, logos, and formatting to make it even more visually appealing and functional.
Step 6: Customize Your Signature
After creating a new signature in the iOS Mail app, the next step is to customize it to make it more visually appealing and functional. Here’s how you can customize your signature:
1. Start by going to the signature settings for your email account in the Mail app as mentioned in the previous steps.
2. Tap on the signature you want to customize – either the new signature you created or an existing one if you want to make changes.
3. Once you are in the text editing screen, you can customize your signature by adding formatting such as bold, italics, or underlined text. Use the text editing toolbar to apply these formatting options.
4. Adjust the font size and font type to make your signature visually consistent with your personal or professional style.
5. To add a hyperlink to your email signature, select the text you want to link and tap the “Link” option on the toolbar. Enter the URL or choose a saved contact from your device’s address book.
6. If you want to add an image or logo to your signature, tap on the “+” icon on the right side of the text editing toolbar. You will be given the option to insert a photo or use the Markup tool to draw or add a signature using your finger or Apple Pencil.
7. Resize and position the inserted image or logo according to your preference.
8. Once you have customized your signature, tap on the “Save” or “Done” button to save your changes.
Customizing your signature allows you to make it more visually appealing and tailored to your personal or professional brand. By applying formatting options, adding hyperlinks, and incorporating images or logos, you can create a signature that stands out and leaves a lasting impression on your recipients.
In the next step, you will learn how to add images or logos to your email signature to further enhance its visual impact and brand representation.
Step 7: Add Images or Logos
Adding images or logos to your email signature can significantly enhance its visual impact and help reinforce your personal or professional brand. Follow these steps to add images or logos to your signature:
1. Open the signature settings for your email account in the iOS Mail app.
2. Select the signature you want to modify or create a new one if you haven’t already.
3. In the text editing screen, tap on the “+” icon on the right side of the toolbar. This will give you options for adding elements to your signature.
4. Choose the “Insert Photo” option to select an image from your device’s photo library. You can also choose the “Markup” option if you want to draw or add a signature using your finger or Apple Pencil.
5. Select the desired image or use the Markup tool to create the desired element.
6. Resize and position the inserted image or logo within your signature.
7. To ensure the image or logo is displayed correctly across different email clients and devices, it’s recommended to optimize the image size and resolution. Images that are too large can result in slower loading times and may not display properly for recipients.
8. Once you are satisfied with the placement and appearance of the image or logo, tap on the “Save” or “Done” button to save your changes.
By adding images or logos to your email signature, you can create a visually appealing and professional representation of yourself or your brand. It helps in building recognition and making your signature stand out among the vast number of emails that recipients receive.
Remember to choose high-quality images or logos that reflect your personal or professional image. Avoid using overly large or complex images that may distract or overwhelm recipients. Keep in mind that some email clients may block images by default, so it’s essential to have a well-designed signature that still looks attractive even without the images.
In the next step, you will learn how to format your email signature to ensure it is visually appealing and consistently represents your personal or professional brand.
Step 8: Format Your Signature
Formatting your email signature is crucial to ensure it is visually appealing, easy to read, and consistent with your personal or professional brand. Follow these steps to format your signature in the iOS Mail app:
1. Open the signature settings for your email account in the Mail app.
2. Select the signature you want to format or create a new one if needed.
3. In the text editing screen, use the options available on the toolbar to format your signature.
4. Adjust the font size, style, and color to achieve the desired look. Consider using a legible font that reflects your brand or personal style.
5. Ensure that the spacing between lines and paragraphs is consistent and visually appealing. Use line breaks or the paragraph format option to separate different sections of your signature.
6. Use bullet points or numbering for lists to make your contact information or other details more organized and easily scannable.
7. If you want to add emphasis to certain parts of your signature, consider using bold or italic formatting sparingly. This can help draw attention to important details or keywords.
8. Keep your signature concise and avoid overwhelming it with excessive text or unnecessary information. Focus on including key details such as your name, job title, contact information, and links to relevant websites or social media profiles.
By formatting your email signature, you can create a visually appealing and professional representation of yourself or your brand. Consistency in font, spacing, and formatting elements will help convey a sense of coherence and attention to detail.
Remember to consider the recipient’s viewing experience across different devices and email clients. Be mindful of the use of colors, as some may not display correctly or may be more difficult to read on certain devices or backgrounds.
Once you are satisfied with the formatting of your signature, tap on the “Save” or “Done” button to save your changes.
In the next step, you will learn how to apply your signature to all email accounts on your iOS device to ensure consistent branding and information in your emails.
Step 9: Apply the Signature to All Accounts
To ensure consistent branding and information in your emails, it’s recommended to apply your signature to all of your email accounts on your iOS device. Follow these steps to apply the signature to all accounts:
1. Open the signature settings for one of your email accounts in the iOS Mail app.
2. Make sure you have created and customized the desired signature for this account.
3. Copy the signature by selecting all of its content or tapping on the “Copy” option available in the text editing toolbar.
4. Go back to the main settings screen by tapping the “Back” button at the top left corner of the screen.
5. Tap on the “Accounts” or “Mail Accounts” option, depending on your iOS version. This will give you an overview of all the email accounts added to your device.
6. For each email account, tap on it to enter its settings.
7. In the signature settings of each account, delete the existing signature, if any, and paste the copied signature by tapping on the text field and selecting “Paste” from the popup menu.
8. Repeat this process for every email account on your iOS device, ensuring that the copied signature is applied consistently to all accounts.
By applying your signature to all accounts, you ensure that your branding, contact information, and other details remain consistent across all your email communications. This helps establish a professional and unified presence, regardless of which account you are using to send emails.
Remember to review and test the signature in each email account to ensure it looks as intended. Make any necessary adjustments to format, font, or layout to accommodate different email clients and devices.
Once you have applied the signature to all accounts, you are ready to send emails with a consistent and professional signature across all your iOS email accounts.
In the final step, you will learn how to test your signature to ensure it appears correctly and functions as intended in outgoing emails.
Step 10: Test Your Signature
Before you start using your email signature in regular correspondence, it’s essential to test it to ensure that it appears correctly and functions as intended in outgoing emails. Follow these steps to test your signature:
1. Open the Mail app on your iOS device.
2. Compose a new email by tapping on the “Compose” or “New Message” button.
3. Enter the recipient’s email address and a subject for the test email.
4. In the body of the email, you should see your signature automatically inserted, reflecting the changes you made in the signature settings.
5. Review your signature to ensure that the formatting, font, and layout are correct. Check for any issues such as text overlapping, missing hyperlinks, or distorted images.
6. Send the test email to yourself or a trusted contact.
7. Open the test email on different devices, email clients, and web browsers to ensure that your signature displays properly across various platforms.
8. Verify that all the links in your signature are working correctly and directing recipients to the intended websites or social media profiles.
9. Pay attention to the email’s appearance in different email clients, such as Outlook, Gmail, or Apple Mail, to ensure that the signature looks consistent and professional.
10. If you notice any issues or inconsistencies during the testing process, go back to the signature settings and make the necessary adjustments.
By testing your signature, you can identify and resolve any potential issues before using it in your regular email communication. This ensures that your signature appears as intended and presents a professional image to your recipients.
Repeat the testing process whenever you make significant changes to your signature or if you encounter any unexpected issues. Regularly reviewing and testing your signature helps to maintain its effectiveness and address any changes in email client behavior or formatting requirements.
Once you are satisfied with the appearance and functionality of your signature during testing, you can confidently use it in your everyday email communication to leave a lasting impression on your recipients.
Remember to periodically revisit your signature settings to keep it up to date and relevant.