
Importance of Cleaning the Laptop Fan
The laptop fan plays a crucial role in maintaining the overall performance and lifespan of your laptop. It is responsible for keeping the internal components cool by dissipating heat generated during operation. Over time, the fan accumulates dust, dirt, and debris, hindering its efficiency. Neglecting to clean the laptop fan can lead to various issues that can significantly impact the performance and longevity of your device.
One of the primary reasons why cleaning the laptop fan is important is to prevent overheating. When dust and debris accumulate on the fan blades and vents, it restricts airflow and hampers heat dissipation. As a result, your laptop may experience frequent overheating, causing it to slow down, freeze, or even shut down unexpectedly. Continuous overheating can also lead to permanent damage to internal components such as the processor, graphics card, or motherboard.
In addition to preventing overheating, cleaning the laptop fan can help improve its performance. When the fan is clogged with dust, it has to work harder to remove heat, resulting in increased fan noise and reduced cooling efficiency. By cleaning the fan regularly, you can restore its optimal functionality, ensuring that your laptop stays cool even during resource-intensive tasks like gaming or video editing.
Dust accumulation can also impact the battery life of your laptop. Overheating caused by a dirty fan can strain the battery and shorten its lifespan. By keeping the laptop fan clean, you can help maintain a stable operating temperature, reducing the strain on the battery and prolonging its overall life.
Moreover, cleaning the laptop fan can have a positive impact on the overall system performance. When your laptop is running at an optimal temperature, the processor can perform at its best, resulting in smoother multitasking, faster application loading times, and better overall responsiveness. Regular cleaning can also help prevent system crashes and improve the stability of your laptop, ensuring a seamless user experience.
Signs that Your Laptop Fan Needs Cleaning
It is important to be aware of the signs that indicate your laptop fan needs cleaning. Timely cleaning can prevent potential damage to your device and ensure its optimal performance. Here are some common signs that indicate it’s time to clean your laptop fan:
- Excessive fan noise: If you notice that the fan noise has become louder than usual, it may be a sign that dust and debris have accumulated on the fan blades. The fan has to work harder to spin, resulting in increased noise levels.
- Hot laptop: If your laptop becomes unusually hot to the touch, it indicates poor heat dissipation. The fan may be clogged with dust, restricting airflow and preventing proper cooling. Excessive heat can cause system instability and performance issues.
- Frequent overheating: If your laptop shuts down or restarts unexpectedly, it could be due to overheating. Dust buildup on the fan can obstruct airflow, leading to inadequate cooling, which in turn causes the system to overheat and shut down as a protective measure.
- Slow performance: If your laptop is running slower than usual, with lagging applications and longer loading times, it might be due to an overheating issue caused by a dirty fan. When the system overheats, the processor has to throttle its performance to prevent damage, resulting in slower operation.
- Frequent system crashes: Overheating due to a dirty fan can lead to frequent crashes and system instability. When the internal components reach high temperatures, it can cause the system to freeze, crash, or display the infamous “blue screen of death.”
It is important not to ignore these signs and take immediate action to clean your laptop fan. Regular maintenance can help prevent these issues and ensure proper airflow and cooling, ultimately prolonging the lifespan of your laptop.
Tools and Materials Needed for Cleaning
Before you begin cleaning the laptop fan, make sure you have the following tools and materials at hand:
- Compressed air: Compressed air is an essential tool for cleaning the laptop fan. It helps remove dust and debris from the fan blades and vents effectively. You can purchase compressed air in cans from electronics stores or online.
- Soft brush: A soft brush, such as a clean paintbrush or a small makeup brush, is useful for dislodging stubborn dust particles from the fan blades and vents. Make sure the brush bristles are gentle enough to avoid damaging the delicate components.
- Microfiber cloth: A microfiber cloth is ideal for wiping down the exterior of the laptop after cleaning the fan. It helps remove any remaining dust or fingerprints, leaving the surface clean and smudge-free.
- Screwdriver (if necessary): Depending on the laptop model, you may need a screwdriver to open the laptop casing and access the fan. Check the manufacturer’s instructions or online resources to determine if you need a screwdriver and ensure you have the appropriate size.
- Antistatic wrist strap (optional): An antistatic wrist strap is recommended if you are going to open the laptop casing. It helps protect the internal components from static electricity that could potentially cause damage.
- Cotton swabs: Cotton swabs can be handy for cleaning hard-to-reach areas, such as between the fan blades or in tight corners. They allow for precise cleaning and help remove stubborn dirt that may be trapped in small crevices.
Having these tools and materials ready before you start cleaning will ensure a smooth and efficient process. Remember to handle the components with care and follow the manufacturer’s guidelines to avoid any accidental damage.
Precautions to Take before Cleaning
Prior to cleaning the laptop fan, it is important to take certain precautions to protect both yourself and your device. By following these precautions, you can ensure a safe and effective cleaning process. Here are some essential precautions to consider:
- Turn off and disconnect the laptop: Before you begin, make sure to shut down the laptop and disconnect it from the power source. This ensures safety and prevents any electrical mishaps.
- Ground yourself: To prevent any static electricity discharge that could damage sensitive internal components, it is advisable to ground yourself. You can do this by touching a grounded object or wearing an antistatic wrist strap.
- Work in a clean and well-ventilated area: Find a clean and well-lit area with good ventilation to perform the cleaning process. This helps to disperse dust particles and ensures that you have enough space to work comfortably.
- Follow the manufacturer’s instructions: Each laptop model may have specific instructions on how to access and clean the fan. It is important to consult the manufacturer’s guidelines or user manual for your laptop to ensure you follow the correct procedure.
- Do not use excessive force: When cleaning the laptop fan, use gentle and careful movements. Avoid applying excessive force as it can damage the delicate components. Be patient and take your time to remove dust and debris without causing any harm.
- Avoid liquid cleaners: Never use liquid cleaners or solvents when cleaning the laptop fan, as they can cause damage to the internal components. Stick to dry cleaning methods using compressed air, brushes, and microfiber cloth.
- Handle the laptop with care: When opening the laptop casing or removing any components, handle them with caution. Be mindful of delicate cables and connectors, and avoid unnecessary strain or bending.
- Keep track of screws: If you need to remove screws to access the laptop fan, keep them organized and note their original positions. This will make reassembling the laptop easier and prevent any confusion or misplaced screws.
By taking these precautions, you can ensure a safe and successful cleaning process, promoting the longevity and optimal performance of your laptop.
Step-by-Step Guide to Cleaning the Laptop Fan
Cleaning the laptop fan can be done with a few simple steps. Follow this step-by-step guide to efficiently clean your laptop fan:
- Shutting down and disconnecting the laptop: Start by shutting down your laptop and unplugging it from the power source. This ensures safety during the cleaning process.
- Removing the laptop battery (if applicable): If your laptop has a removable battery, remove it as an extra precautionary measure. This helps prevent accidental power-ups while you are working on the internal components.
- Locating the laptop fan: Refer to the manufacturer’s instructions or user manual to locate the laptop fan. In most cases, it is positioned near the vents on the side or bottom of the laptop.
- Using compressed air to clean: Hold the can of compressed air upright and use short bursts to blow air into the fan vents. Start from a safe distance and gradually move closer to the vents. This dislodges dust and debris from the fan blades, allowing them to be expelled out of the laptop.
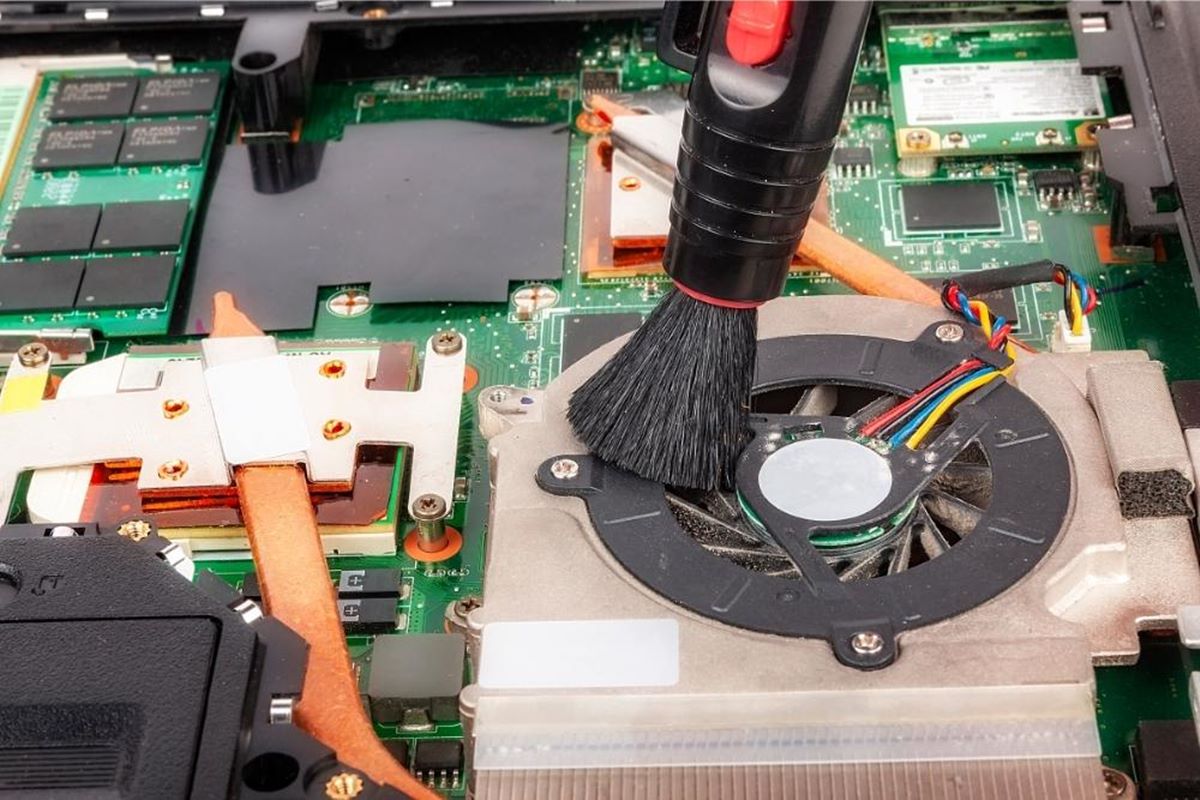
- Cleaning the laptop fan with a soft brush: Use a soft brush, such as a clean paintbrush or a small makeup brush, to gently brush away any remaining dust from the fan blades, vents, and surrounding areas. Be thorough but gentle, ensuring not to damage any delicate components.
- Reinforcing the cleaning process with compressed air: Once you have brushed away the majority of the dust, use the compressed air again to blow away any loosened particles. This helps to ensure a thorough cleaning of the fan and its surrounding areas.
- Reassembling the laptop: Carefully reattach the laptop battery if you had removed it earlier. Make sure all the components are securely in place before moving on to the next step.
- Turning on the laptop and checking the fan: Power on your laptop and listen for any abnormal fan noise. Check if the fan is running smoothly and quietly. This indicates a successful cleaning process and restored airflow.
Following these steps will help you effectively clean your laptop fan and ensure optimal cooling and performance. Remember to handle the components with care and refer to the manufacturer’s instructions specific to your laptop model if needed.
Shutting Down and Disconnecting the Laptop
Before you begin cleaning the laptop fan, the first step is to shut down your laptop and disconnect it from the power source. This ensures your safety and prevents any potential damage to the internal components. Follow these steps to properly shut down and disconnect your laptop:
- Save your work and close all applications: Before shutting down the laptop, save any unsaved work and close all open applications. This ensures that your data is not lost and prevents any potential data corruption.
- Select the shutdown option: Depending on your operating system, locate the shutdown option. It is typically found in the Start menu on Windows or the Apple menu on macOS. Click on the shutdown option to initiate the shutdown process.
- Wait for the laptop to shut down completely: Allow your laptop enough time to shut down completely. This ensures that all processes are properly closed, and the system can safely power off. Do not force the shutdown by pressing the power button unless necessary.
- Disconnect the laptop from the power source: Unplug the power adapter from the laptop and remove it from the wall outlet. This disconnects the laptop from the electrical supply, preventing any electrical accidents and ensuring your safety during the cleaning process.
It is important to follow these steps to properly shut down and disconnect your laptop before cleaning the fan. This helps protect the internal components from damage and ensures a safe working environment. Once you have completed this step, you can proceed with the next steps to access and clean the laptop fan.
Removing the Laptop Battery (if applicable)
If your laptop has a removable battery, it is advisable to remove it before cleaning the laptop fan. By doing so, you can prevent any accidental power-ups and ensure your safety during the cleaning process. Follow these steps to properly remove the laptop battery:
- Turn the laptop over: Flip your laptop over so that the bottom side is facing up. Find the battery release latch or switch, which is usually located near the bottom of the laptop.
- Slide or press the battery release latch: Depending on your laptop model, you may need to slide or press a latch to release the battery. Refer to your laptop’s user manual or manufacturer’s instructions for the specific procedure.
- Remove the battery: Once the latch is released, gently slide or lift the battery out of its compartment. Be careful not to exert too much force or damage any connectors. If the battery is secured with screws, use the appropriate screwdriver to remove them before taking out the battery.
- Place the battery in a safe location: Find a clean and dry place to store the battery while you clean the laptop fan. Avoid placing it on surfaces that may generate static electricity or come into contact with liquids.
It is important to note that not all laptops have removable batteries. If your laptop has a non-removable battery, skip this step and proceed to the next section. Once you have removed the battery, you can continue with the cleaning process, ensuring the safety of both yourself and the laptop’s internal components.
Locating the Laptop Fan
Before you can clean the laptop fan, you need to locate its position within your laptop. The exact location may vary depending on the laptop model, but it is typically found near the vents on the side or bottom of the laptop. Follow these steps to locate the laptop fan:
- Refer to the manufacturer’s instructions: Check the user manual or visit the manufacturer’s website for your laptop model. They often provide detailed information, including diagrams or illustrations, on the placement of components, including the fan.
- Observe the laptop vents: Look for the vents on the side or bottom of your laptop. The fan is usually located near these vents because its primary function is to draw in cool air and expel hot air out of the laptop.
- Listen for the fan: Power on your laptop and listen for the sound of the fan. As the laptop boots up or performs resource-intensive tasks, the fan will kick in to cool down the internal components. By following the sound, you can locate the general vicinity of the fan.
- Inspect the laptop’s exterior: Examine the laptop’s exterior for any markings or labels that indicate the fan’s location. Some laptops have symbols or indicators near the vents that can help you identify the fan’s position.
If you are still having trouble locating the fan, it may be helpful to search online for specific information related to your laptop model. Many manufacturers provide online support forums or videos that can assist you in finding the fan’s exact location.
Once you have successfully located the laptop fan, you can proceed with the cleaning process to remove any dust and debris that may have accumulated, ensuring optimal cooling and preventing potential damage to your laptop.
Using Compressed Air to Clean
Using compressed air is an effective method to remove dust and debris from the laptop fan. Compressed air helps to dislodge the particles and blow them out of the fan and its surrounding areas. Follow these steps to clean the laptop fan using compressed air:
- Gather the necessary tools: Ensure that you have a can of compressed air ready. These cans are readily available at electronics stores or online retailers.
- Position the laptop: Place the laptop on a flat, stable surface in a well-ventilated area. Make sure there is enough space around the laptop to allow air to flow freely during the cleaning process.
- Hold the can of compressed air: Hold the can of compressed air in an upright position. It is important not to tilt the can, as this can cause the compressed air to spray out in a liquid state, which can damage the components.
- Identify the fan vent: Locate the vent through which the fan expels the hot air. This vent is typically found on the side or bottom of the laptop, near the fan’s location.
- Use short bursts of air: Position the nozzle of the compressed air can a few inches away from the fan vent. Apply short bursts of air into the vent in order to dislodge and remove any dust or debris accumulated on the fan blades and vents. Start from a safe distance and gradually move closer for more effective cleaning.
- Move the can around the vent: While blowing the air, gently move the can around the vent to ensure that you cover the entire area. This helps to dislodge dust particles from all angles and ensures a thorough cleaning.
- Repeat for other vents and openings: If your laptop has additional vents or openings, such as keyboard gaps or USB ports, use the compressed air to clean them as well. These areas can accumulate dust and debris over time and impact the laptop’s overall performance.
Remember, always follow the manufacturer’s guidelines and instructions specific to your laptop model. Be cautious not to overuse the compressed air or hold the can too close to the laptop components, as it can cause damage. By using compressed air to clean the fan, you can effectively remove dust and prolong the lifespan of your laptop.
Cleaning the Laptop Fan with a Soft Brush
In addition to using compressed air, using a soft brush is another effective method to clean the laptop fan and remove stubborn dust particles that may have accumulated. A soft brush helps dislodge the dust from the fan blades and vents, allowing for a more thorough cleaning. Follow these steps to clean the laptop fan with a soft brush:
- Gather a soft brush: Use a clean paintbrush or a small makeup brush with soft bristles. Make sure the bristles are gentle enough to avoid scratching or damaging the delicate components of the laptop.
- Turn off the laptop: Before starting the cleaning process, ensure that the laptop is turned off and disconnected from the power source. This minimizes the risk of accidents and ensures your safety.
- Locate the laptop fan: Refer back to the previous section on locating the laptop fan to identify its position. The fan is usually located near the vents on the side or bottom of the laptop.
- Gently brush the fan blades: Using the soft brush, gently brush the fan blades in a back-and-forth motion to dislodge any dust or debris that may have accumulated. Be careful not to apply too much pressure or bend the fan blades.
- Brush the surrounding areas: In addition to the fan blades, brush the surrounding areas, including the vents and any other accessible surfaces near the fan. This helps to remove any dust particles that may have settled in these areas.
- Inspect for remaining debris: After brushing, inspect the fan blades and surrounding areas to check if any debris is still present. If necessary, brush again or use compressed air to blow away any remaining dust.
- Clean the brush: Once you have finished cleaning, gently tap the brush on a surface to remove any loose dust particles. You can also use a separate brush or cloth to clean the bristles and remove any remaining dust.
Remember, always handle the laptop components with care and avoid using excessive force when brushing. By using a soft brush to clean the laptop fan, you can effectively remove stubborn dust particles and ensure optimal cooling for your laptop.
Reinforcing the Cleaning Process with Compressed Air
After using a soft brush to clean the laptop fan, it is recommended to reinforce the cleaning process by utilizing compressed air once again. This helps to further dislodge any remaining dust or debris that may have been loosened during the brushing process. Follow these steps to reinforce the cleaning process with compressed air:
- Gather the compressed air can: Ensure that you have a can of compressed air readily available.
- Position the laptop: Place the laptop on a flat surface in a well-ventilated area. This allows for proper air circulation during the cleaning process.
- Hold the can of compressed air: Hold the can of compressed air in an upright position, as specified by the manufacturer’s instructions.
- Identify the fan vent: Locate the vent through which the fan expels hot air. This vent is typically located near the fan’s position, either on the side or bottom of the laptop.
- Apply short bursts of air: Position the nozzle of the compressed air can a few inches away from the fan vent. Apply short bursts of air into the vent to ensure any remaining dust or debris is blown out. Start from a safe distance and gradually move closer for more effective cleaning.
- Move the can around the vent: While blowing the air, gently move the can around the vent to cover the entire area. This helps to dislodge any remaining dust particles and ensures thorough cleaning.
- Repeat for other vents and openings: If your laptop has additional vents or openings, such as keyboard gaps or USB ports, use the compressed air to clean them as well. This helps to remove any dust or debris that may have accumulated in those areas.
Reinforcing the cleaning process with compressed air after using a soft brush helps to ensure that the laptop fan and its surroundings are thoroughly cleaned from any remaining dust or debris. This step allows for optimal airflow and prevents potential overheating and performance issues in the future.
Reassembling the Laptop
Once you have completed the cleaning process for the laptop fan, it is important to reassemble the laptop properly before powering it on. Follow these steps to reassemble the laptop:
- Inspect the components: Before reassembling, carefully inspect the fan, vents, and surrounding areas to make sure they are clean and free from any debris or obstructions.
- Place the laptop battery (if applicable): If you had removed the laptop battery earlier, carefully insert it back into its compartment. Ensure it is properly aligned and securely positioned.
- Close the laptop casing: Align the laptop casing properly, making sure all the edges and corners are correctly aligned. Slowly and firmly press the casing until it closes completely. You may need to use slight force, but take care not to apply excessive pressure that could damage the laptop.
- Tighten any screws (if necessary): If you had removed any screws to access the laptop fan, use the appropriate screwdriver to tighten them securely. Refer to your laptop’s user manual or manufacturer’s instructions for the specific screw tightening requirements.
- Power on the laptop: Connect the laptop to the power source and press the power button to turn it on. Listen for the fan running smoothly and quietly as the system boots up. This indicates that the fan is functioning properly after the cleaning process.
It is important to ensure that all components are properly aligned and securely in place before powering on the laptop. This helps to prevent any potential issues or damage that may arise from loose components. By reassembling the laptop correctly, you can now enjoy improved cooling performance and overall system stability.
Turning on the Laptop and Checking the Fan
After cleaning and reassembling the laptop, it’s important to turn it on and check if the fan is functioning properly. A properly functioning fan is essential for maintaining optimal performance and preventing overheating. Follow these steps to turn on the laptop and check the fan:
- Connect the laptop to the power source: Plug the power adapter into the laptop and connect it to a power outlet. Ensure that the power adapter is securely connected.
- Press the power button: Locate the power button on your laptop and press it to turn on the system. Depending on your laptop model, you may need to press and hold the power button for a few seconds.
- Listen for the fan: As the laptop boots up, listen for the sound of the fan running. The fan should operate smoothly and quietly. If you notice any unusual or loud noises, it could indicate a problem with the fan that needs further attention.
- Monitor the fan’s performance: Keep an eye on the fan’s speed and temperature while using the laptop. You can use system monitoring software or BIOS settings to view the fan speed and temperature. If the fan remains cool and operates consistently, it indicates that the cleaning process was successful.
- Perform stress tests (optional): To ensure the fan can handle demanding tasks, consider running stress tests that put a heavy load on the system. This can include running resource-intensive programs or playing graphics-intensive games. Monitor the fan’s performance during these tests to ensure it maintains a consistent speed and keeps the laptop cool.
If you notice any issues with the fan, such as abnormal noises, inconsistent speed, or overheating, it may require further attention. In such cases, it is recommended to consult a professional technician for diagnosis and repair.
By turning on the laptop and checking the fan’s performance, you can verify that the cleaning process has been effective in restoring proper airflow and cooling to your laptop, ensuring its optimal functionality and longevity.
How Often Should You Clean Your Laptop Fan?
The frequency of cleaning your laptop fan depends on various factors, including the environment in which you use your laptop and the level of dust and debris accumulation. While there is no specific timeframe that applies to all laptops, there are some general guidelines to consider:
1. Manufacturer’s recommendations: Some laptop manufacturers provide specific guidelines on how often you should clean the laptop fan. Check the user manual or the manufacturer’s website for any recommendations or instructions.
2. Usage and environment: Laptops used in dusty or smoky environments may require more frequent cleaning than those used in cleaner environments. Likewise, if you use your laptop for resource-intensive tasks like gaming or video editing, it may accumulate more dust and require more frequent cleaning.
3. Observe the signs: Pay attention to the signs that indicate your laptop fan needs cleaning, such as excessive fan noise, overheating, slow performance, and frequent system crashes. If you notice these signs, it’s a good indication that it’s time to clean your laptop fan.
4. Regular maintenance: As a general rule, it is recommended to clean your laptop fan at least once every 3 to 6 months to maintain optimal performance. Regular maintenance helps prevent dust buildup and ensures proper airflow and cooling.
5. Consult a professional: If you are unsure about the cleaning frequency or if you are experiencing persistent issues, it may be beneficial to consult a professional technician. They can assess the specific needs of your laptop and provide tailored recommendations for cleaning and maintenance.
Ultimately, the goal of cleaning your laptop fan is to prevent overheating and maintain the overall performance and lifespan of your device. By monitoring the signs, regularly maintaining your laptop, and considering the specific usage and environment, you can determine how often you need to clean your laptop fan and ensure its optimal functionality.
Benefits of Cleaning Your Laptop Fan
Regularly cleaning your laptop fan offers numerous benefits that contribute to improved performance, longevity, and user experience. Here are some significant advantages of keeping your laptop fan clean:
1. Prevents overheating: One of the primary benefits of cleaning your laptop fan is preventing overheating. Dust and debris accumulation can block the airflow and hinder the cooling process, leading to increased temperatures. By cleaning the fan, you ensure that heat is effectively dissipated, preventing overheating and potential damage to internal components.
2. Enhances performance: A clean laptop fan helps to maintain optimal performance. When the fan is free from dust and debris, it can cool the internal components more efficiently, ensuring that they can operate at their best. This results in smoother multitasking, faster application loading times, and overall improved performance.
3. Increases lifespan: Overheating caused by a dirty fan can have negative impacts on the lifespan of your laptop. Excessive heat can lead to the degradation and failure of internal components. By preventing overheating through regular fan cleaning, you can extend the lifespan of your laptop and avoid the need for costly repairs or replacements.
4. Reduces fan noise: A clean laptop fan operates more quietly. Dust and debris on the fan blades can cause the fan to work harder and generate excessive noise. Cleaning the fan removes the obstructions, allowing it to run smoothly and quietly, providing a more peaceful and enjoyable user experience.
5. Improves battery life: Overheating can place additional strain on your laptop’s battery, leading to reduced battery life over time. By maintaining proper cooling through regular fan cleaning, you can prevent excessive heat buildup and extend the lifespan of your battery, ultimately preserving its performance and minimizing the need for frequent recharging.
6. Enhances system stability: A clean laptop fan aids in maintaining system stability. Overheating can cause system crashes, freezing, and other performance issues. By ensuring that the fan is free from dust and debris, you reduce the likelihood of these problems, resulting in a stable and reliable laptop experience.
7. Promotes a healthier workspace: Cleaning your laptop fan not only benefits the laptop itself but also contributes to a healthier workspace. Dust and debris can be a breeding ground for allergens and pollutants, affecting the air quality around your laptop. Regular cleaning helps reduce these particles, creating a cleaner and healthier environment for you to work in.
Overall, cleaning your laptop fan is a necessary maintenance task that provides a range of benefits, including preventing overheating, enhancing performance, increasing lifespan, reducing fan noise, improving battery life, enhancing system stability, and promoting a healthier workspace. By including regular fan cleaning in your laptop maintenance routine, you can enjoy optimal performance and prolong the life of your device.