
Remove Dust and Debris from the Keyboard
One of the areas of a laptop that can accumulate a significant amount of dust and debris is the keyboard. Regular cleaning of the keyboard is essential to maintain its functionality and prevent any buildup that could lead to sticky keys or unresponsive buttons. Here are some steps to effectively remove dust and debris from your laptop keyboard:
- Start by shutting down your laptop and disconnecting the power cord.
- Turn the laptop upside down and gently tap the bottom to dislodge any loose particles.
- Next, use a can of compressed air to blow away any remaining dust. Hold the can upright and spray short bursts of air in between the keys.
- If there are stubborn debris or crumbs that are difficult to remove, you can use a small brush or a toothbrush to gently sweep them away.
- For a more thorough cleaning, dampen a microfiber cloth or cotton swab with a small amount of isopropyl alcohol or screen cleaner. Gently wipe the keys and the spaces in between.
- Be cautious not to use excessive liquid, as it can damage the keyboard. Always ensure that the cloth or swab is only slightly damp.
- Allow the keyboard to air dry for a few minutes before using the laptop again.
By regularly removing dust and debris from your laptop keyboard, you can prolong its lifespan and ensure smooth and accurate typing. Remember to be gentle and avoid using excessive force or liquid, as this could cause damage to the keys or other sensitive components.
Clean the Display Screen
The display screen of a laptop is one of its most prominent features, and keeping it clean can greatly enhance your viewing experience. Over time, dust, fingerprints, and smudges can accumulate on the screen, making it appear dull and affecting the clarity of visuals. Follow these steps to effectively clean your laptop’s display screen:
- Before starting, make sure your laptop is turned off and unplugged to prevent any electrical hazards.
- Use a soft, lint-free cloth or a microfiber cloth to gently wipe the screen in a circular motion. Avoid applying too much pressure as it may damage the screen.
- If there are stubborn smudges or fingerprints, slightly dampen the cloth with water or a screen cleaner specifically designed for electronics. Ensure that the cloth is not soaking wet.
- Gently wipe the affected areas using light pressure and a gentle motion. Avoid spraying any liquid directly onto the screen.
- For hard-to-remove marks, you can create a homemade cleaning solution by combining equal parts of distilled water and vinegar. Dampen a cloth with this solution and gently wipe the screen.
- After cleaning, use a dry cloth to remove any excess moisture and let the screen air dry completely before turning on your laptop.
- Do not use paper towels or abrasive materials such as harsh cleaning chemicals, rough cloths, or tissues, as these can potentially damage the screen surface.
Regularly cleaning the display screen will help maintain its clarity and ensure a more enjoyable visual experience while using your laptop. Avoid touching the screen with dirty fingers and try to keep it away from dusty or smoky environments to minimize the need for frequent cleaning.
Clean the Touchpad or Trackpad
The touchpad or trackpad on a laptop is a crucial component that allows for easy navigation and control of the cursor. Over time, dirt, oil, and debris can accumulate on the touchpad surface, affecting its responsiveness and accuracy. To keep your touchpad clean and functioning optimally, follow these steps:
- Start by shutting down your laptop and disconnecting any external power source.
- Use a clean, lint-free cloth or a microfiber cloth to gently wipe the touchpad surface. Ensure that the cloth is dry and free from any moisture.
- If there are stubborn marks or sticky residue, slightly dampen the cloth with a small amount of water or a mild cleaning solution specifically designed for electronics.
- Gently and carefully wipe the touchpad in a circular motion, applying light pressure. Avoid pressing too hard, as it may damage or scratch the touchpad surface.
- For hard-to-remove dirt or debris, you can use a cotton swab dipped in isopropyl alcohol. Make sure the swab is not dripping wet and gently clean the affected areas.
- After cleaning, use a dry cloth to remove any excess moisture and allow the touchpad to air dry completely before turning on the laptop.
- Avoid using abrasive materials such as rough cloths, tissues, or harsh chemicals, as these can damage the touchpad surface.
Regularly cleaning the touchpad or trackpad will help maintain its sensitivity and ensure smooth navigation on your laptop. Keep in mind to avoid touching the touchpad with dirty or oily fingers, and try to keep it free from dust or liquid spills to minimize the need for frequent cleaning.
Wipe Down the Laptop Case
The laptop case is not only a protective shell for your device but also plays a role in its overall aesthetic appeal. To keep your laptop looking clean and presentable, it’s important to regularly wipe down the case. Here are the steps you can follow:
- Start by shutting down your laptop and disconnecting any external power source.
- Use a soft, lint-free cloth or a microfiber cloth to gently wipe the entire surface of the laptop case. This includes the top cover, bottom cover, and the sides.
- If there are visible smudges, fingerprints, or stains, dampen the cloth slightly with water or a screen cleaner that is safe for the laptop’s exterior surface.
- Gently wipe the affected areas using light pressure. Avoid using excessive force, as it could scratch or damage the case.
- To clean hard-to-reach areas or corners, you can use a soft-bristled brush to sweep away any dust or debris.
- Pay attention to any ports, buttons, or hinges, and ensure they are wiped clean as well.
- Avoid using harsh cleaning chemicals, bleach, or abrasive materials, as these can harm the laptop’s exterior finish.
- Allow the laptop case to air dry completely before powering on your device.
Regularly wiping down the laptop case not only keeps it looking clean but also helps remove dust and grime that can accumulate over time. By taking proper care of your laptop’s exterior, you can not only prolong its lifespan but also maintain a professional and well-maintained appearance.
Clean the Ports and Connections
The ports and connections on a laptop are crucial for connecting various devices and peripherals. However, they can accumulate dust, dirt, and debris over time, which may affect their functionality and disrupt proper connections. Cleaning the ports and connections regularly can help ensure optimal performance. Here’s how you can do it:
- Start by shutting down the laptop and disconnecting any cables or peripherals.
- Inspect each port and connection carefully, looking for any visible dust, lint, or debris.
- Use a can of compressed air to blow away any loose particles from the ports. Hold the can upright and use short bursts of air.
- If there are stubborn dust or particles that are hard to remove, you can use a clean, dry toothbrush or a small, soft-bristled brush to gently brush out the debris.
- Be careful not to apply too much pressure or damage the connectors. Use light, gentle strokes to clean the ports.
- You can also use a cotton swab dipped in isopropyl alcohol to clean the ports. Make sure the swab is not dripping wet, and gently clean the connectors.
- After cleaning, allow the ports to dry completely before reconnecting any cables or peripherals.
- For wireless connections such as Wi-Fi or Bluetooth, ensure the antenna or receiver is not covered in any dust or obstruction.
Cleaning the ports and connections of your laptop will help maintain their functionality and ensure proper connections with other devices. Regular maintenance can prevent issues such as loose connections, poor audio or video output, or slow data transfers. By incorporating this simple cleaning routine, you can enhance the overall performance and longevity of your laptop.
Remove and Clean the Battery
The battery is an essential component of a laptop that provides power when it’s not connected to an electrical outlet. Over time, dust, dirt, and even spills can accumulate on the battery, affecting its performance and lifespan. Cleaning the battery is important to ensure proper functioning and to prevent any potential issues. Here are the steps to safely remove and clean the battery:
- Before starting, make sure your laptop is turned off and unplugged from any power source.
- Check your laptop’s user manual or manufacturer’s instructions to locate the battery and determine if it can be easily removed.
- If the battery is removable, carefully remove it from the laptop following the instructions provided.
- Inspect the battery for any visible dirt, dust, or debris. Use a soft, dry cloth or a cotton swab to gently wipe away any particles.
- If there are stubborn stains or spills on the battery, dampen a cloth or swab with a small amount of isopropyl alcohol. Ensure the cloth or swab is not dripping wet.
- Gently clean the affected areas of the battery using light pressure. Avoid using excessive liquid as it can damage the battery.
- Allow the battery to air dry completely before reinserting it back into the laptop.
- If your laptop has a non-removable battery, use a soft, dry cloth to gently wipe the external surface of the battery.
Regularly cleaning the battery can help prevent dust and dirt buildup, which can cause overheating or poor performance. It’s important to note that some laptops have sealed or non-removable batteries, in which case you should avoid trying to remove the battery yourself and instead focus on cleaning the exterior surface. Always refer to your laptop’s user manual or manufacturer’s instructions for specific guidance on battery cleaning and maintenance.
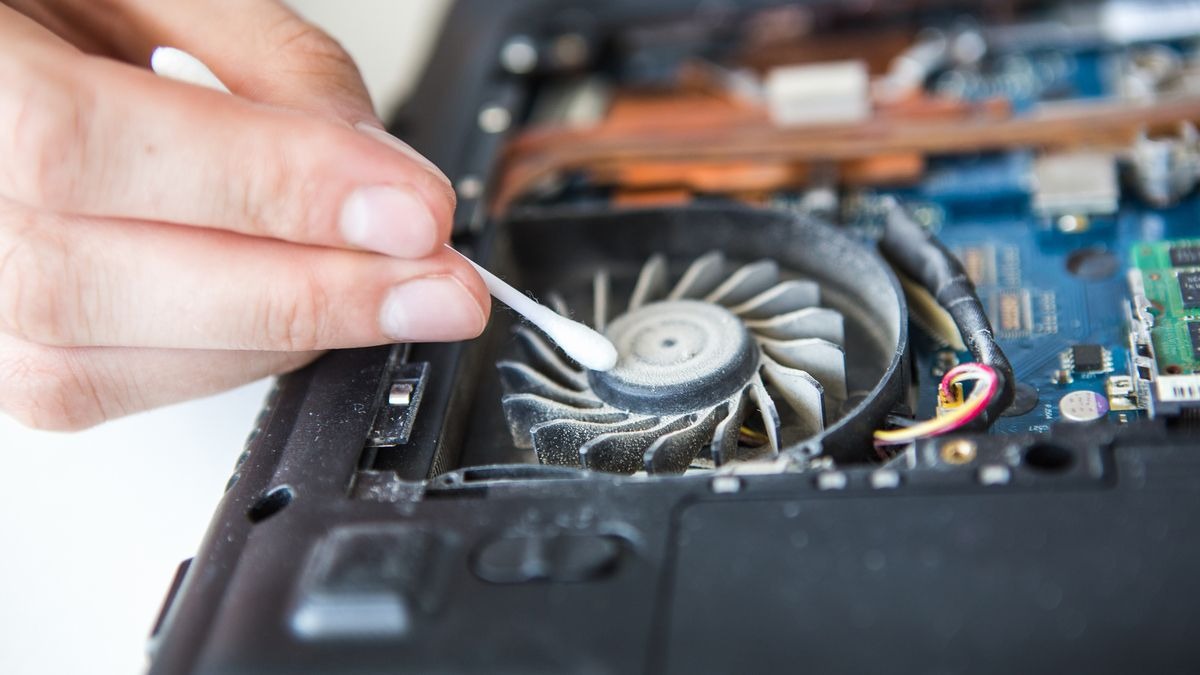
Clean the Fan and Vents
The fan and vents in a laptop play a crucial role in keeping the internal components cool by dissipating heat. However, over time, they can become clogged with dust, lint, and debris, hindering proper airflow and leading to overheating issues. Cleaning the fan and vents regularly is essential to maintain optimal cooling performance. Here’s how you can do it:
- Start by shutting down your laptop and disconnecting any external power source.
- Locate the fan and vents on your laptop. They are typically located on the sides or the bottom of the device.
- Use a can of compressed air to blow away any dust and debris from the vents. Hold the can upright and use short bursts of air.
- Make sure to keep the can of compressed air at least a few inches away from the vents to prevent any liquid from being sprayed onto the components.
- If the fan blades are visible, use a small brush or a cotton swab to gently remove any dust or buildup from them.
- Be extra careful when cleaning the fan blades to avoid exerting too much pressure or causing any damage.
- If the vents are heavily clogged, you may need to remove the bottom cover of your laptop (if it’s removable) to access the fan directly.
- Refer to your laptop’s user manual or manufacturer’s instructions for specific guidance on safely removing and cleaning the fan.
- Avoid using any liquids or cleaning solutions directly on the fan or vents, as this may damage the components.
Cleaning the fan and vents regularly will help prevent overheating, ensure proper airflow, and prolong the lifespan of your laptop. It’s recommended to clean the fan and vents every 3-6 months or more frequently if you notice your laptop running hotter than usual or experiencing performance issues.
Disassemble and Clean the Internal Components
Over time, dust and debris can accumulate within the internal components of a laptop, affecting its overall performance and potentially causing overheating issues. While cleaning the external surfaces and vents is beneficial, sometimes it’s necessary to disassemble the laptop and clean the internal components. Here are some steps to safely disassemble and clean the internal components of your laptop:
- Before proceeding, make sure to consult your laptop’s user manual or manufacturer’s instructions for specific disassembly instructions.
- Start by shutting down your laptop and disconnecting any external power source.
- Remove the screws on the bottom of the laptop using the appropriate screwdriver.
- Gently remove the bottom cover of the laptop to expose the internal components.
- Be cautious and gentle when handling the internal components to avoid causing damage.
- Use a can of compressed air to blow away any dust and debris from the internal components. Pay close attention to the fans, heat sinks, and other areas where dust tends to accumulate.
- Avoid spraying the compressed air too close to the components to prevent any damage.
- If necessary, use a soft brush or a cotton swab dipped in isopropyl alcohol to carefully clean any stubborn dust or residue.
- Allow the internal components to dry completely before reassembling the laptop.
- Reattach the bottom cover of the laptop and secure it with the screws.
It’s important to note that disassembling a laptop can void the warranty, so proceed with caution and only undertake this task if you feel comfortable and confident in doing so. If you have any doubts or concerns, it may be best to seek professional assistance.
Cleaning the internal components of your laptop can help improve its performance, prevent overheating, and extend its lifespan. However, if you’re not familiar with the process or uncertain about any step, it’s always recommended to consult the manufacturer or seek professional help to ensure the safety and integrity of your laptop.