
Checking the Compatibility of the Replacement Battery
Replacing a laptop battery is an essential task to extend the lifespan of your device and ensure uninterrupted usage. Before diving into the battery replacement process, it’s crucial to check the compatibility of the replacement battery to ensure a successful installation. Here are the essential steps to ensure the compatibility of the new battery:
- Check the laptop model: Every laptop model might have a specific battery model that is compatible with it. Look for the laptop’s model number, which is usually located on the bottom of the laptop or in the system settings. Make a note of it as you will need it in the next steps.
- Research the battery model: Using the laptop model number, search online or visit the manufacturer’s website to find the compatible battery model for your laptop. The manufacturer’s website should have a support or product page where you can find the recommended battery models.
- Read customer reviews: Customer reviews can provide valuable insights into the performance and compatibility of the replacement battery. Look for reviews from users who have a similar laptop model and check if they had any issues with the battery compatibility.
- Consult with an expert: If you are unsure about the compatibility or have any specific requirements, it’s wise to consult with an expert or the manufacturer’s customer support. They can provide accurate information and guide you in selecting the right replacement battery.
By following these steps, you can ensure that the replacement battery you choose is compatible with your laptop model. Using an incompatible battery can damage your laptop or lead to performance issues. It’s always better to invest time in checking compatibility before making the purchase.
Gathering the Necessary Tools
Before you begin the process of replacing your laptop battery, it’s important to gather all the necessary tools to ensure a smooth and efficient battery replacement. Here is a list of the essential tools you will need:
- Screwdriver: Depending on the laptop model, you may need a small Phillips or Torx screwdriver to remove the screws that secure the battery compartment or the laptop case.
- Anti-static wrist strap: To protect your laptop from static electricity, it’s advisable to wear an anti-static wrist strap. This will prevent any static discharge that could potentially damage sensitive components inside your laptop.
- Replacement battery: Of course, you will need the new battery that is compatible with your laptop model. Make sure you have obtained the correct battery that matches the specifications of your original battery.
- Clean cloth or canned air: While you have your laptop open, it’s a good opportunity to clean any dust or debris that may have accumulated inside. A clean cloth or canned air can help you remove any unwanted particles.
- Plastic prying tool: In some cases, you may need a plastic prying tool to gently pry open the laptop case without damaging it. This tool will allow you to safely access the battery compartment.
- Container for screws: It’s important to keep track of the screws you remove during the battery replacement process. Using a small container or magnetic pad to store the screws will prevent them from getting lost or misplaced.
By ensuring you have all the necessary tools before starting the battery replacement process, you can work efficiently and avoid any unnecessary delays or complications. It’s always better to be fully prepared to ensure a successful battery replacement.
Preparing the Laptop for Battery Replacement
Before you jump into the process of replacing your laptop battery, it’s important to take a few preparatory steps to ensure a smooth and safe replacement. By following these guidelines, you can minimize the risk of damage to your laptop and make the battery replacement process easier:
- Power off your laptop: To avoid any potential electrical hazards, shut down your laptop properly before getting started. Make sure to save any important work or files and close all applications.
- Disconnect from power source: Unplug your laptop from the power adapter and remove any other external devices, such as USB drives or external monitors. This will prevent any accidental electrical interference during the battery replacement.
- Remove the laptop battery: In some laptop models, you may need to remove the laptop’s bottom panel or a specific cover to access the battery compartment. Carefully follow the manufacturer’s instructions to remove the old battery safely.
- Check for residual power: Even with the laptop powered down, there may still be residual power in the system. To discharge this power, press and hold the power button for a few seconds. This will ensure that there is no remaining power flowing through the laptop during the battery replacement process.
- Ground yourself: It’s important to ground yourself to prevent any static electricity discharge that could harm the delicate components of your laptop. Wear an anti-static wrist strap or touch a grounded metal object to discharge any static buildup.
- Prepare your workspace: Find a clean and well-lit workspace where you can comfortably work on your laptop. It’s recommended to use a large, flat surface with sufficient space to lay out the tools and keep track of the screws.
Taking the time to properly prepare your laptop for battery replacement will help ensure a successful and safe process. By following these guidelines, you can minimize the risk of damaging any components and make the replacement process more efficient.
Opening the Laptop Case
Opening the laptop case is a crucial step in the battery replacement process. However, it’s important to note that the specific steps may vary depending on the laptop model. Here is a general guideline to help you open the laptop case safely:
- Refer to the manufacturer’s instructions: Before proceeding, refer to the laptop’s user manual or search online for specific instructions on how to open your laptop model’s case. Following the manufacturer’s instructions will ensure you don’t damage any components or void the warranty.
- Remove any screws or covers: Most laptops will have screws securing the bottom panel or any specific covers that need to be removed to access the battery compartment. Carefully unscrew and set aside all the necessary screws and covers.
- Use a plastic prying tool: In some cases, you may need to gently pry open the laptop case using a plastic prying tool. Be very careful not to apply too much force or use a metal tool, as this can cause damage to the laptop’s casing.
- Take note of cable connections: As you open the laptop case, you may come across various cables or ribbon connectors that are attached to the motherboard. Take note of their positions and connections to ensure you can reassemble them properly later.
- Be cautious of fragile components: Inside the laptop case, you may encounter delicate components such as the memory modules or the hard drive. Take extra care not to touch or damage these components while opening the case.
It’s important to proceed with caution and avoid applying excessive force or rushing through the process. If you encounter any difficulties or are not confident in opening the laptop case, it’s recommended to seek professional assistance or consult the manufacturer’s customer support.
Remember to take your time and follow the specific instructions for your laptop model to ensure a successful battery replacement without causing any damage to your laptop.
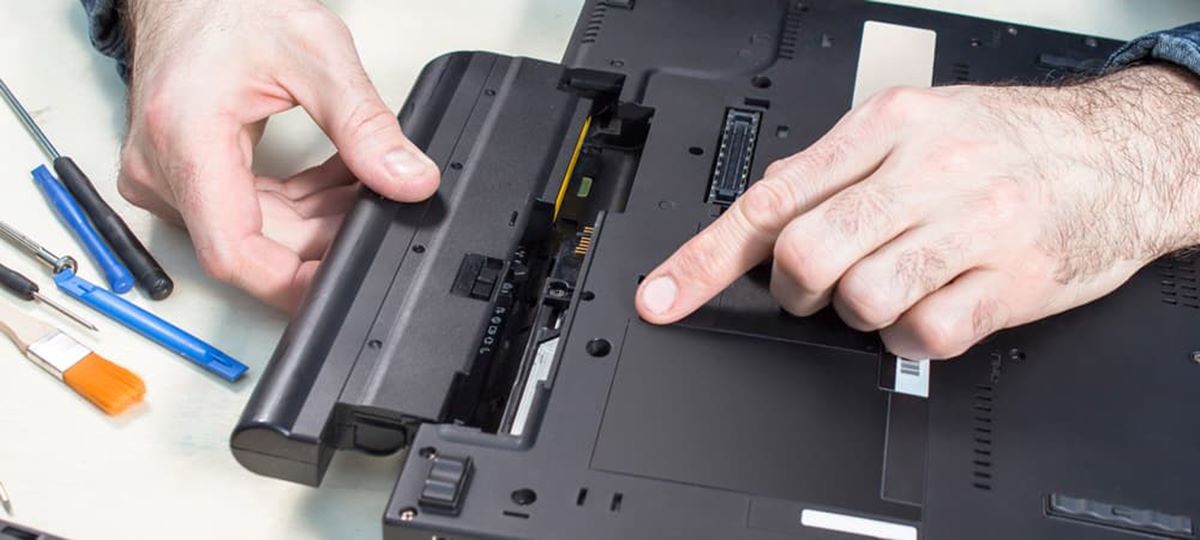
Removing the Old Battery
Once you have successfully opened the laptop case, the next step is to carefully remove the old battery. Here’s a step-by-step guide on how to remove the old battery from your laptop:
- Locate the battery: Look for the battery inside the laptop. It is usually located in a specific compartment or secured with screws or connectors.
- Disconnect the power cable: If there is a power cable connected to the battery, gently unplug it by pulling the connector away from the battery. Be careful not to yank or force the cable, as it may damage the connector or the motherboard.
- Remove any securing screws: Depending on the laptop model, there may be screws that secure the battery in place. Carefully unscrew and set aside these screws, keeping track of their locations.
- Detach any connectors: Some laptop batteries are connected to the motherboard using cable connectors. Gently unplug these connectors by pulling them straight out. Take care not to apply excessive force or damage the connectors.
- Slide or lift out the battery: Depending on the design, you may need to slide the battery out from its compartment or gently lift it out. Take your time and ensure that there are no obstructions or cables in the way.
- Set aside the old battery: Once you have removed the old battery, place it in a safe and appropriate location. As batteries can be hazardous waste, it’s important to dispose of them properly according to your local regulations.
Throughout the process, be mindful of any fragile components or cables in the vicinity of the battery. Take your time and proceed with care to avoid damaging any other parts of your laptop.
Now that you have successfully removed the old battery, you are ready to move on to the next step: installing the new battery.
Installing the New Battery
With the old battery safely removed from your laptop, it’s time to install the new battery. Follow these steps to successfully install the new battery:
- Align the new battery: Take the new battery and align it with the battery compartment in the same orientation as the old battery. Ensure that any screw holes or connectors on the new battery align with the corresponding ones in the laptop.
- Connect the battery: If your new battery has any cable connectors, gently plug them into the appropriate ports on the motherboard. Be careful not to force the connectors or bend the pins.
- Secure the battery: If there were screws securing the old battery, use them to secure the new battery in place. Carefully insert and tighten the screws without applying excessive force.
- Double-check the connections: Before closing the laptop case, ensure that all connections to the new battery are secure. Double-check that any power cables or data cables are properly connected without any loose or disconnected ends.
- Test the battery: Before completely closing up the laptop, it’s a good idea to power it on and check if the new battery is recognized. If the laptop boots up and the battery indicator shows that it’s charging, it indicates a successful installation.
- Close the laptop case: Once you are satisfied with the battery installation, carefully close the laptop case. Replace any covers or panels that were removed and ensure that they are secured in place.
It’s essential to handle the new battery with caution and avoid any physical damage or exposure to extreme temperatures. Always follow the manufacturer’s guidelines for proper installation and usage of the new battery.
Now that you have successfully installed the new battery, it’s time to test it and ensure it provides the expected performance and functionality.
Closing the Laptop Case
After installing the new battery, it’s important to properly close the laptop case to ensure the components are protected and secure. Follow these steps to successfully close the laptop case:
- Check for loose cables: Before closing the laptop case, double-check that all cables and connectors are properly secured. Make sure there are no loose ends or cables that could get pinched when closing the case.
- Align the case: Align the edges of the laptop case carefully to ensure they fit properly. Take your time and ensure there is no misalignment or forced closure that could potentially damage the case.
- Replace any screws or covers: If you removed any screws or covers to access the battery compartment, make sure to replace them in their correct positions. Tighten the screws, but be cautious not to overtighten them.
- Listen for clicks or snaps: As you close the laptop case, listen for any clicks or snaps that indicate the proper alignment and closure of the case. This ensures that all the external components are properly secured.
- Test the laptop: After closing the case, power on the laptop to ensure that it boots up properly. Check if all the functions, including the keyboard, touchpad, and ports, are working as expected.
- Observe for overheating or unusual noise: While using the laptop, keep an eye out for any signs of overheating, such as the fan running constantly at high speed or unusual noise emanating from the laptop. This could indicate a problem with the case closure or the new battery installation.
It’s crucial to ensure that the laptop case is closed correctly to protect the internal components and maintain the integrity of the device. Improper closure can result in damage to the laptop or affect its performance.
By following these steps and taking your time to ensure a proper closure, you can rest assured that your laptop is secure and ready for use with the newly installed battery.
Powering on the Laptop and Testing the New Battery
Now that you have successfully closed the laptop case with the new battery installed, it’s time to power on the laptop and test the functionality of the new battery. Follow these steps to ensure everything is working as expected:
- Connect the power adapter: Plug in the power adapter to the laptop and connect it to a power source. This will provide a continuous power supply while you test the new battery.
- Power on the laptop: Press the power button to start the laptop. The laptop should boot up normally, and you should see the usual startup screens and hear any usual startup sounds.
- Check the battery indicator: Look for the battery indicator on the laptop, either on the taskbar or as a physical LED indicator. It should show that the battery is being charged. If the indicator shows the battery level increasing, it indicates that the new battery is being recognized and charged properly.
- Remove the power adapter: Once you have confirmed that the new battery is charging, safely remove the power adapter from the laptop. The laptop should continue running on the battery power.
- Observe battery performance: Use the laptop for a while and observe the performance of the new battery. Check the battery life, the time it takes to charge, and any significant differences compared to the old battery. Ensure that the laptop can sustain battery power for a reasonable amount of time.
- Run software/utilities: To further test the new battery, run resource-intensive software or utilities that typically drain the battery quickly. Monitor how the battery performs under these conditions to ensure it is functioning optimally.
- Check for abnormal behavior: While using the laptop on battery power, observe for any abnormal behavior such as sudden shutdowns, significant battery drain, or unusual overheating. These could be signs of a defective battery or an installation issue.
By following these steps and thoroughly testing the new battery, you can ensure that it is functioning correctly and meeting your expectations. If you notice any issues or unexpected behavior during testing, it’s advisable to reach out to the manufacturer’s customer support for further assistance.
Now that you have tested the new battery and confirmed its functionality, you can enjoy longer and uninterrupted usage of your laptop.
Properly Disposing of the Old Battery
Once you have successfully replaced the old battery with a new one, it’s important to properly dispose of the old battery. Batteries contain harmful substances and must be handled and disposed of following the appropriate guidelines to minimize environmental impact. Here are the steps you can take to ensure the proper disposal of your old laptop battery:
- Research local regulations: Start by researching the local regulations and guidelines for battery disposal in your area. Municipalities often have specific programs or designated collection points for safe battery disposal, such as recycling centers or electronic waste facilities.
- Contact the manufacturer: Reach out to the battery manufacturer or visit their website to find out if they offer a take-back or recycling program for their batteries. Many manufacturers have initiatives in place to ensure the proper recycling or disposal of their products.
- Look for designated collection points: Check if there are any designated collection points, such as electronics retailers or community centers, where you can drop off the old battery for proper disposal. These collection points will ensure that the battery is handled and recycled in an environmentally responsible manner.
- Follow battery disposal instructions: If there are specific instructions provided by the manufacturer or the local authorities for battery disposal, make sure to follow them carefully. This may include sealing the battery in a plastic bag or taping the terminals to prevent short-circuits.
- Avoid improper disposal: It’s important never to throw old batteries in the regular trash, as they can harm the environment and contaminate landfills. Opt for proper disposal methods to ensure that the battery is recycled or treated in an appropriate manner.
By taking these necessary steps, you can contribute to reducing the environmental impact of battery waste and promote responsible recycling practices. Properly disposing of the old battery ensures that it is handled in an eco-friendly way and its valuable components can be reclaimed for future use.
Remember, the responsible disposal of batteries is not only crucial for environmental sustainability but also a legal requirement in many regions. So, take the time to research and follow the appropriate guidelines to dispose of your old laptop battery safely and responsibly.