
Reasons for Removing the Battery
There are several reasons why you might need to remove the battery from your Dell laptop. Whether you are troubleshooting an issue, performing maintenance, or replacing the battery, knowing how to safely remove it is essential. Here are a few common reasons for removing the battery:
- Troubleshooting: If your laptop is experiencing power-related issues, such as not turning on or not holding a charge, removing the battery can help you isolate the problem. By running the laptop on AC power without the battery, you can determine if the issue is with the battery or the laptop itself.
- Maintenance and cleaning: Over time, dust and debris can accumulate around the battery area, leading to poor performance and overheating. Removing the battery allows you to clean the battery contacts and the surrounding area more effectively, helping to improve the overall functioning of your laptop and extend its lifespan.
- Battery replacement: If your Dell laptop battery is no longer holding a charge or has reached the end of its lifespan, you will need to remove it in order to install a new one. Removing the old battery is the first step in the replacement process.
- Travel and portability: If you frequently travel with your Dell laptop, you may find it more convenient to remove the battery when you are using the laptop near a power source. This can help reduce the weight of your laptop and prolong the battery’s overall lifespan.
Regardless of the reason for removing the battery, it is crucial to follow the proper steps to ensure the process is done safely and without damaging your laptop. Before proceeding, make sure to take the necessary safety precautions and gather the required tools for the task.
Note: The following instructions are specific to Dell laptops and may vary for other laptop brands. Consult your laptop’s user manual for guidance if needed.
Safety Precautions
Before you proceed with removing the battery from your Dell laptop, it’s important to take certain safety precautions to protect yourself and your device. Here are some essential safety measures to keep in mind:
- Power off your laptop: Ensure that your laptop is completely powered off before attempting to remove the battery. This will help prevent any potential electrical mishaps or damage.
- Unplug the power adapter: Disconnect the power adapter from your laptop to avoid any risk of electric shock during the battery removal process.
- Work on a clean and static-free surface: Find a clean and static-free work area to perform the battery removal. This will minimize the risk of static electricity damaging sensitive components inside your laptop.
- Avoid applying excessive force: When handling the battery, avoid using excessive force. If the battery doesn’t easily slide out, do not force it. Instead, double-check to ensure you have properly released any latches or locks that may be holding it in place.
- Remove any jewelry: It’s always a good idea to remove any jewelry, such as rings or bracelets, before working inside your laptop. This will prevent any accidental scratching or damage to the laptop or the battery contacts.
- Avoid liquid contact: Keep liquids, including water and beverages, far away from your laptop during the battery removal process. Any accidental spills can cause irreparable damage to the internal components.
- Handle with care: Treat the battery with care, avoiding any unnecessary bumps, drops, or impacts. Mishandling the battery can lead to physical damage or even battery leakage.
- Use the correct tools: It’s important to use the appropriate tools, such as a screwdriver or latch release mechanism, recommended by Dell for battery removal. Using the wrong tools may result in damage to your laptop or the battery itself.
By following these safety precautions, you can ensure a smooth and risk-free battery removal process. Always prioritize your safety and the well-being of your laptop when performing any maintenance tasks.
Required Tools
Before you start removing the battery from your Dell laptop, make sure you have the necessary tools on hand. Having the right tools will ensure that the battery removal process is efficient and free from any unnecessary complications. Here are the tools you will need:
- Screwdriver: Depending on the model of your Dell laptop, you may require a screwdriver to access the battery compartment. Check the user manual or look for any visible screws on the laptop’s underside to determine the type and size of screwdriver you need.
- Latch release mechanism: Some Dell laptops feature a latch or lock that secures the battery in place. If your laptop has this mechanism, you will need a latch release tool provided by Dell or a small, flat-headed tool like a paperclip or small screwdriver to release the latch and unlock the battery.
- Clean, lint-free cloth: It’s helpful to have a clean, lint-free cloth on hand to wipe down the battery contacts and surrounding areas. This will ensure a good connection and prevent any dirt or debris from interfering with the battery’s performance.
- Anti-static wrist strap (optional): While not required, using an anti-static wrist strap can provide an added layer of protection against static electricity. This strap helps to discharge any static charges from your body, reducing the risk of damaging sensitive electronic components.
Make sure you have these tools readily available before starting the battery removal process. This will help you complete the task smoothly and without any unnecessary delays. You can also check the user manual or Dell’s official website for any specific tools recommended for your laptop model. Properly equipped, you’ll be ready to safely remove the battery from your Dell laptop.
Step 1: Shut Down the Laptop
Before you begin removing the battery from your Dell laptop, you must ensure that the laptop is properly shut down. This step is crucial to prevent any potential damage to the laptop’s components and for your safety. Follow these instructions to shut down your laptop:
- Save your work: Make sure you save any open documents or files on your laptop. Closing any running programs or applications will prevent the loss of unsaved data.
- Close all programs: Close any open programs or applications that may be running on your laptop. This will ensure a smooth shutdown process.
- Click on the “Start” menu: Locate the “Start” button on the bottom-left corner of your screen and click on it.
- Select “Power”: In the “Start” menu, click on the “Power” option. A dropdown menu will appear with several power options.
- Choose “Shut down”: From the power options, select “Shut down.” Your laptop will begin the shutdown process, closing all running programs and processes.
- Wait for the laptop to completely shut down: Once you’ve selected “Shut down,” wait for your laptop to turn off completely. You’ll notice the screen going blank, and the power indicator lights will also turn off.
It’s important to allow your laptop to fully shut down before proceeding to the next steps. This ensures that all processes are stopped, and the laptop is in a safe state to continue with the battery removal process. Taking the time to shut down your laptop properly will minimize the risk of data loss and protect your laptop’s components.
Step 2: Disconnect the Power Adapter
Once you have shut down your Dell laptop, the next step in removing the battery is to disconnect the power adapter. This is an important step to ensure your safety and to prevent any potential damage to the laptop. Follow these instructions to disconnect the power adapter:
- Locate the power adapter connection: Identify the power adapter connection on your Dell laptop. It is usually located on the side or back of the laptop.
- Unplug the power adapter: Gently and firmly grasp the power adapter plug where it connects to your laptop. Apply steady pressure to unplug it from the laptop’s power port.
- Inspect the power adapter and cord: Take a moment to visually inspect the power adapter and cord for any signs of damage, fraying, or loose connections. If you notice any issues, it’s best to address them before proceeding further.
By disconnecting the power adapter, you ensure that your laptop is not receiving any power during the battery removal process. This minimizes the risk of electrical shock and protects the internal components of your laptop.
Note: In some cases, the battery may be located on the bottom of the laptop and the power adapter connection may be on the side. Always refer to your laptop’s user manual for the precise location of the power adapter connection and the battery.
Step 3: Locate the Battery Release Latch
After disconnecting the power adapter, the next step in removing the battery from your Dell laptop is to locate the battery release latch. This latch is what secures the battery in place and needs to be released before you can remove the battery. Follow these instructions to locate the battery release latch:
- Flip over your laptop: Turn your Dell laptop upside down so that the bottom is facing upwards. Place it on a stable and flat surface.
- Inspect the battery compartment: Take a look at the bottom of your laptop and locate the battery compartment. This is usually labeled with an icon or text indicating the battery location. It may also have a series of small vent holes.
- Identify the battery release latch: Look for a small, sliding switch or latch near the battery compartment. This latch is usually located along one edge of the battery or at the corner of the laptop.
The exact location and design of the battery release latch may vary depending on your Dell laptop model. Refer to your laptop’s user manual or Dell’s official website for specific instructions if you are having trouble finding the latch.
Once you have located the latch, you are ready to proceed to the next step of unlocking the battery and removing it from your Dell laptop.
Step 4: Slide the Latch to Unlock the Battery
After locating the battery release latch, the next step in removing the battery from your Dell laptop is to unlock the battery by sliding the latch. This simple action will release the battery, allowing you to remove it safely. Follow these instructions to slide the latch and unlock the battery:
- Identify the direction of the latch: Take a close look at the latch and observe the arrows or labels indicating which direction to slide it. The latch may have a symbol, such as a padlock or an open/close icon.
- Slide the latch in the designated direction: Using your fingers or a small tool, gently slide the latch in the direction indicated. Apply steady pressure while moving the latch to ensure it moves smoothly without forcing it.
- Verify the latch is fully moved: Once you slide the latch, check that it has reached its unlocked position. Some latches may have a visible lock or unlock symbol, or you may feel a slight click indicating that it has fully shifted.
- Confirm the battery is no longer secured: After unlocking the battery, give it a gentle tug to ensure that it is no longer held in place. If the battery moves freely, it means the latch has successfully released it.
It’s important to note that the latch mechanism may be different on various Dell laptop models. If you are unsure about the exact steps to unlock the battery, refer to your laptop’s user manual or Dell’s official website for model-specific instructions.
Once the battery is unlocked, you are ready to proceed to the next step of removing the battery from your Dell laptop.
Step 5: Remove the Battery
With the battery unlocked, it’s time to remove it from your Dell laptop. This step involves safely detaching the battery from its housing, allowing you to access other components or replace it if necessary. Follow these instructions to remove the battery:
- Hold the laptop firmly: Ensure your laptop is secure and stable, either on a flat surface or in your hand with a firm grip.
- Locate the battery: Look for the battery inside the battery compartment, which is typically positioned near the back or center of the laptop’s bottom panel.
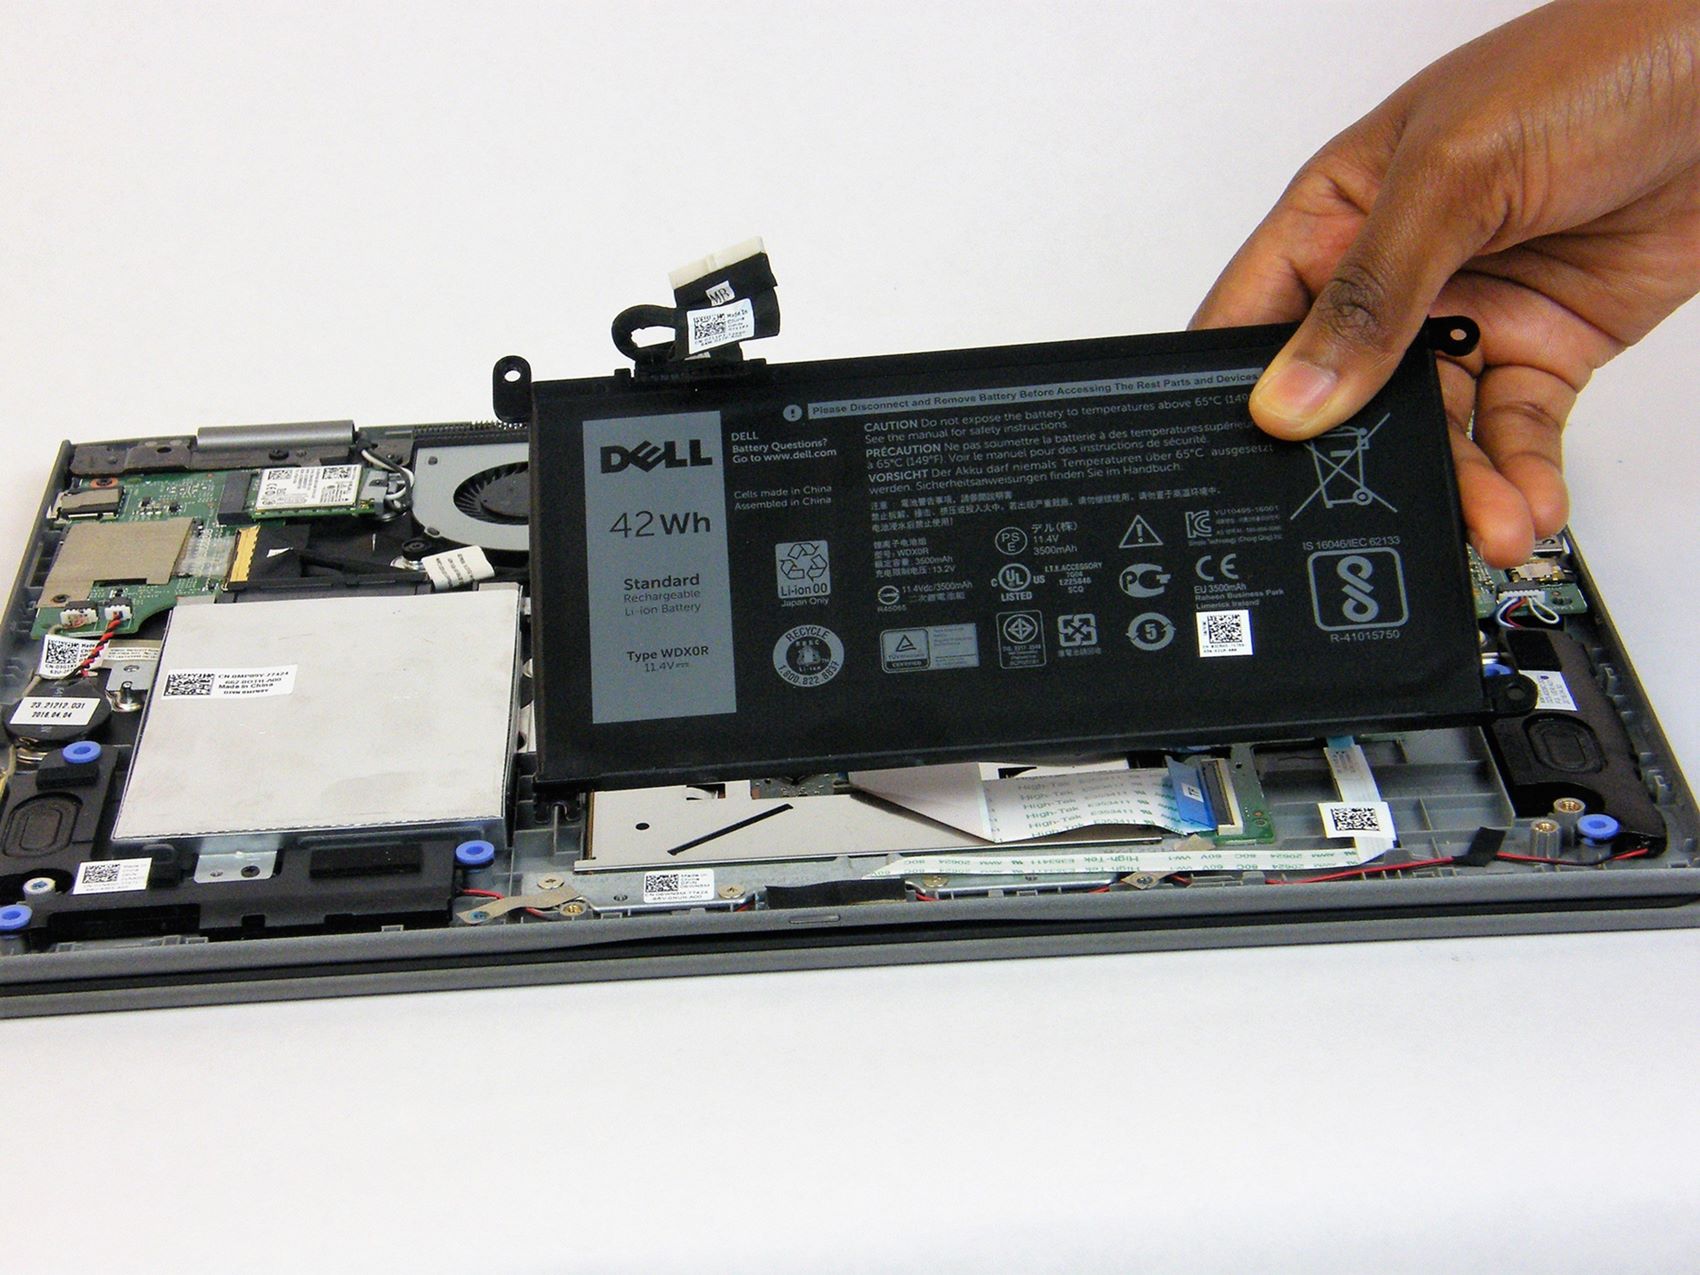
- Gently lift the battery: Using your fingertips or by using a small tool, carefully lift the battery from its compartment. Apply even pressure on both sides of the battery to avoid bending or damaging it.
- Slide the battery out: Once the battery is lifted, slide it out from the laptop’s battery compartment. Move it in a straight line, parallel to the laptop’s surface, to prevent any unnecessary strain on the connectors.
- Set the battery aside: Place the battery on a clean, dry, and static-free surface. Keep it away from any liquids, extreme temperatures, or other potentially damaging elements.
Removing the battery can vary slightly depending on your Dell laptop model. If you encounter any resistance or are unsure about the correct removal process, refer to your laptop’s user manual or Dell’s official website for specific instructions.
At this point, you have successfully removed the battery from your Dell laptop. Proceed to the next steps if you need to clean the battery contacts or replace the battery, or simply keep the battery in a safe place until you are ready to reinsert it.
Step 6: Clean the Battery Contacts (Optional)
While not always necessary, cleaning the battery contacts can help improve the connection and performance of your Dell laptop’s battery. Over time, dust, dirt, or corrosion can accumulate on the battery contacts, hindering the flow of power. Follow these instructions to clean the battery contacts:
- Inspect the battery contacts: Take a close look at the metal contacts on both the battery and inside the battery compartment. Look for any visible signs of dirt, debris, or corrosion.
- Power off your laptop (if not already done): Ensure that your laptop is completely powered off before proceeding with the cleaning process. This is necessary to prevent any accidental damage to the laptop or yourself.
- Prepare a cleaning solution: Create a gentle cleaning solution by mixing a small amount of rubbing alcohol with water. Dip a clean, lint-free cloth or cotton swab into the solution, ensuring it is damp but not saturated.
- Clean the battery contacts: Gently wipe the damp cloth or cotton swab across the metal contacts on both the battery and inside the battery compartment. Use light pressure and slow, circular motions to remove any dirt or corrosion. Pay close attention to any visible buildup and ensure that the contacts are thoroughly cleaned.
- Dry the contacts: After cleaning, allow the battery contacts to air-dry completely. Ensure that no moisture remains before reinserting the battery or reconnecting the power adapter.
It’s important to note that not all Dell laptop models have accessible battery contacts. Some designs may have contacts that are fully encased, making it difficult to clean them directly. In such cases, it’s best to consult your laptop’s user manual or Dell’s official website for specific cleaning instructions.
Cleaning the battery contacts can help maintain a reliable connection between the battery and your laptop, potentially improving the overall performance and battery life. However, if you do not encounter any issues with your laptop’s battery, this step may be optional.
Step 7: Reinsert the Battery (Optional)
After cleaning the battery contacts or if you have completed any required maintenance or replacement, you may choose to reinsert the battery back into your Dell laptop. Reinserting the battery is an optional step and depends on your specific needs and preferences. Follow these instructions to reinsert the battery:
- Ensure the laptop is powered off and unplugged: Make sure your laptop is completely shut down and disconnected from any power source before attempting to reinsert the battery. This is crucial to prevent any electrical mishaps or damage.
- Hold the battery correctly: Grasp the battery with both hands, aligning the connectors on the battery with the corresponding connectors inside the battery compartment. Ensure that the battery is oriented correctly, following any labels or symbols indicating the proper direction.
- Slide the battery into the compartment: Carefully slide the battery into the battery compartment, aligning it with the guides or notches inside. Apply even pressure on both sides of the battery to ensure a secure fit.
- Push the battery down: Gently press down on the battery to ensure it is fully seated in the compartment. You should feel or hear a slight click or snap, indicating that the battery is properly inserted.
- Secure the latch (if applicable): If your Dell laptop has a latch or lock mechanism, slide it back into its locked position to secure the battery in place. Verify that the latch is fully engaged, preventing the battery from accidentally coming loose.
Reinserting the battery is optional and may not be necessary if you prefer to use your laptop without the battery, such as when connected to a power source for extended periods. Always consider your specific needs and consult your laptop’s user manual or Dell’s official website for any model-specific instructions.
Once the battery is reinserted (if you choose to do so), proceed to the next step of reconnecting the power adapter to power on your Dell laptop.
Step 8: Reconnect the Power Adapter
After removing or replacing the battery in your Dell laptop, the next step is to reconnect the power adapter. Reconnecting the power adapter will allow you to power on your laptop and use it while connected to a power source. Follow these instructions to reconnect the power adapter:
- Locate the power adapter connection: Find the power adapter connection on your Dell laptop. It is typically located on the side or back of the laptop.
- Align the power adapter plug: Take the power adapter plug and align it with the power port on your laptop. Ensure that the plug is properly aligned with the port to avoid any damage to the port or the plug.
- Insert the power adapter plug: Gently insert the power adapter plug into the power port on your laptop. Apply steady and even pressure until the plug is fully seated in the port. You may feel a slight click or resistance as the plug is inserted.
- Verify the connection: Once the power adapter is inserted, verify that it is securely connected by checking for a snug fit and ensuring that the plug is not loose or easily dislodged.
Reconnecting the power adapter allows your Dell laptop to draw power from an external power source, whether it’s a wall outlet or a power strip. This step is essential if you want to use your laptop without relying solely on the battery. However, keep in mind that using the laptop with the power adapter connected for extended periods may affect the lifespan of the battery.
With the power adapter reconnected, you are now ready to power on your Dell laptop and resume your work or activities.
Step 9: Start the Laptop Without the Battery (Optional)
In some cases, you may need to start your Dell laptop without the battery, especially if you are troubleshooting power-related issues or prefer to use your laptop solely with the power adapter connected. Follow these instructions to start your laptop without the battery:
- Ensure the laptop is powered off and disconnected from the power adapter: Make sure your laptop is completely shut down and not connected to any power source before proceeding.
- Disconnect the power adapter: Unplug the power adapter from your laptop to ensure a clean disconnect from any power source.
- Remove the battery (if it is still inserted): If the battery is still inserted, gently remove it following the previous steps described earlier.
- Connect the power adapter: Plug the power adapter back into the power port on your laptop. Ensure that it is firmly connected and make sure the power adapter is connected to a power source.
- Power on your laptop: Press the power button on your laptop to turn it on. Without the battery, the laptop should boot up directly from the power adapter source.
Starting your laptop without the battery can help you troubleshoot power-related issues, as it allows you to determine if the problem lies with the battery or other components of your laptop. However, keep in mind that running your Dell laptop directly from the power adapter for an extended period may affect the battery’s longevity and performance.
If you encounter any difficulties or your laptop does not start without the battery, it is recommended to consult the user manual or reach out to Dell’s technical support for further assistance.
Step 10: Replace the Battery (Optional)
If you previously removed the battery for maintenance or troubleshooting purposes, you may choose to replace it to restore the portable functionality of your Dell laptop. Replacing the battery allows you to use your laptop without relying solely on the power adapter. Follow these instructions to replace the battery:
- Ensure the laptop is powered off and disconnected from the power adapter: Make sure your laptop is completely shut down and not connected to any power source before proceeding.
- Hold the replacement battery correctly: Grasp the replacement battery with both hands, aligning the connectors on the battery with the corresponding connectors inside the battery compartment. Ensure that the battery is oriented correctly, following any labels or symbols indicating the proper direction.
- Slide the battery into the compartment: Carefully slide the replacement battery into the battery compartment, aligning it with the guides or notches inside. Apply even pressure on both sides of the battery to ensure a secure fit.
- Push the battery down: Gently press down on the battery to ensure it is fully seated in the compartment. You should feel or hear a slight click or snap, indicating that the battery is properly inserted.
- Secure the latch (if applicable): If your Dell laptop has a latch or lock mechanism, slide it back into its locked position to secure the replacement battery in place. Verify that the latch is fully engaged, preventing the battery from accidentally coming loose.
Replacing the battery allows you to enjoy the portability and convenience of using your Dell laptop without being constantly tethered to a power source. However, it’s important to note that batteries have a limited lifespan, and over time, they may lose their capacity to hold a charge effectively. If you experience any significant degradation in battery performance, you may need to consider replacing it with a new one.
Once the replacement battery is securely inserted, you are ready to reconnect the power adapter and power on your Dell laptop.
Common Mistakes to Avoid
When removing or replacing the battery on your Dell laptop, it’s important to be aware of common mistakes that can lead to potential issues or damage. By avoiding these mistakes, you can ensure a smooth and safe battery removal process. Here are some common mistakes to avoid:
- Not shutting down the laptop: Failing to properly shut down the laptop before removing or replacing the battery can lead to data loss or potential damage to the laptop’s components. Always ensure your laptop is completely powered off.
- Forgetting to disconnect the power adapter: Neglecting to disconnect the power adapter can pose a risk of electrical shock or damage to the laptop. Always unplug the power adapter before proceeding with any battery-related tasks.
- Using excessive force: Applying excessive force when removing or inserting the battery can result in damage to the battery, battery contacts, or other internal components of the laptop. Always use gentle, even pressure during the process.
- Not following the correct sequence: It’s crucial to follow the steps in the correct order to ensure a smooth battery removal process. Skipping or rearranging steps can lead to complications and potential damage to your laptop.
- Failure to properly clean the battery contacts (if applicable): If you choose to clean the battery contacts, make sure to use a gentle cleaning solution and avoid using excessive moisture. Improper cleaning techniques can damage the battery contacts or other components.
- Reconnecting the power adapter while the battery is still inserted: It’s important to remove the battery before reconnecting the power adapter, especially when troubleshooting power-related issues. Leaving the battery inserted while powering on your laptop can result in incorrect power readings or other irregularities.
- Not double-checking the battery orientation: When reinserting a battery or replacing it with a new one, ensure that you have the correct battery model and that you align it properly with the battery compartment. Inserting a battery in the wrong direction can lead to compatibility issues or damage.
By avoiding these common mistakes, you can effectively remove or replace the battery in your Dell laptop without encountering any unnecessary complications or risks. Always refer to your laptop’s user manual or Dell’s official website for specific instructions related to your laptop model.