
Reasons to Clean Your Laptop Fan
Keeping your laptop fan clean is crucial for optimal performance and longevity of your device. Over time, dust, dirt, and debris can accumulate on the fan blades, inhibiting its ability to cool down your laptop. This can lead to overheating, which can cause serious damage to internal components and even result in system failure. Regularly cleaning your laptop fan can help prevent these issues and ensure that your laptop operates smoothly. Here are some compelling reasons to make sure your laptop fan is clean:
- Preventing overheating: One of the main functions of the laptop fan is to regulate the temperature of your device. When the fan is clogged with dust, heat cannot dissipate properly, causing your laptop to overheat. This can lead to sluggish performance, unexpected shutdowns, or even permanent hardware damage.
- Improving performance: An overheating laptop not only affects its lifespan but also slows down its performance. When the internal components are constantly exposed to excessive heat, they may not run at their full potential, resulting in a slower and less responsive laptop. Cleaning the fan ensures that it can effectively cool down the system, allowing it to operate at optimal speed.
- Extending lifespan: Overheating can significantly reduce the lifespan of your laptop. Excessive heat can cause stress on various internal components, including the CPU and GPU, leading to accelerated wear and tear. By regularly cleaning your laptop fan, you can prevent overheating and extend the overall lifespan of your device.
- Preventing loud fan noise: If you notice that your laptop fan is making a loud whirring noise, it is likely due to the accumulation of dust and debris. Cleaning the fan can help reduce the noise level and restore the fan’s proper functioning, providing you with a quieter and more pleasant computing experience.
- Maintaining system stability: When your laptop is running at a consistently high temperature, it not only affects the performance but also the stability of the system. Overheating can lead to system freezes, crashes, and even data loss. Regularly cleaning your laptop fan helps in maintaining a stable and reliable system.
Signs That Your Laptop Fan Needs Cleaning
It’s important to recognize the signs that indicate your laptop fan needs cleaning. By identifying these indicators early on, you can prevent any potential damage to your device. Here are some common signs that your laptop fan is in need of a cleaning:
- Excessive fan noise: If you notice that your laptop’s fan is producing an unusually loud noise, it may be due to the accumulation of dust and debris. A clean fan operates silently, so if you hear loud and whirring noises, it’s a clear indication that cleaning is required.
- Increased temperature: An overheating laptop is a clear sign that the fan needs cleaning. If your laptop feels excessively hot to touch, especially around the fan area, it’s an indication that the fan is not adequately cooling down the system. This can lead to poor performance and potential damage to internal components.
- Frequent system freezes or crashes: When a laptop’s fan is clogged with dust, it can’t effectively cool down the system. This can result in frequent system freezes, crashes, or unexpected shutdowns. If you experience these issues, it’s a sign that your laptop’s fan is in need of a thorough cleaning.
- Slow performance: If your laptop is running slower than usual and tasks take longer to be completed, it could be due to an overheating CPU. A clogged fan prevents proper ventilation, causing the processor to work harder and slower. Cleaning the fan can help restore normal performance.
- Inconsistent airflow: Place your hand near the laptop’s ventilation area and feel for any irregularities in airflow. A clean fan ensures a consistent flow of cool air, while a dirty fan restricts the airflow, leading to inefficient cooling.
By being aware of these signs, you can take timely action to clean your laptop fan and prevent any potential damage or performance issues. Regular maintenance and cleaning of the fan will ensure the optimal functioning of your laptop and prolong its lifespan.
Tools and Materials Needed for Cleaning
Before you begin cleaning your laptop fan, gather the necessary tools and materials to ensure a thorough and safe cleaning process. Having the right equipment will make the task easier and more effective. Here are the tools and materials you will need:
- Screwdriver: You may need a screwdriver to remove the laptop’s back cover or access the fan compartment. Check your laptop’s documentation or search for online guides specific to your laptop model to determine the type of screwdriver required.
- Compressed air canister: A can of compressed air is essential for blowing away dust and debris from the fan blades and other hard-to-reach areas. Ensure that the canister is specifically designed for cleaning electronics and doesn’t contain any harmful chemicals.
- Clean, lint-free cloth: Use a soft, lint-free cloth to wipe away any remaining dust or residue from the fan and surrounding areas. Avoid using paper towels or rough fabrics, as they may scratch the surface of your laptop.
- Isopropyl alcohol: Isopropyl alcohol can be used to clean stubborn dirt and grease from the fan blades or other components. Dilute it with water in a 50:50 ratio and apply it sparingly on a cloth or cotton swab for cleaning.
- Cotton swabs: Cotton swabs are useful for reaching smaller crevices or areas that are difficult to clean with larger tools. They can be dipped in isopropyl alcohol for targeted cleaning.
- Anti-static brush: An anti-static brush can be used to gently remove loose dust and debris from the fan and other parts of your laptop. The bristles of the brush should be soft to avoid scratching the surface.
- Optional: Thermal paste: If you decide to clean the laptop’s fan internally and remove the heat sink, you may need to reapply thermal paste. Thermal paste helps in optimal heat transfer between the CPU and heat sink, ensuring efficient cooling.
Make sure to gather all these tools and materials before you begin the cleaning process to ensure smooth and hassle-free maintenance of your laptop fan.
Preparation Before Cleaning
Before you start cleaning your laptop fan, it’s important to take some necessary precautions and prepare the laptop properly. By following these steps, you can ensure a safe and effective cleaning process:
- Turn off the laptop: Before you begin cleaning, shut down your laptop completely and unplug it from any power source. This will prevent any electrical accidents or damage to the internal components.
- Work in a clean and well-lit area: Find a clear and well-lit workspace to perform the cleaning. This will help you see and access the laptop’s components easily, ensuring a thorough cleaning process.
- Take photos or make notes: If you’re not familiar with the internal components of your laptop, it’s a good idea to take photos or make notes of the disassembly process. This will help you reassemble the laptop correctly after cleaning.
- Remove any external devices: Disconnect any external devices connected to your laptop, such as USB drives or peripherals. This will give you unrestricted access to the laptop’s fan and prevent any accidental damage to the connected devices.
- Ground yourself: To prevent electrostatic discharge, which can damage sensitive electronic components, make sure to ground yourself before handling the laptop’s internal parts. You can do this by touching a grounded metal object or wearing an anti-static wrist strap.
- Refer to the manufacturer’s instructions: Consult your laptop’s user manual or visit the manufacturer’s website for specific instructions on how to access and clean the fan. Different laptop models may require different disassembly steps, so it’s important to follow the manufacturer’s guidelines to avoid any damage.
- Backup your data: While cleaning your laptop fan should not typically affect your data, it’s always a good idea to backup your important files and documents before performing any maintenance. This ensures that your data is safe in case of any unforeseen circumstances.
By following these preparation steps, you can ensure that your laptop is ready for cleaning and minimize the risk of any damage during the process. Proper preparation sets the foundation for a successful and thorough cleaning of your laptop fan.
How to Clean the Laptop Fan Externally
Cleaning the laptop fan externally is a relatively simple process that can help remove dust and debris from the surface of the fan. By following these steps, you can ensure proper airflow and prevent overheating:
- Prepare the laptop: Follow the preparation steps mentioned earlier to turn off the laptop, disconnect any cables, and ground yourself to avoid static electricity discharge.
- Locate the fan: Identify the fan’s location on your laptop. In most cases, the fan is located on the underside or at the side of the laptop. Refer to the manufacturer’s instructions or online resources specific to your laptop model for further guidance.
- Use compressed air: Hold the can of compressed air upright and use short bursts of air to blow away the dust and debris from the fan. Start from a distance of a few inches and gradually move closer to the fan. Be careful not to hold the can too close to prevent moisture buildup or damage to the fan.
- Hold the fan in place: Gently hold the fan blades in place while using the compressed air to prevent them from spinning uncontrollably and potentially damaging the fan or other components.
- Repeat the process: Continue using short bursts of compressed air until you no longer see visible dust or debris coming out from the fan. Pay attention to the area around the fan as well, as dust may accumulate in those areas too.
- Wipe with a cloth: After using the compressed air, take a clean, lint-free cloth and gently wipe away any remaining dust or residue on the fan blades and surrounding area. Be careful not to apply excessive pressure or use abrasive materials that could scratch the surface of the laptop.
By regularly cleaning your laptop fan externally, you can maintain proper airflow and prevent dust buildup. This simple maintenance task can help improve the performance and lifespan of your laptop.
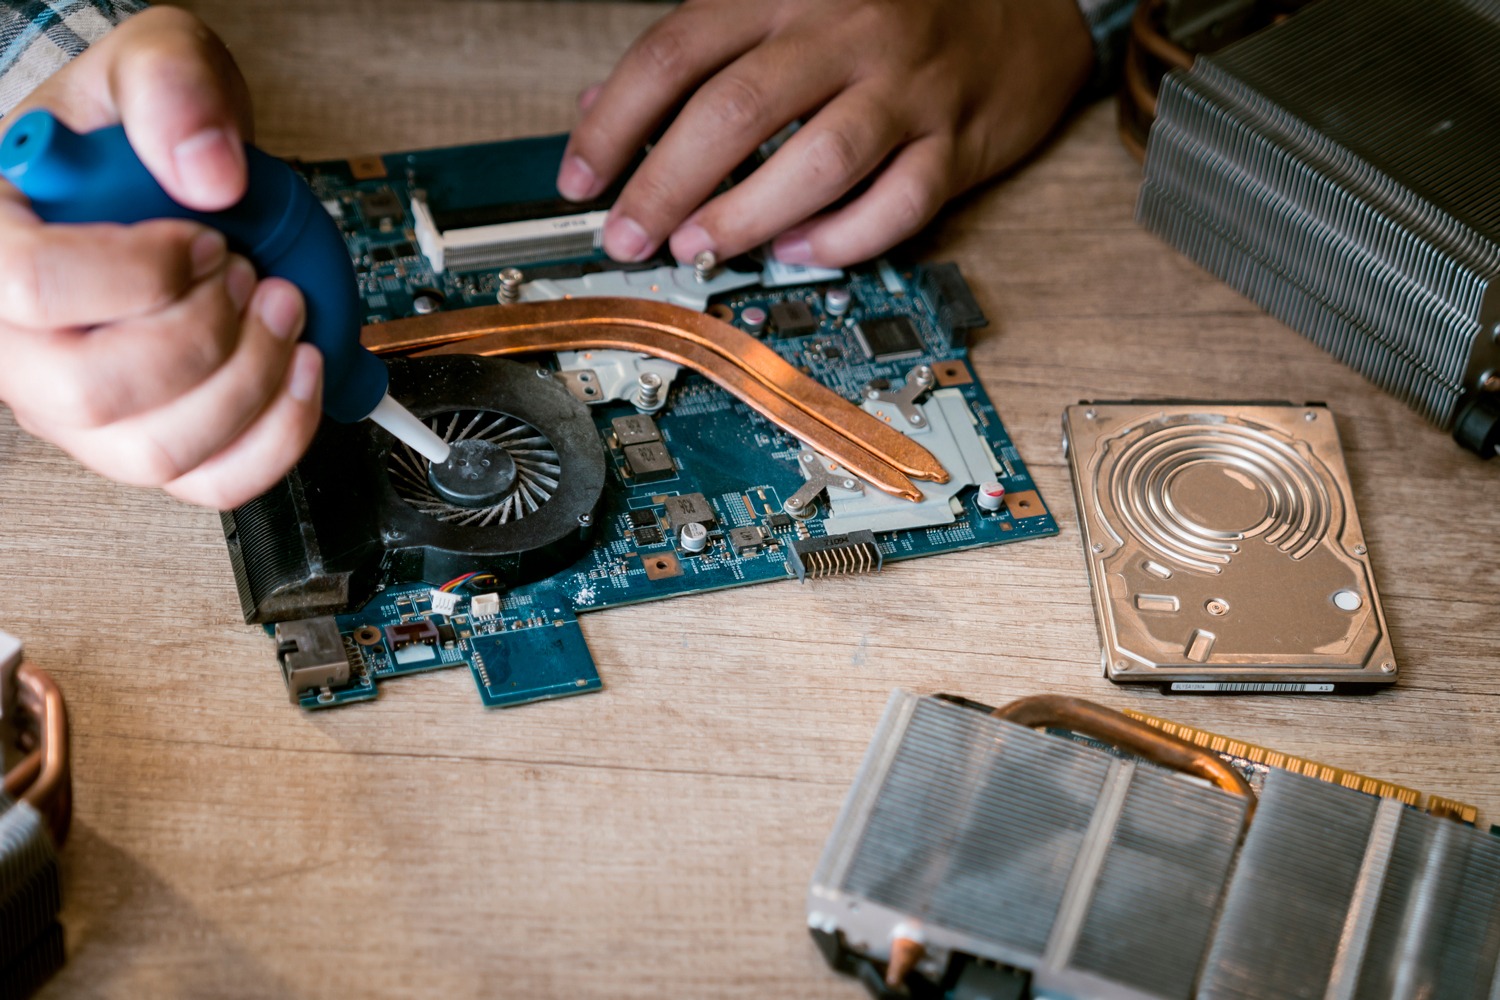
How to Clean the Laptop Fan Internally
Cleaning the laptop fan internally involves accessing the fan and removing any accumulated dust and debris from its components. This method provides a more thorough cleaning and ensures optimal airflow. Here’s a step-by-step guide on how to clean the laptop fan internally:
- Prepare the laptop: As mentioned before, turn off the laptop, unplug it from any power source, and ground yourself to avoid static electricity discharge.
- Gain access to the fan: Consult the manufacturer’s instructions or online resources specific to your laptop model to know how to access the fan. In most cases, it requires removing the laptop’s back cover or keyboard. Use a screwdriver to carefully remove any screws holding these components in place.
- Identify the fan and heat sink: Once you have access to the internal components, locate the fan and heat sink assembly. The fan is typically connected to the heat sink, which helps dissipate heat away from the CPU and GPU.
- Remove dust and debris: Use a can of compressed air to blow away the dust and debris from the fan blades, heat sink fins, and surrounding areas. Ensure that the fan blades are held in place to prevent them from spinning uncontrollably.
- Clean stubborn residue: If there is any stubborn dirt or grease on the fan blades or heat sink, dampen a cloth or cotton swab with a mixture of isopropyl alcohol and water (50:50 ratio) and gently wipe away the residue.
- Reapply thermal paste (optional): If you fully remove the heat sink from the CPU and GPU, make sure to clean off the existing thermal paste using isopropyl alcohol. Then, apply a small amount of fresh thermal paste to the CPU and GPU before reattaching the heat sink. This helps ensure proper heat transfer for efficient cooling.
- Reassemble the laptop: Once the fan and heat sink are clean, carefully reassemble the laptop by following the reverse steps of disassembly. Refer to your laptop’s documentation or online resources if you need guidance on the reassembly process.
Cleaning the laptop fan internally may require more effort, but it allows for thorough removal of dust and debris that could not be reached externally. By performing this cleaning periodically, you can maintain optimal cooling performance and extend the lifespan of your laptop.
Tips for Safe Cleaning
When cleaning your laptop fan, it’s important to prioritize safety and take precautions to avoid any damage to your device. Here are some useful tips to ensure a safe cleaning process:
- Handle the laptop with care: Always handle your laptop with care during the cleaning process. Avoid applying excessive force or pressure to prevent any accidental damage to the internal components.
- Avoid liquid cleaners: Avoid using liquid cleaners directly on the laptop fan or other internal components. Liquid can seep into sensitive areas and cause damage. Stick to compressed air and a clean, lint-free cloth for wiping.
- Maintain static electricity control: To prevent static electricity discharge, ground yourself by touching a grounded metal object or wearing an anti-static wrist strap. This helps protect delicate electronic components from damage.
- Make sure the laptop is powered off: It’s crucial to turn off your laptop and unplug it from any power sources before starting the cleaning process. This prevents any potential electrical accidents or damage when handling the internal components.
- Follow manufacturer’s instructions: Consult your laptop’s user manual or the manufacturer’s website for specific cleaning instructions. Different laptop models may have their own unique procedures, so it’s essential to follow the manufacturer’s guidelines to avoid any damage or voiding warranties.
- Work in a well-ventilated area: Make sure you’re working in a well-ventilated area to avoid inhaling any dust or debris particles that are dispersed during the cleaning process. This helps protect your respiratory system and ensures a cleaner environment.
- Use the right tools: Use the appropriate tools, such as a screwdriver, cotton swabs, and compressed air, to clean your laptop fan. Using the correct tools makes the cleaning process easier and minimizes the risk of damage to the fan or other components.
- Perform regular cleaning: Make cleaning your laptop fan a regular maintenance task. Regular cleaning helps prevent excessive dust buildup, ensuring optimal performance and extending the lifespan of your laptop.
By following these tips, you can safely clean your laptop fan without risking any damage to your device. Remember to prioritize safety and take your time to ensure a thorough and effective cleaning process.
How Often Should You Clean Your Laptop Fan?
The frequency at which you should clean your laptop fan depends on several factors, including the environment in which you use your laptop and how often you use it. However, as a general guideline, it is recommended to clean your laptop fan at least once every 3 to 6 months. Here are a few considerations to help you determine how often you should clean your laptop fan:
- Usage frequency: If you use your laptop daily and for extended periods, it is more likely to accumulate dust and debris quickly. In such cases, more frequent cleaning, such as every 3 months, may be required to maintain optimal performance.
- Environment: If you frequently use your laptop in a dusty or pet-friendly environment, the fan is more susceptible to clogging. In these situations, you may need to clean the fan more often to prevent overheating and potential damage to your laptop.
- Performance decline: Pay attention to any signs of decreased performance or increased temperature while using your laptop. If you notice your laptop running hotter than usual or experiencing performance issues, it may be an indication that the fan needs cleaning, even if it hasn’t been 3 to 6 months since the last cleaning.
- Visible dust accumulation: Take a look at the laptop fan and surrounding areas. If you can visibly see a significant amount of dust or debris on the fan blades or heat sink, it’s a clear indication that cleaning is needed, regardless of the timeframe since your last cleaning.
- Manufacturer’s recommendations: Some laptop manufacturers provide guidelines on recommended cleaning intervals for specific models. Check your laptop’s user manual or the manufacturer’s website to see if they provide any specific recommendations for cleaning the fan.
Ultimately, it’s important to pay attention to your laptop’s performance and any warning signs indicating that the fan needs cleaning. Regular cleaning, even if it’s just a quick maintenance, can help prevent dust buildup and ensure optimal airflow for efficient cooling.
Remember that these are general recommendations, and the frequency of cleaning your laptop fan may vary based on your specific usage and environment. Always assess the cleanliness of your laptop fan and adjust the cleaning schedule accordingly to keep your laptop running smoothly.
Benefits of Regularly Cleaning Your Laptop FanRegularly cleaning your laptop fan offers several benefits that can greatly improve the performance, reliability, and lifespan of your device. Here are some key advantages of keeping your laptop fan clean:
- Optimal cooling: By removing dust and debris from the fan blades and heat sink, cleaning the laptop fan ensures proper airflow and efficient cooling. This helps prevent overheating, which can lead to performance issues, system instability, and even permanent damage to internal components.
- Improved performance: An overheating laptop may experience reduced performance as the CPU and other components throttle their speed to avoid further heat buildup. Regular cleaning keeps the laptop running at optimal temperatures, allowing the hardware to perform at its highest capability without throttling.
- Extended lifespan: Overheating puts stress on the internal components of your laptop, potentially shortening their lifespan. With regular cleaning, you can mitigate the risk of heat-related damage and extend the overall lifespan of your device.
- Reduced noise: Dust buildup on the fan blades can cause them to become unbalanced and spin at higher speeds, resulting in louder fan noise. Cleaning the fan eliminates this dust and reduces the strain on the fan, resulting in quieter operation and a more pleasant computing experience.
- Prevention of system crashes and freezes: An overheating laptop is more prone to system freezes, crashes, and unexpected shutdowns. By maintaining a clean fan, you ensure that your laptop operates within safe temperature limits, reducing the likelihood of these frustrating issues.
- Improved battery life: Overheating can also affect battery performance and reduce its overall lifespan. Proper cooling through regular fan cleaning can help regulate temperatures, prolonging your laptop’s battery life and saving you from frequent battery replacements.
- Enhanced overall efficiency: Cleaning the fan not only benefits the cooling system but also improves the overall efficiency of your laptop. With efficient cooling, your laptop can run tasks more smoothly, minimize delays, and provide a better user experience.
- Cost savings: Regular fan cleaning can help you avoid expensive repairs or the need for a replacement laptop due to heat-related damage. By investing a little time in cleaning, you can prevent costly repairs and potentially extend the lifespan of your laptop.
Overall, the benefits of regularly cleaning your laptop fan extend beyond just cooling. It improves performance, increases the lifespan of your device, reduces noise, and enhances overall efficiency. By incorporating regular cleaning into your laptop maintenance routine, you can optimize your laptop’s performance and enjoy a more reliable computing experience.