
Checking the Chrome Version on Windows
If you’re using Google Chrome on a Windows operating system and want to check the version you currently have installed, there are a few simple methods you can use. Here are three easy ways to check your Chrome version on Windows:
-
Using the Chrome Menu:
To check your Chrome version using the Chrome menu, click on the three-dot icon located in the top-right corner of the browser window. From the drop-down menu, hover over the “Help” option and then click on “About Google Chrome.” A new tab will open, displaying the current version number of Chrome.
-
Using the Settings Page:
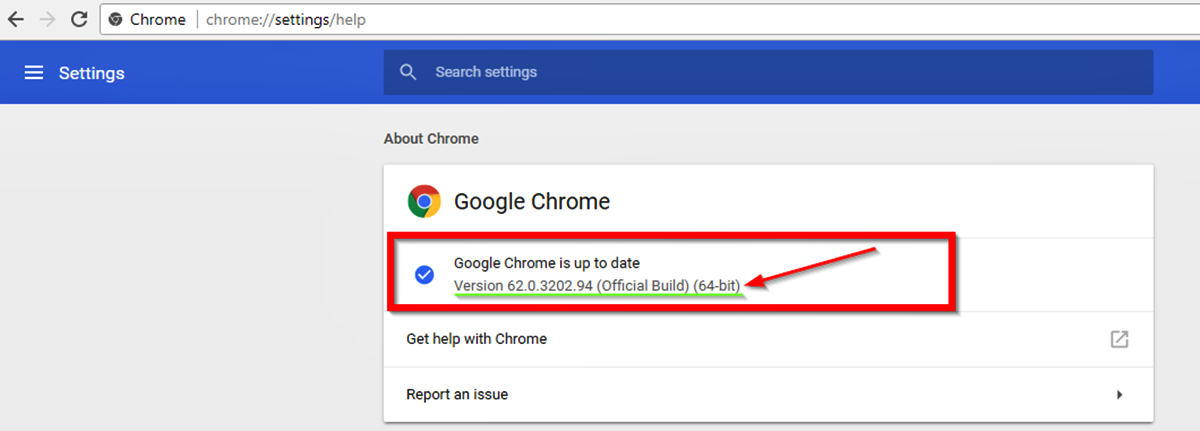
Another method to check your Chrome version on Windows is by accessing the Settings page. Simply click on the three-dot icon in the top-right corner, select “Settings,” and then scroll down to the bottom of the page. Click on the “About Chrome” option, and the version number will be displayed.
-
Using the About Chrome Page:
You can also directly access the About Chrome page to check your version. Open a new tab and type “chrome://settings/help” (without the quotes) into the address bar. Press Enter, and the About Chrome page will open, showing your current Chrome version.
By using any of these methods, you can easily determine the version of Google Chrome installed on your Windows computer. It’s important to keep your Chrome browser up to date, as newer versions often come with security patches, bug fixes, and performance improvements.
Checking the Chrome Version on Mac
If you are a Mac user and want to check which version of Google Chrome you have installed, there are a few simple ways to do so. Here are three methods you can use to check your Chrome version on Mac:
-
Using the Chrome Menu:
Start by clicking on the three-dot icon located in the top-right corner of the Chrome browser window. In the drop-down menu, hover over the “Help” option and then click on “About Google Chrome.” A new tab will open, displaying the current Chrome version you have installed on your Mac.
-
Using the Settings Page:
Another way to check your Chrome version on Mac is through the Settings page. Click on the three-dot icon in the top-right corner of the browser window and select “Settings” from the menu. Scroll down to the bottom of the page, and under the “About Chrome” section, you will find the version number of your Chrome browser.
-
Using the About Chrome Page:
You can also directly access the About Chrome page to check your version. Open a new tab in Chrome and type “chrome://settings/help” (without the quotes) into the address bar. Press Enter, and the About Chrome page will open, showing your current Chrome version on your Mac.
By utilizing any of these three approaches, you can quickly determine the version of Google Chrome installed on your Mac. Remember to regularly update your Chrome browser to enjoy the latest features, enhancements, and security fixes provided by Google.
Checking the Chrome Version on Linux
If you’re using a Linux operating system and want to check the version of Google Chrome installed on your system, there are a few methods to help you quickly find this information. Here are three ways to check your Chrome version on Linux:
-
Using the Chrome Menu:
To check your Chrome version using the Chrome menu, click on the three-dot icon located in the top-right corner of the browser window. From the drop-down menu, hover over the “Help” option and then click on “About Google Chrome.” A new tab will open, displaying the current version number of Chrome on your Linux system.
-
Using the Settings Page:
Another method is to access the Settings page. Click on the three-dot icon in the top-right corner of the browser window and select “Settings” from the menu. Scroll down to the bottom of the page, and under the “About Chrome” section, you will find the version number of your Chrome browser on Linux.
-
Using the Command Prompt or Terminal:
If you prefer using the command line, you can open the Terminal or Command Prompt on your Linux system. Enter the command “google-chrome –version” (without the quotes) and press Enter. The Terminal or Command Prompt will display the current version of Google Chrome installed on your Linux machine.
By using any of these methods, you can easily check the version of Google Chrome on your Linux system. It’s essential to keep your Chrome browser up to date to benefit from the latest features, security patches, and performance improvements provided by Google.
Checking the Chrome Version on Android
If you’re using Google Chrome on an Android device and want to check the version you have installed, there are a few simple methods you can use. Here are three ways to check your Chrome version on Android:
-
Using the Chrome Menu:
To check your Chrome version using the Chrome menu, open the Chrome app on your Android device and tap on the three-dot icon located in the top-right corner of the browser window. From the drop-down menu, tap on “Settings” and then select “About Chrome.” The version number of Chrome will be displayed.
-
Using the Device Settings:
Another method to check your Chrome version on Android is through the device settings. Open the Settings app on your Android device, scroll down and tap on “Apps” or “Application Manager,” depending on your device. Locate and tap on “Chrome” from the list of installed apps, and you’ll see the version number displayed.
-
Using the About Chrome Page:
You can also directly access the About Chrome page to check your version. Open the Chrome app on your Android device, type “chrome://version” (without the quotes) into the address bar, and tap Enter. The About Chrome page will open, displaying the current Chrome version installed on your Android device.
By using any of these methods, you can easily determine the version of Google Chrome installed on your Android device. It’s important to keep your Chrome browser up to date for a smooth browsing experience and to benefit from the latest security patches, bug fixes, and performance improvements provided by Google.
Checking the Chrome Version on iPhone or iPad
If you’re using Google Chrome on an iPhone or iPad and want to check the version you have installed, there are a few simple methods you can use. Here are three ways to check your Chrome version on iPhone or iPad:
-
Using the Chrome Menu:
To check your Chrome version using the Chrome menu, open the Chrome app on your iPhone or iPad and tap on the three-dot icon located in the bottom-right corner of the browser window. From the menu, tap on “Settings” and then select “About Chrome.” The version number of Chrome will be displayed.
-
Using the Device Settings:
Another method to check your Chrome version on iPhone or iPad is through the device settings. Go to your device’s home screen, open the Settings app, and scroll down to find the list of installed apps. Tap on “Chrome” from the list, and you’ll see the version number displayed.
-
Using the App Store:
You can also check your Chrome version by visiting the App Store on your iPhone or iPad. Open the App Store, tap on the “Updates” tab at the bottom, and then locate “Chrome” in the available updates list. The version number will be displayed next to the Chrome app.
By using any of these methods, you can easily determine the version of Google Chrome installed on your iPhone or iPad. It’s important to keep your Chrome browser up to date for optimal performance and to take advantage of the latest features, security enhancements, and bug fixes provided by Google.
Checking the Chrome Version Using the Chrome Menu
One of the easiest methods to check the version of Google Chrome installed on your computer is by using the Chrome menu. Here is a step-by-step guide on how to check the Chrome version using the Chrome menu:
-
Step 1: Open the Chrome Menu
Launch the Google Chrome browser on your computer. At the top-right corner of the browser window, you will see a three-dot icon. Click on this icon to open the Chrome menu.
-
Step 2: Hover Over “Help”
In the Chrome menu, hover your cursor over the “Help” option. This will open a submenu with additional options.
-
Step 3: Click “About Google Chrome”
In the submenu, click on the “About Google Chrome” option. This will open a new tab in your browser.
-
Step 4: View the Chrome Version
The new tab that opens will display information about your Chrome browser, including the current version number. The version number is typically displayed near the top of the page.
By following these simple steps, you can easily check the version of Google Chrome using the Chrome menu. It’s recommended to keep your Chrome browser up to date by regularly checking for and installing any available updates. This ensures you have access to the latest features, security patches, and performance improvements provided by Google.
Checking the Chrome Version Using the Settings Page
Another convenient method to check the version of Google Chrome installed on your computer is by using the Settings page. Here’s a step-by-step guide on how to check the Chrome version using the Settings page:
-
Step 1: Open the Chrome Menu
Launch the Google Chrome browser on your computer. At the top-right corner of the browser window, you will see a three-dot icon. Click on this icon to open the Chrome menu.
-
Step 2: Access the Settings
In the Chrome menu, hover your cursor over the “Settings” option. This will open a submenu with various options.
-
Step 3: Visit the “About Chrome” Section
In the submenu, click on the “Settings” option. This will open the Chrome browser’s Settings page.
-
Step 4: Find the Chrome Version
Scroll down on the Settings page until you reach the bottom. Look for the “About Chrome” section, which contains information about your Chrome browser. You will find the version number displayed here.
By following these simple steps, you can easily check the version of Google Chrome using the Settings page. It’s essential to keep your Chrome browser up to date by regularly checking for and installing any available updates. This ensures you have access to the latest features, security patches, and performance improvements provided by Google.
Checking the Chrome Version Using the About Chrome Page
If you want to quickly check the version of Google Chrome installed on your computer, you can do so by accessing the About Chrome page. Follow these steps to check the Chrome version using the About Chrome page:
-
Step 1: Open the Chrome Browser
Launch the Google Chrome browser on your computer by double-clicking on the Chrome icon on your desktop.
-
Step 2: Enter the About Chrome URL
In the address bar of the Chrome browser, type “chrome://settings/help” (without the quotes) and press Enter. This will open the About Chrome page.
-
Step 3: View the Chrome Version
On the About Chrome page, you will see the version number of the Chrome browser displayed at the top of the page. The version number will be followed by additional information about the browser, such as the update status and other details.
By following these simple steps, you can easily check the version of Google Chrome using the About Chrome page. It’s important to keep your Chrome browser up to date by regularly checking for and installing any available updates. This not only ensures optimal performance but also provides you with access to the latest features, security enhancements, and bug fixes provided by Google.
Checking the Chrome Version Using the Chrome Extensions Page
If you want to find out the version of Google Chrome installed on your computer, you can do so by accessing the Chrome Extensions page. Here’s how you can check the Chrome version using the Chrome Extensions page:
-
Step 1: Open the Chrome Menu
Launch the Google Chrome browser on your computer. At the top-right corner of the browser window, you will see a three-dot icon. Click on this icon to open the Chrome menu.
-
Step 2: Visit the Extensions Page
In the Chrome menu, hover your cursor over the “More Tools” option. This will open a submenu. From the submenu, click on “Extensions.” This will open the Chrome Extensions page.
-
Step 3: Find the Chrome Version
On the Chrome Extensions page, scroll down to the bottom. In the footer section, you will find the version number of Google Chrome displayed next to the Chrome logo. The version number may also include additional information about the build and the update status.
By following these simple steps, you can easily check the version of Google Chrome using the Chrome Extensions page. It’s crucial to keep your Chrome browser up to date by installing any available updates. This ensures that you have the latest features, security patches, and performance improvements provided by Google.
Checking the Chrome Version Using the Command Prompt or Terminal
If you prefer using the command line, you can check the version of Google Chrome installed on your computer using the Command Prompt (Windows) or Terminal (Mac/Linux). Here’s how to do it:
-
Step 1: Open the Command Prompt or Terminal
On Windows, open the Command Prompt by pressing the Windows key + R, typing “cmd” (without the quotes), and hitting Enter. On Mac, open the Terminal by pressing Command + Space, typing “Terminal,” and hitting Enter.
-
Step 2: Enter the Chrome Version Command
Inside the Command Prompt or Terminal window, type the command “google-chrome –version” (without the quotes) and press Enter. This command will display the version of Google Chrome installed on your computer.
-
Step 3: View the Chrome Version
The Command Prompt or Terminal will display the version number of Google Chrome. You’ll be able to see the major version, minor version, and any additional details associated with the version.
By following these steps, you can easily check the version of Google Chrome installed on your computer using the Command Prompt or Terminal. It’s important to keep your Chrome browser up to date by regularly checking for and installing any available updates. This ensures that you have access to the latest features, security patches, and performance improvements provided by Google.
Finding the Chrome Version in the Browser’s User Agent String
If you want to find the version of Google Chrome without accessing any specific menus or settings, you can do so by examining the browser’s User Agent string. Here’s how you can find the Chrome version in the User Agent string:
-
Step 1: Open the Chrome Browser
Launch the Google Chrome browser on your computer by double-clicking on the Chrome icon on your desktop or selecting it from the applications menu.
-
Step 2: Open the Developer Tools
On Windows and Linux, press Ctrl + Shift + I (or F12) to open the Developer Tools. On Mac, press Command + Option + I.
-
Step 3: Go to the “Network” Tab
In the Developer Tools window, go to the “Network” tab.
-
Step 4: Refresh the Page
Either reload the current page or navigate to a new page to capture network requests.
-
Step 5: View the User Agent String
In the list of network requests, find any request that contains “chrome” in its name. Click on that request, and in the Headers tab, look for the “User-Agent” field. The User Agent string includes the version number of Google Chrome.
By following these steps and examining the User Agent string in the Developer Tools, you can easily find the version of Google Chrome installed on your computer. Remember to keep your Chrome browser up to date by regularly checking for and installing any available updates. This ensures that you have access to the latest features, security patches, and performance improvements provided by Google.
Understanding Chrome Version Numbers and Updates
Google Chrome follows a specific version numbering scheme, and understanding these version numbers can help you stay informed about updates and improvements to the browser. Here’s an overview of Chrome version numbers and updates:
Chrome version numbers typically consist of four segments separated by periods, such as 92.0.4472.101. Each segment represents a different level of detail:
-
Major Version:
The first segment represents the major version number. This number changes when a significant update or new release is introduced. Major updates often include major feature enhancements, design changes, security improvements, and performance optimizations.
-
Minor Version:
The second segment indicates the minor version number. Minor updates typically introduce new features, bug fixes, and smaller performance improvements. These updates often focus on enhancing specific functionalities or addressing user-reported issues.
-
Build Number:
The third segment represents the build number. Build updates usually consist of technical changes, security patches, and fixes that are released between minor updates. These updates are crucial for maintaining stability and security in the browser.
-
Patch Number:
The fourth segment denotes the patch number. Patch updates are released to address critical security vulnerabilities, bugs, and performance issues identified after the initial release or subsequent minor updates.
Google Chrome automatically checks for updates and installs them in the background. Regularly updating your Chrome browser ensures you have access to the latest features, performance improvements, security patches, and bug fixes from Google. You can manually check for updates by clicking on the three-dot Chrome menu icon, selecting “Help,” and then clicking on “About Google Chrome.”
It’s important to note that Chrome version numbers may vary slightly across different operating systems and platforms. However, the basic versioning structure and update process remain consistent.
By staying informed about Chrome version numbers and updates, you can ensure that your browsing experience is optimized, secure, and up to date with the latest developments from Google.