
Why Change Your iPad Name?
Changing the name of your iPad might not be the first thing that comes to mind when you think of customization options, but it can actually offer several benefits. Here are a few reasons why you might consider changing your iPad’s name:
- Personalization: By giving your iPad a unique name, you can make it feel more personal and tailored to your preferences. It allows you to add a touch of individuality to your device and make it stand out in a crowded sea of devices.
- Organization: If you own multiple Apple devices, such as an iPhone, Macbook, or Apple Watch, changing the name of your iPad can help you easily identify and differentiate it from the other devices. This can be especially useful when using applications like AirDrop or iCloud, where having distinct device names can help streamline file sharing and syncing.
- Security: Changing your iPad’s name can provide an additional layer of security. When connecting to Wi-Fi networks, your device’s name may be visible to others. By using a generic name or something unrelated to your personal information, you can prevent potential unauthorized access or targeted attacks based on your device’s name.
- Privacy: Your iPad’s name may show up on various network-connected devices or services, such as Bluetooth devices or other Apple devices in your vicinity. By modifying the name, you can minimize the chances of inadvertently revealing personal information or device ownership.
- Fun and creativity: Renaming your iPad offers a chance to unleash your creativity and have a little fun. You can choose a name that reflects your interests, hobbies, or simply showcases your sense of humor.
Whether you prefer a practical approach or want to inject some personality into your device, changing the name of your iPad can be an enjoyable and advantageous task. Let’s now explore the step-by-step process to change the name of your iPad!
Steps to Change Your iPad Name
If you’re ready to give your iPad a new name, follow these simple steps to change it:
- Step 1: Open the Settings app
Go to your iPad’s home screen and tap on the “Settings” app. It is represented by a gear icon and is usually located on the first page of your home screen. - Step 2: Access General settings
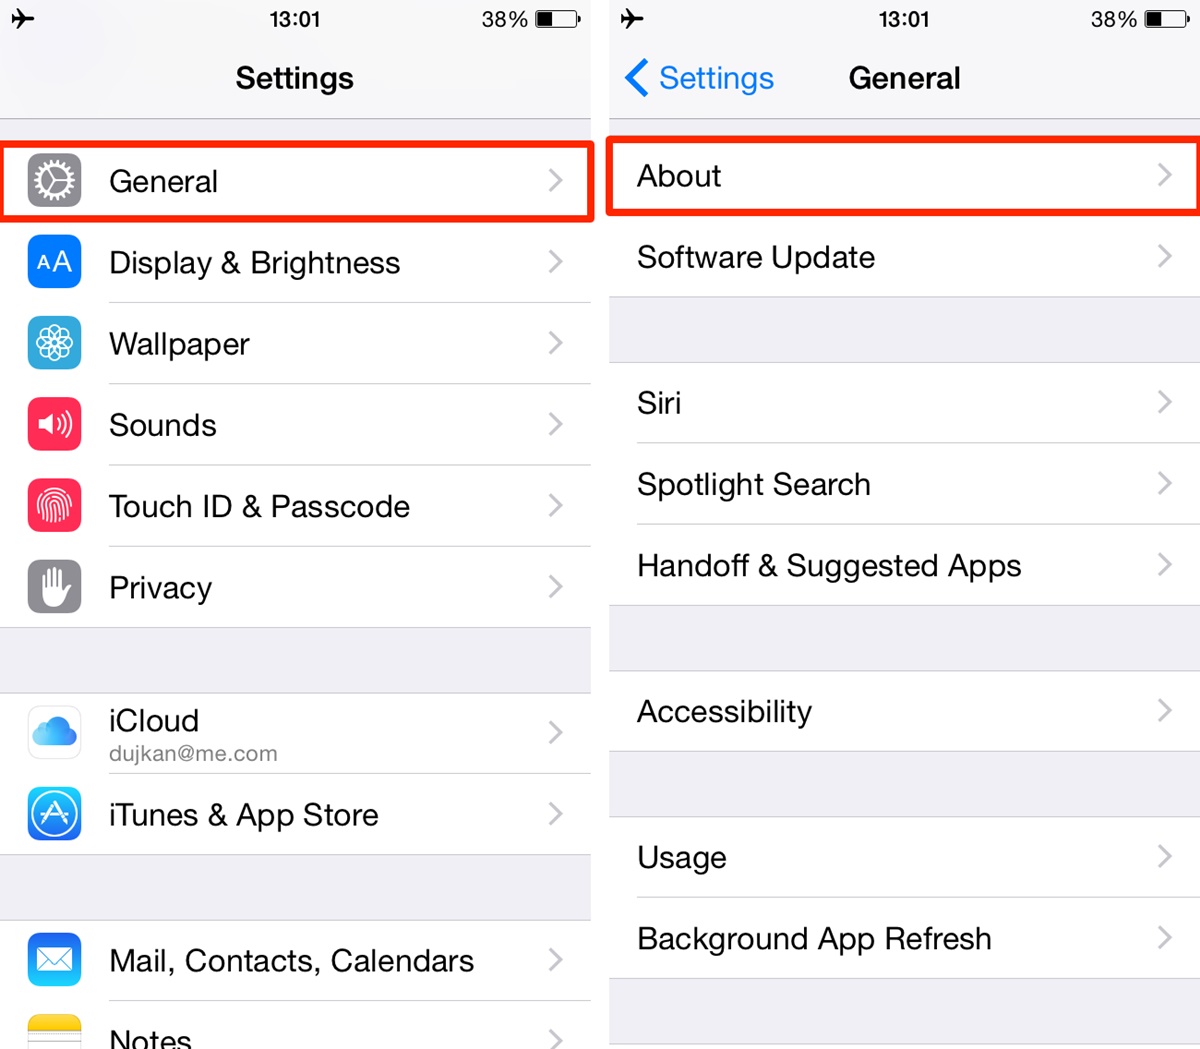
In the Settings app, scroll down and tap on “General.” This will open the general settings menu that contains various options for customizing your device. - Step 3: Tap on About
Within the General settings, locate and tap on “About.” This section provides detailed information about your iPad, including its name, software version, and other relevant details. - Step 4: Tap on Name
Once you are in the About section, you will see various details about your iPad. Look for the entry labeled “Name” and tap on it. - Step 5: Enter the new name
After tapping on “Name,” a text field will appear where you can enter the new name for your iPad. Use the on-screen keyboard to type in the desired name. Keep in mind that the name should be unique and not already in use by another device. - Step 6: Save the changes
After entering the new name, tap on “Done” or “Save” to confirm the changes. Your iPad will then update its name, and you’ll see the new name reflected in the About section as well as in other places where the device name is displayed.
That’s it! You have successfully changed the name of your iPad. Enjoy using your newly personalized device!
Step 1: Open the Settings App
To begin the process of changing your iPad’s name, you first need to open the Settings app. The Settings app serves as the control center for customizing various aspects of your device. Here’s how you can access it:
- Unlock your iPad: Press the Home button or swipe up from the bottom of the screen to unlock your iPad. Enter your passcode or use Touch ID/Face ID if necessary.
- Locate the Settings app: On your iPad’s home screen, look for the app icon that resembles a silver gear. It is typically located on the first page, but you may need to swipe left or right to find it if you have multiple home screen pages.
- Tap on the Settings app: Once you have located the Settings app, tap on it to open it. The app will launch, revealing a variety of options and settings you can modify.
Opening the Settings app is the first step towards changing your iPad’s name. It is important to note that the Settings app is a crucial tool for managing and customizing various aspects of your iPad, so familiarizing yourself with its layout and options can be beneficial.
Now that you have successfully opened the Settings app, you’re ready to proceed to the next step in the process.
Step 2: Access General Settings
Once you have opened the Settings app on your iPad, the next step is to access the General settings. The General settings menu contains various options for customizing your device. Here’s how you can find and access the General settings:
- Look for the “General” option: Scroll down through the Settings app until you locate the “General” option. It is usually positioned among the top sections of the app, just below the initial options like Wi-Fi and Bluetooth.
- Tap on “General”: Once you have found the “General” option, tap on it to access the general settings menu. When you tap on it, the screen will transition to a new page dedicated to the general settings of your iPad.
By accessing the General settings, you can navigate through various options, including software updates, accessibility features, device management, and more. This section allows you to make broad changes that impact the overall functionality and behavior of your iPad.
Take a moment to explore the different options and familiarize yourself with the General settings. This will help you become more confident in navigating through the settings and will assist you in making any necessary changes.
Now that you have successfully accessed the General settings, you’re ready to move on to the next step in changing your iPad’s name – tapping on the “About” option.
Step 3: Tap on About
After accessing the General settings of your iPad, the next step in changing your iPad’s name is to tap on the “About” option. The “About” section provides detailed information about your device, including its name, software version, storage capacity, and more. Here’s how you can find and tap on the “About” option:
- Scroll down the General settings: On the General settings page, scroll down until you see the option labeled “About.” It is typically located towards the bottom of the menu.
- Tap on “About”: Once you have located the “About” option, tap on it to access the detailed information about your iPad.
By tapping on the “About” option, you will be able to view essential details regarding your iPad’s hardware and software. This section provides useful information that can help you troubleshoot issues, check for software updates, or verify the authenticity of your device.
It’s worth noting that the “About” section also contains the current name of your iPad. This is the name that is being displayed to other devices when you connect via Bluetooth or Wi-Fi. Changing this name is the ultimate goal of this process, so continue to the next step to proceed with naming your iPad.
Step 4: Tap on Name
Now that you’ve reached the “About” section of your iPad’s settings, the next step in changing your iPad’s name is to tap on the “Name” option. This is where you can modify the current name of your device. Follow these simple instructions to access the “Name” setting:
- Locate the “Name” option: Scroll down through the “About” section until you find an entry labeled “Name”. It is usually located towards the top of the “About” page.
- Tap on “Name”: Once you’ve located the “Name” option, simply tap on it to proceed to the next step.
By tapping on the “Name” option, you’re signaling your intention to modify the existing name of your iPad. This action will allow you to enter a new name and personalize your device according to your preferences.
Before moving on to the next step, take a moment to think about the new name you want to give your iPad. Consider a name that reflects your personality, interests, or simply makes it unique and easy to identify.
Now that you’ve successfully tapped on the “Name” option, you’re ready to proceed to the next step and enter the new name for your iPad.
Step 5: Enter the New Name
After tapping on the “Name” option in the “About” section of your iPad’s settings, it’s time to enter the new name for your device. Follow these steps to input your desired name:
- Tap on the text field: Once you’ve accessed the “Name” setting, you’ll see a text field where the current name of your iPad is displayed. Tap on this text field to activate the virtual keyboard.
- Type in the new name: Using the virtual keyboard, enter the new name you want to assign to your iPad. Keep in mind that the name should be unique and not already in use by another device. You can use a combination of letters, numbers, and special characters in the name.
- Review your new name: Take a moment to review the new name you’ve entered in the text field. Make sure it accurately represents your desired naming choice.
Entering the new name allows you to personalize your iPad and give it a distinct identity. You can choose a name that reflects your personality, showcases your interests, or simply makes it easier to recognize among other connected devices.
Remember, the name you choose for your iPad should be something memorable and meaningful to you. It’s an opportunity to add a touch of individuality to your device and make it uniquely yours.
Once you have entered your new name, continue to the next step to save the changes and apply the new name to your iPad.
Step 6: Save the Changes
After entering the new name for your iPad, the final step in the process of changing your iPad’s name is to save the changes. Here’s what you need to do:
- Review the new name: Before saving the changes, take a moment to double-check the new name you’ve entered. Make sure it’s precisely what you want.
- Tap on “Done” or “Save”: Look for the option to save the changes. Depending on the iOS version you’re using, you may see either a “Done” or “Save” button. Tap on this button to proceed.
By tapping on “Done” or “Save,” you confirm the new name you’ve entered and apply it to your iPad. The changes will be immediately reflected in the system settings and displayed to other devices when connecting via Bluetooth or Wi-Fi.
It’s important to note that some apps or services may require you to restart your iPad for the name change to take effect. If prompted, follow the instructions to restart your device and ensure that the new name is fully updated across all system functions.
Congratulations! You’ve successfully changed the name of your iPad. Enjoy using your newly renamed device and let it reflect your personal style and preferences.
Benefits of Changing Your iPad Name
Changing the name of your iPad can offer several benefits that go beyond just personalization. Here are some advantages of changing your iPad’s name:
- Personalization: By giving your iPad a unique name, you can make it feel more personal and tailored to your preferences. It allows you to add a touch of individuality to your device and make it stand out in a crowded sea of devices.
- Organization: If you own multiple Apple devices, such as an iPhone, Macbook, or Apple Watch, changing the name of your iPad can help you easily identify and differentiate it from the other devices. This can be especially useful when using applications like AirDrop or iCloud, where having distinct device names can help streamline file sharing and syncing.
- Enhanced Security: Changing your iPad’s name can provide an additional layer of security. When connecting to Wi-Fi networks, your device’s name may be visible to others. By using a generic name or something unrelated to your personal information, you can prevent potential unauthorized access or targeted attacks based on your device’s name.
- Privacy: Your iPad’s name may show up on various network-connected devices or services, such as Bluetooth devices or other Apple devices in your vicinity. By modifying the name, you can minimize the chances of inadvertently revealing personal information or device ownership.
- Easy Identification: Changing the name of your iPad can make it easier to locate and identify your device in various scenarios. For example, when using Find My iPad, a unique name can help you quickly identify your device in a list of other devices.
- Fun and Creativity: Renaming your iPad offers a chance to unleash your creativity and have a little fun. You can choose a name that reflects your interests, hobbies, or simply showcases your sense of humor. It’s a small way to bring enjoyment and personality to your device.
Whether you’re looking for personalization, improved organization, enhanced security, or simply a bit of fun, changing the name of your iPad can provide a range of benefits. Take advantage of this feature and make your iPad unique to you!
Things to Consider Before Changing Your iPad Name
Before you go ahead and change the name of your iPad, there are a few important factors to consider. Take a look at these points to ensure a smooth transition and avoid any potential issues:
- Compatibility with Apps and Services: Keep in mind that changing your iPad’s name may impact the compatibility of certain apps or services that rely on device identification. While most apps and services should adjust to the new name seamlessly, there is a possibility that some may require additional steps or updates to function properly.
- iCloud and Apple ID: If you are using iCloud and have your iPad associated with your Apple ID, changing the device name may not automatically update the name in all areas of your iCloud account. To ensure consistency, you may need to manually update the device name in the iCloud settings as well.
- Wireless Networks: When you change your iPad’s name, it may affect the way it connects to wireless networks. Some networks may still recognize your device by its previous name, which could lead to connection issues. If this happens, you may need to manually reconnect your iPad to the network or restart the router.
- Apple Support and Warranty: It’s worth noting that changing the name of your iPad has no impact on your AppleCare warranty coverage or access to Apple support. However, if you ever need to contact Apple support for assistance, they may ask you to provide the previous name of the device for verification purposes.
- Synchronization and Backups: Changing your iPad’s name should not affect your existing data or backups. However, it’s always a good practice to have a recent backup of your device before making any significant changes. This ensures that you have a copy of your data in case of any unexpected issues during or after the renaming process.
- Consistency: If you’re using multiple Apple devices within your ecosystem, such as an iPhone, Mac, or Apple Watch, it may be beneficial to maintain a consistent naming convention across all devices. This can help streamline the identification and management of your devices, making it easier for you to locate and use them.
Considering these factors before changing your iPad’s name can help you avoid any unexpected issues and ensure a smooth transition. Take the time to evaluate how the name change may potentially impact your device and its interactions with apps, services, and other devices in your Apple ecosystem.
FAQs about Changing the iPad Name
Here are some frequently asked questions about changing the name of your iPad:
- 1. Can I change the name of my iPad anytime?
Yes, you can change the name of your iPad at any time by following the steps outlined in this guide. It’s a simple process that can be done within the Settings app on your device. - 2. Will changing the iPad name delete my data?
No, changing the name of your iPad will not delete any data or settings from your device. It is purely a cosmetic change that does not affect the functionality or content stored on your iPad. - 3. Should I choose a unique name for my iPad?
Choosing a unique name for your iPad can be beneficial, especially if you own multiple Apple devices. A unique name helps you easily identify and differentiate your iPad from other devices when connecting via Bluetooth or Wi-Fi. - 4. Can I use special characters in the iPad name?
Yes, you can use special characters in the name of your iPad. However, it’s important to note that not all applications or services may support special characters in device names, so it’s best to use alphanumeric characters to ensure compatibility. - 5. Will changing my iPad’s name affect its warranty or support?
No, changing the name of your iPad will not affect your warranty or support from Apple. The device name is not linked to the warranty or support coverage provided by Apple, so you can change it without any concerns in this regard. - 6. Can I revert to the original name after changing it?
Yes, you can always revert to the original name of your iPad if you decide that you prefer it or want to restore the default settings. Simply follow the same steps outlined in this guide and enter the original name of your device. - 7. Will changing my iPad’s name affect its performance?
No, changing the name of your iPad will not have any impact on its performance. The device name is simply a label used for identification purposes and does not affect the hardware or software of your device.
These are some common questions related to changing the name of an iPad. Hopefully, they address any concerns or uncertainties you may have about the process.