
Selecting and Opening a Google Docs File
Google Docs is a powerful online word processing tool that allows you to create and collaborate on documents. If you want to change the background of a Google Docs file to a picture, follow the steps below:
To start, navigate to the Google Docs homepage and sign in to your Google account. Once you’re signed in, you will be able to access all of your saved documents. Locate the document you want to work on and click on it to open it in the Google Docs editor.
If you don’t have an existing document, you can create a new one by clicking on the “Blank” option in the “Start a new document” section.
Upon opening the document, you will be presented with a clean and blank canvas where you can start entering your content. Take a moment to ensure that you have the correct document open before proceeding.
Before you can change the background to a picture, it’s important to have the right document selected. Double-check that you are working in the correct Google Docs file to avoid making unintended changes to other documents.
Once you have verified that you are in the right document, you can proceed to the next step, which involves navigating to the “Page setup” option within Google Docs. The “Page setup” option allows you to customize various document settings, including the document’s background.
Navigating to the “Page setup” Option
Changing the background of a Google Docs file to a picture requires accessing the “Page setup” option. Follow the steps below to navigate to this option:
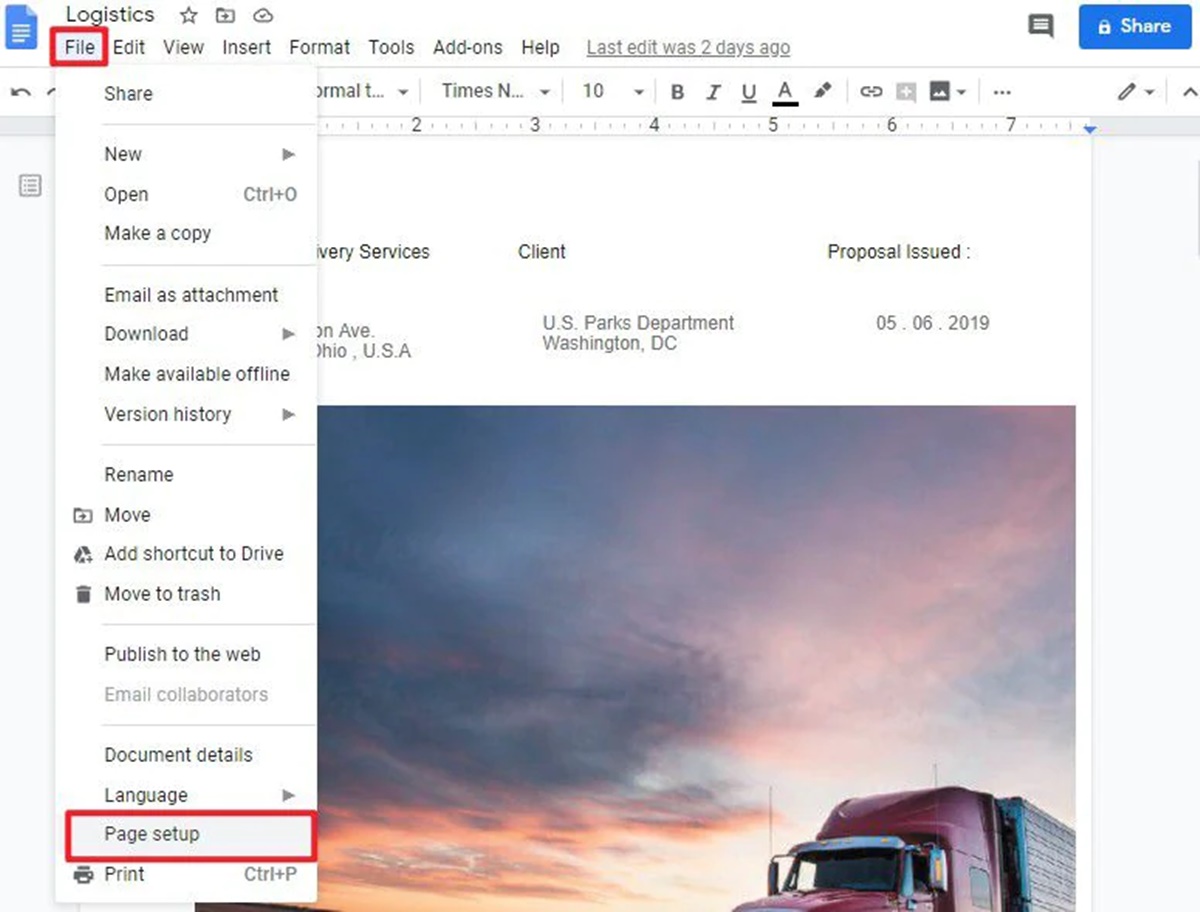
1. Once you have opened your Google Docs file, look for the “File” tab located at the top left corner of the screen. Click on it to reveal a dropdown menu.
2. In the dropdown menu, scroll down and select the “Page setup” option. This will open a new window where you can modify various settings for your document.
3. Alternatively, you can also access the “Page setup” option by clicking on the “File” tab and selecting “Page setup” from the submenu. This will directly open the same window for modifying document settings.
Upon clicking the “Page setup” option, you will be presented with a range of customizable settings, including margins, page orientation, and paper size. This is where you can make modifications to the document’s background.
By accessing the “Page setup” option, you are now one step closer to changing the background of your Google Docs file to a picture. In the next section, we will explore how to access the “Page Background” menu to proceed with this customization.
Accessing the “Page Background” Menu
To change the background of a Google Docs file to a picture, you need to access the “Page Background” menu. Follow the steps below to access this menu:
1. After opening the “Page setup” window, you will notice a tab labeled “Page background” at the top of the window. Click on this tab to access the “Page Background” menu.
2. Upon clicking the “Page background” tab, a dropdown menu will appear. This menu provides several options for customizing the background of your Google Docs file.
3. Among the options in the dropdown menu, click on the “Image” option. This will allow you to upload an image and set it as the background of your document.
4. By selecting the “Image” option, a new window will open where you can choose an image from various sources, including your computer, Google Drive, or the web. You can also search for images directly from the window using the integrated Google Image search feature.
5. Once you have selected an image, click the “Insert” button. The image will be inserted into your document and set as the background.
By successfully accessing the “Page Background” menu and selecting the “Image” option, you are now ready to upload and set an image as the background of your Google Docs file. In the next section, we will explore how to upload an image from your device.
Choosing the “Image” Option
Once you have accessed the “Page Background” menu in Google Docs, you can choose the “Image” option to upload and set an image as the background of your document. Follow the steps below to select the “Image” option:
1. After opening the “Page Background” menu, you will see a dropdown with several options. Navigate and click on the “Image” option in the dropdown menu.
2. By selecting the “Image” option, a new window will appear where you can upload an image from various sources.
3. In the image upload window, you will find multiple tabs such as “Upload”, “Drive”, and “Web”. These tabs allow you to choose the source of the image you want to set as the background.
4. If you have an image saved on your computer or device, click on the “Upload” tab. This will enable you to browse your files and select the desired image.
5. Alternatively, if your image is stored in your Google Drive, click on the “Drive” tab. This option allows you to select an image from your Google Drive storage.
6. If you prefer to search for an image online, click on the “Web” tab. You can then enter keywords or a specific URL to find an image that suits your background preferences.
By choosing the “Image” option in the “Page Background” menu, you have unlocked the ability to upload, select, and set an image as the background of your Google Docs document. In the next section, we will delve into the process of uploading an image from your device.
Uploading an Image from Your Device
To change the background of your Google Docs file to a picture, you can easily upload an image from your device. Follow the steps below to successfully upload an image:
1. After selecting the “Image” option in the “Page Background” menu, a new window will appear where you can choose the source of the image.
2. To upload an image from your device, click on the “Upload” tab in the image upload window. This will allow you to browse your computer’s files and folders.
3. Once you have accessed your computer’s files, navigate to the folder where your desired image is saved. Select the image file and click “Open” or “Upload” (depending on your operating system).
4. The selected image will be uploaded and inserted as the background of your Google Docs document. You may need to wait a few seconds for the upload process to complete, especially if the image file is large.
5. After the image has been successfully uploaded, you will see it displayed as the background of your document. You can preview how it looks and make further adjustments as necessary.
It’s important to note that the image you upload will be stretched to fit the page dimensions. Therefore, it’s advisable to use an image with a resolution that matches or exceeds the dimensions of your document to avoid any pixelation or distortion.
By following these steps, you can easily upload an image from your device and set it as the background of your Google Docs file. Next, we will explore how to modify the settings of the image to achieve the desired visual effect.
Modifying the Image Settings
Once you have uploaded an image as the background of your Google Docs file, you have the option to modify the settings of the image to achieve the desired visual effect. Follow the steps below to modify the image settings:
1. With the image selected as the background, click on it to activate the “Image options” toolbar. This toolbar will appear at the top of the screen, providing you with various customization options.
2. In the “Image options” toolbar, you will find options such as “Format options”, “Image size”, “Image rotation”, and more.
3. To adjust the size of the image, click on the “Image size” option. This will allow you to resize the image proportionally by dragging the handles at the corners or edges of the image.
4. If you want to rotate the image, click on the “Image rotation” option. You can then choose to rotate the image clockwise or counterclockwise in 90-degree increments.
5. Additionally, you can use the “Image transparency” option to make the image more transparent or opaque. Adjust the slider to control the level of transparency you desire.
6. To further customize the appearance of the image, click on the “Format options” tab. Here, you can apply filters, adjust brightness, contrast, and saturation, and even crop the image to focus on specific elements.
By modifying the image settings, you can fine-tune the visual presentation and ensure the background aligns with your document’s overall aesthetic. Take your time to experiment with the various settings and find the perfect combination that enhances your document.
Once you’re satisfied with the modifications, you can move on to adjusting the position and size of the image in the next section.
Adjusting the Position and Size of the Image
After modifying the settings of the image in your Google Docs document, you may want to further refine its positioning and size. Follow the steps below to adjust the position and size of the image:
1. With the image selected as the background, click on it to activate the “Image options” toolbar at the top of the screen.
2. In the “Image options” toolbar, locate the “Position” option. This allows you to control the placement of the image within the document.
3. Click on the dropdown arrow next to the “Position” option to reveal the available placement options, such as “Wrap text”, “Fix position on page”, “Move with text”, and more.
4. Select the appropriate placement option based on your preferences. For example, choosing the “Wrap text” option will allow the text to flow around the image, while “Fix position on page” will keep the image in a fixed position regardless of the text movement.
5. To resize the image, you can click and drag the handles located at the corners or edges of the image. This will allow you to adjust its dimensions to better fit your document layout.
6. You can also manually input specific measurements for the image size by selecting the image and entering the desired dimensions in the toolbar that appears above it.
By adjusting the position and size of the image, you can ensure that it is visually aligned with your document’s content. Experiment with different placement options and resizing techniques to find the optimal position and dimensions for the image in your Google Docs file.
Once you’re satisfied with the image’s placement and size, you can proceed to apply the background image to all pages or specific ones in the next section.
Applying the Background Image to All Pages (or Specific Ones)
When you have set an image as the background in your Google Docs document, you have the option to apply it to all pages or only specific ones. Follow the steps below to apply the background image as per your preference:
1. After customizing and positioning the image as desired, right-click on the image to bring up the context menu. Alternatively, you can select the image and click on the “Format” tab in the toolbar.
2. In the context menu or the “Format” tab, select the option labeled “Background”. This will open a submenu with further customization options.
3. In the “Background” submenu, you will find two options: “Apply to all” and “Apply to selected”. Choose the appropriate option based on your requirements.
4. If you want the background image to be applied to all pages in your Google Docs document, select the “Apply to all” option. This will set the image as the background for every page in the document.
5. If you want the background image to be applied only to specific pages, select the “Apply to selected” option. This will allow you to specify the pages where the background image should be applied.
6. If you choose the “Apply to selected” option, a dialog box will appear, prompting you to select the pages you want to apply the background image to. You can select multiple pages by holding down the Ctrl key (or Command key on Mac) while clicking on the page numbers.
By selectively applying the background image to all pages or specific ones, you can customize the appearance of your Google Docs document to suit your needs. Make sure to review and verify that the image is applied correctly to the desired pages.
Once you have applied the background image to the desired pages, you can save your changes and view the updated document with the new background image.
Saving and Viewing the Updated Document
After applying and finalizing the background image for your Google Docs document, it’s important to save your changes and preview the document to ensure the background appears as expected. Follow the steps below to save and view the updated document:
1. Click on the “File” tab located at the top left corner of the screen to access the file options menu.
2. From the dropdown menu, select the “Save” or “Save & Close” option to save the changes made to your document. Alternatively, you can use the keyboard shortcut Ctrl + S (Windows) or Command + S (Mac) to quickly save the document.
3. Once the document is saved, you can click on the “View” tab in the menu bar to switch to the “View” mode. This will allow you to preview the document exactly as it will appear to others.
4. In the “View” mode, you can scroll through the document and observe how the background image is displayed on different pages. Verify that the image is properly applied and visible across all pages.
5. If you notice any issues or decide to make further adjustments to the document, you can easily switch back to the editing mode by clicking on the “Edit” tab.
Remember to periodically save your changes as you continue working on the document to avoid losing any modifications. Saving regularly ensures that your progress is preserved and that the background image remains intact.
By saving and previewing the updated document, you can ensure that the background image appears as intended and make any necessary refinements before finalizing and sharing the document with others.