
Importance of Backing Up Your Photos
Backing up your photos is a crucial step in safeguarding your precious memories. In this digital age, where our lives are documented through countless digital photographs, the loss of those memories can be devastating. Whether it’s due to a computer crash, accidental deletion, or a stolen device, without a backup, those photos may be lost forever.
One of the main reasons to back up your photos is to protect them against accidental deletion or storage device failure. Hard drives can fail unexpectedly, and if you don’t have a backup, you risk losing all your photos in an instant. It only takes one unfortunate incident to erase years worth of memories.
Another important reason to back up your photos is the risk of theft or damage to your devices. If your computer or external hard drive gets stolen or damaged, again, without a backup, your photos could be gone forever. Therefore, having a backup ensures that even if the physical device is lost or damaged, your memories remain intact.
Additionally, backing up your photos provides peace of mind. You’ll no longer have to worry about accidentally deleting a photo or experiencing a technical glitch that erases your collection. Knowing that your photos are safely stored and easily retrievable allows you to enjoy them without the fear of losing them.
Furthermore, backing up your photos allows you to preserve them for future generations. Family photos and special moments captured today can be cherished by future family members. By creating backups, you ensure that these memories can be passed down through the generations, allowing the stories and legacy to continue.
Lastly, backing up your photos gives you the freedom to organize and manage your collection effectively. With a backup, you can easily create albums, sort through your pictures, and delete any duplicates or unwanted photos without the fear of losing something valuable.
Different Options for Backing Up Your Photos
When it comes to backing up your photos, there are several options available to suit your needs and preferences. Let’s explore some of the most popular methods:
1. External Hard Drive: One of the most common and reliable ways to back up your photos is by using an external hard drive. These devices connect to your computer via USB and provide ample storage space for your photos. Simply copy your photos onto the external hard drive, and you’ll have a backup that you can access even if your computer fails. External hard drives are portable, making them a great option for those who want to keep their backups separate from their main device.
2. Cloud Storage Services: Cloud storage services, such as Google Drive, Dropbox, and iCloud, offer a convenient way to back up your photos. These services store your photos securely on remote servers, accessible from any device with an internet connection. The advantage of cloud storage is that your photos are automatically synced across multiple devices, providing a seamless backup experience. Additionally, cloud storage services often have advanced features like facial recognition and search capabilities, making it easy to find specific photos.
3. Network Attached Storage (NAS): NAS devices are like personal cloud servers that you set up in your home. They provide large storage capacity and can be accessed by multiple devices on your home network. NAS devices offer the convenience of cloud storage while giving you complete control over your data. This option is ideal for those who want to have a local backup of their photos without relying on third-party servers.
4. Online Photo Storage Services: There are also specialized online photo storage services designed specifically for photographers. These services, such as SmugMug and Zenfolio, not only provide backup storage but also offer features like online galleries, photo selling capabilities, and website integration. If photography is a significant part of your life, these services can be a great choice to showcase and protect your work.
When choosing a backup option, consider factors like storage capacity, ease of use, cost, and security. It’s often recommended to have multiple backup solutions to ensure redundancy and protect against unforeseen circumstances. By utilizing one or a combination of these options, you can rest assured that your photos are safe and easily accessible in case of any disasters.
Using an External Hard Drive
Backing up your photos using an external hard drive is a reliable and straightforward option. Here’s how you can get started:
1. Choose the Right External Hard Drive: Look for an external hard drive with sufficient storage capacity to accommodate your photo collection. Consider factors like durability, transfer speed, and compatibility with your computer’s operating system.
2. Connect the External Hard Drive: Connect the external hard drive to your computer using the provided USB cable. Make sure the drive is recognized by your computer and appears as a separate storage device.
3. Copy and Paste Your Photos: Navigate to the folder or location where your photos are stored on your computer. Select the photos or the entire folder, right-click, and choose “Copy.” Then, navigate to the external hard drive and right-click in the desired location. Choose “Paste” to copy your photos to the external hard drive.
4. Organize and Maintain Structure: To keep your backup organized, consider creating separate folders for different categories or dates. This will make it easier to navigate and locate specific photos in the future.
5. Create Regular Backups: It’s essential to maintain a regular backup routine to ensure your photos are always up to date. Schedule a reminder to perform backups at regular intervals or consider using backup software that automatically backs up your photos based on a predefined schedule.
6. Safely Store the External Hard Drive: Once you’ve completed the backup process, keep your external hard drive in a safe location away from potential hazards such as water, extreme temperatures, or physical damage. Consider having an additional backup at an off-site location for added security.
7. Test and Verify your Backup: Periodically check your backup files on the external hard drive to ensure they can be accessed and are not corrupted. It’s better to identify any potential issues early on rather than discovering them when you need to restore your photos.
Using an external hard drive for backing up your photos provides a reliable and tangible backup solution. It gives you control over your data and ensures that you have a physical copy of your memories easily accessible in case of data loss or computer failure.
Using Cloud Storage Services
Cloud storage services offer a convenient and versatile option for backing up your photos. Here’s how you can utilize these services:
1. Sign up for a Cloud Storage Service: Research and choose a reputable and reliable cloud storage service that suits your needs. Popular options include Google Drive, Dropbox, OneDrive, and iCloud.
2. Install and Set Up the App: Download and install the cloud storage service’s application on your computer or mobile device. Sign in to your account and follow the on-screen instructions to set up the initial configuration.
3. Select Photos to Upload: Choose the photos you want to back up from your computer’s storage or mobile device’s gallery. Most cloud storage apps allow you to select photos individually or in batches.
4. Start the Upload: Click the “Upload” button or drag and drop your selected photos into the cloud storage app. The upload process may take some time, depending on the size of your photos and your internet connection speed.
5. Enable Automatic Syncing: Many cloud storage services offer automatic syncing, which means any new photos added to your device will be automatically backed up. Enable this feature to ensure that your photo collection stays up to date without manual intervention.
6. Manage and Organize: Once your photos are uploaded to the cloud storage service, you can organize them into albums or folders for easy navigation. Some services even offer AI-powered features that can automatically organize your photos based on location, faces, or date.
7. Access and Share Your Photos: The great advantage of using cloud storage is that you can access your photos from any device with an internet connection. Whether you’re using your computer, smartphone, or tablet, simply log in to your cloud storage service account, and your photos will be at your fingertips. You can also easily share your photos with family and friends by generating shareable links or granting access to specific albums.
8. Protect Your Cloud Storage Account: Keep your login credentials secure and consider enabling two-factor authentication for added protection. Regularly reviewing your account settings and keeping your app and device software up to date will help prevent any security vulnerabilities.
Using cloud storage services for backing up your photos provides the advantage of accessibility, scalability, and automatic syncing. With these services, you can rest assured that your photos are safely stored in the cloud, and you can access them anytime, anywhere.
Steps to Back Up Your Photos on an External Hard Drive
Backing up your photos on an external hard drive is a reliable way to protect your precious memories. Here’s a step-by-step guide on how to do it:
1. Connect the External Hard Drive: Plug your external hard drive into an available USB port on your computer. Make sure it’s securely connected and recognized by your computer.
2. Select the Photos to Back Up: Open the folder or location where your photos are stored on your computer. Choose the photos you want to back up. You can select individual photos or entire folders.
3. Copy the Photos: Right-click on the selected photos and choose “Copy.” Alternatively, you can use the keyboard shortcut Ctrl+C (Command+C on Mac) to copy the files.
4. Navigate to the External Hard Drive: Open the window or file explorer for the external hard drive. If necessary, create a new folder to organize your backup files. Right-click inside the external hard drive window and choose “Paste” to copy the photos onto the drive.
5. Monitor the Progress: Depending on the size of your photo collection and the transfer speed of your computer and external hard drive, the copying process may take some time. Monitor the progress by observing the progress bar or file transfer status.
6. Verify the Backup: Once the copying process is complete, take a moment to ensure that the photos have been successfully transferred to the external hard drive. You can do this by checking the file count and comparing it to the original number of files you selected to back up.
7. Safely Eject the External Hard Drive: Before disconnecting the external hard drive from your computer, make sure to safely eject it. This ensures that all files are properly closed and prevents data corruption. Right-click on the external hard drive icon and choose “Eject” or “Safely Remove” from the context menu.
8. Store the External Hard Drive Safely: Store your external hard drive in a secure location, away from potential hazards such as water, extreme temperatures, or physical damage. It’s recommended to have an additional backup copy at an off-site location for added security.
Remember to update your external hard drive backup regularly as you add new photos to your collection. Following these steps will help ensure that your photos are safely and securely backed up on an external hard drive, giving you peace of mind knowing that your memories are protected.
Steps to Back Up Your Photos with Cloud Storage Services
Backing up your photos using cloud storage services is a convenient and reliable option. Here are the steps to follow:
1. Sign Up and Install the Cloud Storage App: Choose a cloud storage service that suits your needs and create an account. Download and install the app on your computer or mobile device.
2. Configure the App: Launch the cloud storage app and sign in using your account credentials. Follow the initial setup prompts to customize settings such as syncing preferences, folder locations, and photo quality.
3. Select the Photos to Upload: Navigate to the folder or location on your computer or mobile device where your photos are stored. Choose the photos you want to back up. You can select individual photos, specific folders, or your entire photo library.
4. Upload the Photos: In the cloud storage app, look for the “Upload” button or an option to add files. Click on it and select the photos you want to upload. The app will begin transferring the photos to your cloud storage account.
5. Enable Automatic Syncing (Optional): Many cloud storage services offer automatic syncing, which continuously uploads any new photos added to your device. Enable this feature to ensure that your backup is always up to date without manual intervention.
6. Organize and Manage your Photos: Once the photos are uploaded to your cloud storage account, you can organize them into folders or albums for easy access. Take advantage of any tagging or labeling features offered by the service to further streamline your organization process.
7. Access and Share your Photos: With your photos stored in the cloud, you can access them from any device with an internet connection. Simply log in to your cloud storage account using the app or a web browser, and your photos will be available for viewing and sharing. Some cloud storage services also offer sharing options that allow you to generate links or invite others to access specific albums or photos.
8. Protect your Cloud Storage Account: Ensure the security of your cloud storage account by using a strong and unique password. Consider enabling additional security measures such as two-factor authentication for added protection.
Regularly review your cloud storage settings to ensure your backup is working correctly and adjust any preferences as needed. By following these steps, you can back up your photos safely and efficiently using cloud storage services, giving you peace of mind knowing that your memories are securely stored and easily accessible.
Backing Up Your iPhoto Library
If you are an iPhoto user, it’s essential to back up your iPhoto Library to protect your valuable photo collection. Here’s how you can do it:
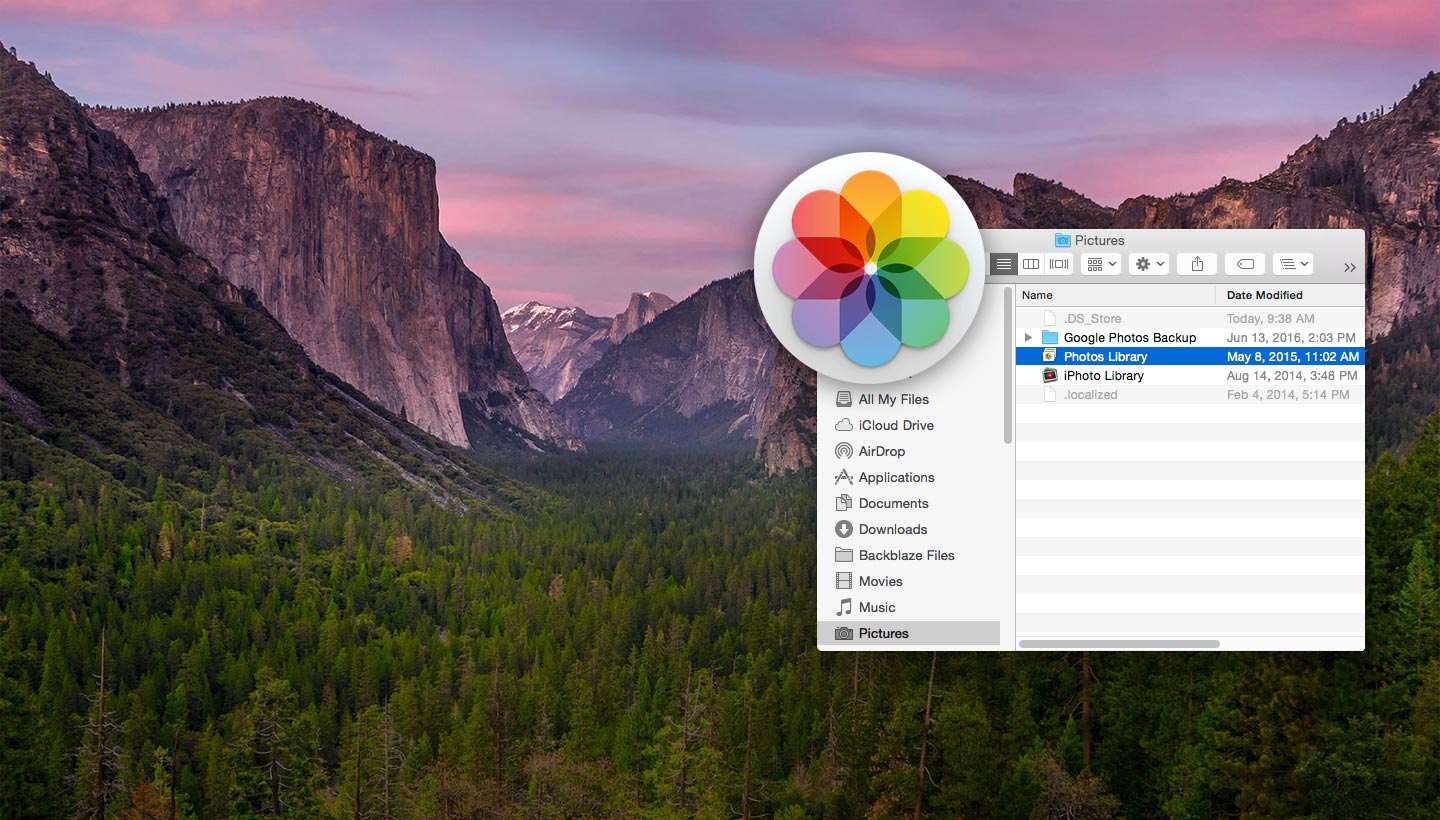
1. Locate your iPhoto Library: The iPhoto Library is usually stored in the Pictures folder on your Mac. To access it, open a Finder window, navigate to your user directory (the one with your username), and then open the Pictures folder. Your iPhoto Library should be there. It will appear as a package file with the extension “.photolibrary”.
2. Choose a Backup Method: You have multiple options for backing up your iPhoto Library, such as using an external hard drive, cloud storage services, or a combination of both. Select the method that best suits your needs and preferences.
3. External Hard Drive Backup: If you prefer using an external hard drive, simply copy the entire iPhoto Library package file to the external drive. You can do this by dragging and dropping the iPhoto Library file from your Pictures folder to the external hard drive.
4. Cloud Storage Backup: To back up your iPhoto Library using cloud storage services, you need to upload the iPhoto Library package file to your cloud storage account. Depending on the size of your iPhoto Library, this may take some time. Make sure you have enough storage space in your cloud storage account.
5. Incremental Backup: It’s advisable to perform regular incremental backups rather than starting from scratch each time. For subsequent backups, you can choose to back up only the new or modified files since the last backup. This saves time and reduces the amount of data that needs to be transferred.
6. Automate Your Backup: To ensure consistent and hassle-free backups, consider automating the process. You can use backup software that allows you to schedule backups at regular intervals. This way, your iPhoto Library will be automatically backed up without you having to remember to do it manually.
7. Verify and Test Your Backup: After completing the backup process, it’s essential to verify that your iPhoto Library backup is intact and accessible. Access the backup location, whether it’s an external hard drive or cloud storage, and ensure that the iPhoto Library file can be opened and all your photos are intact.
Remember to update your iPhoto Library backup whenever you make significant changes to your photo collection. By following these steps, you can ensure the safety and longevity of your iPhoto Library, allowing you to continue enjoying your photos with peace of mind.
Steps to Back Up Your iPhoto Library on an External Hard Drive
Backing up your iPhoto Library on an external hard drive provides an extra layer of protection for your valuable photo collection. Here’s a step-by-step guide on how to do it:
1. Connect the External Hard Drive: Plug your external hard drive into an available USB port on your Mac. Ensure that the drive is securely connected and recognized by your computer.
2. Locate your iPhoto Library: Open a Finder window on your Mac and navigate to the Pictures folder. Inside the Pictures folder, you should find your iPhoto Library. It will appear as a package file with the extension “.photolibrary”.
3. Copy the iPhoto Library: Select the iPhoto Library package file, right-click, and choose “Copy”. Alternatively, you can use the keyboard shortcut Command+C.
4. Paste the iPhoto Library to the External Hard Drive: Open the window for the external hard drive, right-click in the desired location, and choose “Paste”. Alternatively, you can use the keyboard shortcut Command+V. This will start the process of copying the iPhoto Library to the external hard drive.
5. Monitor the Copying Process: Depending on the size of your iPhoto Library and the transfer speed of your computer and external hard drive, the copying process may take some time. Monitor the progress by observing the progress bar or file transfer status.
6. Safely Eject the External Hard Drive: After the copying process is complete, make sure to safely eject the external hard drive from your Mac. This ensures that the files are properly closed and prevents data corruption. Right-click on the external hard drive icon on your desktop and choose “Eject” from the context menu.
7. Store the External Hard Drive Securely: Keep your external hard drive in a safe location away from potential hazards such as water, extreme temperatures, or physical damage. Consider keeping a duplicate backup at an off-site location for added security.
8. Periodically Update the Backup: As you continue to add new photos or make changes to your iPhoto Library, it’s important to regularly update the backup on your external hard drive. Set a reminder to perform backups at regular intervals or consider using backup software that can automate the process for you.
By following these steps, you can ensure your iPhoto Library is backed up on an external hard drive, providing you with peace of mind knowing that your precious photos are protected and easily recoverable in case of any unforeseen events.
Steps to Back Up Your iPhoto Library with Cloud Storage Services
Backing up your iPhoto Library using cloud storage services offers a convenient and secure way to protect your valuable photo collection. Here’s a step-by-step guide on how to do it:
1. Sign Up for a Cloud Storage Service: Choose a reputable cloud storage service that suits your needs and create an account. Popular options include Google Drive, Dropbox, OneDrive, or iCloud.
2. Install and Set Up the Cloud Storage App: Download and install the cloud storage app on your Mac. Sign in to your cloud storage account using your credentials. Follow the on-screen instructions to complete the initial setup process.
3. Locate Your iPhoto Library: Open a Finder window on your Mac and navigate to the Pictures folder. Inside the Pictures folder, you should find your iPhoto Library. It will appear as a package file with the extension “.photolibrary”.
4. Open the Cloud Storage App: Launch the cloud storage app on your Mac. It should appear in your Applications folder or in the menu bar at the top of your screen. Sign in to the app using your cloud storage account credentials.
5. Upload the iPhoto Library: In the cloud storage app, look for the upload button or an option to add files. Click on it and navigate to your iPhoto Library file. Select the iPhoto Library file and click “Open” or “Upload” to begin the upload process.
6. Monitor the Upload Progress: The time it takes to upload your iPhoto Library will depend on the size of your library and your internet connection speed. Monitor the progress bar or file transfer status to ensure that the upload is completed successfully.
7. Organize and Manage Your iPhoto Library in the Cloud: Once the upload is complete, you can organize and manage your iPhoto Library in the cloud storage service. Create folders, albums, or tags to help structure and categorize your photos to make them easier to find and navigate.
8. Enable Automatic Syncing (Optional): Many cloud storage services offer automatic syncing, allowing any changes made to your iPhoto Library on your Mac to be automatically reflected in the cloud. Enable this feature to ensure that your backup remains up to date without manual intervention.
9. Access and Restore Your iPhoto Library: You can access your iPhoto Library from any device with an internet connection by signing in to your cloud storage account. In case of data loss or if you need to restore your iPhoto Library, simply download the iPhoto Library file from your cloud storage service back to your Mac.
By following these steps, you can ensure your iPhoto Library is backed up and securely stored in the cloud. This provides you with the convenience of accessing your photos from anywhere and the assurance that your precious memories are protected.
Tips for Organizing Your Backed Up Photos or iPhoto Library
Having a well-organized photo library can make it easier to navigate and find specific photos whenever you need them. Here are some useful tips for organizing your backed-up photos or iPhoto Library:
1. Create Folders or Albums: Use folders or albums to group similar photos together. You can create folders based on events, locations, or people, and then organize your photos into these folders or albums accordingly.
2. Use Descriptive File Names: Rename your photos with descriptive file names that reflect the content or location of the photo. This will make it easier to search and locate specific photos in the future.
3. Add Tags or Keywords: Assign tags or keywords to your photos to help categorize them further. For example, you can add tags like “vacation,” “family,” or “nature” to easily filter and find specific types of photos.
4. Utilize Metadata: Take advantage of the metadata embedded in your photos. This includes information like date, time, location, and camera settings. Organizing and searching for photos based on metadata can be extremely helpful and efficient.
5. Remove Duplicates: Regularly review your photo collection and remove any duplicate photos to save storage space and reduce clutter. There are software programs available that can help identify and remove duplicate photos automatically.
6. Sort by Date or Location: Sort your photos chronologically or by location to create a timeline or map view of your photo collection. This can be especially useful for events or trips with multiple photos taken at different times or locations.
7. Backup Your Organization Structure: When backing up your photos or iPhoto Library, make sure to include the organizational structure you’ve created. This ensures that your backups retain the same organization and makes it easier to restore your photos if needed.
8. Regularly Review and Update: Set aside time periodically to review and update your photo organization. As you continue to add new photos, make sure to categorize them correctly and adjust your organizational structure as needed.
9. Consider Facial Recognition Software: If your photo collection contains a large number of people, consider using facial recognition software to automatically tag and organize your photos based on the people present in them. This can save you a significant amount of time and effort.
10. Utilize Smart Albums (iPhoto Users): If you’re an iPhoto user, take advantage of smart albums. These are dynamic albums that automatically populate based on specific criteria, such as date range, keywords, or ratings. Utilizing smart albums can further streamline and automate your organization process.
By following these tips, you can create a well-organized and easily navigable photo collection, whether it’s stored in your backed-up files or your iPhoto Library. Having an organized photo library allows you to quickly find and enjoy your favorite memories with ease.
Frequently Asked Questions about Backing Up Photos or iPhoto Library
Here are some commonly asked questions regarding backing up photos or an iPhoto Library:
Q: How often should I back up my photos or iPhoto Library?
A: It is recommended to back up your photos or iPhoto Library regularly, especially if you add new photos frequently. A good practice is to schedule backups at least once a month or consider using automated backup software.
Q: Should I use an external hard drive or cloud storage for backing up my photos?
A: Both options have their advantages. An external hard drive provides physical control over your data, while cloud storage offers convenience and accessibility. It’s recommended to have multiple backup solutions for redundancy and enhanced protection.
Q: How much storage space do I need for backing up my photos?
A: The required storage space will depend on the size of your photo collection. Assess your current photo storage needs and ensure that your backup solution has enough capacity to accommodate your existing and future photos.
Q: Can I back up my iPhoto Library to multiple locations?
A: Yes, you can back up your iPhoto Library to multiple locations. It’s a good practice to have multiple backups, such as an external hard drive and cloud storage, to ensure redundancy and secure your photos in case of data loss.
Q: Can I still access my backed-up photos or iPhoto Library if I switch between devices or platforms?
A: Yes, if you use cloud storage services for backup, you can access your backed-up photos or iPhoto Library from various devices and platforms as long as you have the necessary login credentials and compatible apps or software installed.
Q: Can I restore my deleted photos from a backup?
A: Yes, if you have a backup, you can restore deleted photos from it. The process will vary depending on the backup solution you’re using, so refer to the backup software or service documentation for specific instructions on restoring deleted photos.
Q: Is it necessary to organize my backed-up photos or iPhoto Library?
A: Organizing your backed-up photos or iPhoto Library is not necessary, but it can greatly enhance your ability to find and enjoy your photos. Consider organizing them into folders, using descriptive names, adding tags, or utilizing metadata for efficient photo management.
Q: How long should I keep my backup files or iPhoto Libraries?
A: It is recommended to keep your backup files or iPhoto Libraries for as long as you want to preserve your photos. Photos hold sentimental and historical value, so maintaining backups allows you to protect those memories and pass them on to future generations.
Q: Should I test my backups periodically?
A: Yes, it is a good practice to test your backups periodically to ensure that they can be accessed and that the files are not corrupted. This will give you confidence that your backups are reliable and can be used in case of data loss or emergencies.
Remember, backing up your photos or iPhoto Library is crucial for preserving your precious memories. If you have any specific concerns or questions, it is advisable to consult the documentation or support resources provided by your backup solution or software.