
Benefits of using multiple iPhoto libraries
When it comes to managing a large collection of photos, iPhoto is a go-to software for many macOS users. One of the lesser-known features of iPhoto is the ability to create multiple libraries, offering a range of benefits for organizing and managing your photos.
1. Organization and categorization: By creating separate iPhoto libraries, you can categorize your photos based on different criteria. For example, you can have one library dedicated to personal photos, another for work-related images, and yet another for your hobby photography. This allows for better organization and makes it easier to locate specific photos when needed.
2. Increased performance: When you have a large number of photos in a single iPhoto library, it can slow down the software’s performance. By creating multiple libraries and distributing your photos across them based on themes or time periods, you can improve iPhoto’s performance and responsiveness.
3. Privacy and security: If you have photos that you would prefer to keep separate from others or want to ensure their privacy, using multiple libraries can be a great option. You can create a library specifically for those personal or sensitive photos and keep it password-protected or encrypted, providing an extra layer of security.
4. Simplified sharing: Having separate libraries can also simplify the process of sharing photos with others. For instance, if you want to share only a selection of photos from a specific event or vacation, you can easily create a new library for those photos and share just that library, rather than sharing your entire photo collection.
5. Flexibility for different hobbies or projects: If you are involved in multiple hobbies or projects that require frequent photo management, having separate libraries can help streamline your workflow. You can dedicate a library to each hobby or project, making it easier to find and work with the relevant photos.
Overall, the ability to create and use multiple iPhoto libraries offers a range of benefits in terms of organization, performance, security, sharing, and flexibility. By leveraging this feature, you can effectively manage your photo collection and enhance your overall experience with iPhoto.
How to create a new iPhoto library
If you want to create a new iPhoto library to better organize your photos or for a specific project, follow these simple steps:
- First, quit iPhoto if it’s currently open on your Mac.
- Hold down the Option key on your keyboard and launch iPhoto.
- A dialog box will appear asking you to choose an iPhoto library or create a new one. Click on the Create Library button.
- Select a location on your computer where you want to save the new iPhoto library. You can choose your Documents folder, an external hard drive, or any other desired location. Give the new library a name and click Save.
- A new iPhoto window will open, indicating that you have successfully created a new library.
That’s it! You now have a new iPhoto library to work with. Keep in mind that each library will have its own separate collection of photos and albums.
You can switch between different libraries whenever you want, as we’ll explore in the next section.
It’s worth noting that you can also create a new iPhoto library directly from the iPhoto application by going to the File menu, selecting New, and then choosing Library. This method offers the same outcome as the one described earlier but skips the need to hold down the Option key when launching iPhoto.
Creating multiple iPhoto libraries provides you with the flexibility to organize your photos in a way that suits your needs. Whether it’s for different projects, separate categories, or to maintain privacy, having multiple libraries allows you to keep your photo collection well-managed and easily accessible.
How to switch between iPhoto libraries
Switching between iPhoto libraries is a straightforward process that allows you to access and work with different collections of photos. To switch between iPhoto libraries on your macOS, follow these steps:
- If iPhoto is open, close it by going to the iPhoto menu and selecting Quit iPhoto.
- Hold down the Option key on your keyboard.
- While holding down the Option key, launch iPhoto by clicking on its icon in the dock or clicking on its application in the Applications folder.
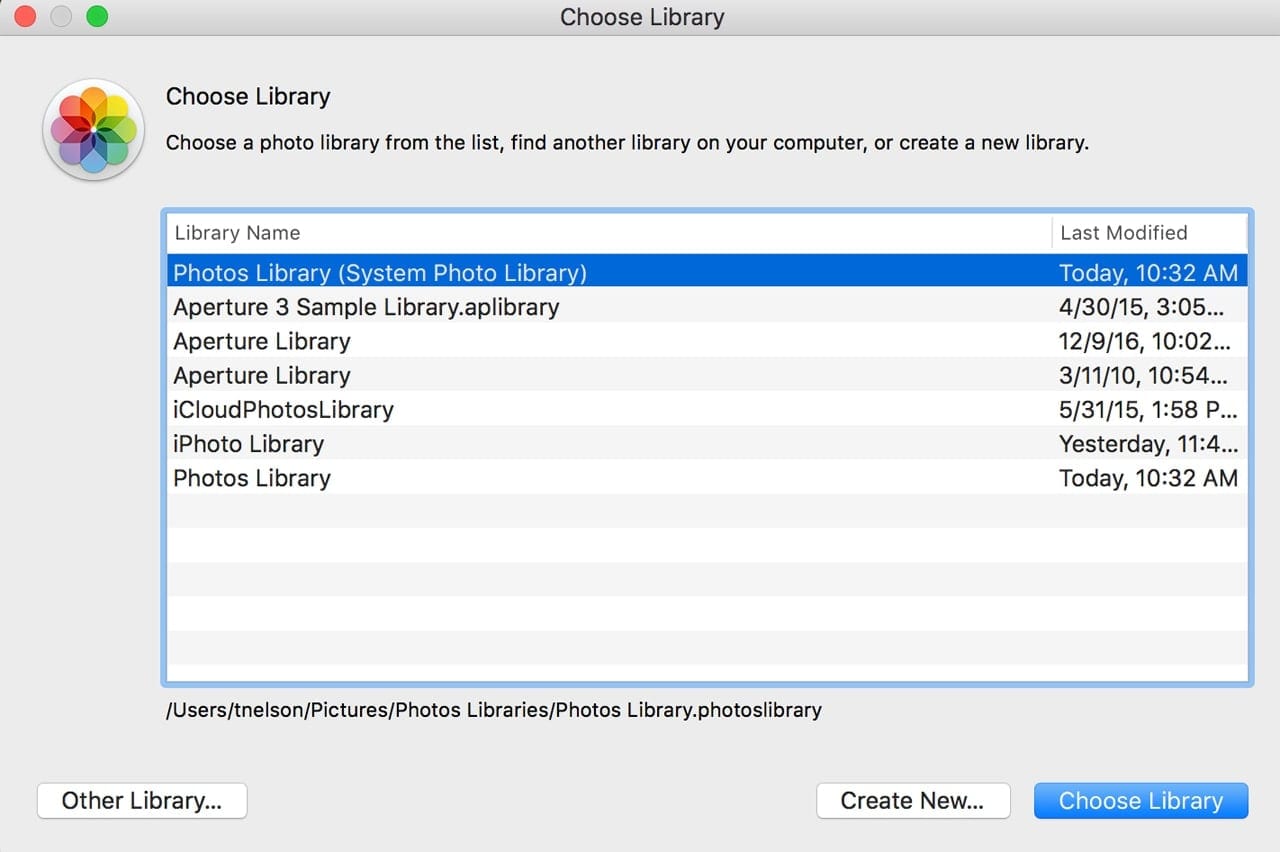
- A dialog box will appear, showing all the available iPhoto libraries. Select the library you want to open and click Choose Library.
- iPhoto will now open with the selected library, and you can start working with the photos and albums within that library.
It’s important to note that you can have multiple iPhoto libraries stored in different locations on your computer or external drives. Each time you switch between libraries, iPhoto will remember the library you have chosen and open it by default next time you launch the application.
Alternatively, you can also switch between libraries from within the iPhoto application itself:
- Open iPhoto on your Mac.
- Go to the iPhoto menu in the top menu bar.
- From the drop-down menu, select Switch to Library.
- A list of available libraries will appear. Choose the library you want to switch to, and iPhoto will load that library.
By being able to switch between iPhoto libraries, you have the flexibility to work with different collections of photos without merging them into a single library. This allows for better organization and easier management of your photo collection.
Remember to always close iPhoto before switching libraries to avoid any conflicts or issues. Additionally, make sure to properly back up your libraries to ensure the safety of your photos.
Tips for organizing photos in different libraries
Having multiple iPhoto libraries can be a powerful way to organize and manage your photos. Here are some tips to help you make the most out of your different libraries:
- Create libraries based on themes or categories: Consider separating your photos into different libraries based on themes or categories that make sense to you. For example, you could have libraries for family photos, travel pictures, work-related images, or specific events like weddings or birthdays.
- Use descriptive naming: When creating new libraries, give them clear and descriptive names so that you can easily identify and remember what each library contains. This will help you find the right library quickly when you want to access or organize specific photos.
- Organize albums within each library: Once you have separate libraries, take advantage of the ability to create albums within each library. You can further categorize your photos by creating albums for specific trips, occasions, or subjects. This makes it easier to locate and browse through photos within each library.
- Consider using smart albums: Smart albums are a powerful feature in iPhoto that automatically organizes and groups photos based on criteria you set. For example, you can create a smart album that includes only photos taken in a certain year or with a specific keyword. Utilizing smart albums can save you time and effort in organizing your photos.
- Regularly review and declutter: It’s easy for photo libraries to become cluttered over time. Make it a habit to regularly review your different libraries and delete any duplicate, blurry, or unwanted photos. This will help keep your libraries organized and make it easier to find the photos you truly value.
- Consider merging libraries when necessary: While having multiple libraries has its advantages, there may come a time when you want to merge two or more libraries together. iPhoto offers options to merge libraries, allowing you to consolidate your photos while still maintaining some level of organization.
By implementing these tips, you can effectively organize and manage your photos in different iPhoto libraries. Customizing your libraries and using features like albums and smart albums will help you easily navigate through your collection and find the photos you’re looking for.
Remember to regularly back up your libraries to avoid any data loss and ensure that your precious memories are always protected.
Backing up multiple iPhoto libraries
It is crucial to regularly back up your iPhoto libraries to protect your precious collection of photos. When you have multiple iPhoto libraries, it’s important to ensure that all of them are backed up properly. Here are some recommended backup strategies for multiple iPhoto libraries:
- External hard drive: Consider using an external hard drive to back up your iPhoto libraries. Connect the external drive to your Mac and use backup software to make copies of your libraries. This provides an additional layer of protection in case of a hardware failure or computer crash.
- Cloud storage: Use cloud storage services like iCloud, Google Drive, or Dropbox to create backups of your iPhoto libraries. These services offer automatic syncing, which means that any changes or additions you make to your photos will be reflected in the backup. Just ensure that you have enough space to accommodate all your photos.
- Time Machine: If you use Apple’s Time Machine backup feature, it will automatically back up your iPhoto libraries along with other files on your Mac. Set up Time Machine to include your libraries in the backup, and it will create regular backups that can be easily restored if needed.
- Duplicate libraries for local backup: Creating duplicate copies of your iPhoto libraries on different drives or locations can provide an additional local backup. This can be done manually by copying the libraries to external drives or creating duplicates on different partitions within your Mac’s storage.
- Offsite backup: Consider having an offsite backup option to protect your iPhoto libraries in case of a natural disaster, theft, or other unforeseen events. This could involve uploading your libraries to a secure cloud storage service or periodically transferring physical copies of your libraries to a trusted storage location away from your primary residence.
Whichever backup method you choose, it’s important to establish a regular backup routine to ensure that your iPhoto libraries are always protected. Aim to schedule backups on a regular basis, whether it’s daily, weekly, or monthly, depending on your requirements.
Remember to test your backups periodically to ensure they are working properly and that you can successfully restore your iPhoto libraries if needed.
Backing up your multiple iPhoto libraries is essential to safeguarding your cherished photos. By utilizing a combination of local and offsite backup solutions, you can enjoy peace of mind knowing that your photo collection is protected from data loss.
Troubleshooting common issues with multiple iPhoto libraries
While using multiple iPhoto libraries can be beneficial for organizing your photos, there can be some common issues that you may encounter. Here are some troubleshooting tips to help you address these problems:
- Library not found: If you’re unable to locate a specific library or iPhoto is not recognizing it, ensure that the library is in the correct location. Check the folder or external drive where the library is stored and make sure it hasn’t been moved or renamed.
- Library open in another application: If you receive an error message stating that the library is already open in another application, make sure that you’ve completely closed iPhoto on your Mac. If the issue persists, restart your computer and try opening the library again.
- Slow performance: If you notice that iPhoto is running slowly when switching between libraries, it could be due to the size of your libraries or the number of photos within them. Consider optimizing your libraries by removing duplicate or unnecessary photos to improve performance.
- Library corruption: In some cases, a library file may become corrupted, causing issues when you try to open it. Use the iPhoto Library First Aid feature to repair any potential problems. Access this feature by holding down the Option and Command keys while launching iPhoto, and then selecting the desired library to repair.
- Syncing issues with multiple devices: If you’re syncing your iPhoto libraries across multiple devices, ensure that all devices are using the same version of iPhoto or its successor, Photos. Check for any software updates and apply them to ensure compatibility and smooth syncing.
- Library password issues: If you have password-protected a library and are having trouble accessing it, ensure that you are entering the correct password. If you’ve forgotten the password or are unable to unlock the library, use the “Keychain Access” utility on your Mac to reset or recover the password associated with that library.
If you’re experiencing persistent issues with your iPhoto libraries, it may be helpful to consult Apple’s support documentation or reach out to their support team for further assistance. They can provide specific guidance and troubleshooting steps based on your situation.
Remember to always backup your iPhoto libraries before attempting any troubleshooting steps, as it ensures that your valuable photos are protected.
By following these troubleshooting tips, you can overcome common issues that may arise when using multiple iPhoto libraries and ensure a smooth experience managing and working with your photo collection.
Advanced techniques for managing multiple iPhoto libraries
Once you are comfortable with creating and switching between multiple iPhoto libraries, you can explore advanced techniques to further enhance your management of these libraries. Here are some techniques to consider:
- Shared libraries: iPhoto allows you to share libraries across multiple Macs on the same network. This can be useful for collaborating with others or accessing your photo collection from different devices. To set up a shared library, go to the iPhoto menu, select Preferences, and enable the “Share my photos” option. You can then access and work with the library from other Macs.
- Using referenced libraries: By default, iPhoto copies imported photos into its library. However, you have the option to keep your photos in their original location and have iPhoto create references to them. This is useful if you have limited storage space or prefer keeping your photos organized in a particular file structure. To enable referenced libraries, go to the iPhoto menu, select Preferences, and check the “Copy files to iPhoto Library” option.
- Merging libraries: If you have multiple iPhoto libraries that you want to consolidate into a single library, iPhoto provides a library merge feature. Open the library that you would like to merge other libraries into, go to the File menu, select “Import to Library”, and choose the libraries you want to merge. This will combine the photos and albums from the selected libraries into your current library.
- Using external photo management software: If you find iPhoto’s organizational capabilities limiting, you may consider using external photo management software in conjunction with iPhoto. Software like Adobe Lightroom or Apple’s own Aperture provides more advanced organizational features and allows you to create catalogs or projects separate from iPhoto libraries.
- Creating smart folders: Smart folders in iPhoto automatically organize photos based on criteria you set. You can create smart folders to group photos by specific keywords, ratings, dates, or other metadata. Utilizing smart folders can be an effective way to organize and access photos across multiple libraries.
- Utilizing third-party plugins: iPhoto supports third-party plugins that can extend its capabilities. These plugins can provide additional features for organizing, editing, and sharing photos. Explore available plugins to find ones that align with your specific needs.
By adopting these advanced techniques, you can tailor the management and organization of your multiple iPhoto libraries to suit your unique requirements. Experiment with these techniques to find the approaches that work best for your photo collection and workflow.
Remember to backup your iPhoto libraries regularly to ensure the safety of your photos and to be cautious when making changes or merging libraries to avoid any unintentional data loss.
With these advanced techniques and a bit of experimentation, you can make the most out of your multiple iPhoto libraries and enjoy a highly organized and efficient photo management system.
Alternatives to using multiple iPhoto libraries
While using multiple iPhoto libraries can be a useful approach for organizing your photos, there are alternative methods you can consider. These alternatives offer different ways of managing your photo collection based on your specific needs and preferences. Here are a few alternatives to using multiple iPhoto libraries:
- Tagging and metadata: Rather than creating separate libraries, you can rely on robust tagging and metadata features within iPhoto or other photo management software. Tags and metadata allow you to assign keywords, ratings, and other descriptive information to your photos, making it easier to search and organize them without having to rely on separate libraries.
- Folder organization: If you prefer a more manual approach, you can organize your photos into folders on your computer’s file system. Create separate folders based on themes, categories, or projects and use your preferred photo management software to browse and access the photos within these folders. This approach allows for greater flexibility in terms of organizing and accessing your photos.
- File naming conventions: By adopting a consistent file naming convention, you can easily group and organize your photos based on custom criteria. For example, you can use a combination of dates, event names, or other relevant information in your file names. This method allows you to navigate and categorize your photos without relying on separate libraries.
- External photo management software: Consider using external photo management software like Adobe Lightroom, Capture One, or ACDSee. These applications offer advanced organizational features, allowing you to create catalogs, collections, or projects to manage and access your photos. Such software often provides powerful tools for editing, keywording, and metadata management, giving you comprehensive control over your photo collection.
When choosing an alternative to using multiple iPhoto libraries, it’s important to consider factors such as the size of your photo collection, desired level of organization, and the specific features and functionalities you require.
Remember that each alternative has its own learning curve and may require migrating your existing iPhoto libraries or adjusting your workflow. Take the time to research, evaluate, and experiment with different options to find the best fit for your specific needs.
Regardless of the approach you choose, ensure that you have a reliable backup strategy in place to protect your photos and prevent data loss.
Exploring alternatives to using multiple iPhoto libraries allows you to find a system that aligns with your organizational preferences and enhances your overall photo management experience.