
Find Duplicate Files in the Mac’s Finder
Having duplicate files on your Mac can not only take up valuable storage space, but it can also make it difficult to find the files you actually need. Fortunately, the Mac’s Finder offers several built-in features and tools to help you locate and manage duplicate files. Let’s explore some of these tricks.
Use the Smart Folders Feature in Finder: One of the easiest ways to find duplicate files is by using Smart Folders in Finder. Smart Folders allow you to create custom search criteria to quickly locate files based on specific attributes or conditions, such as file name or file extension. By setting up a Smart Folder to search for files with the same name or file type, you can easily identify and manage duplicates.
Sort Files by Name or Size: Another helpful method is to sort files in Finder by name or size. This allows you to quickly spot files with identical names or sizes within a specific folder or directory. By right-clicking on the column headers in Finder and selecting the desired sorting option, you can easily arrange the files and find duplicates.
Utilize the Duplicate Finder App: If the built-in features in Finder aren’t enough, there are various third-party duplicate finder apps available for Mac. These apps are specifically designed to scan your Mac’s storage and identify duplicate files. They provide convenient options to review and remove duplicates, helping you keep your storage clean and organized.
Empty the Trash to Remove Duplicates Completely: Remember that deleting duplicates from your Mac doesn’t completely remove them until you empty the Trash. So, make sure to empty the Trash after deleting duplicate files to free up the occupied storage space.
Use Terminal Commands to Locate Duplicate Files: For advanced users comfortable with the Terminal, there are specific commands that can help locate duplicate files. One such command is “fdupes,” which scans directories for identical files and lists them for further action.
Utilize the Terminal Command ‘find’ and ‘md5’: The Terminal command “find” in combination with the “md5” command allows you to search for duplicate files based on their content. This method calculates the MD5 checksum for each file and compares them, helping you identify exact duplicates.
With these tips and tricks, you can efficiently find and manage duplicate files in the Mac’s Finder, freeing up storage space and making it easier to access the files you need.
Use the Smart Folders Feature in Finder
The Smart Folders feature in Finder is a powerful tool that can help you easily find and manage duplicate files on your Mac. By creating custom search criteria, you can quickly locate files based on specific attributes or conditions. This makes it effortless to identify and manage duplicates within your file system.
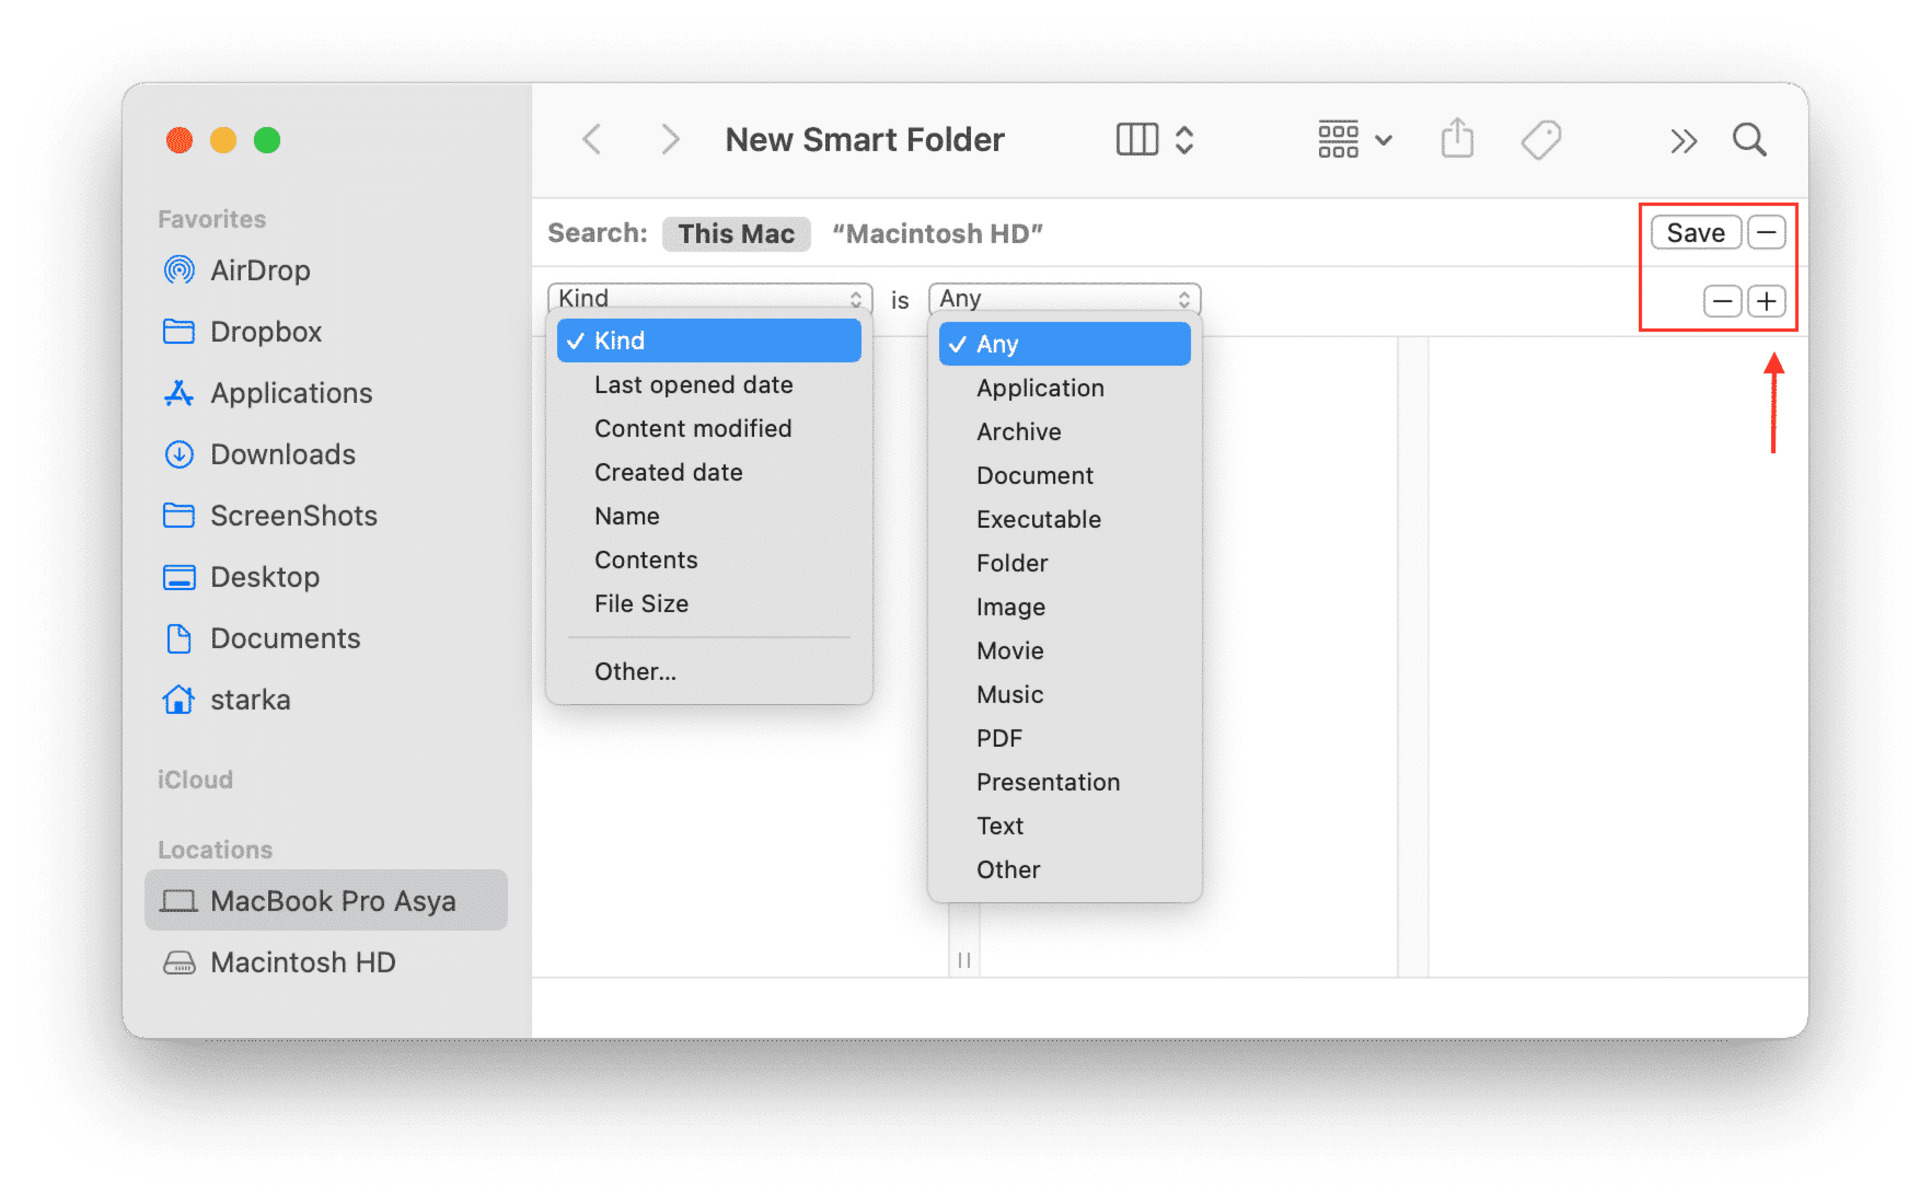
To create a Smart Folder, open Finder and click on “File” in the menu bar. From the dropdown menu, select “New Smart Folder.” A new window will open, allowing you to set up the search criteria for your Smart Folder.
Searching by File Name: One way to find duplicates is by searching for files with the same name. In the Smart Folder window, select “Name” from the first dropdown menu and choose “is” from the second dropdown menu. Enter the name of the file you suspect to have duplicates of. Click on the “+” button to add more search criteria if needed.
Searching by File Type: Another useful method is to search for duplicates based on file type. In the Smart Folder window, select “Kind” from the first dropdown menu and choose “is” from the second dropdown menu. Select the file type you want to search for from the third dropdown menu. This will display all files of that specific type, making it easier to identify duplicates.
Combining Multiple Criteria: You can also combine different search criteria to refine your search for duplicates. For example, you can search for files with the same name and file extension by selecting “Name” from the first dropdown menu and “is” from the second dropdown menu, and then entering the name and extension in the respective fields. This allows you to narrow down the search results and locate specific duplicates.
Once you have set up the search criteria for your Smart Folder, click on “Save” and give your Smart Folder a name. The Smart Folder will now appear in the Finder sidebar, making it easily accessible for future use.
When you open the Smart Folder, it will display all the files that match the search criteria you set. From here, you can review the files, select the duplicates you want to delete, and move them to the Trash.
Using the Smart Folders feature in Finder provides a convenient and efficient way to locate and manage duplicate files on your Mac. It saves you time and effort by streamlining the process of finding duplicates within your file system.
Sort Files by Name or Size
In order to efficiently identify duplicate files on your Mac, sorting files by name or size can be a valuable technique. By rearranging files within Finder based on these criteria, you can quickly spot files with identical names or sizes, making it easier to pinpoint duplicates for further action.
Sorting by Name: To sort files in Finder by name, open the desired folder or directory and navigate to the View menu in the menu bar. From there, select “Show View Options.” In the View Options window, check the box next to “Sort By” and choose “Name” from the dropdown menu. This will arrange the files alphabetically by their names.
By scanning through the list of files, you can easily identify files with the same names right next to each other. This method allows for a quick visual inspection, making it easier to determine which files are duplicates and should be removed.
Sorting by Size: Sorting files by size can also be helpful in finding duplicate files. With this method, you will be able to identify files with identical sizes or files that have significantly larger or smaller sizes compared to the rest.
To sort files by size in Finder, follow the same steps mentioned above for sorting by name. However, this time, select “Size” instead of “Name” from the dropdown menu in the View Options window. This will arrange the files from smallest to largest or vice versa, based on their file sizes.
Scanning through the list, you can easily spot files that have the same size, indicating that they might be duplicates. You can then compare these files further to confirm if they are indeed duplicates.
Sorting files by name or size within Finder provides a straightforward method for identifying duplicate files on your Mac. By visually inspecting the arrangement, you can quickly hone in on potential duplicates, allowing for an efficient clean-up process and improved organization of your files.
Utilize the Duplicate Finder App
If the built-in features in Finder are not sufficient for your duplicate file management needs, you can turn to third-party duplicate finder apps. These apps are specifically designed to scan your Mac’s storage and identify duplicate files, providing you with a convenient and effective way to locate and remove duplicates.
Benefits of Using a Duplicate Finder App:
- Efficiency: Duplicate finder apps utilize advanced algorithms to quickly scan and analyze your Mac’s storage, identifying duplicate files in a fraction of the time it would take to manually search for them.
- Accuracy: These apps are designed to detect not only files with identical names but also files with similar content or metadata, ensuring thorough duplicate identification.
- Categorization and Organization: Some duplicate finder apps categorize duplicates based on file type or other parameters, making it easier to review and manage duplicates in a more organized manner.
- Auto-select and Auto-delete Options: Many duplicate finder apps provide options to automatically select or delete duplicates based on certain criteria, saving you time and effort in the cleanup process.
Popular Duplicate Finder Apps for Mac:
- Gemini 2: Gemini 2 is a highly-rated duplicate finder app that uses intelligent algorithms to detect and merge duplicate files, freeing up valuable disk space. It provides an intuitive and user-friendly interface, allowing you to review and handle duplicates easily.
- Cisdem Duplicate Finder: Cisdem Duplicate Finder offers robust scanning capabilities, allowing you to find duplicate files across various storage locations on your Mac. It enables you to preview files before deletion and gives you the flexibility to exclude certain folders or file types from the scan.
- Duplicate Cleaner For iPhoto: Specifically designed for iPhoto users, Duplicate Cleaner For iPhoto scans your iPhoto library to identify duplicate photos and allows you to manage them efficiently. It offers features like auto-marking duplicates and providing a side-by-side comparison of similar photos.
When choosing a duplicate finder app, consider factors such as user reviews, features, pricing, and compatibility with your specific version of macOS. With the help of these specialized apps, you can easily locate and eliminate duplicate files, ensuring an organized and optimized storage system on your Mac.
Empty the Trash to Remove Duplicates Completely
Deleting duplicate files from your Mac is only the first step in the process of removing them completely from your system. To completely free up the occupied storage space, you need to make sure you empty the Trash.
When you delete files on your Mac, they are moved to the Trash folder. However, they continue to occupy storage space until you empty the Trash. This applies to duplicate files as well. Even if you remove duplicates from their original locations, they are not completely deleted until you empty the Trash.
Steps to Empty the Trash:
- Locate and open the Trash folder on your Mac. It is usually located as an icon in the Dock or in the sidebar of a Finder window.
- Once the Trash folder is open, review its contents to ensure that the duplicates you want to remove are indeed present.
- Click on the “Empty” or “Empty Trash” button, typically located in the upper-right corner of the Trash folder window. Alternatively, you can right-click on the Trash icon in the Dock and select “Empty Trash” from the context menu.
- A confirmation window will appear, asking you to confirm the action of permanently deleting all items in the Trash. Make sure you review the contents of the Trash folder again to avoid accidentally removing any important files.
- Click on the “Empty Trash” or “Confirm” button to proceed with emptying the Trash. The duplicate files will be permanently deleted from your system, and the occupied storage space will be freed up.
It is worth mentioning that emptying the Trash is a permanent action, and you cannot recover deleted files once the Trash is emptied. Therefore, ensure that you have thoroughly reviewed the contents of the Trash folder before proceeding to avoid any unintended loss of important files.
By emptying the Trash, you not only remove duplicate files from your Mac but also completely free up the storage space they were occupying. This ensures that your system is optimized and organized, allowing for better performance and efficient storage management.
Use Terminal Commands to Locate Duplicate Files
If you’re comfortable using the Terminal and prefer a more hands-on approach, you can leverage specific commands to locate duplicate files on your Mac. These Terminal commands allow you to perform advanced searches and comparisons, helping you identify duplicate files based on various attributes or content.
The ‘fdupes’ Command:
One popular command-line tool for finding duplicate files is ‘fdupes’. To use ‘fdupes’, you first need to install it on your Mac. You can do this by using package managers like Homebrew or running the necessary commands.
Once installed, open the Terminal and navigate to the directory or folder where you want to search for duplicates. Then, enter the following command:
fdupes -r folder_path
Replace folder_path with the actual path to the directory or folder you want to scan. The ‘-r’ flag ensures that ‘fdupes’ searches recursively throughout the specified directory and its subdirectories.
‘fdupes’ will scan the designated directory and display a list of duplicate files it finds. You can then review the results and decide how to manage the duplicates, whether you want to delete them or move them to a different location.
The ‘find’ and ‘md5’ Command:
If you want to locate duplicate files based on their content, you can use a combination of the ‘find’ and ‘md5’ commands in the Terminal.
To begin, open the Terminal and navigate to the top-level directory you want to search through. Then, enter the following command:
find . -type f -exec md5 '{}' ';' | sort | uniq -d --all-repeated=separate
This command will calculate the MD5 checksum for each file in the designated directory and its subdirectories. It then sorts the results and displays only the duplicate files (those with repeated MD5 checksums).
You can further customize this command to search for duplicates based on different file attributes or use other hash algorithms, such as SHA-1 or SHA-256, if preferred.
Using Terminal commands like ‘fdupes’, ‘find’, and ‘md5’ allows you to take a more hands-on approach to locate duplicate files on your Mac. These commands enable advanced searches, giving you the flexibility to search based on specific criteria or file content.
Utilize the Terminal Command ‘fdupes’
When it comes to finding and managing duplicate files on your Mac using the Terminal, the ‘fdupes’ command is a powerful tool that can simplify the process. ‘fdupes’ is a command-line utility designed to locate and list duplicate files within a specified directory or folder.
Before using the ‘fdupes’ command, ensure that you have it installed on your Mac. You can install ‘fdupes’ using package managers like Homebrew or by downloading it from reputable sources and following the installation instructions.
To use the ‘fdupes’ command, open the Terminal and navigate to the directory you want to scan for duplicates. Then, enter the following command:
fdupes -r folder_path
Replace ‘folder_path’ with the actual path to the directory you wish to scan. The ‘-r’ option tells ‘fdupes’ to search recursively through the specified directory and its subdirectories. This ensures that you identify duplicates located in all levels of the directory structure.
Once the command is executed, ‘fdupes’ will start scanning the directory and display a list of duplicate files it finds. The output will include information such as the file size, modification time, and the path to each duplicate file.
‘fdupes’ also provides various options that you can use to customize the behavior of the command. For example, you can use the ‘-d’ option to prompt you for which duplicates to delete or use the ‘–delete’ option to automate the deletion process without prompting.
Review the duplicate file list carefully, and decide how you want to handle the duplicates. You can choose to delete the duplicates manually or use the available options provided by ‘fdupes’ to streamline the removal process.
Overall, the ‘fdupes’ command offers a convenient and efficient way to locate and manage duplicate files on your Mac directly from the Terminal. It saves valuable time and allows for a more hands-on approach in organizing and optimizing your file system.
Take Advantage of the Terminal Command ‘find’ and ‘md5’
If you’re comfortable using the Terminal and want to locate duplicate files based on their content, you can leverage the power of the ‘find’ and ‘md5’ commands. This combination allows you to search for duplicates by calculating and comparing the MD5 checksums of files within a specified directory or folder.
To begin, open the Terminal and navigate to the top-level directory you want to search through. Then, enter the following command:
find . -type f -exec md5 '{}' ';' | sort | uniq -d --all-repeated=separate
‘find’ is a versatile command that allows you to search for files based on various attributes. In this case, the command searches for files (-type f) within the specified directory and its subdirectories. The ‘exec’ option executes the ‘md5’ command on each file found.
‘md5’ calculates the MD5 checksum for each file, which is a unique value representing its content. By comparing these checksums, you can identify duplicate files with the same content.
The resulting output will be a list of duplicate files, sorted and grouped together based on their MD5 checksums. Each group of duplicates will be displayed separately.
Take the time to review the list carefully, as it may contain variations of the same file or files that have similar content. By examining the file paths, you can determine the duplicates you want to remove or manage.
This method allows you to customize the search by modifying the ‘find’ command. For example, you can narrow down the search to specific file types or exclude certain directories from the search.
Using the combination of the ‘find’ and ‘md5’ commands in the Terminal gives you a powerful tool to locate duplicate files based on their content. It bypasses file names and focuses on the actual content, making it a reliable method for finding duplicates that may have different names or reside in different directories.
Use a Third-Party App to Find and Remove Duplicates
If you’re looking for a user-friendly and efficient way to find and remove duplicate files on your Mac, utilizing a third-party app is a great option. These dedicated apps are specifically designed to scan your storage and identify duplicate files, making it easier for you to clean up and optimize your file system.
Benefits of Using a Third-Party App:
- Advanced Scanning Technology: Third-party apps use advanced algorithms to quickly scan and analyze your storage, identifying duplicate files accurately and efficiently.
- Automated Detection and Removal: These apps streamline the duplicate file management process by automatically detecting and suggesting duplicates for removal. You can choose to delete duplicates individually or in bulk.
- Flexible Filtering Options: Many apps offer filtering options to refine your search and narrow down the types of files to scan, such as specific file extensions, file sizes, or date ranges.
- Safe Removal: Third-party apps typically provide a backup or safety mechanism to ensure that files are safely removed. This prevents accidental deletion or loss of important files.
Popular Third-Party Duplicate Finder Apps:
- Gemini 2: Gemini 2 is an intuitive and feature-rich duplicate finder app for Mac. It uses intelligent algorithms to detect and merge duplicate files, allowing you to free up valuable disk space while keeping important files intact.
- Cisdem Duplicate Finder: Cisdem Duplicate Finder is a powerful app that helps you locate and remove duplicate files from various storage locations on your Mac. It allows you to preview files before deletion and offers customization options for a more targeted search.
- Duplicate Cleaner For iPhoto: Specifically designed for iPhoto users, Duplicate Cleaner For iPhoto scans your iPhoto library to find and manage duplicate photos. It offers features such as auto-marking duplicates and providing side-by-side comparisons to make the process efficient and straightforward.
Consider factors such as user reviews, features, and pricing when choosing a third-party duplicate finder app. These apps offer a user-friendly interface and a range of functionalities to help you efficiently locate and remove duplicate files, improving your storage organization and system performance.
Utilize the Gemini 2 App to Find and Merge Duplicate Files
When it comes to finding and merging duplicate files on your Mac, the Gemini 2 app is an excellent choice. Gemini 2 is a dedicated duplicate finder app that intelligently scans your storage and identifies duplicate files, allowing you to merge or remove them easily.
Key Features of Gemini 2:
- Smart Scanning: Gemini 2 uses advanced algorithms to scan and analyze your storage, identifying duplicate files based on content, not just file names. This helps ensure thorough and accurate detection of duplicates.
- Intelligent Recommendations: The app offers smart recommendations, suggesting which duplicate files to remove or merge. It provides detailed information about each duplicate, allowing you to make informed decisions.
- Safe Cleanup: Gemini 2 ensures the safety of your files during the cleanup process. It provides a backup system that allows you to recover mistakenly deleted files, giving you peace of mind while managing duplicates.
- Flexible Control: You have full control over the duplicate files identified by Gemini 2. You can choose to remove duplicates one by one or merge them into a single file, saving valuable storage space.
Using Gemini 2 to Find and Merge Duplicate Files:
- Download and install Gemini 2 from the Mac App Store or the developer’s website.
- Launch Gemini 2 on your Mac.
- Select “Scan for Duplicates” to initiate the scan process.
- Gemini 2 will start scanning your storage, analyzing files and identifying duplicates based on their content. The process may take some time, depending on the size of your storage.
- Once the scanning is complete, Gemini 2 will present you with a list of duplicate files it found. You can review the details of each duplicate, such as file size, location, and modification date.
- Based on the recommendations provided by Gemini 2, you can choose to merge or remove duplicates. The merging process creates a single file from different duplicates, allowing you to keep the best version while getting rid of unnecessary duplicates.
- After selecting the duplicates you want to manage, click on the appropriate option to merge or remove them.
Gemini 2 simplifies the process of finding and merging duplicate files on your Mac. It offers a user-friendly interface, intelligent scanning capabilities, and secure file management options, making it a valuable tool for optimizing storage and improving organization. With Gemini 2, you can reclaim valuable disk space without the risk of accidentally deleting important files.
Use the Cisdem Duplicate Finder App to Clean Up Duplicates
If you’re looking for an efficient and user-friendly way to clean up duplicate files on your Mac, the Cisdem Duplicate Finder app is a reliable choice. This dedicated app is designed to scan your storage and identify duplicate files, helping you reclaim valuable disk space while improving the organization of your files.
Key Features of Cisdem Duplicate Finder:
- Comprehensive Scanning: Cisdem Duplicate Finder thoroughly scans your storage, including internal and external drives, to locate duplicate files. It provides a comprehensive analysis of file duplicates, allowing you to make informed decisions.
- Flexible Scan Options: The app offers a variety of scanning options to suit your needs. You can choose to scan specific folders, entire drives, or even network locations. This flexibility ensures that you can target specific areas where duplicates may be present.
- Accurate Duplicate Detection: Cisdem Duplicate Finder uses advanced algorithms to identify duplicate files based on content, not just file names. This ensures accurate detection of duplicates, even if they have different names but identical content.
- Smart Selection and Removal: The app provides intelligent selection options, allowing you to choose which duplicates to keep or remove. You can select duplicates based on various criteria, such as file size, creation date, or file type. This eliminates the risk of accidentally deleting important files.
Using Cisdem Duplicate Finder to Clean Up Duplicates:
- Download and install Cisdem Duplicate Finder from the developer’s website or reputable app stores.
- Launch Cisdem Duplicate Finder on your Mac.
- Select the desired scanning mode: “Quick Scan” for a fast scan or “Deep Scan” for a more thorough and comprehensive scan.
- Choose the folders or drives you want to scan for duplicates.
- Click on the “Scan” button to start the scanning process.
- Once the scan is complete, Cisdem Duplicate Finder will display a list of duplicate files it found. You can review the duplicates and sort them based on different criteria, such as file size or file type.
- Select the duplicates you want to remove, either individually or in batches.
- Click on the “Delete” button to remove the selected duplicates. Alternatively, you can choose to move the duplicates to a different location.
Cisdem Duplicate Finder streamlines the process of cleaning up duplicate files on your Mac by providing a user-friendly interface, powerful scanning capabilities, and flexible removal options. It helps you optimize storage space and improve the overall organization of your files, ensuring a clutter-free and efficient system.
Remove Duplicate Files with the Duplicate Cleaner For iPhoto App
If you are an iPhoto user and need to clean up duplicate photos, the Duplicate Cleaner For iPhoto app is a valuable tool to consider. This dedicated app is specifically designed to scan your iPhoto library and identify duplicate images, allowing you to efficiently remove them without losing any precious memories.
Key Features of Duplicate Cleaner For iPhoto:
- Seamless iPhoto Integration: Duplicate Cleaner For iPhoto seamlessly integrates with the iPhoto application, allowing you to directly access and scan your iPhoto library for duplicates.
- Precise Duplicate Detection: The app employs advanced algorithms to detect duplicate photos, considering various attributes such as file size, date, and image similarity.
- Side-by-Side Comparison: Duplicate Cleaner For iPhoto provides a side-by-side comparison feature, enabling you to visually compare similar photos to determine which version to keep and which to delete.
- Automated Cleaning: The app offers an auto-mark feature, which automatically selects duplicates based on customizable criteria, saving you time in the manual selection process.
- Backup and Recovery: Duplicate Cleaner For iPhoto provides a backup mechanism, ensuring that no photos are permanently deleted without the possibility of recovery. This gives you peace of mind during the cleaning process.
Using Duplicate Cleaner For iPhoto to Remove Duplicate Files:
- Download and install Duplicate Cleaner For iPhoto from the developer’s website or trusted app stores.
- Launch Duplicate Cleaner For iPhoto on your Mac.
- The app will automatically detect and load your iPhoto library. If the library is stored in a non-standard location, you can manually select it by clicking on the “Select iPhoto Library” button.
- Click on the “Scan for Duplicates” button to start the scanning process. Duplicate Cleaner For iPhoto will analyze your library and identify duplicate photos.
- Once the scan is complete, the app will present a list of duplicate photos found in your iPhoto library. You can preview the duplicates in a side-by-side comparison mode to decide which versions to keep.
- Use the available tools and features within Duplicate Cleaner For iPhoto to mark duplicates for deletion or keep specific versions based on your preferences.
- Click on the “Clean Up” button to remove the marked duplicate photos from your iPhoto library. Alternatively, you can choose to move them to a different location for further review before deletion.
By using the Duplicate Cleaner For iPhoto app, you can efficiently and effectively remove duplicate photos from your iPhoto library. It streamlines the process, saving you time and ensuring that your photo collection remains organized and clutter-free without the worry of accidentally deleting important images.
Avoid Duplicate Files in the Future
Preventing the accumulation of duplicate files not only helps optimize your storage space but also makes it easier to manage and organize your files. By implementing a few simple practices, you can minimize the occurrence of duplicate files on your Mac and ensure a more streamlined file system in the future.
Organize Your Files:
Maintaining a well-organized file structure is crucial in avoiding duplicate files. Establish a consistent system for naming and organizing your files in a logical manner. Use descriptive file names and create specific folders or directories to categorize your files based on their content or purpose.
Regularly Review and Clean Up:
Regularly review your files to identify and remove duplicates. Set aside time at regular intervals to conduct clean-up sessions, where you can scan for duplicates using Finder or a dedicated duplicate finder app. Deleting duplicate files promptly ensures that they don’t accumulate and clutter your storage.
Be Mindful When Downloading and Saving Files:
Be conscious of the files you download and save. Before saving a file, check if you already have a copy of it in a different location. Avoid saving multiple copies of the same file from different sources.
Use File Syncing and Cloud Storage Solutions:
Utilize file syncing and cloud storage services to centralize your files and avoid accidental duplication. These services, such as iCloud Drive, Dropbox, or Google Drive, automatically sync your files across devices and provide version control, reducing the chances of creating duplicate files.
Enable Duplicate File Warnings:
Certain applications, such as photo editing software or document management tools, offer options to enable duplicate file warnings. By enabling this feature, you will receive alerts when attempting to save a file with a similar name or content, helping you avoid unintentional duplication.
Invest in File Management Tools:
Consider using file management tools that offer features like automatic duplicate detection and removal. These tools continually monitor your file system and identify duplicate files, simplifying the process of managing duplicates and keeping your storage clutter-free.
By adopting these practices and being mindful of your file management habits, you can significantly reduce the occurrence of duplicate files on your Mac. Taking proactive measures to prevent duplication will result in a more organized and efficient file system, maximizing your productivity and saving valuable storage space.