
Arrange By: Name
The ‘Arrange By: Name’ option in the Mac Finder allows you to organize your files and folders alphabetically by their names. This can be particularly useful when you have a large number of files and want to quickly locate a specific one.
When you select the ‘Arrange By: Name’ option, your files and folders will be arranged in ascending order based on their names. This means that files starting with numbers or special characters will appear first, followed by files with names starting with A, B, C, and so on.
The ‘Arrange By: Name’ option is especially handy when you need to find a file with a specific name. Instead of manually searching through your entire system, you can simply navigate to the desired folder and use the sorting feature to easily locate the file you need.
Additionally, the ‘Arrange By: Name’ option works well for organizing files within folders. If you have a folder with numerous files, sorting them by name can help you quickly identify and access the required files.
It’s important to note that the ‘Arrange By: Name’ option is not limited to files alone. It also applies to folders, allowing you to arrange them alphabetically when needed.
The ‘Arrange By: Name’ option provides a simple, yet effective way to organize and navigate through your files and folders. Whether you’re searching for a specific file or want to arrange files within a folder in a logical order, this feature streamlines the process and saves you time and effort.
Arrange By: Date Modified
The ‘Arrange By: Date Modified’ option in the Mac Finder allows you to sort your files and folders based on the date and time they were last modified. This can be a helpful way to quickly find the most recently updated files or to track changes made to specific documents.
When you select the ‘Arrange By: Date Modified’ option, your files and folders will be arranged in descending order, with the most recently modified items appearing first. This makes it easy to locate files that have been recently worked on or updated.
The ‘Arrange By: Date Modified’ option is particularly useful in scenarios where you need to access files that were recently edited, such as when collaborating on a project or tracking changes in a shared folder. By sorting files by their modification date, you can quickly identify the most recent versions and ensure you’re working with the latest information.
Additionally, the ‘Arrange By: Date Modified’ option can help you organize your files chronologically. This is especially helpful when you’re dealing with files that need to be reviewed or processed in a specific order, such as photos, invoices, or project files.
Furthermore, this feature can assist in file maintenance tasks, enabling you to easily identify and delete old or redundant files based on their modification dates. By arranging files by date modified, you can quickly identify files that haven’t been accessed or modified in a long time, helping to free up storage space and declutter your system.
The ‘Arrange By: Date Modified’ option provides a convenient way to sort and manage your files based on their modification dates. Whether you’re trying to locate recently modified files, organize files in chronological order, or declutter your system, this feature offers enhanced efficiency and improves your overall file management experience.
Arrange By: Size
The ‘Arrange By: Size’ option in the Mac Finder allows you to sort your files and folders based on their size. This can be incredibly useful when you want to quickly identify and manage large files that may be taking up significant storage space on your system.
When you select the ‘Arrange By: Size’ option, your files and folders will be arranged in descending order, with the largest files appearing first. This allows you to easily locate and manage files that are consuming the most storage capacity on your Mac.
The ‘Arrange By: Size’ option can be beneficial in various scenarios. For example, if you’re running out of storage space and need to identify large files or folders that you can delete or move to an external storage device, sorting by size allows you to quickly pinpoint those space-consuming items.
This feature is also handy if you’re working on a project that involves transferring or sharing large files. By arranging files by size, you can easily identify the largest files and prioritize their handling, ensuring that you’re efficiently managing your data.
Addtionally, sorting files by size can help you identify potential duplicates or redundant files. If you notice multiple files with the same or similar names but different sizes, it may indicate that you have duplicate files taking up unnecessary space. By using the ‘Arrange By: Size’ option, you can identify these duplicates and take appropriate action, such as deleting or consolidating them.
Whether you’re looking to manage your storage space, identify large files for specific tasks, or uncover duplicate or redundant files, the ‘Arrange By: Size’ option empowers you to efficiently organize and navigate your files and folders based on their sizes.
Arrange By: Kind
The ‘Arrange By: Kind’ option in the Mac Finder allows you to sort your files and folders based on their file types or formats. This feature categorizes your files and presents them in groups based on their respective file extensions, making it easier to locate and manage specific types of files.
When you select the ‘Arrange By: Kind’ option, the Finder will organize your files into groups such as Documents, Spreadsheets, Images, Audio, Videos, and more, depending on the file types present in your directories.
This sorting option is particularly helpful when you are looking for a specific type of file and want to filter out irrelevant files. For example, if you’re working on a project and need to access all the image files, using the ‘Arrange By: Kind’ option will quickly group all image files together, allowing for easy navigation and retrieval.
The ‘Arrange By: Kind’ feature is not limited to standard file types; it can also recognize and categorize files based on specific applications. This means that if you have files associated with certain software programs, like Adobe Photoshop or Microsoft Word, they will be accurately grouped together when you select the ‘Arrange By: Kind’ option.
This functionality helps simplify file management and organization, making it effortless to locate files based on their types or applications. It is also beneficial for de-cluttering your system as you can easily identify and remove unnecessary files or duplicates within specific categories.
Whether you’re looking to find files based on their types or applications, streamline your workflow by grouping related files together, or efficiently organize your files, the ‘Arrange By: Kind’ option in the Mac Finder is a powerful tool that enhances your file management experience.
Arrange By: Application
The ‘Arrange By: Application’ option in the Mac Finder allows you to sort and organize your files and folders based on their associated applications. This feature can be incredibly useful when you’re working on projects that involve multiple software programs or when you need to access files specific to certain applications.
When you select the ‘Arrange By: Application’ option, the Finder will categorize and group your files and folders based on the applications they are associated with. This means that files created or opened with the same application, such as Adobe Photoshop or Microsoft Word, will be organized together under their respective applications.
The ‘Arrange By: Application’ option offers several benefits. For instance, if you regularly work with multiple applications simultaneously, this feature makes it more convenient to locate and access files pertaining to each application. It helps streamline your workflow by grouping files associated with specific software programs, ensuring that you can easily find what you need when working on a particular project or task.
In addition, the ‘Arrange By: Application’ option can assist in managing files that require specific applications to open or edit. This is particularly helpful when collaborating with others, as it enables you to quickly identify files that require a specific application to access or modify. You can easily share these files with colleagues or clients, knowing the necessary software is readily available.
Furthermore, using the ‘Arrange By: Application’ option can help declutter your system by allowing you to identify and remove unused or redundant files associated with specific applications. This can free up storage space and improve overall system performance.
Whether you’re working with multiple applications, need to quickly locate files specific to certain programs, or want to tidy up your system by removing unnecessary files, the ‘Arrange By: Application’ option in the Mac Finder provides a valuable organizational tool for your file management needs.
Arrange By: Tags
The ‘Arrange By: Tags’ option in the Mac Finder allows you to sort and organize your files and folders based on the tags you assign to them. Tags are customizable labels that you can apply to files, making it easier to classify and locate them based on specific criteria or categories.
When you select the ‘Arrange By: Tags’ option, the Finder will group your files and folders based on the tags you have assigned to them. This means that files with the same or similar tags will be organized together, providing a convenient way to navigate through your files based on your desired classifications.
The ‘Arrange By: Tags’ feature offers several benefits. Firstly, it provides a flexible and customizable organizational system for your files. You can create and use tags that align with your workflow, projects, or personal preferences. For example, you might create tags like “Work,” “Personal,” “Important,” or “To Do,” allowing you to quickly locate and access files based on their relevance to these categories.
Furthermore, the ‘Arrange By: Tags’ option allows for easy filtering and searching of files. If you have a large number of files and only want to focus on a specific subset, you can choose the corresponding tag from the dropdown menu and instantly view only the files that match that tag.
Tags also offer a convenient way to track the progress or status of certain files. For example, you can use tags like “In Progress,” “Completed,” or “Pending Review,” making it easy to identify files that require attention or are ready for the next step in your workflow.
In addition, tags can be shared across Mac devices and even with colleagues or collaborators. This makes it simple to maintain consistency and easily access files using the same tags, regardless of the device or user.
The ‘Arrange By: Tags’ option in the Mac Finder empowers you to customize your file organization and effortlessly locate files based on your chosen tags. Whether you’re categorizing files for a specific project, tracking progress, or simply adding some personalized organization to your files, this feature provides a powerful tool for efficient file management.
Arrange By: None
The ‘Arrange By: None’ option in the Mac Finder allows you to view your files and folders in their current order, without any specific sorting criteria applied. It essentially leaves the arrangement of files and folders as is, giving you the freedom to organize and navigate through your files in a way that best suits your needs.
When you select the ‘Arrange By: None’ option, the Finder will display your files and folders in their default order, often based on their creation dates or the order in which they were added to the directory. This can be useful when you prefer to keep your files in a specific order or when you want to view them exactly as they are organized within a folder.
The ‘Arrange By: None’ option provides flexibility and allows you to maintain the existing order of your files and folders. It can be beneficial when dealing with files that have a specific order or when you want to preserve the way files are arranged within a particular project or task.
Additionally, the ‘Arrange By: None’ option can be advantageous when you prefer to manually organize and sort your files rather than relying on the predefined sorting options. This can be particularly useful when working on creative projects or when you have a unique filing system that works best for your specific workflow.
With the ‘Arrange By: None’ option, you have the freedom to arrange and navigate through your files in a way that makes the most sense to you. It allows you to maintain the existing order or manually rearrange files based on your preferences, providing a flexible approach to file organization.
This option is also helpful when you want to quickly locate and access files without any interference or reorganization. If you regularly access specific files in a specific sequence, using the ‘Arrange By: None’ option can save you time and help streamline your workflow.
Overall, the ‘Arrange By: None’ option in the Mac Finder gives you control over your file organization and the ability to decide how you want to view and interact with your files and folders.
Using the ‘Arrange By’ Dropdown Menu
The ‘Arrange By’ feature in the Mac Finder provides a convenient way to sort and organize your files and folders. It offers a dropdown menu with various options that allow you to arrange your files based on different criteria such as name, date modified, size, kind, application, tags, or even no specific arrangement.
Using the ‘Arrange By’ dropdown menu is straightforward. Simply click on the dropdown arrow next to the ‘Arrange By’ label in the Finder toolbar or right-click within a Finder window to access the sorting options. From the dropdown menu, you can select the desired criteria by which you want to arrange your files.
Each option in the ‘Arrange By’ dropdown menu serves a specific purpose:
- Name: Sorts your files and folders alphabetically by their names.
- Date Modified: Arranges files based on the date and time they were last modified, with the most recent appearing first.
- Size: Organizes files in descending order, with the largest files displayed first.
- Kind: Categorizes and groups files based on their types or associated applications.
- Application: Groups files according to the applications they are associated with.
- Tags: Sorts files based on the tags you have assigned to them.
- None: Displays files in their current order without any specific arrangement.
By selecting a sorting option from the ‘Arrange By’ dropdown menu, you can instantly reorganize and group your files and folders according to your preferred criteria.
This feature provides flexibility and adaptability to your file management process. You can choose the sorting option that best suits your needs at any given time, allowing you to quickly find and access the files you’re looking for.
Furthermore, the ‘Arrange By’ dropdown menu allows you to experiment with different sorting options to see which one works best for a specific task or workflow. You can easily switch between sorting criteria to find the most efficient and effective way to navigate and manage your files.
Overall, the ‘Arrange By’ dropdown menu in the Mac Finder is a powerful tool that enhances your file organization and accessibility. It gives you the freedom to choose how you want to arrange and view your files, providing a personalized and efficient file management experience.
Changing the ‘Arrange By’ Option
The ‘Arrange By’ option in the Mac Finder gives you the flexibility to change and customize how your files and folders are sorted and organized. Changing the ‘Arrange By’ option is simple and can be done in a few easy steps.
To change the ‘Arrange By’ option, follow these steps:
- Open a Finder window by clicking on the Finder icon in the Dock or selecting File > New Finder Window from the menu.
- Click on the ‘View’ menu in the menu bar at the top of the screen.
- In the dropdown menu, select ‘Arrange By’ to reveal a submenu with various sorting options.
- From the submenu, click on the desired sorting option to change how your files and folders are arranged.
After selecting a new ‘Arrange By’ option, the Finder will automatically reorganize and display your files and folders based on the chosen criteria.
It’s important to note that you can change the ‘Arrange By’ option at any time, depending on your current needs and preferences. For example, you might want to sort your files alphabetically by name when searching for a particular file, or organize files by date modified when reviewing recent changes.
Changing the ‘Arrange By’ option provides you with the flexibility to adapt your file organization to different tasks, workflows, or sorting preferences. It allows you to tailor how your files are arranged, making it easier to find and access the specific information you’re looking for.
Furthermore, the ability to change the ‘Arrange By’ option enables you to experiment with different sorting criteria to find the most efficient and effective way to navigate and manage your files. You can easily switch between options to determine which arrangement method works best for a specific situation or project.
Ultimately, the ability to change the ‘Arrange By’ option in the Mac Finder empowers you to take control of your file organization and optimize your workflow. It enhances your ability to quickly locate, access, and manage your files, streamlining your overall file management experience.
Customizing the ‘Arrange By’ Settings
The ‘Arrange By’ feature in the Mac Finder provides some options for customizing the settings to further refine how your files and folders are organized. This customization allows you to tailor the sorting and categorization of your files to suit your specific needs and preferences.
To customize the ‘Arrange By’ settings, follow these steps:
- Open a Finder window by clicking on the Finder icon in the Dock or selecting File > New Finder Window from the menu.
- Click on the ‘View’ menu in the menu bar at the top of the screen.
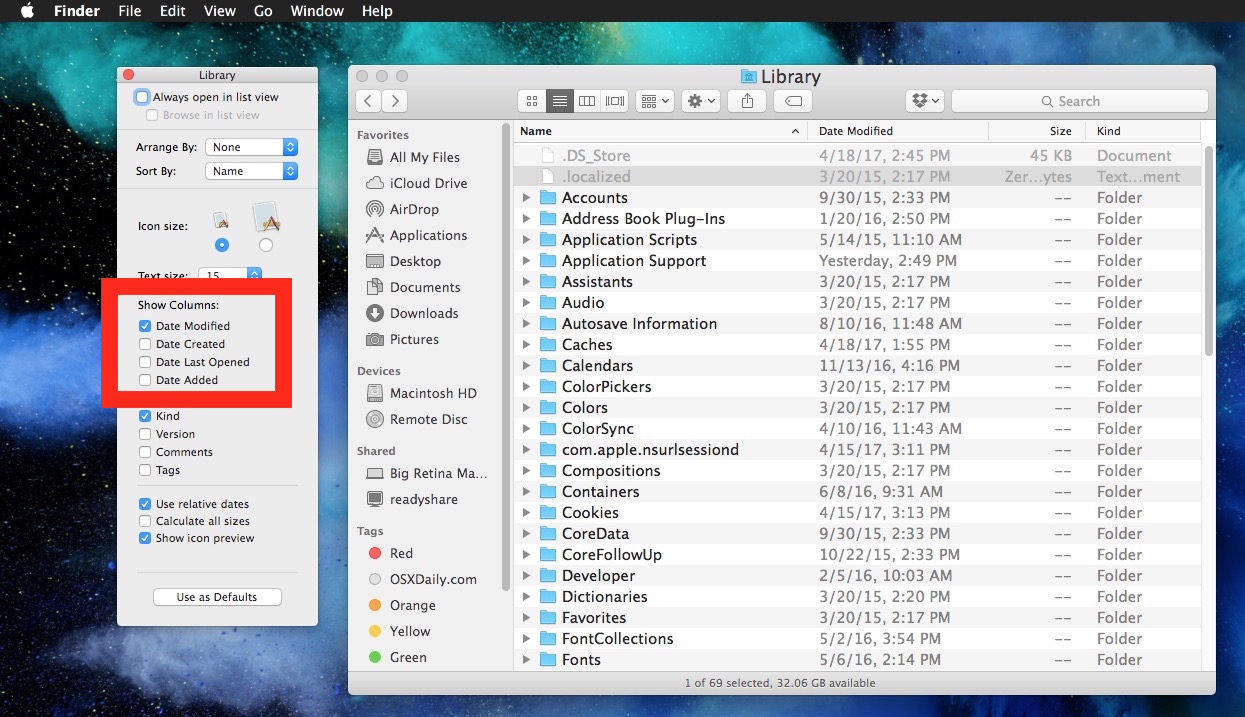
- In the dropdown menu, select ‘Show View Options’ or press Command+J as a shortcut.
- A window will appear with various options to customize the display and sorting settings.
- Under the ‘Arrange By’ section, you can choose additional options such as sorting folders on top or grouping files based on specific criteria.
By customizing the ‘Arrange By’ settings, you can fine-tune how your files and folders are presented and organized. Here are a few customization options you might find useful:
- Sorting Folders on Top: This option allows you to prioritize folders in the arrangement, placing them at the top of the list for better visibility.
- Grouping: The ‘Arrange By’ settings also provide the ability to group files by specific criteria such as ‘Kind’ or ‘Application’. This can help you quickly identify and organize files based on their types or associated software.
- Sorting Order: You can customize the ascending or descending sorting order for the ‘Arrange By’ criteria. For example, you can choose to sort files by name in either ascending or descending alphabetical order.
Customizing the ‘Arrange By’ settings provides greater control and flexibility over how your files and folders are organized. You can adjust the settings based on your unique preferences and workflow requirements, enabling you to optimize the way you work with your files.
By personalizing the sorting and display options, you can create a file system that suits your specific needs. This customization enhances your efficiency and productivity by allowing you to quickly locate and access the files you need for ongoing projects or tasks.
Overall, the ability to customize the ‘Arrange By’ settings in the Mac Finder empowers you to tailor your file organization to your liking. It enhances your file management experience by providing a more personalized and customized approach to organizing and accessing your files and folders.
Tips and Tricks for Using the ‘Arrange By’ Option
The ‘Arrange By’ option in the Mac Finder is a powerful tool for organizing and managing your files and folders. Here are some tips and tricks to help you make the most out of this feature:
- Combine ‘Arrange By’ Options: You can further refine your file arrangement by combining multiple ‘Arrange By’ options. For example, you can sort files by ‘Kind’ and within each group, arrange them by ‘Date Modified’. This allows for a more structured and granular organization of your files.
- Utilize Keyboard Shortcuts: To quickly access and toggle between different ‘Arrange By’ options, use keyboard shortcuts. For example, pressing Command+Control+1 switches to ‘Arrange By: Name’, Command+Control+2 switches to ‘Arrange By: Date Modified’, and so on.
- Create Custom Tags: Take advantage of the ‘Tags’ option in the ‘Arrange By’ menu by creating custom tags that align with your specific workflow or projects. This can help you easily locate and filter files based on your preferred categories or criteria.
- Use Quick Look: When files are sorted using the ‘Arrange By’ option, you can use the Quick Look feature by selecting a file and pressing the spacebar. This allows you to preview the file without opening it, providing a faster way to view its contents.
- Apply Consistent Tagging: To maximize the effectiveness of the ‘Tags’ option, establish a consistent tagging system. Use clear and descriptive tags that are applicable to your files, and consistently apply them to ensure easy searching and organization.
- Automation with Automator: For repetitive tasks involving file organization, consider using Automator to automate certain actions. You can create workflows to automatically sort or tag files based on specific criteria, saving you time and effort in managing large numbers of files.
- Customize Finder Window Columns: You can customize the columns displayed in Finder windows to show additional information about your files, such as file size, creation date, or file type. This can provide you with more visibility and context when arranging files using the ‘Arrange By’ option.
By implementing these tips and tricks, you can enhance your efficiency and productivity when utilizing the ‘Arrange By’ option in the Mac Finder. Customizing and combining sorting options, utilizing shortcuts, and creating a consistent file organization system can greatly simplify and streamline your file management tasks.
Remember to explore and experiment with different features and options within the Mac Finder to discover the techniques that work best for your specific needs and workflow. The ‘Arrange By’ option is a versatile tool that can be customized to suit your preferences and help you efficiently organize and navigate your files and folders.