
What are Finder Views?
When you navigate through your files and folders on a Mac, you interact with a built-in application called Finder. Finder provides a seamless and intuitive way to access and manage the files stored on your computer. One of the key features of Finder is its ability to display files and folders in different views, allowing you to choose the most convenient and visually appealing layout for your needs. These different views are called Finder views.
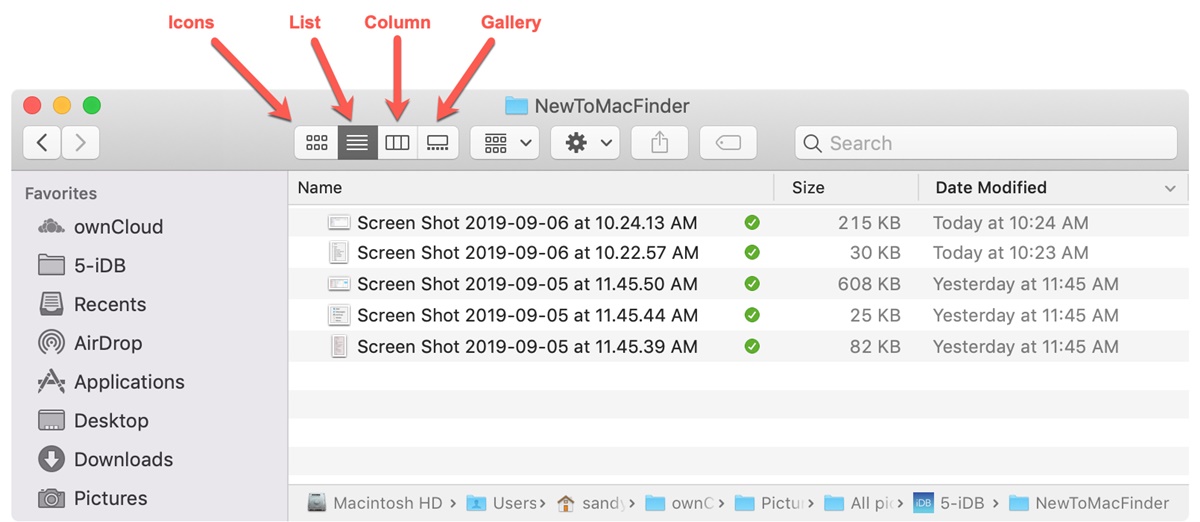
Finder views allow you to customize how your files and folders are presented, making it easier for you to locate and organize your digital content. Whether you prefer a more visual approach or a detailed list view, Finder has you covered. The four main views available in Finder are Icon view, List view, Column view, and Gallery view.
The Icon view, as the name suggests, presents your files and folders as icons. This view is ideal when you need a quick and visually appealing way to navigate through your files. Icons are displayed in a grid-like arrangement, providing a snapshot of each file’s content. You can customize the size of the icons, arrange them by name or modification date, and even preview files without opening them.
The List view, on the other hand, presents your files and folders in a detailed list format. This view is useful when you need more information about each file, such as file size, date created, and file type. You can sort the list by different criteria, making it easier to find specific files or folders. The List view also allows you to select multiple files and perform actions on them simultaneously, such as copying or deleting.
The Column view provides a hierarchical view of your file system, displaying a series of columns that represent each level of the folder structure. This view is especially handy when working with nested folders or when you need to quickly navigate through a complex directory structure. You can expand and collapse columns to reveal or hide subfolders, making it easy to drill down into the desired folder.
The Gallery view offers a visually rich browsing experience, especially for media files. It displays your files as large thumbnails with additional information, such as file size and resolution. This view is perfect for quickly browsing through images or videos, as you can preview them with a larger view. You can also play videos directly in the Gallery view, avoiding the need to launch a separate media player.
Each Finder view has its own unique advantages and can be customized to suit your preferences and requirements. Whether you prefer a more visual approach, a detailed list view, or a hierarchical column view, Finder gives you the flexibility to work in the view that best suits your needs. Understanding these views will enable you to efficiently navigate through your files and folders on your Mac, making file management a breeze.
Understanding the Different Finder Views
Finder offers four distinct views to help you navigate and organize your files: Icon view, List view, Column view, and Gallery view. Each view has its own unique characteristics and benefits. Understanding the differences between these views will allow you to make the most of Finder’s capabilities and enhance your file management experience on your Mac.
Icon view is the default view in Finder, presenting files and folders as graphical icons. This view is ideal for visual thinkers who prefer to identify files by their icons rather than filenames. You can easily resize the icons to suit your preferences by using the slider in the toolbar. Additionally, you have the option to arrange items by name, date, size, or tags, making it easier to locate specific files. Icon view also allows you to view file previews and access Quick Look by pressing the spacebar, enabling you to preview file contents without opening them.
List view provides a detailed, text-based representation of your files and folders. It displays file and folder names, along with additional information such as size, date modified, and file type. This view is useful when you need to sort and organize files based on specific criteria. You can easily resize columns, reorder them, and even add or remove additional columns to customize the display. List view also supports multi-column sorting, allowing you to sort by multiple criteria simultaneously.
Column view is a hierarchical view that displays your files and folders in a series of columns, representing each level of the folder structure. This view is particularly beneficial when navigating through complex folder hierarchies as it provides a clear and concise representation of your directory structure. By expanding and collapsing the columns, you can easily navigate through different levels of folders and subfolders. Column view also allows you to preview files by selecting them and using Quick Look, enabling you to view the contents of files without opening them.
Gallery view offers a visually engaging and media-focused experience for browsing your files. It displays large thumbnails of images, videos, and other media files, providing a quick and easy way to visually scan through your collection. Gallery view provides additional information about each file, such as resolution, file size, and file format. With the play button overlay, you can preview videos directly from the view, eliminating the need to open a separate media player. This view is especially useful for photographers and designers who need a visual representation of their files.
Understanding the different Finder views empowers you to choose the most suitable visual layout for your specific tasks and preferences. Whether you prefer a more icon-based approach, a detailed list view, a hierarchical column view, or a media-focused gallery view, Finder offers the flexibility to help you efficiently navigate, organize, and manage your files on your Mac.
Using the Icon View
The Icon view in Finder is a versatile and visually appealing way to navigate through your files and folders on your Mac. It presents files and folders as graphical icons, providing a quick snapshot of each item’s content. Here’s a guide on how to make the most of the Icon view and customize it to suit your needs.
To switch to the Icon view, open a Finder window and click on the “View” option in the menu bar. From the drop-down menu, select “As Icons.” You can also use the shortcut Command + 1 to switch immediately to the Icon view.
Once you are in the Icon view, you can resize the icons to your liking. Use the slider in the toolbar or use the pinch-to-zoom gesture on your trackpad to adjust the size of the icons. This flexibility allows you to fit more icons on the screen or increase the size for better visibility.
When working with a large number of files, it can be helpful to arrange the icons in a specific order. In the Icon view, you can group and sort the icons by different criteria such as name, date added, modification date, and tags. To sort the icons, go to “View” in the menu bar, select “Sort By,” and choose the desired sorting option. Alternatively, you can right-click on a blank area in the Finder window and select “Sort By” from the context menu.
If you need to quickly locate a specific file in a folder, use the Finder’s search bar located at the top right corner of the window. Simply type in the file name or any keywords related to the file, and Finder will instantly display the relevant results.
One of the advantages of the Icon view is the ability to preview files without opening them. To preview a file, simply select it and press the spacebar. This activates Quick Look, a feature that displays a larger preview of the file’s content, such as an image or a document. Use the arrow keys to navigate through the previews, allowing you to quickly preview multiple files.
To perform actions on one or more files, such as copying or moving, simply select the desired icons and right-click to access the contextual menu. From there, you can choose the desired action or use the keyboard shortcuts for common operations, such as Command + C to copy or Command + V to paste.
Customizing the Icon view further allows you to tailor it to your preferences. You can adjust the grid spacing, change the background color, show or hide file extensions, and even customize the icon arrangement options. Experiment with the preferences available in the Finder’s View Options menu by clicking on the “View” option in the menu bar and selecting “Show View Options.”
By utilizing the power of the Icon view, you can efficiently browse through your files and easily identify the content you need. Whether you want a quick visual scan of your files, preview the content without opening them, or customize the view to your liking, the Icon view in Finder allows you to work with flexibility and convenience.
Customizing the Icon View
One of the great features of the Icon view in Finder is its customizability. You can personalize the Icon view to suit your preferences and workflow, making your file management experience on your Mac even more efficient and enjoyable. Here are some ways you can customize the Icon view to optimize your workflow.
To access the customization options for the Icon view, open a Finder window and click on the “View” option in the menu bar. From the drop-down menu, select “Show View Options.” Alternatively, you can use the keyboard shortcut Command + J.
In the View Options window, you can adjust the grid spacing of the icons. The grid spacing determines the amount of space between each icon, allowing you to fit more icons on the screen or make them more visually distinct. Simply use the slider or input a specific value to adjust the grid spacing according to your preference.
Another useful customization option is changing the background color of the Icon view. By default, the background is set to a light gray hue, but you can select a different color or even set it to a transparent background. To change the background color, click on the color swatch next to the “Background” option in the View Options window and select the desired color.
If you find that file extensions are important for your workflow, you can choose to display or hide them in the Icon view. File extensions are the characters that follow the last dot in a file name and indicate the file type. To toggle the display of file extensions, check or uncheck the “Show file extensions” option in the View Options window.
Another useful customization option is the arrangement of icons within a folder. You can choose to arrange icons by name, modification date, creation date, or other criteria. This allows you to quickly locate files based on specific sorting preferences. In the View Options window, select the desired sorting option from the “Arrange By” drop-down menu.
In addition to the sorting options, you can also group icons in the Icon view. Grouping organizes files and folders into categories, making it easier to visually identify related items. To enable grouping, check the “Use Groups” option in the View Options window. You can then choose the criteria by which files are grouped, such as kind, date, or tags.
Furthermore, you can customize the way icons are displayed in the Icon view. By default, icons are displayed as previews of file contents. However, you can choose to display them as generic icons or use custom icons for specific file types. This can be especially useful if you have specific icons that you associate with certain file types or if you prefer a more consistent visual appearance. To change the icon display, select the desired option from the “Icon Size” drop-down menu in the View Options window.
Experiment with the various customization options in the Icon view to find the perfect setup for your workflow. Whether it’s adjusting the grid spacing, changing the background color, displaying file extensions, arranging icons, grouping files, or customizing the icon display, you have the flexibility to tailor the Icon view to your liking. By customizing the Icon view, you can create a personalized file management environment that enhances your productivity and enjoyment while using your Mac.
Using the List View
The List view in Finder provides a detailed and organized way to view and manage your files and folders on your Mac. With a text-based layout, it offers more information at a glance, making it suitable for tasks that require precise file details. Here’s a guide on how to use and optimize the List view to streamline your file management workflow.
To switch to the List view, open a Finder window and click on the “View” option in the menu bar. From the drop-down menu, select “As List.” Alternatively, you can use the shortcut Command + 2 to switch immediately to the List view.
In the List view, you’ll see a vertical list of file and folder names, along with additional details such as file size, creation date, modification date, and file type. To sort the list by a specific criteria, click on the column header. For example, clicking on the “Name” column will sort the list alphabetically by file name. Clicking again will reverse the sorting order. You can also sort by other columns, such as size or modification date, to quickly find the files you’re looking for.
To customize the appearance of the List view, you can adjust the width and order of the columns. Simply click and drag the column dividers to resize them according to your preference. You can also rearrange the columns by clicking and dragging the column headers to a new position. This allows you to prioritize the information that is most important to you and tailor the List view to your specific needs.
One of the advantages of the List view is its support for multi-column sorting. Holding down the Shift key and clicking on an additional column header will sort the list by multiple criteria simultaneously. This is useful when you need to sort files by different attributes, such as sorting files by name and then by modification date. The multi-column sorting feature provides a more refined way to organize and locate files quickly.
In addition to organizing files and folders, the List view allows you to perform actions on multiple items efficiently. To select multiple files or folders, hold down the Command key and click on each item. You can then modify, copy, move, or delete the selected items simultaneously. This feature saves you time and effort, especially when managing large numbers of files.
The List view also includes a search bar at the top right corner of the Finder window. Simply type in keywords or file names to instantly filter the list and display only the files that match your search criteria. This helps you quickly locate specific files within a folder or directory.
To further customize the List view, you can access additional options in the View Options window. Click on the “View” option in the menu bar and select “Show View Options.” From there, you can choose to display additional file details, such as file extensions, file sizes, or the date added. You can also enable or disable the display of the file preview column, which shows a thumbnail or file icon for each item.
The List view in Finder offers a comprehensive and flexible approach to file management. With detailed information, customizability, multi-column sorting, and powerful search capabilities, the List view empowers you to efficiently navigate, organize, and manage your files on your Mac.
Customizing the List View
The List view in Finder provides a customizable way to view and manage your files on your Mac. With the ability to adjust column widths, choose which columns to display, and customize sorting options, you can tailor the List view to suit your specific needs and optimize your file management workflow. Here’s a guide on how to customize the List view for an enhanced file management experience.
To access the customization options for the List view, open a Finder window and click on the “View” option in the menu bar. From the drop-down menu, select “Show View Options.” Alternatively, you can use the keyboard shortcut Command + J.
In the View Options window, you can adjust the width of the columns to display the desired amount of information. Simply click and drag the column dividers to resize the columns according to your preference. This allows you to prioritize the information that is most important to you, such as file name, size, or modification date.
Additionally, you have the flexibility to choose which columns to display in the List view. From the View Options window, check or uncheck the boxes next to the available columns to show or hide specific information. For example, if you’re working with image files, you may want to display the dimensions column to quickly determine their sizes. You can also drag and drop the columns to rearrange their order, providing a customized view that suits your preferences.
The List view includes default columns such as Name, Date Modified, Size, and Kind, but you can add even more columns to display additional information about your files. To add columns, click on the “Add Column” button in the View Options window. A list of available columns will appear, allowing you to choose the ones that are most relevant to your file management tasks. You can display columns for file extension, creation date, label, and more.
Sorting options in the List view provide a convenient way to organize your files based on criteria that matter to you. To change the sorting order, simply click on a column header. For example, clicking on the “Name” column header will sort the files alphabetically by name. Clicking again will reverse the sorting order. You can also sort by other columns, such as modification date or file size, to quickly find the files you’re looking for. Holding down the Shift key and clicking on another column header allows you to sort by multiple criteria simultaneously.
The List view also supports grouping, which allows you to visually categorize your files based on specific criteria. To enable grouping, check the “Use Groups” option in the View Options window. You can then choose the criteria by which files are grouped, such as kind, date, or tags. Grouping can be especially useful when dealing with a large number of files or when you want to visually separate different types of files within a folder.
In addition to column customization and sorting options, the List view offers additional settings for a personalized file management experience. From the View Options window, you can choose to show file extensions, display file sizes in a specific format, and even enable calculations for the total size of selected files. These settings allow you to fine-tune the List view to fit your preferences and make your file management workflow more efficient.
By customizing the List view in Finder, you can create a streamlined and personalized file management environment on your Mac. Adjusting column widths, choosing which columns to display, customizing sorting options, and utilizing grouping settings allow you to tailor the List view to your specific needs. With a customized List view, you can enhance your productivity and efficiency when navigating and managing your files.
Using the Column View
The Column view in Finder provides a hierarchical and intuitive way to navigate through your files and folders on your Mac. With a column-based layout, it allows you to easily explore nested folders and quickly locate the files you need. Here’s a guide on how to use the Column view effectively for efficient file management.
To switch to the Column view, open a Finder window and click on the “View” option in the menu bar. From the drop-down menu, select “As Columns.” Alternatively, you can use the shortcut Command + 3 to switch immediately to the Column view.
In the Column view, your Finder window is divided into multiple columns, each representing a different level of the folder hierarchy. The leftmost column represents your starting point, such as your top-level Macintosh HD or a specific folder you’ve selected. As you click on a folder in the leftmost column, a new column appears to the right, displaying the contents of that folder. You can continue clicking on folders to drill down into subfolders, allowing for a seamless and efficient navigation experience.
To collapse or expand a column, simply click on the disclosure triangle next to a folder’s name. This allows you to condense the view and hide the contents of a folder, giving you a clearer overview of your file structure. You can also collapse or expand multiple folders at once by holding down the Option key and clicking on the disclosure triangles of the desired folders.
The Column view provides a preview of the selected file within the rightmost column. This allows you to quickly glance at the contents of a file without opening it. For example, if you select an image file, you’ll be able to see a thumbnail preview of the image. This preview feature is helpful when you need to identify a specific file based on its content, saving you time from opening individual files to verify their contents.
Keyboard shortcuts can further enhance your experience with the Column view. To navigate within columns, you can use the arrow keys on your keyboard. Pressing the right arrow key expands a selected folder, while the left arrow key collapses it. You can also use the Command key along with the arrow keys to traverse through columns quickly, allowing for efficient navigation.
If you need to perform actions on files or folders in the Column view, simply select the item and right-click to access the contextual menu. From there, you can choose various actions, such as copying, moving, or deleting the selected item. Additionally, you can use keyboard shortcuts, such as Command + C to copy or Command + V to paste, to streamline your file management tasks.
In the Column view, you can also utilize the search bar located at the top right corner of the Finder window. Simply type in keywords or file names to instantly filter the contents of the current column and quickly locate specific files or folders.
Customizing the Column view is also possible to suit your preferences. In the View Options window, accessed by clicking on the “View” option in the menu bar and selecting “Show View Options,” you can adjust settings such as the column width and the number of visible columns.
By taking advantage of the Column view in Finder, you can efficiently navigate through your files and folders on your Mac. With its hierarchical structure, the Column view provides a seamless and organized way to explore nested folders and locate files quickly, making file management tasks more efficient and convenient.
Customizing the Column View
The Column view in Finder offers a customizable and efficient way to navigate and manage your files and folders on your Mac. With a variety of customization options available, you can tailor the Column view to suit your preferences and optimize your file management workflow. Here’s a guide on how to customize the Column view to enhance your productivity.
To access the customization options for the Column view, open a Finder window and click on the “View” option in the menu bar. From the drop-down menu, select “Show View Options.” Alternatively, you can use the keyboard shortcut Command + J.
In the View Options window, you’ll find various settings that allow you to customize your Column view experience. One of the customization options is adjusting the column width to display the desired amount of information. Simply click and drag the column dividers to resize the columns according to your preference. This enables you to view more of the file or folder names or allocate more space for the file details.
Another customization option in the View Options window is the ability to control the number of visible columns. By default, Finder dynamically adjusts the number of columns based on the available space in the Finder window. However, if you prefer a fixed number of columns, you can uncheck the “Automatic” checkbox and manually specify the number of columns you want to display.
Additionally, you can customize the behavior of the Column view when opening new folders. In the View Options window, you’ll find a drop-down menu labeled “Open new folders in.” From there, you can choose between “Column View” and “List View.” Selecting “Column View” ensures that new folders are opened in the Column view, maintaining a consistent navigation experience. If you prefer a different view, such as List view, you can choose “List View” from the drop-down menu.
The Column view also offers a unique feature called “spring-loaded folders,” which allows you to easily move files or folders between different directories. To enable this feature, simply drag a file or folder onto a collapsed folder in the Column view and hover over it for a moment. The folder will automatically expand, allowing you to navigate to the desired destination before dropping the item. This feature saves you time and effort by eliminating the need to repeatedly navigate back and forth between directories.
Furthermore, the Column view provides keyboard shortcuts for efficient navigation. Using the arrow keys on your keyboard, you can easily move between columns. Pressing the right arrow key expands the selected folder, while the left arrow key collapses it. Holding down the Option key while pressing the arrow keys expands or collapses multiple folders simultaneously, allowing you to quickly navigate through your file hierarchy.
By customizing the Column view in Finder, you can tailor your file management environment to your specific needs and preferences. Adjusting the column width, setting the number of visible columns, choosing the default view for new folders, and utilizing the spring-loaded folders feature streamline your navigation and improve productivity. With a customized Column view, you can efficiently manage your files and folders, making file organization and retrieval a seamless and personalized experience on your Mac.
Using the Gallery View
The Gallery view in Finder is a visual and media-focused way to browse and manage your files on your Mac. It provides large thumbnail previews and additional information, making it ideal for quickly scanning through images, videos, and other media files. Here’s a guide on how to effectively use the Gallery view to enhance your file management experience.
To switch to the Gallery view, open a Finder window and click on the “View” option in the menu bar. From the drop-down menu, select “As Gallery.” Alternatively, you can use the shortcut Command + 4 to switch immediately to the Gallery view.
In the Gallery view, your files are displayed as large thumbnails, allowing for a visually engaging browsing experience. This view is particularly useful when working with visual content, such as photos or videos. You can easily scroll through the thumbnails, either by using the scroll wheel on your mouse or by swiping on your trackpad.
The Gallery view provides additional information about each file, such as file size, resolution, and file format. This metadata is displayed below each thumbnail, allowing you to quickly gather relevant details about your files without opening them. This can be especially helpful when searching for specific files based on their attributes.
Another advantage of the Gallery view is the ability to preview files directly within the view. For example, if you select an image file, a larger preview of the image will be displayed on the right-hand side of the window. You can also play videos directly within the Gallery view, avoiding the need to open a separate media player. This feature allows for convenient and quick file previewing, saving you valuable time when browsing through your media collection.
To perform actions on files or folders in the Gallery view, you can use the contextual menu. Simply right-click on a file or folder to access a range of actions, such as copying, moving, or deleting. Gallery view also supports keyboard shortcuts for common operations, such as Command + C to copy or Command + V to paste.
If you want to search for specific files or narrow down your selection in the Gallery view, you can utilize the search bar at the top right corner of the Finder window. By typing in keywords or file names, the Gallery view instantly filters the contents, displaying only the files that match your search criteria. This feature allows for quick and efficient file retrieval in a media-rich environment.
Customizing the Gallery view further enhances your browsing and file management experience. Like other views, you can adjust the size of the thumbnails in the Gallery view. Simply use the slider in the toolbar or the pinch-to-zoom gesture on your trackpad to resize the thumbnails according to your preference. This flexibility allows you to prioritize visibility or fit more thumbnails on the screen.
By utilizing the power of the Gallery view in Finder, you can easily browse and manage your media files. The large thumbnail previews, additional file information, quick file previewing, and search capabilities make it an efficient and visually appealing way to navigate through your media collection. With customizable options and support for common file actions, the Gallery view provides a seamless and enjoyable file management experience on your Mac.
Customizing the Gallery View
The Gallery view in Finder offers customizable options that allow you to personalize your browsing experience and optimize your file management workflow. By adjusting settings and preferences, you can tailor the Gallery view to suit your needs and enhance your efficiency. Here’s a guide on how to customize the Gallery view for a more refined file management experience.
To access the customization options for the Gallery view, open a Finder window and click on the “View” option in the menu bar. From the drop-down menu, select “Show View Options.” Alternatively, you can use the keyboard shortcut Command + J.
In the View Options window, you’ll find several options that allow you to customize the appearance of the Gallery view. One of the customization options is adjusting the size of the thumbnails. Use the slider or the pinch-to-zoom gesture on your trackpad to resize the thumbnails according to your preference. This customization feature allows you to prioritize visibility or fit more thumbnails on the screen.
Another useful customization option is changing the background color of the Gallery view. By default, the background is set to a light gray hue, but you can select a different color or even set it to a transparent background. To change the background color, click on the color swatch next to the “Background” option in the View Options window and select the desired color.
In addition to adjusting thumbnail size and background color, you can choose what information is displayed underneath each thumbnail in the Gallery view. From the View Options window, you can toggle on or off various metadata fields, such as file name, file size, resolution, or file format. This allows you to customize the level of detail you see for each file, tailoring it to your specific needs.
If you prefer to have a more compact Gallery view, you can choose the “Use Small Size” option in the View Options window. This option reduces the thumbnail size and conserves screen space, allowing you to fit more thumbnails on the screen at once. This can be useful when working with a large number of files or when you want a more condensed overview of your media collection.
Furthermore, you can customize the sorting order of files in the Gallery view. From the View Options window, you can choose the sorting criteria, such as name, size, modification date, or kind. You can also specify the sorting order, whether it be ascending or descending. Customizing the sorting order allows you to organize your media files in a way that is most meaningful and convenient for your workflow.
By employing the search bar at the top right corner of the Finder window, you can filter the contents of the Gallery view and quickly locate specific files within your media collection. Simply type in keywords or file names, and the Gallery view instantly displays results that match your search criteria. This feature enhances your efficiency when working with large media libraries.
By customizing the Gallery view in Finder, you can create a personalized and efficient media browsing environment on your Mac. Adjusting thumbnail size, changing the background color, selecting displayed metadata, and customizing sorting options allow you to tailor the Gallery view to your specific requirements. With a customized Gallery view, you can maximize your productivity and enjoyment when browsing and managing your media files.
Tips for Using Finder Views Efficiently
Finder views provide a range of options for navigating, organizing, and managing your files and folders on your Mac. To make the most of these views and optimize your file management workflow, consider the following tips for using Finder views efficiently:
- Know your view options: Familiarize yourself with the different Finder views, including Icon view, List view, Column view, and Gallery view. Each view has its own advantages and features, so understanding their capabilities can help you choose the most suitable view for your specific tasks.
- Utilize keyboard shortcuts: Learn the keyboard shortcuts for switching between and navigating within Finder views. Using keyboard shortcuts, such as Command + 1 for Icon view, Command + 2 for List view, Command + 3 for Column view, and Command + 4 for Gallery view, can save time and streamline your workflow.
- Sort and group files: Take advantage of the sorting and grouping options available in Finder views. By sorting files based on specific criteria, such as name, date modified, or size, you can quickly locate the files you need. Grouping files by kind, date, or tags can further help to organize and visually categorize your files.
- Customize view settings: Explore the customization options within each Finder view to tailor them to your preferences. Adjust icon size, grid spacing, column widths, and the display of additional file details to create a view that suits your needs and improves visibility.
- Use search functionality: The search bar in Finder views allows you to quickly find specific files or narrow down your selection. Use keywords or file names to filter the display and locate files efficiently within your folder hierarchy.
- Take advantage of Quick Look: In various Finder views, including Icon view and Column view, you can use Quick Look to preview file contents without opening them. Simply select a file and press the spacebar to trigger quick previews, saving you time when browsing through files.
- Leverage multiple windows or tabs: Use multiple Finder windows or tabs to simultaneously view different locations or organize your work. This helps you quickly navigate between different directories or compare files and folders side by side.
- Utilize drag and drop: Finder views support drag and drop functionality for moving, copying, or organizing files and folders. Dragging files from one view to another or within the same view can simplify file management tasks and improve efficiency.
- Learn the context menu options: Right-clicking on files or folders in Finder views reveals a contextual menu with various actions and options. Take the time to explore these options to discover useful features like renaming, duplicating, compressing files, and more.
By following these tips, you can navigate and manage your files more efficiently using Finder views. Whether it’s sorting and grouping files, customizing view settings, utilizing search functionality, or leveraging keyboard shortcuts and contextual menus, these strategies will help streamline your file management process and enhance your productivity on your Mac.