
Why Add Album Art in Windows Media Player?
Album art is an important component of the overall music experience. It not only adds visual appeal but also helps in identifying and organizing your music collection. When you add album art in Windows Media Player, you bring life to your digital music library, making it more visually appealing and easier to navigate. Here are a few reasons why you should consider adding album art in Windows Media Player:
- Enhanced Visual Experience: Album art adds a visual element to your music collection, making it more engaging and enjoyable to browse through in Windows Media Player. Instead of seeing generic placeholders, you’ll be greeted with vibrant and unique artwork that represents the album’s mood or theme.
- Quick Identification: With album art, you can easily identify your favorite albums at a glance. It becomes much simpler to find and select the specific album you want to listen to, especially when you have a large music library.
- Improved Organization: Adding album art ensures that your music collection is well-organized. It helps you visually distinguish between different albums and creates a more organized and visually appealing library. This can be particularly helpful if you have a vast and diverse music collection.
- Personalization: Customizing album art allows you to put your own personal touch on your music collection. You can choose to use the official album cover or even create your own unique artwork to reflect your personal style and taste.
- Seamless Integration: When playing music on other devices or media players that support album art, such as mobile phones or car stereos, the added album art will be displayed alongside the songs. This creates a seamless and consistent visual experience across various platforms.
Incorporating album art into your Windows Media Player library is a simple and effective way to enhance your overall music experience. It not only makes your music collection visually appealing but also improves organization and helps in quick identification of albums. So, take a little time to add album art to your music albums and enjoy a more immersive and visually captivating music experience in Windows Media Player.
Step 1: Find the Album Art
The first step in adding album art to your Windows Media Player is to find the artwork for the album you want to add. Here are a few methods to help you find album art:
- Online Search: Conduct an online search using the album name and artist to find album art images. You can use search engines like Google or specialized websites like Discogs or AllMusic.
- Music Streaming Platforms: If you subscribe to music streaming platforms like Spotify or Apple Music, you can often find high-quality album art on these platforms. Simply search for the album and artist, then save the album art image to your computer.
- Album Art Websites: There are several websites dedicated to album art, such as AlbumArtExchange or CoverMyTunes. These websites offer a vast collection of album covers that you can search and download.
- Rip from CD: If you have the physical CD of the album, you can rip the album art from the CD using software like Windows Media Player or iTunes. These programs can automatically fetch album art from an online database when you rip the CD.
- Create Your Own: If you are feeling creative, you can create your own album art using graphic design software or online tools. You can incorporate images, text, and various design elements to make the album art uniquely yours.
Once you have found or created the album art, it’s important to ensure that the image file format is compatible with Windows Media Player. Common formats such as JPEG or PNG are widely supported.
Remember to choose a high-resolution image to ensure that the album art looks crisp and clear when displayed in Windows Media Player. Low-resolution images may appear pixelated or blurry.
By following this step and finding the appropriate album art for your music collection, you are one step closer to enhancing your Windows Media Player experience and giving your music library a visually appealing touch.
Step 2: Rename Album Art Image File
Once you have found the perfect album art for your music collection, the next step is to rename the image file before adding it to Windows Media Player. Renaming the file is important to ensure that Windows Media Player recognizes it as the album art for the corresponding album. Here’s how you can rename the album art image file:
- Identify the Album: Make sure you know which album the image file corresponds to. It’s important to have the correct album name to properly associate the art with the right album in Windows Media Player.
- Right-Click and Select “Rename”: Locate the album art image file on your computer. Right-click on the file and select the “Rename” option from the context menu.
- Use Album Name: Rename the image file using the album name. You can also include the artist’s name or any other relevant information to make it easier to identify later.
- Replace Invalid Characters: Remove any invalid characters from the file name, such as slashes (/), backslashes (\), question marks (?), or quotation marks (“). These characters can cause issues with compatibility and recognition.
- Keep File Extension: Ensure that you retain the original file extension of the image file, whether it is .jpg, .png, or any other commonly supported image format. The file extension allows Windows Media Player to recognize the file as an image.
For example, if you have found the album art for the album “Thriller” by Michael Jackson, you can rename the image file as “Thriller.jpg” or “Michael Jackson – Thriller.jpg”. The key is to have a clear and descriptive file name that relates to the album.
By renaming the album art image file to match the album name, you will ensure that Windows Media Player associates the correct image with the respective album in your music library. This step helps in organizing your collection and makes it easier to browse and enjoy your music with visually appealing album art.
Step 3: Copy Album Art Image File to Music Folder
Now that you have renamed the album art image file, the next step is to copy it to the music folder where the corresponding album is located. By placing the album artwork in the same folder as the music files, Windows Media Player will be able to recognize and display it when you access that album. Here’s how you can copy the album art image file to the music folder:
- Locate the Music Folder: Identify the folder where your music collection is stored. This is usually the default location where Windows Media Player saves your imported music.
- Navigate to the Album Folder: Locate the specific folder corresponding to the album for which you want to add album art. This folder contains the music files associated with that album.
- Ensure View Options: Make sure that file extensions are visible and that you can see the album art image file alongside the music files. This will help you ensure that the image file is placed in the correct folder.
- Copy the Album Art: Right-click on the album art image file and select the “Copy” option from the context menu. Alternatively, you can use the keyboard shortcut Ctrl+C (or Command+C on Mac) to copy the file.
- Paste in Album Folder: Navigate back to the album folder and right-click inside the folder. Select the “Paste” option from the context menu or use the keyboard shortcut Ctrl+V (or Command+V on Mac) to paste the album art image file into the folder.
Ensure that the album art image file is pasted directly into the album folder and not any subfolders within it. Placing the album art image file in the album folder will allow Windows Media Player to associate the image with the correct album when it scans your music library.
By copying the album art image file to the music folder, you ensure that Windows Media Player can access and display the artwork whenever you access that particular album. This step brings your music collection to life visually and makes it more enjoyable to browse and engage with in Windows Media Player.
Step 4: Open Windows Media Player and Select the Album
After copying the album art image file to the music folder, the next step is to open Windows Media Player and select the album for which you want to add the album art. Windows Media Player will scan your library and display the music albums available. Here’s how you can open Windows Media Player and select the album:
- Launch Windows Media Player: Locate the Windows Media Player application on your computer. You can usually find it in the Start menu or by searching for “Windows Media Player” in the search bar.
- Import Library: If you haven’t already, import your music library into Windows Media Player. You can do this by selecting the “File” menu and choosing the “Add to Library” option. Follow the prompts to add your music files to the library.
- Find the Album: In the Windows Media Player window, locate the music library section. This is typically on the left side or in a navigation panel. Browse or search for the album you want to add the album art to.
- Select the Album: Once you have located the desired album, click on it to select it. This will open the album details page in Windows Media Player.
By selecting the album in Windows Media Player, you are preparing to add the album art to that specific album. Windows Media Player will display the album details and any existing metadata associated with the album.
Note that if the album already has album art associated with it, you can replace it with the new image you copied. If there’s no existing album art, this is where you can add it for the first time.
With Windows Media Player open and the album selected, you are ready for the next step of adding the album art and enhancing the visual experience of your music collection.
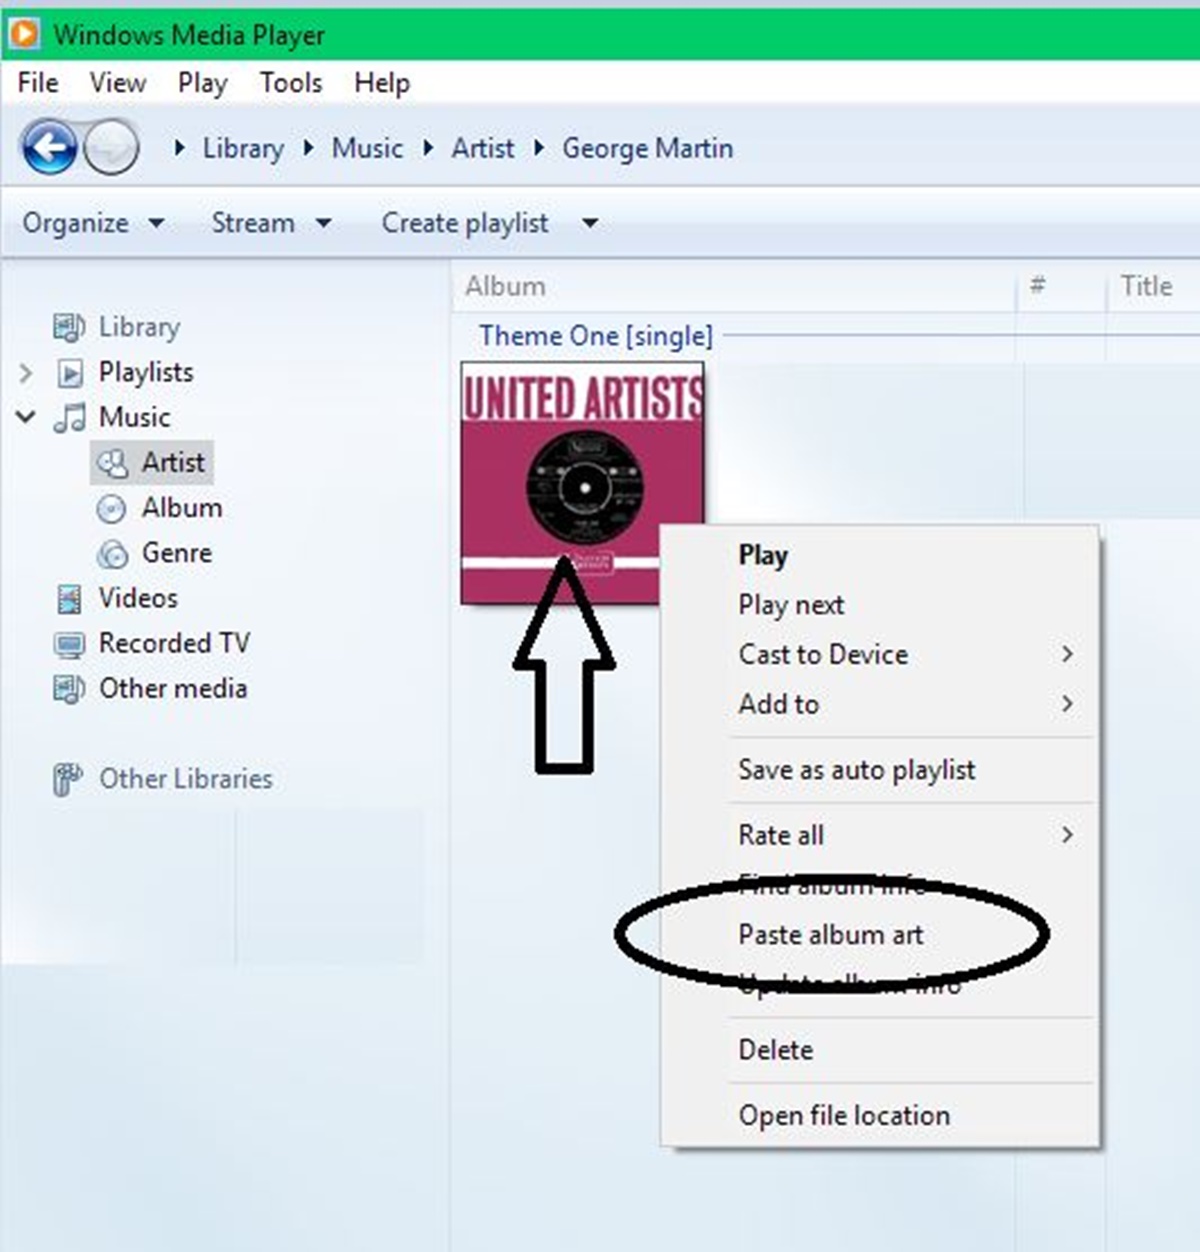
Step 5: Right-click on the Album and Select “Paste Album Art”
Now that you have opened Windows Media Player and selected the album to which you want to add album art, it’s time to paste the album art image you copied earlier. By right-clicking on the album and selecting the “Paste album art” option, you can visually enhance your music collection. Here’s how you can do it:
- Ensure Album is Selected: Make sure the album for which you want to add album art is still selected in Windows Media Player. You should see the album details and any existing metadata.
- Right-Click on the Album: Place your cursor over the selected album, then right-click on it with your mouse or trackpad. This will open a context menu with various options.
- Select “Paste Album Art”: From the context menu, locate the option that says “Paste album art” and click on it. This will initiate the process of adding the album art to the selected album.
Windows Media Player will now access the clipboard, where the album art image file is stored, and import it as the album’s artwork. The program will associate the image with the album, allowing it to appear alongside the album’s tracks and metadata.
It’s important to note that if there was already existing album art associated with the selected album, the new album art will replace it. On the other hand, if the album had no prior album art, this step will add it for the first time.
By right-clicking on the album and selecting “Paste album art,” you are taking the final step to visually enhance your music library in Windows Media Player. The album art will now be displayed alongside the album’s details, creating a more engaging and immersive music listening experience.
Step 6: Adjust the Album Art Position and Size
After pasting the album art in Windows Media Player, you have the option to adjust its position and size to ensure the best visual representation. This step is important to make the album art fit well within the designated area and to ensure that it looks aesthetically pleasing. Here’s how you can adjust the album art position and size:
- Select the Album Art: In the album details view of Windows Media Player, make sure the album art is selected. You can click on it to activate it for editing.
- Resize the Album Art: To resize the album art, click and drag one of the corners of the image. Hold the mouse button and move the corner inwards or outwards to adjust the size. This allows you to make the album art bigger or smaller based on your preference.
- Reposition the Album Art: To reposition the album art, click and drag it within the designated area. You can move it horizontally or vertically to adjust its position within the album details view. This helps you find the best placement that complements the album information and overall layout.
- Align with Other Elements: Take into consideration other elements present in the album details view, such as the album title or artist name. Position the album art in a way that it aligns well with these elements, avoiding any overlapping or obstructing of important information.
- Preview and Adjust Again: After making adjustments, take a moment to preview the album details view in Windows Media Player and ensure that the album art looks visually appealing and well-integrated. If necessary, repeat the resizing and repositioning process until you achieve the desired outcome.
By adjusting the position and size of the album art, you can enhance the visual balance and aesthetics of your music library. This step allows you to fine-tune the appearance of the album art within Windows Media Player, ensuring that it aligns harmoniously with the other elements and enhances the overall visual experience.
Step 7: Save the Changes and Enjoy Your Album Art in Windows Media Player
After adjusting the position and size of the album art to your satisfaction, the final step is to save the changes and fully enjoy the visual representation of your music albums in Windows Media Player. Here’s how you can save the changes and immerse yourself in the beauty of your personalized album art:
- Review the Adjustments: Take a moment to review the position and size of the album art within the album details view of Windows Media Player. Ensure that you are happy with the final result and that it enhances the overall visual experience of your music library.
- Save the Changes: To save the changes made to the album art, simply exit the album details view in Windows Media Player. The program will automatically save the adjustments made to the album art so that they are applied consistently each time you access the album.
- Navigate through Your Music Library: Take the opportunity to navigate through your music library and explore different albums with their newly added album art. Enjoy the visual representation as you browse through your favorite songs and discover new music.
- Experience a Visually Engaging Music Collection: With the album art added and adjustments made to its position and size, you can now experience a visually engaging music collection. Each album will be accompanied by its unique artwork, enhancing the visual appeal and personalization of your Windows Media Player.
- Immerse Yourself in the Music: As you listen to your music in Windows Media Player, take a moment to appreciate the added album art and how it enriches your music listening experience. The visually captivating album art creates a more immersive and enjoyable environment for you to enjoy your favorite songs.
By saving the changes made to the album art and fully immersing yourself in your personalized music library, you can embrace the visual enhancement that Windows Media Player brings. Enjoy the unique artwork that represents each album and allows you to connect visually with your music collection.