
Why is it important to access Google Docs Trash?
As an avid user of Google Docs, you may have experienced the sinking feeling that comes with accidentally deleting an important document. However, before you panic, know that Google Docs has a built-in safety net – the Trash folder. Accessing the Google Docs Trash is not only crucial for recovering mistakenly deleted files but also for managing your overall document storage and organization. Let’s delve into why accessing Google Docs Trash is so important.
First and foremost, the Google Docs Trash acts as a safety net for your documents. It’s not uncommon to unintentionally delete a file, whether it’s due to a misclick or a momentary lapse in concentration. Without the ability to access the Trash folder, recovering these lost files would be next to impossible. By having access to the Trash, you can promptly retrieve and restore these files, ensuring that no vital information or hard work goes to waste.
Furthermore, the Trash folder plays a crucial role in overall document management and organization. As you create and collaborate on various projects, your Google Docs account can quickly become cluttered with outdated or unnecessary files. Accessing the Trash allows you to review and evaluate these documents, giving you the opportunity to permanently delete those that are no longer needed. This helps free up valuable storage space and creates a more streamlined and efficient workflow.
Another reason why it is important to access Google Docs Trash is to safeguard against potential data loss or breaches. Accidental deletion of files is not the only threat to your documents. They can also be subject to malicious actions or unauthorized access. By regularly reviewing the Trash folder, you can spot any suspicious or unauthorized deletions, enabling you to take appropriate action to protect your valuable documents.
Moreover, accessing the Google Docs Trash ensures a comprehensive backup strategy for your documents. While Google Docs automatically saves your work as you go, accidents can still happen. By regularly checking the Trash folder, you can verify that all your important files are intact and haven’t been accidentally deleted or corrupted. This provides peace of mind knowing that you have a backup plan in case of any unforeseen circumstances or technical glitches.
Accessing Google Docs Trash on a computer
Accessing the Google Docs Trash folder on a computer is a straightforward process that can be done in just a few simple steps. Whether you’re using a Windows PC, Mac, or Linux machine, here’s how you can access the Trash folder on your computer:
- Open your preferred web browser and go to the Google Docs website (https://docs.google.com).
- Sign in to your Google account if you haven’t done so already.
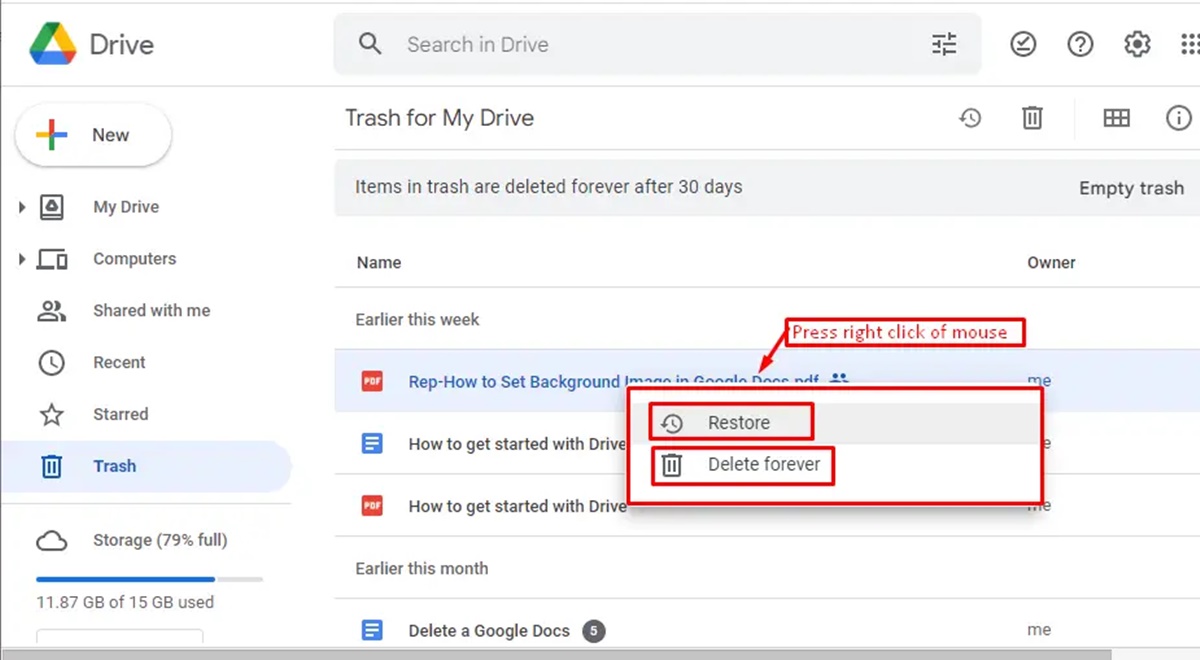
- Once you’re signed in, you will see the Google Docs homepage. Look for the “Trash” link on the left-hand side menu and click on it. This will take you to the Trash folder.
- In the Trash folder, you will find a list of all the recently deleted files. You can browse through the files or use the search bar at the top to locate a specific document.
- To restore a deleted file, simply click on the document and select the “Restore” option. The file will then be moved back to its original location within your Google Docs.
- If you want to permanently delete a file from the Trash, select the file and click on the “Delete forever” option. Please note that once a file is permanently deleted, it cannot be recovered.
Remember, the Trash folder retains deleted documents for 30 days. After this period, the files are automatically deleted permanently. That’s why it’s important to regularly check and manage your Trash folder to avoid losing any important files beyond recovery.
Accessing the Google Docs Trash on a computer gives you full control over your deleted documents. It allows you to restore mistakenly deleted files, permanently delete unwanted files, and ensure the security and organization of your Google Docs workspace.
Accessing Google Docs Trash on a mobile device
Accessing the Google Docs Trash folder on your mobile device is just as important as on a computer. Whether you’re using an Android or iOS device, here’s how you can access the Trash folder and manage your deleted documents:
If you’re using an Android device:
- Open the Google Docs app on your Android device.
- Tap on the three horizontal lines in the top-left corner to open the side menu.
- Scroll down and tap on “Trash” to access the Trash folder.
- Once you’re in the Trash folder, you’ll be able to see a list of all the recently deleted files. You can browse through the documents or use the search bar at the top to find a specific file.
- To restore a deleted file, tap on the document and select the “Restore” option. The file will be moved back to its original location.
- If you want to permanently delete a file from the Trash, tap on the document and select the “Delete forever” option. Keep in mind that once a file is permanently deleted, it cannot be recovered.
If you’re using an iOS device:
- Launch the Google Docs app on your iOS device.
- Tap on the menu icon in the top-left corner to open the side menu.
- Scroll down and tap on “Trash” to access the Trash folder.
- Similar to the Android app, you’ll see a list of the recently deleted files in the Trash folder. You can browse or search for specific documents using the search bar at the top.
- To restore a deleted file, tap on the document and choose the “Restore” option. The file will be restored to its original location.
- If you wish to permanently delete a file from the Trash, tap on the document and select the “Delete forever” option. Remember, permanent deletion is irreversible.
By accessing the Google Docs Trash on your mobile device, you can easily manage your deleted files, restore important documents, and maintain a clean and organized workspace while on the go.
How to restore deleted files from the Google Docs Trash
Accidentally deleting an important file from Google Docs can be a stressful experience. However, with the Trash folder, you can easily restore deleted files and retrieve your valuable content. Here’s how you can restore deleted files from the Google Docs Trash:
- Open your web browser and navigate to the Google Docs website (https://docs.google.com).
- Sign in to your Google account if you haven’t already.
- On the left-hand side menu, click on “Trash” to access the Trash folder.
- Once you’re in the Trash folder, you will see a list of all the recently deleted files. You can scroll through the documents or use the search bar at the top to locate a specific file.
- To restore a deleted file, click on the document and select the “Restore” option. The file will be moved back to its original location within your Google Docs.
It’s important to note that the restored file will retain its original sharing settings and collaborators. This means that any individuals or groups who had access to the file prior to deletion will still have access to it after restoration.
Additionally, it’s worth mentioning that the Trash folder retains deleted documents for a period of 30 days. If you don’t restore a file within this timeframe, it will be automatically and permanently deleted from the Trash. Therefore, it’s crucial to regularly check the Trash folder and restore any important files before they are permanently removed.
By following these simple steps, you can restore deleted files from the Google Docs Trash and ensure that no valuable information or hard work goes to waste.
How to permanently delete files from the Google Docs Trash
Permanently deleting files from the Google Docs Trash folder is important for freeing up storage space and ensuring that unwanted or sensitive documents are completely removed from your Google Docs account. Here’s how you can permanently delete files from the Google Docs Trash:
- Go to the Google Docs website (https://docs.google.com) in your web browser.
- Sign in to your Google account if you haven’t already done so.
- Click on “Trash” in the left-hand side menu to access the Trash folder.
- In the Trash folder, you will see a list of all the recently deleted files. Scroll through the documents or use the search bar at the top to locate the file you want to permanently delete.
- Select the file you want to permanently delete by clicking on it.
- Once the file is selected, click on the “Delete forever” option. A pop-up message will appear asking you to confirm your action.
- Confirm the permanent deletion by clicking on the “Delete” button in the pop-up message.
Keep in mind that once a file is permanently deleted, it cannot be recovered. Therefore, it’s important to exercise caution and make sure that you really want to permanently delete the selected file.
Furthermore, it’s important to note that permanently deleting a file from the Google Docs Trash will also remove any shared access or collaboration associated with that file. This means that any individuals or groups who had access to the file will no longer be able to view or edit it.
By following these steps, you can permanently delete files from the Google Docs Trash, freeing up storage space and ensuring that unwanted files are completely removed from your Google Docs account.
Tips for managing and organizing your Google Docs files
Managing and organizing your Google Docs files efficiently is key to maximizing productivity and staying organized. Here are some helpful tips to help you effectively manage and organize your Google Docs files:
- Create a folder structure: Organize your documents into folders based on topics, projects, or any other logical structure that suits your needs. This will make it easier to locate files and keep your workspace organized.
- Use descriptive file names: Give your files meaningful and descriptive names that quickly convey their content. This will help you and your collaborators easily identify and find the right document.
- Utilize color-coded labels: Take advantage of the label feature in Google Docs to visually categorize and prioritize your documents. Assign different colors to different types of files or specific projects to quickly identify and differentiate them.
- Take advantage of stars and favorites: Use the star or favorite feature to mark important or frequently accessed files. This will help you easily locate and access these files without having to search through folders.
- Regularly review and clean up: Set aside time to review your Google Docs files periodically. Delete any unnecessary or outdated documents to free up storage space and maintain a clutter-free workspace.
- Collaborate effectively: If you are working with others on a document, take advantage of the collaboration features in Google Docs. Assign clear roles and permissions, use comments to provide feedback, and make use of version history to track changes.
- Use search and filters: Google Docs offers powerful search and filter options. Take advantage of these to quickly locate specific files when you need them. You can search by file name, content, or even specific keywords within documents.
- Organize with tables of contents: For longer or more complex documents, use tables of contents to create a navigational structure. This allows readers to quickly jump to specific sections, making your document more user-friendly.
- Automate with add-ons: Explore the vast array of add-ons available for Google Docs. These can help automate tasks, improve collaboration, and enhance the functionality of your documents.
- Regularly back up: While Google Docs automatically saves your work, consider backing up important files outside of Google Drive for added security. This way, you will have an extra layer of protection against accidental deletions or technical issues.
By implementing these tips, you can effectively manage and organize your Google Docs files, ensuring a streamlined workflow and easy access to your important documents.