
Importance of Data Security
In today's digital age, data security is paramount, especially when it comes to our personal devices like the iPhone 10. Our smartphones contain a treasure trove of sensitive information, including personal photos, messages, contacts, and even financial data. Therefore, ensuring the security of this data is crucial to safeguarding our privacy and protecting ourselves from potential threats.
Data security on the iPhone 10 goes beyond just protecting it from physical theft. It involves safeguarding the digital information stored on the device from unauthorized access, data breaches, and loss. With the increasing prevalence of cyber threats and the growing reliance on smartphones for various aspects of our lives, the need for robust data security measures cannot be overstated.
Furthermore, data security is not only about protecting our personal information but also about preserving memories and valuable digital assets. Many of us store irreplaceable photos and videos on our iPhones, making it essential to have reliable backup systems in place to prevent the loss of these precious memories.
Moreover, in the event of a device malfunction or loss, having a secure backup ensures that important data can be recovered without hassle. This is particularly crucial for business professionals who rely on their iPhones for work-related communications, documents, and other critical information.
In essence, the importance of data security for the iPhone 10 cannot be emphasized enough. It is not merely a matter of protecting data from potential threats but also about preserving our digital lives and ensuring that we have access to our valuable information when we need it most. Therefore, understanding the various backup options available for the iPhone 10 and implementing robust data security measures is essential for every user.
Understanding iPhone 10 Backup Options
When it comes to safeguarding the data on your iPhone 10, having a comprehensive understanding of the available backup options is crucial. Apple offers users multiple avenues to back up their device, ensuring that their valuable data remains secure and accessible. By familiarizing yourself with these backup options, you can proactively protect your digital assets and mitigate the risk of data loss.
iCloud Backup
One of the most convenient and widely used backup options for iPhone 10 users is iCloud Backup. This feature allows you to automatically back up your device's data to Apple's cloud storage. By enabling iCloud Backup, your photos, videos, app data, device settings, and more are securely stored in the cloud, ensuring that you can easily restore them in the event of a device loss or malfunction.
iTunes Backup
For users who prefer local backups, iTunes provides a reliable solution. By connecting your iPhone 10 to a computer with iTunes installed, you can create a complete backup of your device. This method ensures that a copy of your data is stored on your computer, offering an additional layer of security and control over your backups.
Encrypting Your iPhone Backup
In addition to standard backups, iPhone 10 users have the option to encrypt their backups. Encryption adds an extra level of security by protecting your backup with a password. This means that even if your backup falls into the wrong hands, the data remains inaccessible without the encryption password, safeguarding your sensitive information.
Managing Your Backup Storage
As you continue to use your iPhone 10, managing your backup storage becomes essential. With iCloud Backup, Apple provides users with 5 GB of free cloud storage. However, if you require more space, you can purchase additional storage plans to accommodate your growing backup needs. Understanding how to manage and optimize your backup storage ensures that you can continue to protect your data without encountering storage limitations.
Restoring Data from Backup
Beyond creating backups, understanding how to restore data from these backups is equally important. Whether you're setting up a new iPhone 10 or need to recover lost data, knowing how to initiate the restoration process ensures that you can seamlessly retrieve your backed-up information when necessary.
By comprehensively understanding the backup options available for the iPhone 10, users can proactively safeguard their data, preserve their digital memories, and ensure that they have access to their valuable information whenever the need arises. Whether utilizing iCloud Backup, iTunes Backup, encryption, or managing backup storage, having a solid grasp of these options empowers users to take control of their data security and maintain peace of mind in an increasingly digital world.
Setting Up iCloud Backup
Setting up iCloud Backup on your iPhone 10 is a straightforward yet essential process that ensures the continuous protection of your valuable data. By enabling iCloud Backup, you can seamlessly and securely store your photos, videos, app data, device settings, and more in Apple's cloud storage, providing you with peace of mind and the ability to restore your information whenever needed.
To initiate the setup of iCloud Backup, follow these simple steps:
-
Connect to Wi-Fi: Ensure that your iPhone 10 is connected to a Wi-Fi network. iCloud Backup requires a stable internet connection to securely transmit your data to the cloud.
-
Access Settings: Open the "Settings" app on your iPhone 10 and tap on your Apple ID banner at the top of the screen. This will take you to the iCloud settings.
-
Navigate to iCloud Backup: Within the iCloud settings, locate and tap on "iCloud Backup." This will bring you to the backup configuration screen.
-
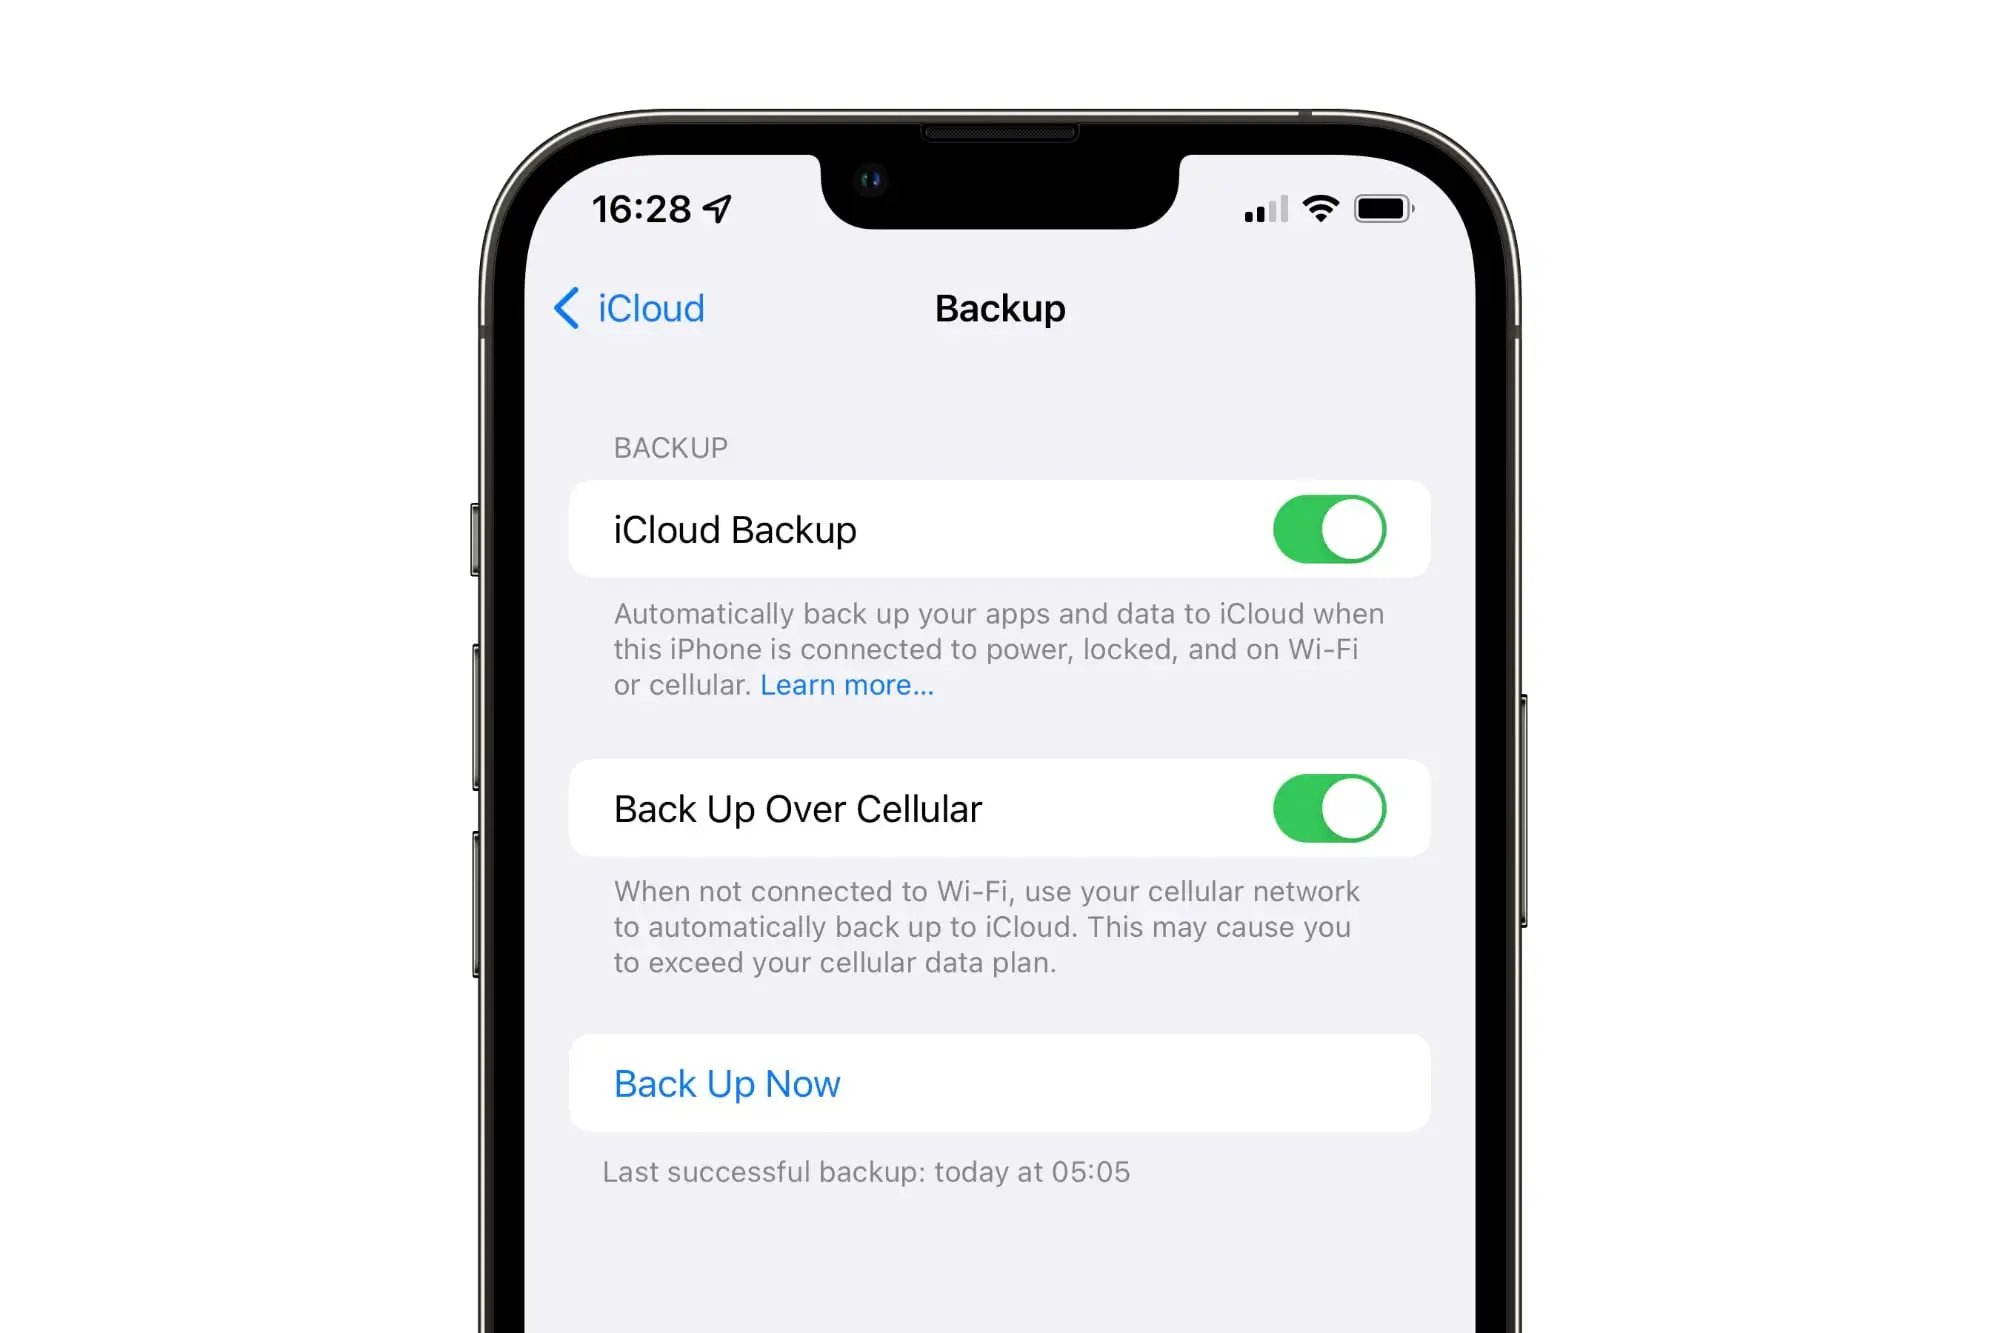
Enable iCloud Backup: On the iCloud Backup screen, toggle the "iCloud Backup" switch to the on position. Once enabled, your iPhone 10 will automatically initiate the backup process when connected to Wi-Fi and plugged in to charge.
-
Monitor Backup Progress: After enabling iCloud Backup, your device will begin backing up its data to iCloud. You can monitor the progress of the backup by navigating to the iCloud Backup screen, where you will see the time of the last successful backup and the size of the backup.
-
Ensure Automatic Backups: To ensure that your iPhone 10 continues to back up regularly, verify that the "iCloud Backup" switch remains enabled. Additionally, it's advisable to keep your device connected to Wi-Fi and power during the initial backup and subsequent automatic backups for seamless and uninterrupted data protection.
By following these steps, you can effectively set up iCloud Backup on your iPhone 10, providing a reliable and convenient method to safeguard your data. With iCloud Backup enabled, you can rest assured that your important information is securely stored in the cloud, ready to be restored in the event of a device replacement, loss, or data recovery needs.
Using iTunes for Backup
Using iTunes for backup provides iPhone 10 users with a reliable and versatile method to safeguard their device's data. While iCloud Backup offers seamless cloud-based storage, iTunes Backup offers a local backup solution, allowing users to create and manage backups directly on their computers. This approach provides an additional layer of control and security over the backup process.
To initiate a backup using iTunes, follow these steps:
-
Connect Your iPhone 10: Start by connecting your iPhone 10 to your computer using a USB cable. Once connected, launch the iTunes application on your computer. If prompted, ensure that you "Trust This Computer" on your iPhone to establish a secure connection.
-
Access Device Summary: In iTunes, locate and select your iPhone 10 from the device toolbar. This will display a summary of your device's information, including its storage capacity, software version, and backup options.
-
Initiate Backup: Under the "Backups" section within the device summary, you will find the "Manually Back Up and Restore" option. Here, you can choose to "Back Up Now" to initiate a complete backup of your iPhone 10 to your computer.
-
Monitor Backup Progress: As the backup process commences, iTunes will display a progress bar indicating the status of the backup. Depending on the amount of data on your device, the backup process may take some time to complete.
-
Verify Backup Completion: Once the backup process finishes, iTunes will display the time and date of the last successful backup. It is advisable to verify that the backup was completed successfully to ensure that your data is securely stored on your computer.
By utilizing iTunes for backup, iPhone 10 users can benefit from the flexibility and control offered by local backups. This method allows for the creation of multiple backups on different computers, providing an added layer of redundancy and security for your data. Additionally, iTunes Backup enables users to manage their backup files directly, offering the ability to archive, restore, and delete backups as needed.
Furthermore, iTunes Backup serves as an invaluable resource for users who prefer to have direct control over their data storage and backup processes. In situations where internet connectivity may be limited, or when users prefer to maintain physical copies of their backups, iTunes provides a reliable solution for safeguarding valuable information.
In essence, by leveraging iTunes for backup, iPhone 10 users can ensure the comprehensive protection of their data, complementing the convenience of iCloud Backup with a robust local backup strategy. This approach empowers users to proactively secure their digital assets and maintain control over their data, reinforcing the importance of implementing diverse backup solutions for optimal data security.
Encrypting Your iPhone Backup
Encrypting your iPhone backup adds an additional layer of security to your backed-up data, ensuring that sensitive information remains protected from unauthorized access. By enabling encryption for your iPhone backup, you can safeguard personal data, app passwords, Wi-Fi settings, and other confidential information stored in the backup file.
To encrypt your iPhone backup, follow these simple steps:
-
Connect to iTunes: Start by connecting your iPhone to your computer and launching the iTunes application.
-
Access Device Summary: In iTunes, select your iPhone from the device toolbar to access the device summary.
-
Enable Encryption: Under the "Backups" section within the device summary, select the "Encrypt iPhone backup" option. You will be prompted to create a password for the encrypted backup.
-
Create Backup: After setting the encryption password, proceed to create a backup by clicking on the "Back Up Now" button. The backup process will encrypt the data and store it securely on your computer.
By encrypting your iPhone backup, you ensure that even if the backup file falls into the wrong hands, the data remains inaccessible without the encryption password. This is particularly crucial when backing up sensitive business information, financial data, or personal content that you wish to keep confidential.
Furthermore, encrypted backups are essential for maintaining the security and privacy of your data, especially in the event of a lost or stolen device. With an encrypted backup, you can rest assured that your personal information remains protected, mitigating the risk of unauthorized access to your backed-up data.
It's important to note that the encryption password set for your iPhone backup should be memorable yet secure. Avoid using easily guessable passwords and consider utilizing a combination of letters, numbers, and special characters to enhance the strength of the encryption.
In essence, by encrypting your iPhone backup, you reinforce the security of your backed-up data, ensuring that sensitive information remains shielded from potential threats. This proactive measure aligns with best practices for data security, providing peace of mind and confidence in the protection of your valuable digital assets.
Managing Your Backup Storage
Managing your backup storage is a critical aspect of maintaining a reliable and effective data security strategy for your iPhone 10. As you continue to use your device and accumulate new data, it's essential to monitor and optimize your backup storage to ensure that your valuable information remains protected and accessible when needed.
When utilizing iCloud Backup, Apple provides users with 5 GB of free cloud storage. However, as your data grows, you may find that this initial allocation is insufficient to accommodate your backup needs. In such cases, it's advisable to consider upgrading to a paid iCloud storage plan, offering additional storage capacity to support your growing backup requirements.
To manage your backup storage effectively, follow these essential steps:
-
Assess Your Storage Needs: Begin by evaluating the size of your current backup and estimating your future storage requirements. Consider the types of data you need to back up, such as photos, videos, app data, and device settings, to gauge the necessary storage capacity.
-
Upgrade iCloud Storage: If your existing iCloud storage is nearing capacity, consider upgrading to a higher storage tier. Apple offers various paid storage plans, ranging from 50 GB to 2 TB, providing ample space to accommodate your backups and ensure that your data remains protected.
-
Optimize Backup Content: Review the data being backed up to iCloud and assess whether all content is essential for backup. Removing unnecessary data, such as redundant photos or outdated app data, can help optimize your backup storage and reduce the space required for backups.
-
Monitor Backup Size: Regularly check the size of your iCloud backups to track storage usage and identify any significant increases in backup size. This proactive approach allows you to anticipate storage needs and take appropriate measures to manage your backup storage effectively.
-
Utilize iCloud Storage Management: Leverage the built-in storage management tools provided by Apple to gain insights into your iCloud storage usage. These tools enable you to identify large files, manage backups for specific apps, and optimize your storage allocation based on your backup priorities.
By actively managing your backup storage, you can ensure that your iPhone 10 backups remain up to date, comprehensive, and well-organized. This proactive approach not only safeguards your data but also streamlines the backup process, allowing for efficient utilization of your available storage resources.
In summary, managing your backup storage is a fundamental aspect of maintaining robust data security for your iPhone 10. By assessing your storage needs, upgrading iCloud storage, optimizing backup content, monitoring backup size, and utilizing iCloud storage management tools, you can effectively safeguard your valuable data and maintain seamless access to your backups.
Restoring Data from Backup
Restoring data from a backup is a crucial process that ensures you can recover your valuable information in the event of a device replacement, data loss, or the need to retrieve specific content from a previous backup. Whether you've experienced a device malfunction, upgraded to a new iPhone 10, or accidentally deleted important data, knowing how to restore from a backup is essential for maintaining the integrity of your digital information.
When it comes to restoring data from a backup, iPhone 10 users have multiple options, each designed to facilitate a seamless and efficient recovery process. The following steps outline the process of restoring data from an iCloud backup:
-
Initial Setup: When setting up a new or erased iPhone 10, you will encounter the "Apps & Data" screen during the setup process. Here, select the "Restore from iCloud Backup" option to initiate the restoration process.
-
Sign in to iCloud: After choosing the "Restore from iCloud Backup" option, you will be prompted to sign in to your iCloud account using your Apple ID and password. This step is essential to access your iCloud backups and retrieve the desired data.
-
Select Backup: Upon signing in to iCloud, you will be presented with a list of available backups associated with your Apple ID. Choose the most relevant backup based on the backup date and size, ensuring that it contains the data you wish to restore.
-
Restore Process: Once you've selected the desired backup, the restoration process will commence. Your iPhone 10 will begin downloading the selected backup from iCloud and restoring the backed-up data to your device.
-
Completion and Verification: After the restoration process is complete, your iPhone 10 will restart, and the restored data will be available on your device. It's advisable to verify that the restored content, including photos, contacts, messages, and app data, is successfully retrieved from the backup.
In addition to restoring from an iCloud backup, iPhone 10 users can also utilize iTunes to restore data from a local backup stored on their computer. By connecting the iPhone 10 to the computer and launching iTunes, users can select the "Restore Backup" option to initiate the restoration process, providing a versatile alternative for data recovery.
In essence, understanding how to restore data from a backup empowers iPhone 10 users to maintain control over their digital information and recover essential data when needed. By following the appropriate restoration steps, users can ensure that their valuable content is seamlessly retrieved from backups, enabling them to continue using their devices with confidence and peace of mind.