
Setting Up Thunderbird
Setting up Thunderbird is the first step to create a mailing list and efficiently manage your contacts. Follow these simple instructions to get started:
1. Download and Install Thunderbird: Visit the official Thunderbird website and download the appropriate version for your operating system. Once downloaded, run the installation file and follow the on-screen instructions to install Thunderbird on your computer.
2. Launch Thunderbird: After installation, launch Thunderbird by clicking on its icon in the application menu or desktop shortcut. The Thunderbird welcome screen will appear, prompting you to set up your email account.
3. Add a New Email Account: Click on the ‘Email’ button on the welcome screen. Thunderbird will automatically detect the most popular email providers, such as Gmail, Yahoo, and Outlook. If your email provider is listed, simply enter your email address and password, and Thunderbird will configure the account settings. Otherwise, click on ‘Skip this and use my existing email’ to manually enter the details of your email account.
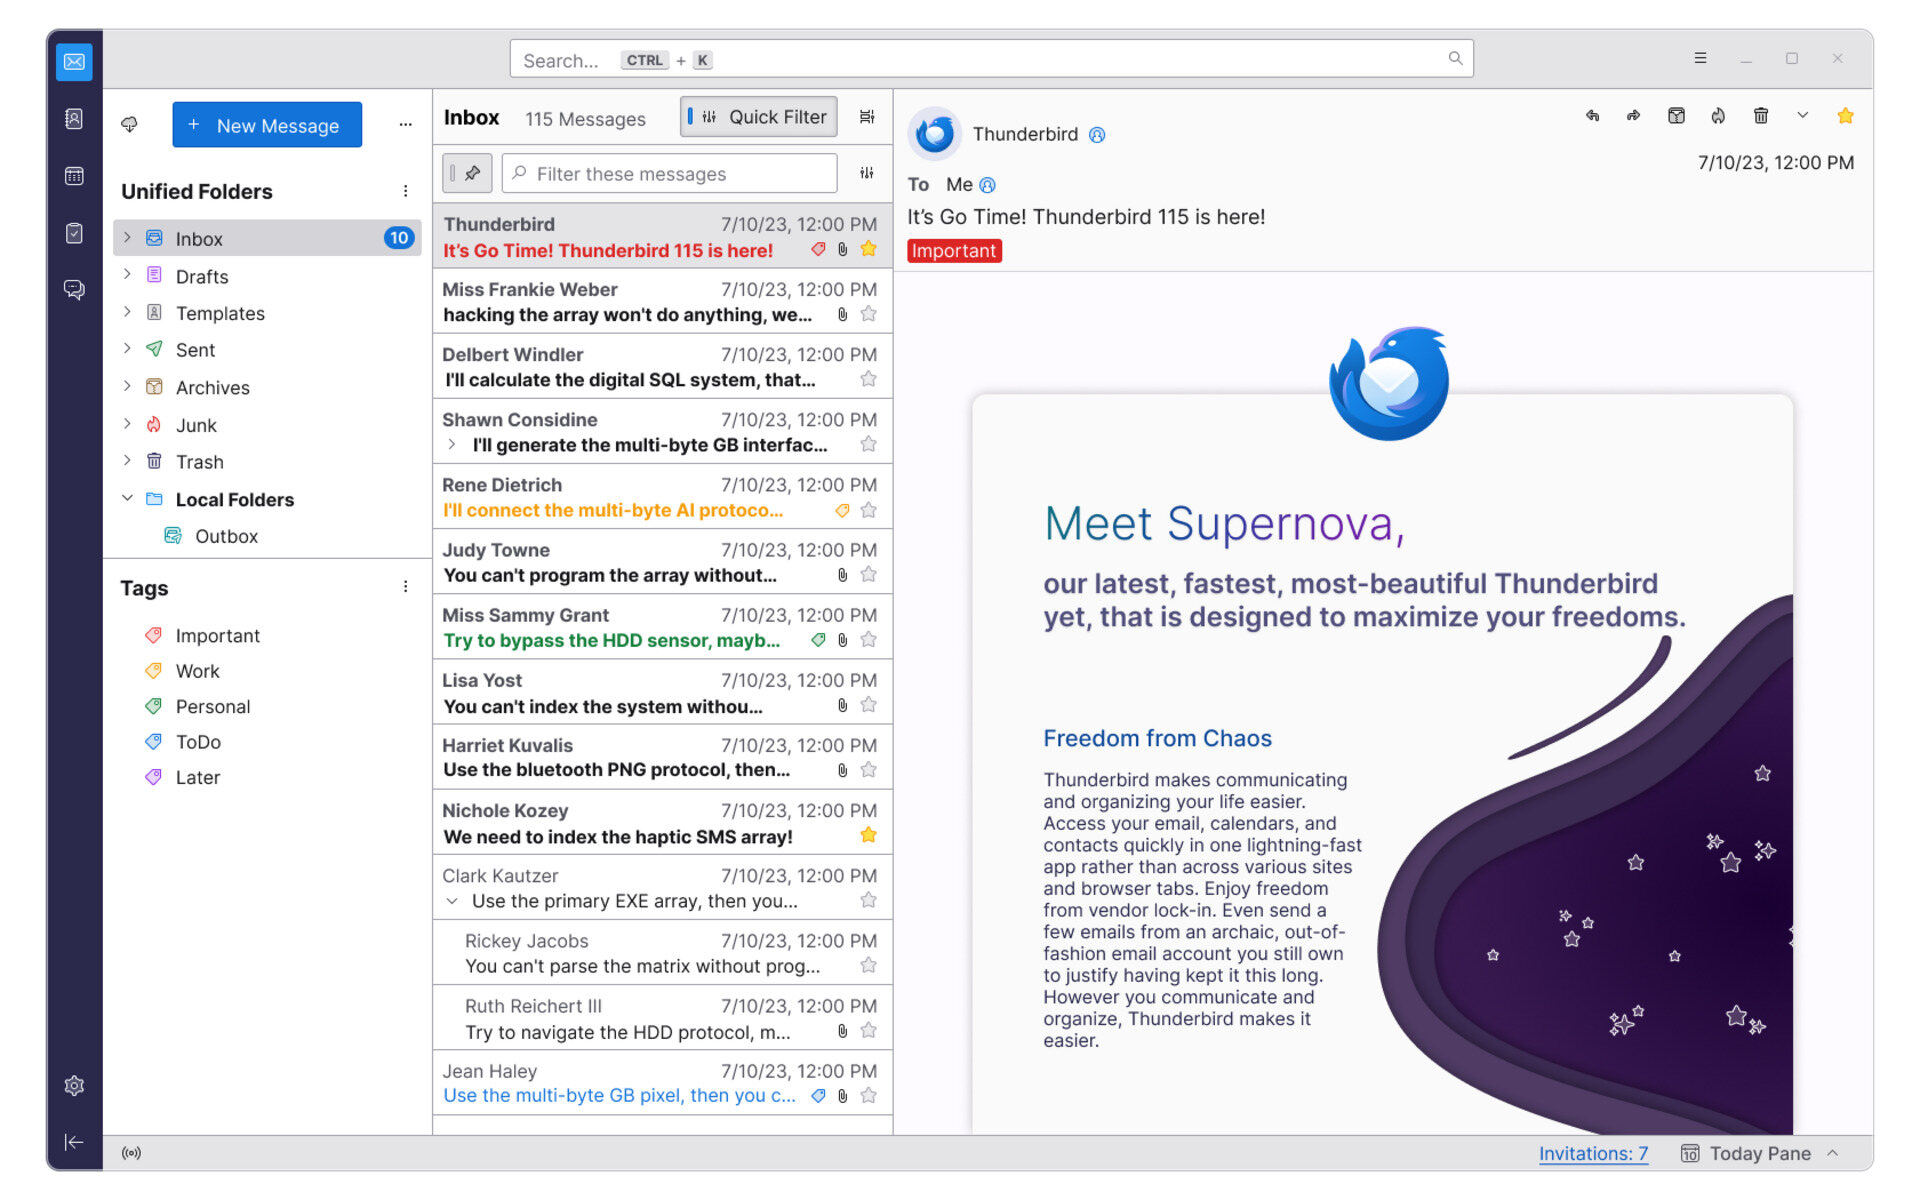
4. Open Address Book: Once you have set up your email account, click on the ‘Address Book’ icon located on the top toolbar. This will open the Thunderbird Address Book, where you can manage your contacts.
You are now ready to create a mailing list and start adding contacts. Continue reading to learn more about managing your contacts in Thunderbird.
Adding a New Email Account
To create a mailing list in Thunderbird, you need to add your email account first. Here’s how you can do it:
1. Open Thunderbird: Launch Thunderbird by clicking on its icon in the application menu or desktop shortcut.
2. Open the Account Settings: Click on the three horizontal lines at the top right corner of the Thunderbird window, and then click on “Options” from the drop-down menu. In the options menu, select “Account Settings” to open the account settings window.
3. Add a New Email Account: In the Account Settings window, click on the “Account Actions” button, which is located at the bottom-left corner. From the drop-down menu, select “Add Mail Account” to open the Account Wizard.
4. Enter Your Name and Email Address: In the Account Wizard, enter your name and email address in the respective fields. This name will be displayed as the sender’s name when you send emails.
5. Enter Your Password: Enter the password for your email account. You can also choose to save the password, so you don’t have to enter it every time you open Thunderbird.
6. Configure Your Account: Thunderbird will try to automatically configure your account settings based on your email address. If the automatic setup is successful, you will see a message confirming the successful configuration. Click on the “Done” button to finish the setup.
7. Manual Configuration: If Thunderbird couldn’t automatically configure your account, you need to manually provide the incoming and outgoing server settings. On the Account Wizard page where it asks for your account type, select “IMAP” or “POP3,” depending on your email provider’s settings. Enter the incoming and outgoing server details as provided by your email provider.
8. Test Your Account: After completing the setup, Thunderbird will test the account settings to ensure that everything is working correctly. If the test is successful, click on the “Done” button to finish adding your email account.
Congratulations! You have successfully added a new email account in Thunderbird. Now you can start creating a mailing list and managing your contacts effectively.
Open Address Book
To manage your contacts and create a mailing list in Thunderbird, you need to open the Address Book. Here’s how you can easily access it:
1. Launch Thunderbird: Start by launching Thunderbird on your computer. You can find the Thunderbird icon in your application menu or desktop shortcut.
2. Open the Address Book: Once Thunderbird is open, look for the “Address Book” icon located on the top toolbar. It typically resembles a small book or card symbol. Click on the icon to open the Address Book.
3. Explore the Address Book Interface: The Address Book interface will appear, displaying a list of your contacts on the left side of the window. The right side will show the details of the selected contact. You can customize the view of your contacts by selecting various options such as Card View or List View.
4. Navigate through Contacts: To navigate through your contacts, simply click on the contact name in the list on the left side. The contact’s details will be displayed on the right side, including their email address, phone number, and any other information you have entered.
5. Sort and Search Contacts: Thunderbird offers various options to sort and search for contacts. You can sort contacts by name, email address, or any other available criteria. To search for a specific contact, use the search bar located at the top of the Address Book window and enter the contact’s name or email address.
6. Edit Contact Details: To edit the details of a contact, select the contact from the list, and click on the “Edit” button. This will allow you to make changes to their name, email address, phone number, and any other information you have saved for that contact.
7. Delete Contacts: If you need to remove a contact from your Address Book, select the contact from the list and click on the “Delete” button. Confirm the deletion when prompted, and the contact will be permanently removed from your Address Book.
Now that you have opened the Address Book in Thunderbird, you can explore and manage your contacts efficiently. In the following sections, we will delve deeper into creating mailing lists, adding contacts manually, and importing contacts from other sources.
Creating a New Contact Group
In Thunderbird, you can organize your contacts by creating contact groups. Contact groups, also known as distribution lists or mailing lists, allow you to efficiently manage and send emails to a selected group of contacts. Here’s how you can create a new contact group in Thunderbird:
1. Open the Address Book: Launch Thunderbird and click on the “Address Book” icon located on the top toolbar. This will open the Thunderbird Address Book.
2. Click on “New List”: In the Address Book, click on the “New List” button. This button is usually represented by a list icon with a plus sign (+) or an option in the menu bar.
3. Enter Group Details: A dialog box will appear, asking for the details of the new contact group. Enter a name for the group in the “List Name” field. This can be the name of a specific project, department, or any other identifier that represents the group. You can also add a description to provide further information about the group (optional).
4. Add Contacts to the Group: To add contacts to the new group, click on the “Select Members” button. A new window will open, displaying your list of contacts. Select the contacts you want to add to the group by checking the boxes next to their names. You can select multiple contacts by holding down the Ctrl key (Windows) or Command key (Mac) while clicking on the desired contacts.
5. Save the Group: After selecting the contacts, click on the “OK” or “Save” button to save the contact group. The new group will now appear in the list of contact groups in the Thunderbird Address Book.
6. Edit Group Details: If you need to edit the details of a contact group, right-click on the group name in the Address Book and select “Properties” or an equivalent option. This will allow you to change the group name, description, or add/remove contacts from the group.
7. Delete a Contact Group: To delete a contact group, right-click on the group name in the Address Book and select “Delete” or an equivalent option. Confirm the deletion when prompted, and the group will be permanently removed from the Address Book.
By creating contact groups, you can easily manage and communicate with specific sets of contacts in Thunderbird. In the next sections, we will explore different methods of adding contacts to your groups, such as importing contacts and manually adding individual contacts.
Importing Existing Contacts
If you already have a list of contacts stored in another application or file, you can easily import them into Thunderbird. This allows you to quickly populate your address book and make use of the existing contact information. Here’s how you can import your existing contacts in Thunderbird:
1. Open the Address Book: Launch Thunderbird and click on the “Address Book” icon located on the top toolbar. This will open the Thunderbird Address Book.
2. Access Import Options: In the Address Book, click on the “Tools” menu located at the top of the Thunderbird window. From the drop-down menu, select “Import” or “Import/Export” to access the import options.
3. Choose Import Source: In the import options window, select the source from which you want to import your contacts. Thunderbird provides various options, such as importing from a file, from another email program, or even from a webmail service. Choose the option that best suits your needs.
4. Follow the Import Wizard: Once you have selected the import source, follow the instructions provided by the import wizard. This may include selecting the specific file or program from which to import, choosing the file format if applicable, and indicating the destination in Thunderbird where the imported contacts should be saved.
5. Map Fields (if applicable): In some cases, you may need to map the fields of your imported contacts to the corresponding fields in Thunderbird. This ensures that the contact information is accurately transferred. For example, you may need to map the “First Name” field in the imported file to the “Given Name” field in Thunderbird. Follow the on-screen instructions to complete this mapping process.
6. Complete the Import: Once you have completed the necessary steps in the import wizard, click on “Finish” or “Import” to initiate the import process. Thunderbird will then import the contacts from the selected source and add them to your address book.
7. Verify Imported Contacts: After the import process is complete, go back to the Thunderbird Address Book and verify that your imported contacts are now visible in the contacts list. Take a moment to review the contact details and ensure that everything imported correctly.
By importing your existing contacts into Thunderbird, you can save time and effort in manually entering each contact. This also ensures that your address book is up to date with all the relevant information. In the following sections, we will explore other methods of adding contacts to Thunderbird, including manually adding contacts and adding contacts from emails.
Adding Contacts Manually
If you have a small number of contacts or want to add specific details to each contact, manually adding them to Thunderbird is the way to go. This allows you to have complete control over the contact information you enter. Here’s how you can manually add contacts in Thunderbird:
1. Open the Address Book: Launch Thunderbird and click on the “Address Book” icon located on the top toolbar. This will open the Thunderbird Address Book.
2. Click on “New Contact”: In the Address Book, click on the “New Contact” button. This button is typically represented by a plus sign (+) or an option in the menu bar.
3. Enter Contact Information: A new window or dialog box will appear, depending on the Thunderbird version you are using. Enter the contact’s details in the provided fields. These details may include the contact’s name, email address, phone number, address, and other relevant information.
4. Additional Contact Details: If you want to add additional details to the contact, such as a nickname, birthday, or notes, you can do so by clicking on the appropriate tabs or buttons in the contact editing window.
5. Save the Contact: After entering the contact’s information, click on the “Save” or “OK” button to save the contact. The contact will now appear in your Thunderbird Address Book.
6. Edit Contact Details: To make changes to a contact’s details, select the contact from the list in the Address Book and click on the “Edit” button. This will open the contact editing window, where you can modify the contact’s information as needed.
7. Delete Contacts: If you need to remove a contact from your Address Book, select the contact from the list and click on the “Delete” button. Confirm the deletion when prompted, and the contact will be permanently removed from your Address Book.
By manually adding contacts to Thunderbird, you have full control over the details you enter. This allows you to customize each contact’s information according to your specific needs. In the next sections, we will explore other methods of adding contacts in Thunderbird, such as adding contacts from emails and importing contacts from other sources.
Adding Contacts from Emails
Thunderbird makes it easy to add contacts directly from emails. This feature is especially useful when you receive an email from a new contact and want to save their information for future reference. Here’s how you can add contacts from emails in Thunderbird:
1. Open the Email: Launch Thunderbird and navigate to the email containing the contact’s information that you want to add.
2. Select the Contact’s Name: In the email message, locate the contact’s name or email address. Click on the name to select it. Thunderbird will recognize it as a potential contact.
3. Add Contact Information: With the contact’s name selected, right-click on it and choose the “Add to Address Book” option from the context menu. Alternatively, you can also click on the contact’s name, go to the “Tools” menu, and select “Add to Address Book”.
4. Verify and Edit Contact Details: Thunderbird will open a new window or dialog box with the contact’s information. Review the details to ensure their accuracy. If necessary, make any edits or additions to the contact’s information before saving.
5. Save the Contact: Once you have verified the contact’s details, click on the “Save” or “OK” button to save the contact. The contact will now be added to your Thunderbird Address Book.
6. Repeat for Additional Contacts: You can add multiple contacts from emails by repeating the above steps for each contact you want to save.
7. Edit Contact Details: If you need to make changes to a contact’s information, select the contact from the Address Book and click on the “Edit” button. This will allow you to modify the contact’s details as needed.
8. Delete Contacts: To remove a contact from your Address Book, select the contact and click on the “Delete” button. Confirm the deletion when prompted, and the contact will be permanently removed.
By adding contacts directly from emails in Thunderbird, you can quickly save important contact information without the need for manual entry. This feature streamlines the process of building your address book and helps you stay organized. In the following sections, we will explore other methods of managing contacts in Thunderbird.
Editing Contacts
In Thunderbird, you have the flexibility to edit and update your contacts’ information as needed. Whether you want to correct a typo, update a phone number, or add additional details, the edit contact feature makes it easy to keep your contact information accurate and up to date. Here’s how you can edit contacts in Thunderbird:
1. Open the Address Book: Launch Thunderbird and click on the “Address Book” icon located on the top toolbar. This will open the Thunderbird Address Book.
2. Locate the Contact: In the Address Book, locate the contact you want to edit. You can scroll through the list or use the search bar at the top to find the contact quickly.
3. Edit Contact Details: Once you have found the contact, double-click on it to open the contact editing window. You will see all the available fields for that contact, such as name, email address, phone number, and more.
4. Make Changes: In the contact editing window, make the desired changes to the contact’s information. You can edit any field, add new details, or delete existing information as needed.
5. Save the Changes: After making the necessary changes, click on the “Save” or “OK” button to save the updated contact information. Thunderbird will update the contact’s details in your address book.
6. Verify the Changes: After saving the edits, verify that the contact’s details reflect the changes you made. Review the information to ensure its accuracy and completeness.
7. Repeat for Other Contacts: If you have more contacts to edit, follow the same process for each contact you wish to update. Edit their details, save the changes, and verify the updated information.
8. Delete Contacts: If you want to remove a contact from your Address Book, select the contact, and click on the “Delete” button. Confirm the deletion when prompted, and the contact will be permanently removed.
By editing contacts in Thunderbird, you can ensure that your address book remains accurate and reflects the most up-to-date information for your contacts. This allows you to stay organized and easily access the correct contact details when needed.
Deleting Contacts
In Thunderbird, you have the flexibility to remove contacts from your address book when they are no longer needed or if you want to keep your contact list updated. Deleting contacts is a quick and straightforward process. Here’s how to delete contacts in Thunderbird:
1. Open the Address Book: Launch Thunderbird and click on the “Address Book” icon located on the top toolbar. This will open the Thunderbird Address Book.
2. Locate the Contact: In the Address Book, scroll through the list or use the search bar at the top to find the contact you want to delete.
3. Select the Contact: Once you have located the contact, click on it to select it. The contact’s details will be displayed on the right side of the Address Book.
4. Delete the Contact: To delete the selected contact, click on the “Delete” button. This button is typically represented by a trash can icon or can be found in the menu bar. A confirmation dialog will appear, asking you to confirm the deletion.
5. Confirm the Deletion: In the confirmation dialog, verify that you have selected the correct contact for deletion. Once you are sure, click on the “OK” or “Delete” button to confirm the deletion.
6. Verify the Contact’s Deletion: After confirming the deletion, the contact will be permanently removed from your Thunderbird Address Book. Double-check the address book to ensure that the contact has been deleted successfully.
7. Repeat for Other Contacts: If you have more contacts to delete, follow the same process for each contact you want to remove from your address book. Select the contact, click on the “Delete” button, and confirm the deletion.
By deleting unwanted or outdated contacts, you can keep your Thunderbird Address Book organized and focused on the contacts that are relevant to you. This decluttering process streamlines your contact list and helps you find contacts more efficiently when needed.
Organizing Contacts into Categories
In Thunderbird, you can organize your contacts into categories to make it easier to manage and find specific groups of contacts. By creating categories, you can efficiently group contacts based on criteria such as work, personal, family, or any other custom categories that fit your needs. Here’s how you can organize contacts into categories in Thunderbird:
1. Open the Address Book: Launch Thunderbird and click on the “Address Book” icon located on the top toolbar. This will open the Thunderbird Address Book.
2. Select the Contacts: In the Address Book, select the contacts that you want to organize into a category. You can select multiple contacts by holding down the Ctrl key (Windows) or Command key (Mac) while clicking on the desired contacts.
3. Right-click and Choose “New Category”: After selecting the desired contacts, right-click on one of the selected contacts and choose “New Category” from the context menu. Alternatively, you can go to the “File” or “Edit” menu and select “New Category” or a similar option.
4. Name the Category: A dialog box will appear, prompting you to enter a name for the category. Enter a descriptive name that represents the group of contacts you selected. For example, you can use “Work Contacts,” “Family,” or “Personal” as category names.
5. Add Contacts to the Category: Once you have named the category, the selected contacts will be automatically added to it. You can verify this by clicking on the category in the Address Book, and the contacts assigned to that category will be displayed.
6. Edit Category Details: If you need to make changes to the category’s name or other details, right-click on the category name and choose “Properties” or a similar option. This allows you to modify the category’s name, add a description, or make any other necessary changes.
7. Remove Contacts from Categories: To remove a contact from a category, locate the contact in the Address Book, right-click on it, and choose “Remove from Category” or a similar option. This will remove the contact from the selected category while keeping it in the Address Book.
8. Delete Categories: If you want to delete a category, right-click on the category name in the Address Book and choose “Delete” or a similar option. Confirm the deletion when prompted, and the category will be permanently removed along with the contacts assigned to it.
By organizing your contacts into categories, you can easily manage and find specific groups of contacts in Thunderbird. This categorization process helps streamline communication, making it more efficient and organized.
Searching for Contacts
In Thunderbird, searching for specific contacts can be a time-saving feature, especially when you have a large number of contacts in your address book. Thunderbird offers robust search capabilities that allow you to quickly find the contact you’re looking for. Here’s how you can search for contacts in Thunderbird:
1. Open the Address Book: Launch Thunderbird and click on the “Address Book” icon located on the top toolbar. This will open the Thunderbird Address Book.
2. Locate the Search Bar: At the top of the Address Book window, you will find a search bar or a field labeled “Search”. Click on this field to activate the search functionality.
3. Enter the Search Criteria: In the search bar, enter the criteria you want to search for. This can include the contact’s name, email address, phone number, or any other relevant information you have saved for the contact.
4. Review the Search Results: As you type your search criteria, Thunderbird will dynamically display the matching contacts in the Address Book. The search results will update in real-time as you enter more characters or refine your search query.
5. Refine Your Search: If the initial search results are extensive, you can refine your search further by adding additional search parameters. For example, you can search for contacts within a specific category or limit the search to specific fields like the email address or phone number.
6. Clear the Search: To clear the search and view all contacts again, click on the “X” or “Clear” button in the search field. This will reset the search criteria and display the full list of contacts in the Address Book.
7. Search in Advanced Mode: Thunderbird also offers an Advanced Search feature, which allows you to perform more complex searches based on multiple criteria simultaneously. To access the Advanced Search mode, click on the “More Options” or “Advanced” button located near the search bar.
8. Save Search as a Virtual Folder (Optional): Thunderbird provides an option to save your search criteria as a virtual folder. This allows you to access the search results as a separate folder in the Thunderbird sidebar. To save your search as a virtual folder, click on the “Save as Folder” or “Save Search” option where available.
By leveraging the search functionality in Thunderbird, you can easily locate specific contacts within your address book. This efficient searching process saves you time and ensures that you can access the information you need quickly and conveniently.
Exporting Contacts
In Thunderbird, you have the option to export your contacts, allowing you to create a backup or transfer them to another application or device. Exporting contacts is a useful feature that helps preserve your contact information and facilitates seamless data migration. Here’s how you can export contacts in Thunderbird:
1. Open the Address Book: Launch Thunderbird and click on the “Address Book” icon located on the top toolbar. This will open the Thunderbird Address Book.
2. Select the Contacts: In the Address Book, select the contacts you want to export. You can select multiple contacts by holding down the Ctrl key (Windows) or Command key (Mac) while clicking on the desired contacts.
3. Access the Export Menu: With the desired contacts selected, go to the “Tools” menu located at the top of the Thunderbird window. From the drop-down menu, select “Export” or “Export…”.
4. Choose the Export Format: In the export dialog box, select the desired export format for your contacts. Thunderbird offers various formats such as CSV (Comma Separated Values), vCard, or LDIF (LDAP Data Interchange Format).
5. Specify the Export Destination: Choose the location where you want to save the exported contact file. You can select a specific folder or create a new one for the exported file. Ensure you select a location that is easily accessible and memorable.
6. Configure Export Options (if applicable): Depending on the chosen export format, Thunderbird may offer additional options to configure before exporting. These options may include selecting specific fields to export, encoding options, or contact formatting preferences. Adjust the options according to your preferences or leave them at their default settings.
7. Initiate the Export: Once you have reviewed the export settings and chosen the destination, click on the “Save” or “Export” button to start the export process. Thunderbird will convert the selected contacts into the specified format and save them as an exported file.
8. Verify the Exported Contacts: After the export is completed, navigate to the destination folder you specified and verify that the exported contact file is present. Open the file with a text editor or another application to ensure that the contact information is intact and as expected.
By exporting your contacts in Thunderbird, you can create a backup copy of your contact information and easily transfer it to other applications or devices. This feature ensures that you have a safeguard in place for your valuable contact data and allows for seamless data management and migration.
Importing Contacts from a Different Email Account
If you have contacts stored in a different email account and want to import them into Thunderbird, you can easily do so using the import feature. This allows you to consolidate your contacts from multiple accounts into one central location. Here’s how you can import contacts from a different email account into Thunderbird:
1. Open the Address Book: Launch Thunderbird and click on the “Address Book” icon located on the top toolbar. This will open the Thunderbird Address Book.
2. Access Import Options: In the Thunderbird Address Book, click on the “Tools” menu located at the top of the Thunderbird window. From the drop-down menu, select “Import” or “Import/Export” to access the import options.
3. Choose Import Source: In the import options window, select the source from which you want to import your contacts. Thunderbird provides various options for importing contacts, such as importing from another email program or from a file. Choose the option that best suits your needs.
4. Follow the Import Wizard: Once you have selected the import source, follow the instructions provided by the import wizard. This may include selecting the specific email program or file format to import from, as well as providing the necessary login credentials if applicable.
5. Map Fields (if applicable): In some cases, you may need to map the fields of your imported contacts to the corresponding fields in Thunderbird. This ensures that the contact information is accurately transferred. For example, you may need to map the “First Name” field in the imported file to the “Given Name” field in Thunderbird. Follow the on-screen instructions to complete this mapping process.
6. Complete the Import: Once you have completed the necessary steps in the import wizard, click on “Finish” or “Import” to initiate the import process. Thunderbird will then import the contacts from the selected source and add them to your Thunderbird Address Book.
7. Verify Imported Contacts: After the import process is complete, go back to the Thunderbird Address Book and verify that your imported contacts are now visible in the contacts list. Take a moment to review the contact details and ensure that everything imported correctly.
By importing contacts from a different email account into Thunderbird, you can consolidate your contact information in one central location. This makes it easier to manage and access your contacts, regardless of the email account they were originally associated with.
Backing up and Restoring Contacts
Backing up your contacts is essential to protect your valuable contact data from loss or accidental deletion. Thunderbird provides a convenient way to create backups of your contacts, allowing you to restore them if needed. Here’s how you can back up and restore contacts in Thunderbird:
1. Open the Address Book: Launch Thunderbird and click on the “Address Book” icon located on the top toolbar. This will open the Thunderbird Address Book.
2. Backing Up Contacts:
- Individual Contact: To back up an individual contact, select the contact from the list, right-click on it, and choose “Export” or “Export…”. Select the desired export format (such as CSV or vCard) and specify the backup location. Click “Save” or “Export” to create the backup file.
- All Contacts: To back up all your contacts, click on the “Tools” menu located at the top of the Thunderbird window. From the drop-down menu, select “Export” or “Export…”. Choose the export format and select a backup location for the exported contact file. Click “Save” or “Export” to create the backup file.
3. Restoring Contacts:
- Individual Contact: To restore an individual contact, locate the backup file on your computer. Open the Thunderbird Address Book and click on the “Tools” menu. From the drop-down menu, select “Import” or “Import…”. Choose the appropriate import format and locate the backup file. Follow the on-screen instructions to complete the import process.
- All Contacts: To restore all your contacts, navigate to the backup file on your computer. Open Thunderbird and go to the Address Book. Click on the “Tools” menu and select “Import” or “Import…”. Choose the import format and locate the backup file. Follow the instructions to import all the contacts from the backup file.
4. Verify the Restored Contacts: After the import is complete, go back to the Thunderbird Address Book and verify that your restored contacts are now visible in the list. Take a moment to review their details and ensure that everything is restored correctly.
Regularly backing up your contacts in Thunderbird is essential to safeguard your data from potential loss or accidental deletion. It provides peace of mind knowing that you have a backup copy of your important contact information that can be easily restored in case of any unexpected situations.
Managing Mailing Lists
In Thunderbird, managing mailing lists allows you to efficiently organize and send emails to specific groups of contacts. Whether you want to send newsletters, announcements, or updates to a particular set of recipients, Thunderbird provides several features to help you manage your mailing lists effectively. Here’s how you can manage mailing lists in Thunderbird:
1. Creating a Mailing List: To create a mailing list, open the Thunderbird Address Book and click on the “New List” button. Enter a name for the list and add contacts to it by selecting them from your address book.
2. Adding Contacts to a Mailing List: Add contacts to an existing mailing list by opening the list in the Address Book and clicking the “Select Members” button. Choose contacts from your address book and click “OK” to add them to the list.
3. Removing Contacts from a Mailing List: To remove contacts from a mailing list, open the list in the Address Book, select the contacts you want to remove, and click on the “Remove” or “Delete” button.
4. Sending Emails to a Mailing List: Compose a new email and enter the mailing list name in the “To” field. Thunderbird will automatically expand the list and include all the contacts in the email. Compose your email as usual and send it to the mailing list.
5. Customizing Mailing List Options: Thunderbird allows you to customize various options for mailing lists. Right-click on a mailing list in the Address Book and select “Properties” or a similar option. Here, you can modify the list name, description, add custom fields, or change other settings related to the mailing list.
6. Managing Mailing Lists with Categories: Thunderbird lets you manage mailing lists more efficiently by organizing them into categories. Create categories in the Address Book, then drag and drop mailing lists into the relevant categories for easy access and organization.
7. Troubleshooting Tips for Mailing Lists: If you encounter any issues with your mailing lists, such as contacts not receiving emails or delivery problems, ensure that the email addresses are correct, check for any spam filters, and consider using dedicated mailing list services for larger lists.
By effectively managing mailing lists in Thunderbird, you can streamline your email communication and easily send targeted messages to specific groups of contacts. This feature facilitates efficient communication and ensures that your email campaigns reach the intended recipients.
Creating a Mailing List
In Thunderbird, creating a mailing list allows you to group contacts together and send emails to multiple recipients simultaneously. Whether you want to send newsletters, announcements, or updates, Thunderbird provides a straightforward process for creating and managing mailing lists. Here’s how you can create a mailing list in Thunderbird:
1. Open the Address Book: Launch Thunderbird and click on the “Address Book” icon located on the top toolbar. This will open the Thunderbird Address Book.
2. Click on “New List”: In the Address Book, click on the “New List” button. This button is typically represented by a list icon with a plus sign (+) or an option in the menu bar.
3. Enter List Details: A dialog box will appear, prompting you to enter details for the new mailing list. Enter a name for the list in the “List Name” field. This can be the name of a specific project, group, or any other identifier that represents the recipients of the list. You can also add a description to provide further information about the list (optional).
4. Add Contacts to the List: To add contacts to the new mailing list, click on the “Select Members” button. A new window will open, displaying your list of contacts. Select the contacts you want to add to the list by checking the boxes next to their names. You can select multiple contacts by holding down the Ctrl key (Windows) or Command key (Mac) while clicking on the desired contacts.
5. Save the List: After selecting the contacts, click on the “OK” or “Save” button to save the mailing list. The new mailing list will now appear in the list of contacts in the Thunderbird Address Book.
6. Edit List Details: If you need to make changes to the mailing list, right-click on the list name in the Address Book and select “Properties” or an equivalent option. This will allow you to edit the list name, description, or add/remove contacts from the list.
7. Delete the Mailing List: To delete a mailing list, right-click on the list name in the Address Book and select “Delete” or an equivalent option. Confirm the deletion when prompted, and the mailing list will be permanently removed.
By creating mailing lists in Thunderbird, you can easily send targeted emails to specific groups of contacts. This simplifies your email communication and helps ensure that your messages reach the intended recipients efficiently.
Adding Contacts to a Mailing List
Once you have created a mailing list in Thunderbird, it’s time to add contacts to it. Adding contacts to a mailing list allows you to easily send emails to multiple recipients simultaneously. Here’s how you can add contacts to a mailing list in Thunderbird:
1. Open the Address Book: Launch Thunderbird and click on the “Address Book” icon located on the top toolbar. This will open the Thunderbird Address Book.
2. Locate the Mailing List: In the Address Book, locate the mailing list to which you want to add contacts. The mailing list will have the name you assigned to it during creation.
3. Open the Mailing List: Double-click on the mailing list to open it and display the list of contacts already included.
4. Add Contacts from Existing Contacts: To add contacts from your existing address book, click on the “Select Members” button. A new window will open, displaying your list of contacts.
5. Select Contacts: In the “Select Members” window, select the contacts you want to add to the mailing list. You can select multiple contacts by holding down the Ctrl key (Windows) or Command key (Mac) while clicking on the desired contacts.
6. Add Selected Contacts: After selecting the contacts, click on the “Add” or “OK” button. The selected contacts will now be added to the mailing list.
7. Add New Contacts: If the contacts you want to include are not already in your address book, you can manually input their information. To do this, click on the “New Contact” button and enter the contact details in the provided fields. Once the new contact is created, click on the “Add” or “OK” button to add it to the mailing list.
8. Verify the Addition: After adding contacts to the mailing list, verify that they are included by reviewing the list of contacts within the mailing list in the Thunderbird Address Book.
By adding contacts to a mailing list in Thunderbird, you can efficiently manage group email communication. This simplifies the process of sending emails to multiple recipients and ensures that important messages are disseminated to the right group of people.
Removing Contacts from a Mailing List
In Thunderbird, you can easily manage your mailing lists by removing contacts that are no longer relevant or should no longer receive emails from a specific list. Removing contacts from a mailing list ensures that your email communication remains targeted and effective. Here’s how you can remove contacts from a mailing list in Thunderbird:
1. Open the Address Book: Launch Thunderbird and click on the “Address Book” icon located on the top toolbar. This will open the Thunderbird Address Book.
2. Locate the Mailing List: In the Address Book, locate the mailing list from which you want to remove contacts. The mailing list will have the name you assigned to it during creation.
3. Open the Mailing List: Double-click on the mailing list to open it and display the list of contacts included.
4. Select Contacts to Remove: In the mailing list, select the contacts you want to remove. You can select multiple contacts by holding down the Ctrl key (Windows) or Command key (Mac) while clicking on the desired contacts.
5. Remove Selected Contacts: After selecting the contacts, right-click on the selection and choose the “Remove” or “Delete” option. This will remove the selected contacts from the mailing list.
6. Verify the Removal: After removing the contacts, verify that they are no longer included in the mailing list by reviewing the list of contacts within the mailing list in the Thunderbird Address Book.
7. Save the Mailing List: After removing the contacts, ensure that you save the updated mailing list. You can do this by clicking on the “Save” or “OK” button, depending on the Thunderbird version you are using.
By removing contacts from a mailing list in Thunderbird, you can refine your email communication and ensure that messages are sent to the appropriate audience. This allows you to maintain an up-to-date and relevant list of recipients for your email campaigns.
Sending Emails to a Mailing List
Once you have created a mailing list in Thunderbird and added contacts to it, you can start sending emails to the entire list with just a few clicks. Sending emails to a mailing list allows you to efficiently communicate with a group of recipients without the need to manually add each contact to the recipient field. Here’s how you can send emails to a mailing list in Thunderbird:
1. Open a New Email: Launch Thunderbird and click on the “Write” button or go to the “File” menu and select “New Message” to open a new email composition window.
2. Enter the Mailing List Name: In the recipient field (usually labeled as “To”), type the name of the mailing list you want to send the email to. As you type, Thunderbird will automatically suggest matching mailing lists based on the input.
3. Expand the Mailing List: After entering the mailing list name, Thunderbird will expand and display all the contacts included in the mailing list. You will see a list of email addresses that belong to the mailing list in the recipient field.
4. Compose your Email: With the mailing list expanded in the recipient field, compose your email as usual. Add a subject, write the email content, and format it according to your preferences. You can also add attachments, insert images, or apply formatting options using the Thunderbird email composer.
5. Review and Send: Before sending the email, review the recipient field to ensure that all the intended contacts from the mailing list are included. Double-check the email content for accuracy and completeness. Once satisfied, click on the “Send” button to send the email to the mailing list.
6. Track Email Delivery (Optional): If you need to track the delivery of emails sent to the mailing list, consider using additional email tracking services or software. These services provide insights on email open rates, click-through rates, and other engagement metrics.
By sending emails to a mailing list in Thunderbird, you can efficiently communicate with a group of recipients without the need to manually enter each contact’s email address. This saves time and ensures that important messages reach the entire mailing list with ease.
Customizing Mailing List Options
Thunderbird provides a range of customizable options that allow you to tailor your mailing list settings according to your specific needs. Customizing the mailing list options ensures that you can optimize the features and functionality to suit your email communication requirements. Here’s how you can customize mailing list options in Thunderbird:
1. Open the Address Book: Launch Thunderbird and click on the “Address Book” icon located on the top toolbar. This will open the Thunderbird Address Book.
2. Locate the Mailing List: In the Address Book, locate the mailing list that you want to customize. The mailing list will have the name you assigned to it during creation.
3. Right-Click and Access Properties: Right-click on the mailing list and select “Properties” or a similar option from the context menu. This will open the properties window for the mailing list.
4. Modify Mailing List Name or Description: In the properties window, you can modify the name of the mailing list by editing the “List Name” field. You can also add or modify the description of the mailing list to provide further information or context.
5. Add Custom Fields: Thunderbird allows you to add custom fields to your mailing list to store additional information about each contact. To add a custom field, click on the “Add” or “New” button within the properties window. Enter the custom field name, select the field type (e.g., Text or Date), and click “OK” to add the custom field.
6. Modify Existing Fields: You can also modify the existing field names for the mailing list. For example, if you want to change the default “Given Name” field to “First Name,” you can do so within the properties window by editing the field name.
7. Customize Display Name Format: You can customize the display name format in Thunderbird to determine how the contact names appear in the mailing list. To customize the display name format, go to “Tools” > “Options” > “Composition” > “Addressing” > “Advanced” and adjust the format according to your preference.
8. Save Changes: After customizing the mailing list options, click on the “Save” or “OK” button within the properties window to save the changes you made.
By customizing mailing list options in Thunderbird, you can personalize the settings to align with your specific requirements. This enables more effective and efficient email communication with your contacts and allows you to manage your mailing lists in a way that best suits your needs.
Managing Mailing Lists with Categories
In Thunderbird, managing mailing lists becomes even more efficient when you utilize the feature of categorizing them. Categorizing mailing lists allows you to organize and group them based on specific criteria, making it easier to manage and navigate through your email communication. Here’s how you can manage mailing lists with categories in Thunderbird:
1. Open the Address Book: Launch Thunderbird and click on the “Address Book” icon located on the top toolbar. This will open the Thunderbird Address Book.
2. Create Categories: In the Address Book, you can create categories to organize your mailing lists. To create a category, right-click in the left pane of the Address Book and select “New Category” or a similar option. Enter a name for the category that clearly reflects the purpose or criteria of the mailing lists it will include.
3. Move Mailing Lists: To organize your mailing lists into categories, simply drag and drop the mailing lists into the corresponding category in the left pane of the Address Book. You can also right-click on a mailing list, select “Properties,” and assign it to a specific category in the “Categories” field within the properties window.
4. Access Mailing Lists by Category: Once you have categorized your mailing lists, you can easily access them by clicking on the corresponding category in the left pane of the Address Book. This will display only the mailing lists belonging to that specific category, providing a streamlined and organized view.
5. Modify Categories: If you need to make changes to your categories, right-click on the category name in the left pane of the Address Book and select “Properties” or a similar option. Here, you can edit the category name, assign a different color to the category, or make any other desired modifications.
6. Delete Categories: To remove a category and its associated mailing lists, right-click on the category name and select “Delete” or a similar option. Confirm the deletion when prompted, and the category and its mailing lists will be permanently removed.
7. Organize Categories: You can also further organize your categories by creating sub-categories within them. Simply right-click on the category and select “New Category” or a similar option. Move or assign mailing lists to the appropriate sub-category for a more refined categorization structure.
By managing mailing lists with categories in Thunderbird, you can efficiently organize and navigate through your email communication. This allows for better segmentation and management of your mailing lists, ensuring that you can easily access them based on specific criteria or purposes.
Troubleshooting Tips for Mailing Lists
While using mailing lists in Thunderbird can greatly streamline your email communication, you may encounter occasional challenges or issues. Here are some troubleshooting tips to help you resolve common problems and ensure smooth operation of your mailing lists:
1. Check Contact Email Addresses: Ensure that the email addresses of the contacts in your mailing list are correct and up to date. Incorrect or outdated email addresses can result in emails not being delivered or bouncing back.
2. Beware of Spam Filters: Make sure that the emails sent to the mailing list are not being flagged as spam. Check spam folders and ask the recipients to mark the emails as “Not Spam” to improve deliverability.
3. Consider Using a Dedicated Mailing List Service: For larger mailing lists or when deliverability is critical, consider using a dedicated mailing list service or software. These services specialize in managing mailing lists and offer advanced features to increase efficiency and delivery rates.
4. Ensure Proper Email Formatting: Before sending emails to your mailing list, double-check the email formatting, including subject lines, body content, and attachments. Proper email formatting reduces the chances of emails being marked as spam or rejected by email clients.
5. Manage Unsubscribes: Provide a clear and easy way for recipients to unsubscribe from your mailing list. Include an unsubscribe link in your emails and promptly remove unsubscribed contacts to comply with email regulations and prevent potential issues.
6. Regularly Update Your Mailing Lists: Keep your mailing lists up to date by regularly reviewing and updating the contact information. Remove contacts that are no longer relevant or have requested to be removed from the list to maintain a healthy and engaged recipient base.
7. Avoid Overloading Email Servers: When sending emails to a large mailing list, consider spacing out the sending time to avoid overloading your email server or triggering spam filters. This helps ensure smoother delivery and better performance.
8. Test Emails with a Small Sample: Before sending an email to the entire mailing list, consider sending a test email to a small sample of contacts. This allows you to verify the email formatting, check deliverability, and identify any issues before sending it to the entire list.
By following these troubleshooting tips, you can overcome common challenges and maintain the effectiveness of your mailing lists in Thunderbird. Addressing issues promptly ensures smooth operation and successful email communication with your recipients.