
Setting up a Unified Inbox in Thunderbird
One of the great features of Thunderbird, a popular email client, is the ability to create a unified inbox. A unified inbox allows you to view and manage emails from multiple accounts in one central location. Instead of switching between different email accounts, you can now streamline your email management by setting up a unified inbox in Thunderbird. In this section, we will guide you through the steps to achieve this efficient setup.
Step 1: Launch Thunderbird
Open Thunderbird on your computer to begin the setup process. If you don’t have Thunderbird installed, you can download it from the official website and follow the installation instructions.
Step 2: Open the Account Settings
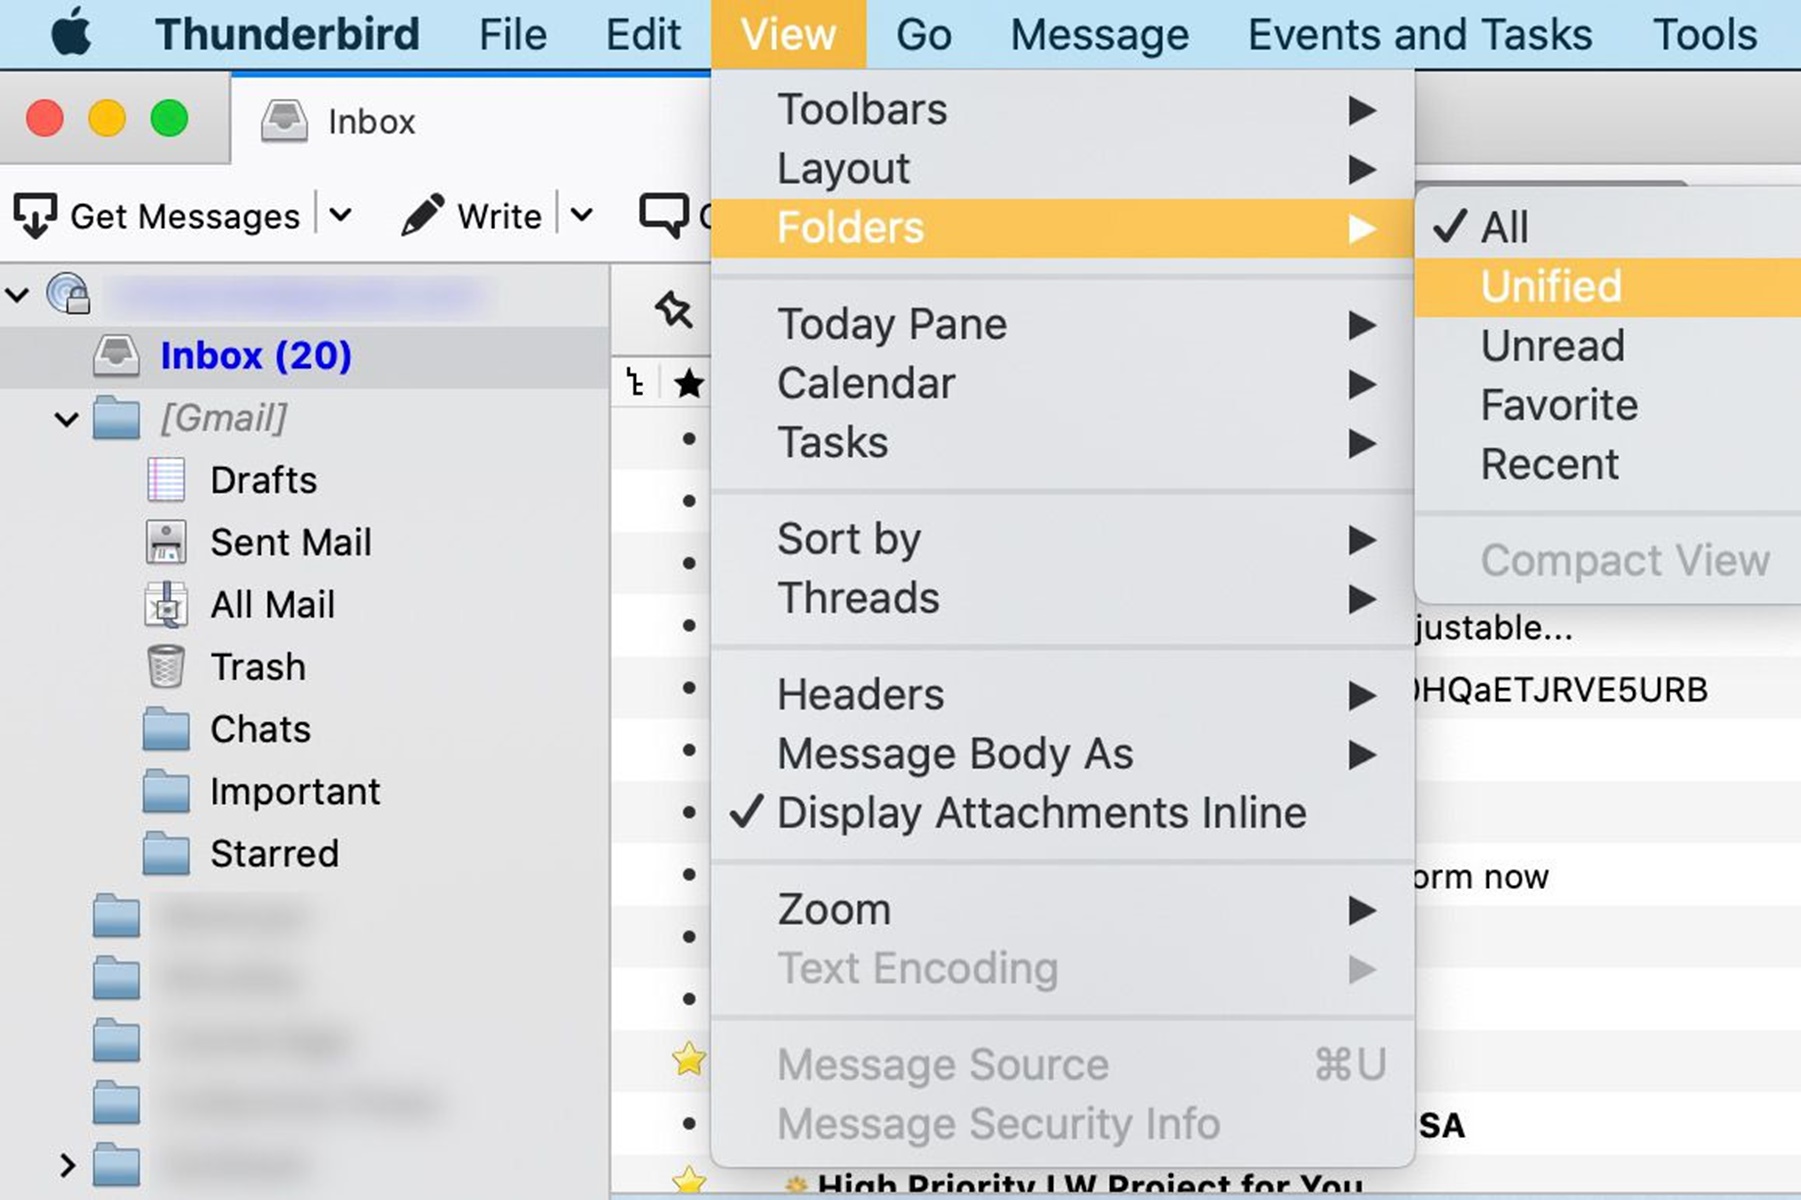
Click on the menu icon in the top-right corner of Thunderbird, then navigate to “Options” and select “Account Settings” from the drop-down menu. This will open the Account Settings window.
Step 3: Click on the “Add Mail Account” button
In the Account Settings window, locate the “Account Actions” section and click on the “Add Mail Account” button. This will prompt a new window to appear where you can enter the details of your email account.
Step 4: Enter your email address and password
In the new window, enter your email address and the password associated with your account. Thunderbird will automatically attempt to configure your account settings based on the provided information.
Step 5: Choose “Manual config”
If Thunderbird cannot automatically configure your account settings, click on the “Manual config” button. This will allow you to manually enter the details of the incoming and outgoing mail servers.
Step 6: Configure the incoming and outgoing servers
Refer to the documentation provided by your email service provider to obtain the correct settings for the incoming and outgoing mail servers. In the Manual Account Configuration window, enter these settings accordingly.
Step 7: Click on “Re-test” to verify the settings
After entering the server settings, click on the “Re-test” button to verify that the settings are correct. Thunderbird will attempt to establish a connection with the mail servers to ensure that everything is configured properly.
Step 8: Click on “Create Account”
If the test is successful, click on the “Create Account” button to add the email account to Thunderbird. Repeat steps 3 to 8 for each email account you want to include in the unified inbox.
Step 9: Select all email accounts in the Account Settings
Go back to the Account Settings window and select all the email accounts you want to include in the unified inbox. You can hold the Ctrl key (or Command key on macOS) and click on each account to select multiple accounts at once.
Step 10: Right-click and choose “New Folder”
Right-click on one of the selected email accounts and choose “New Folder” from the context menu. This will create a new folder that will serve as the container for your unified inbox.
Step 11: Give the folder a name
In the New Folder dialog box, give the folder a name that is easily recognizable. You can name it “Unified Inbox” or any other descriptive name of your choice.
Step 12: Repeat steps 11-12 for each email account
Repeat steps 11 and 12 for each email account you have selected. This will create individual folders for each account within the unified inbox container folder.
Step 13: Open the Unified Inbox
In the Thunderbird sidebar, click on “Unified Folders” to expand the section and reveal the unified inbox folder you created in the previous steps.
Step 14: Click on “Virtual Folder” in the toolbar
In the Thunderbird toolbar, click on the “Virtual Folder” button, which looks like a folder with a lightning bolt on it. This will allow you to create a virtual folder that combines the emails from all the selected email accounts.
Step 15: Select the folders you want to include in the Unified Inbox
In the Virtual Folder dialog box, select the individual folders you created for each email account. These folders will contain the respective emails in the unified inbox.
Step 16: Click on “OK”
Click on the “OK” button to save your settings and create the virtual folder. Thunderbird will synchronize the emails from the selected folders and display them in the unified inbox.
Step 17: Access your emails in the Unified Inbox
You can now access and manage all your emails from multiple accounts in the unified inbox. You will find them sorted by date and time, allowing you to easily view and respond to your messages efficiently.
Step 18: Manage your emails in the Unified Inbox
You can perform all the usual email management tasks in the unified inbox, such as replying, forwarding, archiving, and deleting. Thunderbird provides a seamless experience by treating the unified inbox as a regular email folder.
Congratulations! You have successfully set up a unified inbox in Thunderbird. Enjoy the convenience of accessing and managing all your emails from different accounts in one centralized location.
Step 1: Launch Thunderbird
Setting up a unified inbox in Thunderbird is a straightforward process that begins with launching the Thunderbird email client on your computer. Thunderbird is a free and open-source email application developed by the Mozilla Foundation and is available for Windows, macOS, and Linux operating systems.
To launch Thunderbird, search for the application in your computer’s applications or programs menu. Alternatively, you can click on the Thunderbird icon on your desktop if you have it pinned for easy access.
Once you have launched Thunderbird, you will be greeted with the main screen, which serves as your email dashboard. From here, you can manage and organize your email accounts, folders, and messages.
Thunderbird offers a user-friendly interface that is easy to navigate. The main screen is divided into several sections, including a sidebar on the left, a message list in the center, and a preview pane on the right. The sidebar provides quick access to various features and folders.
By default, Thunderbird displays the Inbox folder of the primary email account on the message list. However, with the unified inbox feature, you can consolidate multiple email accounts into one central location, making it more convenient to access and manage your emails.
Launching Thunderbird is the first step in the process of setting up a unified inbox. It gives you access to the email client’s rich features and functionality, allowing you to proceed with configuring your email accounts and creating the unified inbox.
If you don’t already have Thunderbird installed on your computer, you can download the latest version from the official Thunderbird website. The installation process is straightforward and guided, ensuring that you can quickly get started with managing your emails in Thunderbird.
Now that you have launched Thunderbird, you are ready to move on to the next step and open the Account Settings to begin the configuration process. Thunderbird provides a simple and intuitive interface for managing email accounts, making it easy to set up and customize your email experience according to your preferences.
Step 2: Open the Account Settings
After launching Thunderbird, the next step in setting up a unified inbox is opening the Account Settings. The Account Settings window is where you can manage all your email accounts, configure server settings, and customize various email-related options.
To access the Account Settings, click on the menu icon located in the top-right corner of the Thunderbird interface. The menu icon is represented by three horizontal lines or a hamburger icon. When you click on it, a drop-down menu will appear.
From the drop-down menu, navigate to the “Options” section, and then select “Account Settings”. This action will open a new window dedicated to managing your email accounts and settings in Thunderbird.
The Account Settings window is divided into different sections, each representing a specific aspect of email management. These sections include “Account Actions”, “Server Settings”, “Copies & Folders”, “Composition & Addressing”, “Junk Settings”, and many more.
Within the Account Settings window, you can add and remove email accounts, edit account details, configure server and connection settings, set up automatic email signature, manage folder organization, and customize various preferences to suit your needs.
When setting up a unified inbox, the Account Settings window plays a crucial role. It allows you to configure the necessary settings for each individual email account and then combine them into a single unified inbox.
In addition to managing accounts, the Account Settings window also provides options for configuring various advanced features in Thunderbird, such as encryption and security settings, calendar settings, certificates, and more.
Thunderbird offers a user-friendly interface within the Account Settings window, with clear labels and intuitive navigation. This makes it easy to find and adjust the required settings for your email accounts and preferences.
Step 3: Click on the “Add Mail Account” button
Once you have opened the Account Settings window in Thunderbird, the next step in setting up a unified inbox is to click on the “Add Mail Account” button. This button allows you to add a new email account to Thunderbird and configure its settings.
In the Account Settings window, locate the “Account Actions” section. It is usually located at the bottom-left corner of the window. Within this section, you will find the “Add Mail Account” button.
Clicking on the “Add Mail Account” button will prompt a new window to appear, where you can enter the details of your email account. This window serves as a setup wizard that guides you through the process of adding your email account to Thunderbird.
When adding a new email account, it is important to have the necessary information readily available. This includes your email address and the password associated with your account. You may also need to specify the incoming and outgoing mail server settings, depending on your email service provider.
Enter your email address and password in the respective fields provided in the setup wizard. Make sure to double-check them for accuracy before proceeding. Thunderbird takes privacy and security seriously, so your login credentials are encrypted and protected.
After entering your email address and password, Thunderbird will automatically attempt to configure the account settings based on the provided information. It will try to connect to the mail servers using the default settings and protocols. This automated setup process saves you time and effort in manually configuring the account.
If Thunderbird successfully configures your account settings, a confirmation message will appear, indicating that the account has been added successfully. You can then proceed to the next steps of setting up your unified inbox or add more email accounts if needed.
However, in some cases, Thunderbird may not be able to automatically configure the settings. This can happen if your email service provider uses non-standard or specific configuration parameters. In such situations, you will need to choose the “Manual config” option and enter the server settings manually.
Clicking on the “Manual config” option will expand the window, revealing additional fields where you can enter the incoming and outgoing mail server settings, including the server type, port numbers, and security options. Refer to the documentation provided by your email service provider to obtain the correct settings for your account.
Once you have provided all the necessary information, click on the “Done” button to complete the setup process. Thunderbird will then add the email account to your list of configured accounts and display it in the Account Settings window.
By clicking on the “Add Mail Account” button and following the setup wizard, you can easily add new email accounts to Thunderbird and take the next steps to set up your unified inbox. This feature allows you to manage multiple email accounts seamlessly within a single interface.
Step 4: Enter your email address and password
After clicking on the “Add Mail Account” button in Thunderbird’s Account Settings window, you will be prompted to enter your email address and password. This step is essential for Thunderbird to establish a connection with the email server and retrieve your emails.
In the setup wizard window that appears after clicking the “Add Mail Account” button, locate the fields where you can input your email address and password. These fields are typically labeled as “Email Address” and “Password” or similar.
Enter your full email address in the respective field. For example, if your email address is “example@example.com,” type “example@example.com” in the Email Address field. Make sure to enter the complete address correctly to avoid any errors.
Next, input the password associated with your email account in the Password field. Thunderbird encrypts and securely stores your password, ensuring the privacy and security of your email account credentials.
Double-check the accuracy of both the email address and password before proceeding. Any mistake in entering the information can prevent Thunderbird from successfully connecting to your email server.
Please note that Thunderbird supports a wide range of email account providers, including popular ones like Gmail, Outlook, Yahoo, and many others. The setup wizard will automatically configure the account settings for well-known providers, saving you time and effort. However, for some custom or lesser-known email providers, you may need to enter additional server settings manually.
If Thunderbird successfully verifies your email address and password, it will proceed with configuring the account settings automatically. You will see a confirmation message indicating that the setup was successful. You can then continue to the next steps to complete the setup of your unified inbox.
However, if Thunderbird is unable to verify the email address and password, it will display an error message indicating that the input is invalid or incorrect. In such cases, carefully review the email address and password you entered to ensure accuracy. If necessary, re-enter the credentials and try again. If the issue persists, double-check with your email service provider to ensure you have the correct login credentials.
By entering your email address and password accurately in Thunderbird’s setup wizard, you are providing the necessary authentication information for Thunderbird to access your email account securely. This step is essential for Thunderbird to establish a connection with the email server and enable you to manage your emails seamlessly within the email client.
Step 5: Choose “Manual config”
If Thunderbird is unable to automatically configure your email account settings based on the entered email address and password, you will need to choose the “Manual config” option. This option allows you to manually enter the server settings for your email account.
In the setup wizard window, after entering your email address and password, if Thunderbird is unable to detect the correct settings, you will see an option labeled “Manual config.” This option is typically located next to or below the automated configuration settings.
Selecting the “Manual config” option will expand the setup wizard window, providing you with additional fields to enter various server settings for both incoming and outgoing mail.
Manually configuring your email account settings requires you to provide specific details about your email service provider’s servers. These details may include the server type (e.g., POP or IMAP), server addresses, port numbers, and security settings.
To manually configure your email account, consult the documentation or support resources provided by your email service provider. They should provide the necessary information on the server settings required for Thunderbird.
In the setup wizard window, you will see fields for entering the server settings, such as the incoming server (POP or IMAP) and the outgoing server (SMTP). Inputting the correct server addresses and port numbers is crucial for Thunderbird to establish a successful connection with your email provider’s servers.
Additionally, you may need to specify the authentication method, encryption type, and other security settings, depending on your email service provider’s requirements.
It is important to ensure the accuracy of the manual configuration settings to avoid any connectivity issues or errors when Thunderbird tries to access your email account. Double-check the server information and consult your email service provider’s documentation or support if you are uncertain about any of the settings.
Once you have entered the manual configuration settings for both the incoming and outgoing servers, you can proceed to the next steps in the setup wizard to complete the setup of your email account in Thunderbird.
Choosing the “Manual config” option in Thunderbird’s setup wizard gives you control over the server settings of your email account. While it may require some additional effort to gather and input the correct information, it provides flexibility to configure your email account to your specific needs and ensure a successful connection with your email provider’s servers.
Step 6: Configure the incoming and outgoing servers
After choosing the “Manual config” option in Thunderbird’s setup wizard, you will need to configure the incoming and outgoing server settings for your email account. Configuring these settings correctly is crucial for Thunderbird to establish a successful connection with your email provider’s servers.
The incoming server handles the retrieval of incoming emails from your email provider, while the outgoing server is responsible for sending outgoing emails. Each server requires specific information to establish a connection.
In the setup wizard window, you will see fields for the incoming server (POP or IMAP) and the outgoing server (SMTP). These fields will require entries for the server addresses, port numbers, and the appropriate security settings.
To configure the incoming server, you need to determine whether your email provider supports POP (Post Office Protocol) or IMAP (Internet Message Access Protocol). While both protocols allow you to access your emails, they differ in their approach to managing and retrieving messages.
If your email provider supports POP, you will need to enter the POP server address and port number in the corresponding fields. The POP server typically uses port 110 for non-encrypted connections and port 995 for secure connections (POP3S).
For IMAP, you will need to input the IMAP server address and port number. The standard port for IMAP is 143, while the secure port for IMAPS is 993.
Next, you need to configure the outgoing server (SMTP). This is the server responsible for sending your emails. It requires similar information for server address, port number, and security settings.
The typical port for the SMTP server is 25, but many email providers now require the use of SSL/TLS encryption for secure connections. In such cases, you will need to select either the SSL or TLS encryption option and use the corresponding port, usually 465 or 587.
It is important to ensure the accuracy of the server addresses, port numbers, and security settings. These details may vary depending on your email provider, so refer to the documentation or support resources provided by your email service provider for the correct configuration settings.
By accurately configuring the incoming and outgoing server settings, you enable Thunderbird to establish a seamless connection with your email provider’s servers, ensuring a reliable email experience within the Thunderbird email client.
Once you have entered all the necessary server settings, you can proceed to the next steps in the setup wizard to complete the configuration of your email account in Thunderbird. Ensure that you double-check the entries to avoid any connectivity issues or errors when Thunderbird attempts to connect to your email provider’s servers.
Step 7: Click on “Re-test” to verify the settings
After configuring the incoming and outgoing server settings for your email account in Thunderbird, the next step is to verify that the settings are correct. This verification ensures that Thunderbird can establish a successful connection with your email provider’s servers.
In the setup wizard window, you will find a button labeled “Re-test” or “Test Account Settings.” This button allows you to initiate a test to verify the accuracy of the server settings you have entered.
Clicking on the “Re-test” button will prompt Thunderbird to establish a connection with your email provider’s servers using the specified settings.
During the test, Thunderbird will attempt to retrieve the server settings, authenticate your email account, and simulate the process of receiving and sending emails. It will also check for the secure connection to ensure the data transfer is encrypted.
Once the test is complete, Thunderbird will display the status of the test, indicating whether the connection was successful or if any errors were encountered.
If the test is successful, Thunderbird will provide a confirmation message, assuring you that the configuration settings are accurate, and Thunderbird has successfully connected to your email provider’s servers.
However, if the test results in an error message, it indicates that there might be incorrect settings or connectivity issues that need to be addressed.
If an error occurs during the test, double-check the server settings you have entered, including the server addresses, port numbers, and security settings. Ensure that they align with the specific requirements of your email provider.
Common mistakes include misspelled server addresses, incorrect port numbers, or using the wrong security settings. Correcting these errors will help establish a successful connection between Thunderbird and your email provider.
If you are unsure about the correct settings, consult the documentation or support resources provided by your email service provider. They can guide you through the necessary configuration details or troubleshoot any issues you may encounter.
Re-testing the account settings is an essential step in ensuring that Thunderbird is properly configured to receive and send emails from your email account. By verifying the server settings, you can guarantee a seamless email experience within Thunderbird.
Once you have confirmed that the test results are successful, you can proceed to the next steps in the setup wizard and complete the setup of your email account in Thunderbird.
Step 8: Click on “Create Account”
After verifying the server settings in Thunderbird’s setup wizard, the next step is to finalize the setup of your email account by clicking on the “Create Account” button. This action will add the email account to Thunderbird, allowing you to start managing your emails within the application.
In the setup wizard window, locate the “Create Account” button. It is usually located at the bottom-right corner of the window, next to the “Re-test” or “Test Account Settings” button.
Before clicking on the “Create Account” button, double-check that all the entered information, including the email address, password, server settings, and test results, is accurate. This ensures a smooth configuration process and avoids potential errors or connectivity issues.
By clicking on the “Create Account” button, Thunderbird will initiate the process of adding the email account to its list of configured accounts. It will establish a connection with the specified email provider’s servers and retrieve your email folders and messages.
If the account creation process is successful, Thunderbird will display a confirmation message indicating that the email account has been successfully added. Congratulations! You can now start using Thunderbird to send, receive, and manage your emails for the configured account.
However, in some cases, the account creation process may encounter errors or encounter issues with the server connection. If this happens, carefully review the entered information, including the email address, password, and server settings. Make sure they are correct and aligned with your email provider’s requirements.
If you continue to experience difficulties in creating the account, double-check the server settings with your email service provider’s documentation or support resources. They can provide additional guidance or troubleshoot any issues you may encounter.
Once you have successfully created the email account in Thunderbird, it will be displayed in the Account Settings window. You can now access and manage your emails within Thunderbird, using its intuitive interface and powerful features.
Remember that Thunderbird supports the management of multiple email accounts, so you can repeat the steps for each email account you want to include in your unified inbox. This allows you to conveniently access and manage all your emails from different accounts in one central location.
By clicking on the “Create Account” button, you complete the setup of your email account in Thunderbird, bringing you one step closer to enjoying the benefits and convenience of using Thunderbird as your email client.
Step 9: Repeat steps 3-8 for each email account
If you have multiple email accounts that you want to include in the unified inbox in Thunderbird, you will need to repeat steps 3 to 8 for each of these accounts. This allows you to add and configure each email account to Thunderbird, enabling centralized access and management of all your emails.
Starting with step 3, click on the “Add Mail Account” button in the Account Settings window for each additional email account you want to set up.
Enter the email address and password associated with the respective account in the setup wizard window. If Thunderbird is able to automatically detect the settings based on the entered credentials, it will configure the account accordingly.
If Thunderbird is unable to automatically configure the settings, choose the “Manual config” option and enter the specific server settings for the account. Ensure the accuracy of the settings, referring to the documentation or support resources provided by your email service provider if necessary.
After configuring the server settings, click on the “Re-test” button to verify the accuracy of the settings and establish a connection with the email provider’s servers. This step ensures that Thunderbird can properly receive and send emails for the account.
If the test is successful, proceed to click on the “Create Account” button to finalize the setup of each email account. Thunderbird will add the account to its list of configured accounts, allowing you to manage the emails within the application.
Repeat these steps 3 to 8 for each additional email account you want to include in the unified inbox. By setting up multiple email accounts in Thunderbird, you can centralize your email management, enhancing efficiency and convenience.
In the Account Settings window, you will see a list of all the email accounts you have added. This provides a clear overview of the configured accounts and allows for easy access and management.
Remember to carefully review the entered information for each account, especially the email address, password, and server settings, to ensure the accuracy of the configurations.
Once you have successfully added and configured all the email accounts, Thunderbird will sync the messages from the individual accounts and display them in the unified inbox. You can then access and manage your emails from multiple accounts seamlessly within Thunderbird’s unified interface.
The ability to set up multiple accounts in Thunderbird and consolidate them into a unified inbox is a valuable feature that simplifies email management. By repeating steps 3 to 8 for each email account, you can harness the full potential of Thunderbird to streamline your email workflow.
Step 10: Select all email accounts in the Account Settings
After adding and configuring multiple email accounts in Thunderbird, the next step in setting up a unified inbox is to select all the email accounts in the Account Settings window. This step allows you to designate which accounts should be included in the unified inbox.
In the Thunderbird interface, click on the menu icon located in the top-right corner and navigate to “Options” and then select “Account Settings” from the drop-down menu. The Account Settings window will open, displaying a list of the email accounts you have added.
Hold down the Ctrl key (or Command key on macOS) on your keyboard and click on each email account you want to include in the unified inbox. As you click on the accounts, they will be highlighted or selected in the Account Settings window.
By selecting all the email accounts, you ensure that Thunderbird consolidates the messages from these accounts into the unified inbox, allowing for centralized access and management.
Take a moment to review the selected accounts to ensure that you have included all the necessary email accounts that you want to view and manage in the unified inbox. This step helps you customize your unified inbox to your preferences and needs.
It is worth noting that you can also choose to include or exclude specific email accounts from the unified inbox at any time. By selecting an account in the Account Settings window, you can toggle its inclusion or exclusion from the unified inbox as needed.
Managing multiple email accounts within Thunderbird’s unified interface provides a streamlined workflow, enabling you to efficiently handle emails from various accounts without the need to switch between separate email clients or interfaces.
Once you have selected all the email accounts that you want to include in the unified inbox, you can move on to the next steps in configuring and customizing the unified inbox settings.
Remember that Thunderbird allows you to manage an unlimited number of email accounts, so you can include as few or as many accounts as required, depending on your specific needs and preferences.
By selecting all the email accounts in the Account Settings window, you establish which accounts will contribute to the unified inbox experience. This step ensures that Thunderbird consolidates the emails from these accounts, providing a centralized and organized view of your inbox.
Step 11: Right-click and choose “New Folder”
Once you have selected all the email accounts that you want to include in the unified inbox, the next step is to create folders within Thunderbird where the emails from each account will be organized. This step allows you to organize your emails and maintain a clear separation between the different accounts.
To create a new folder, start by navigating to the Account Settings window in Thunderbird. You can access this window by clicking on the menu icon in the top-right corner of the Thunderbird interface and selecting “Options” and then “Account Settings” from the drop-down menu.
In the Account Settings window, you will see a list of the email accounts you have added. Right-click on one of the selected email accounts. A context menu will appear.
From the context menu, select the option that says “New Folder.” This action will prompt a dialogue box to appear, allowing you to provide a name for the new folder.
Consider choosing a descriptive name for the folder that will make it easy for you to distinguish it within your unified inbox. For example, you can name the folder based on the email account it represents, such as “Work Inbox,” “Personal Inbox,” or “Gmail Inbox.”
Click on the “OK” button to create the new folder. Thunderbird will then add the folder under the selected email account in the Account Settings window.
Repeat steps 11 and 12 for each selected email account. This ensures that you have a dedicated folder for each account within the unified inbox.
Creating separate folders for each email account allows you to maintain a logical organization of your emails and easily access messages from specific accounts when needed. It also helps to prevent any confusion or mixing up of emails between different accounts.
Thunderbird provides a flexible folder structure, allowing you to create subfolders within these main folders if desired. This gives you additional control and flexibility in organizing your unified inbox based on your preferences.
By right-clicking on each selected email account and creating a new folder, you establish a clear structure within Thunderbird’s unified inbox for organizing your emails. This step ensures that emails from different accounts remain separate and easily accessible within the appropriate folders.
Once you have created the necessary folders for each account, you can proceed to the next steps in configuring the unified inbox settings and accessing your emails in the unified view.
Step 12: Give the folder a name
After creating a new folder for each selected email account within the Thunderbird Account Settings window, the next step is to give each folder a name. Assigning clear and descriptive names to the folders helps you easily identify and organize your emails within the unified inbox.
In the Account Settings window, locate the newly created folder under each email account. Right-click on the folder to open a context menu, then select the option that says “Properties” or “Folder Properties.” This will open a pop-up window where you can configure the properties of the selected folder.
Within the folder properties window, locate the field where you can enter the folder’s name. Click inside the field to activate it, and then type in your desired name for the folder.
When naming the folders, consider using descriptive and meaningful names that reflect the email account each folder represents. For example, you can name a folder “Work Inbox” for emails related to your work account, “Personal Inbox” for personal email account messages, or “Gmail Inbox” if you have set up a Gmail account.
Choosing clear and descriptive names for each folder will make it easier for you to locate and manage emails within the unified inbox, especially when dealing with multiple accounts.
After entering the chosen name, click on the “OK” button to save the changes. Thunderbird will apply the new name to the folder within the Account Settings window.
Repeat step 12 for each created folder, giving each folder within your unified inbox a unique and recognizable name that corresponds to the associated email account.
Giving each folder a name helps you maintain an organized email management system within Thunderbird. It allows you to quickly locate and differentiate emails from different accounts, ensuring that you can efficiently manage and respond to emails in the unified inbox.
By providing descriptive names to each folder within the unified inbox, you establish a clear structure that facilitates easy navigation and management of emails. This step helps maintain clarity and organization as your inbox grows with incoming messages from various email accounts.
With your folders named and organized, you are now ready to access and manage your emails within the unified inbox in Thunderbird. The named folders serve as designated containers for emails from each account, providing a structured and efficient workspace within Thunderbird’s interface.
Step 13: Repeat steps 11-12 for each email account
Once you have successfully created and named a new folder for one email account within Thunderbird, the next step is to repeat steps 11 and 12 for each additional email account you have included in the unified inbox. This ensures that you have a dedicated folder for each account, allowing you to organize and manage your emails effectively.
Starting with the next email account in the Account Settings window, right-click on the account and choose the “New Folder” option from the context menu. This action will prompt a dialogue box to appear.
Within the dialogue box, enter a descriptive name for the folder that represents the specific email account. This helps differentiate emails from different accounts within your unified inbox.
Consider using names that clearly identify the associated email account, such as “Work Inbox,” “Personal Inbox,” or the name of the email service provider, like “Gmail Inbox” or “Yahoo Inbox.”
Click on the “OK” button to create the folder. Thunderbird will add the folder under the selected email account in the Account Settings window.
Repeat steps 11 and 12 for each additional email account you want to include in the unified inbox, creating and naming a new folder for each account. This ensures that you have a separate and organized space for emails from each account within the unified inbox.
By creating individual folders for each email account, you maintain a clear structure to manage and access emails within Thunderbird. This allows for better organization and ease of navigation, especially when dealing with multiple accounts.
Take a moment to review the folder names you have chosen for each account, ensuring that they are descriptive and accurate. This will help you quickly identify and locate emails from specific accounts within Thunderbird’s unified inbox.
Repeat steps 11 and 12 until you have created and named folders for all the email accounts you want to include in the unified inbox. This ensures that you can effectively manage and differentiate emails from each account in Thunderbird.
With folders created and named for each email account, you are now ready to access and manage your emails within Thunderbird’s unified inbox. The folder structure allows you to maintain separation and organization, enabling efficient email management across multiple accounts.
Step 14: Open the Unified Inbox
After creating folders for each email account, the next step in setting up a unified inbox in Thunderbird is to open the unified inbox itself. The unified inbox provides a centralized view of all your emails from the different accounts, making it convenient to access and manage your messages.
In the Thunderbird interface, locate the sidebar on the left-hand side. It displays various sections, including the Inbox folder for each email account you have added.
Click on the section titled “Unified Folders” within the sidebar. This expands the section, revealing the unified inbox folder you created earlier in the Account Settings.
The unified inbox folder appears below the individual email account folders in the sidebar, providing a clear distinction between the different folders.
Choose the unified inbox folder by clicking on it. This action will display the combined view of all the emails from your multiple accounts within the message list in the center of the Thunderbird interface.
The unified inbox gathers emails from all the selected accounts into a single location, allowing you to conveniently view and manage your messages without having to switch between separate account folders.
You will notice that the unified inbox displays emails from different accounts in a unified manner, sorted by date and time. This provides a clear overview of your emails, allowing you to efficiently navigate and respond to messages.
By opening the unified inbox, you have established a centralized workspace within Thunderbird, giving you a unified view of all your emails from multiple accounts. This simplifies your email management and ensures that you can easily keep track of all your messages.
From the unified inbox, you can perform various email management tasks, such as reading, replying, forwarding, and organizing your emails by moving them to specific folders within the unified inbox or individual account folders.
With the unified inbox open, you have a comprehensive view of your emails, allowing you to stay organized and effectively manage your communication across different email accounts in Thunderbird.
Now that you have successfully opened the unified inbox, you can proceed to the next steps and explore the various features and functionalities available for managing your emails within Thunderbird’s unified interface.
Step 15: Click on “Unified Folders” in the sidebar
Once you have successfully created and named the folders for each email account in Thunderbird, the next step in setting up a unified inbox is to access the “Unified Folders” section in the sidebar. This section allows you to access and manage the unified view of all your email accounts.
In the Thunderbird interface, locate the sidebar on the left-hand side of the screen. The sidebar contains various sections and folders related to your email accounts.
Scroll down the sidebar until you find the section titled “Unified Folders”. This section is where you can access the unified view of all emails from your multiple accounts.
To expand the “Unified Folders” section and reveal the folders within it, click on the folder name. In some versions of Thunderbird, you may need to click on a small arrow next to the “Unified Folders” section to expand it.
Once expanded, you will see the folders within the “Unified Folders” section. These folders represent the combined view of emails from all your accounts.
Typically, you will find folders such as “Inbox”, “Sent”, “Drafts”, “Trash”, and “Junk” within the “Unified Folders” section. These folders display emails that are relevant to each category from all the enabled email accounts.
Clicking on the “Inbox” folder, for example, will show the combined view of incoming emails from all the selected accounts, sorted by date and time of receipt.
Navigating through the folders within the “Unified Folders” section allows you to manage and organize your emails effortlessly, regardless of the email account they belong to.
By clicking on the “Unified Folders” section in the sidebar, you gain access to the unified view of your email accounts in Thunderbird. This streamlined view simplifies your email management and enables you to handle your emails effectively in one centralized location.
With the “Unified Folders” section expanded, you can conveniently access and manage emails from all your enabled accounts, making it easier to respond to messages, sort emails into appropriate folders, and maintain an organized inbox.
Now that you have successfully clicked on “Unified Folders” in the sidebar, you can proceed to the next steps and explore the various email management features available within the unified view of Thunderbird’s interface.
Step 16: Click on “Virtual Folder” in the toolbar
After accessing the “Unified Folders” section in the sidebar, the next step in setting up a unified inbox in Thunderbird is to click on the “Virtual Folder” option located in the toolbar. This option allows you to create a virtual folder that combines the emails from all the selected email accounts into a single unified view.
Locate the toolbar at the top of the Thunderbird interface. The toolbar contains various icons and options for managing your emails.
In the toolbar, find the icon that represents a folder with a lightning bolt on it. This icon represents the “Virtual Folder” feature in Thunderbird.
Click on the “Virtual Folder” icon to activate the feature and start creating your virtual folder.
Once you have clicked on the “Virtual Folder” icon, a new window will appear where you can configure the settings for your virtual folder.
The virtual folder window provides options for customizing the unified inbox to your preferences. Here, you can choose the folders and email accounts you want to include in the unified view.
Review the available options and select the appropriate folders from each account that you want to see in the unified inbox. Typically, you would select the “Inbox” folder of each account to have all incoming emails in one place.
If you have created subfolders within the email accounts for further organization, you can also select those subfolders to be included in the unified inbox.
After selecting the desired folders, click on the “OK” button to save your settings and create the virtual folder.
Thunderbird will then synchronize the selected folders, combining the emails from each account into the virtual folder, providing you with a unified view of your emails.
Creating a virtual folder in Thunderbird allows you to manage and access all your emails from different accounts without the need to navigate through individual account folders. It streamlines your email management, providing a centralized workspace for efficiently handling your messages.
With the virtual folder set up, you no longer need to switch between separate folders for different accounts. You can now access and manage emails from multiple accounts in one place, simplifying your email workflow.
By clicking on the “Virtual Folder” option in the toolbar, you have created the virtual folder that combines the emails from all the selected accounts into a unified inbox in Thunderbird. Now you can proceed to the next steps and start accessing and managing your emails within the unified inbox.
Step 17: Select the folders you want to include in the Unified Inbox
After creating the virtual folder for the unified inbox in Thunderbird, the next step is to select the specific folders that you want to include in this unified view. Selecting the folders allows you to customize the content displayed within the unified inbox according to your preferences and needs.
In the virtual folder window that appears after creating the virtual folder, you will see a list of all available folders from the selected email accounts.
Review the list and select the folders that contain the emails you want to appear in the unified inbox. By default, the “Inbox” folder of each selected email account is usually included.
If you have created additional folders within your email accounts for organizing specific types of emails, such as “Sent,” “Drafts,” or custom folders, you can also choose to include them in the unified inbox.
To select the folders, click on the checkbox or mark them as selected in the virtual folder window. Selected folders will be included in the unified inbox, while unselected folders will not be displayed.
You can select multiple folders from each email account to include them in the unified inbox. This customization allows you to have a personalized view of your emails, tailored to your specific needs.
Review the selected folders to ensure that you have included all the folders you intended to appear in the unified inbox. This step helps you accurately organize and manage your emails.
By selecting the specific folders, you have greater control and flexibility in managing your emails within the unified inbox. You can focus on the folders that are most important to you and hide the ones that are not relevant.
Once you have selected the folders you want to include in the unified inbox, click on the “OK” button to save your selections.
Thunderbird will sync the chosen folders and update the unified inbox view accordingly, displaying the emails from the selected folders in one centralized view.
By carefully choosing the folders to include, you optimize the unified inbox experience, ensuring that you can conveniently access and manage the emails that matter most to you.
Now that you have selected the folders for your unified inbox, you can proceed to the next steps and start accessing and managing your emails within Thunderbird’s unified interface.
Step 18: Click on “OK”
After selecting the folders you want to include in the unified inbox, the next step is to click on the “OK” button to save your selections. This finalizes the configuration of the unified inbox in Thunderbird, ensuring that the chosen folders are displayed in the unified view.
In the virtual folder window, locate the “OK” button. It is usually located at the bottom-right corner of the window.
Review your folder selections to ensure that you have included the desired folders in the unified inbox.
Once you are satisfied with your selections, click on the “OK” button to save the configuration.
Thunderbird will update the unified inbox based on your folder selections, combining the emails from the chosen folders into one central view.
By clicking on “OK,” you confirm and apply the folder selections to the unified inbox. This ensures that the unified view accurately represents the emails from the chosen folders within Thunderbird.
With the folder selections saved, Thunderbird will synchronize the chosen folders and populate the unified inbox with the combined content from the selected folders.
Now, when you access the unified inbox, you will see all the emails from the selected folders, sorted by date and time of receipt.
Clicking on individual emails within the unified inbox will allow you to view and manage them as you would in regular folders, such as replying, forwarding, or moving to specific folders within the unified view.
Remember, you can always go back to the virtual folder settings and modify the folder selections if you want to include or exclude specific folders from the unified view.
With your selections saved, you have successfully configured the unified inbox in Thunderbird to display the chosen folders and their respective emails in one centralized view.
Now that you have clicked on “OK,” you can proceed to access and manage your emails within Thunderbird’s unified inbox and enjoy the convenience of a centralized email management experience.
Step 19: Access your emails in the Unified Inbox
After configuring and finalizing the unified inbox in Thunderbird, the next step is to access and start managing your emails within this unified view. The unified inbox provides a centralized location to conveniently access and handle all your emails from different accounts.
To access the unified inbox, navigate to the sidebar in Thunderbird. Locate the “Unified Folders” section, which you expanded earlier to create the unified inbox.
Click on the “Unified Inbox” folder within the “Unified Folders” section. This action will display the combined view of all your emails from the selected folders within Thunderbird’s main message list.
As you open the unified inbox folder, you will see a consolidated list of emails from the selected accounts, sorted by date and time of receipt. This unified view eliminates the need to switch between different account folders, allowing for quicker and more efficient email management.
Browse through the list of emails in the unified inbox and click on a message to open its content in the preview pane or a separate window, depending on your Thunderbird settings.
You can perform various actions on emails within the unified inbox, such as replying, forwarding, deleting, or marking them as unread. Thunderbird offers a range of tools and options in its interface to help you manage and organize your emails effectively.
With the unified inbox, you can easily distinguish emails from different accounts by looking at the sender information or the assigned folder names within the unified view. This ensures you can quickly identify and respond to messages based on their originating accounts.
Remember, any actions you perform on emails within the unified inbox, such as moving them to specific folders or marking them as important, will be reflected in the respective account folders as well.
Accessing your emails in the unified inbox streamlines your email management, providing a central location to stay organized and efficiently handle all your messages without navigating between separate folders or interfaces.
Now that you have successfully accessed the unified inbox, you can proceed to manage, respond to, and organize your emails with ease.
Step 20: Manage your emails in the Unified Inbox
Now that you have accessed your emails within Thunderbird’s unified inbox, the final step is to effectively manage and organize your messages. The unified inbox provides a centralized workspace where you can perform various actions on your emails, ensuring efficient email management.
In the unified inbox, you can apply common email management tasks to your messages, whether they originate from your work, personal, or other email accounts.
From the unified inbox, you can perform actions such as replying to emails, forwarding them to others, deleting unwanted messages, and marking important emails for follow-up.
To reply to an email in the unified inbox, open the message and click on the reply icon or right-click and select “Reply.” This action will allow you to compose your response directly within Thunderbird.
If you need to forward an email to someone else, choose the forward icon or right-click and select “Forward.” You can then add the recipient’s email address and any additional comments before sending the forwarded message.
To delete an email that you no longer need, select the message and press the “Delete” key, click on the delete icon, or right-click and choose “Delete.” The message will be moved to the trash folder, where it can be permanently deleted or recovered if needed.
If you come across an important email that requires further attention, you can mark it as unread or flag it for follow-up. These features help you prioritize and ensure that important emails do not get overlooked.
Managing emails in the unified inbox is not limited to just these actions. Thunderbird offers a comprehensive set of tools and features to help you stay organized and streamline your email workflow.
You can also create folders within the unified inbox to categorize and sort your emails. To create a new folder, right-click within the unified inbox section and choose “New Folder.” Give the folder a descriptive name, such as “Important” or “Action Items,” and then drag and drop relevant emails into these folders for better organization.
Furthermore, you can use Thunderbird’s search functionality to quickly find specific emails or set up filters to automatically sort incoming messages into appropriate folders within the unified inbox.
With Thunderbird’s powerful email management features at your disposal, the unified inbox becomes a centralized hub where you can efficiently handle your emails from different accounts without switching between multiple interfaces.
By effectively managing your emails in the unified inbox, you can maintain organization, prioritize important messages, and stay on top of your communication, all within Thunderbird’s unified interface.