
Understanding File Systems on iPad and Mac/PC
Before diving into the various methods of transferring files from an iPad to a Mac or PC, it is important to understand the differences in file systems between the two platforms.
The iPad uses the iOS file system, which is different from the file systems used by Mac and PC. The iOS file system is more locked down compared to the file systems used on Mac and PC, which allows for stricter control over file access and security. On the other hand, the file systems on Mac and PC provide more flexibility and advanced functionality.
When transferring files from an iPad to a Mac or PC, it is necessary to consider compatibility between the two file systems. Some file formats may not be compatible across all platforms, so it is important to ensure that the files you want to transfer can be opened and accessed on the destination device.
Furthermore, it is important to note that the methods of file transfer may vary depending on the operating system and versions of the iPad, Mac, or PC being used. Therefore, it is recommended to check the specific requirements and instructions for your devices before proceeding.
By understanding the differences in file systems and the compatibility factors, you can choose the most appropriate method for transferring files from your iPad to a Mac or PC, ensuring a seamless and efficient transfer process.
Option 1: Using iTunes to Transfer Files
iTunes is a popular media management software developed by Apple that can be used to transfer files between an iPad and a Mac or PC.
To transfer files using iTunes, you’ll first need to ensure that the latest version of iTunes is installed on your computer. Then, follow these steps:
- Connect your iPad to your computer using a USB cable. Launch iTunes if it doesn’t open automatically.
- Select your iPad icon that appears in the iTunes interface.
- Click on the “File Sharing” option under the “Settings” section in the left sidebar.
- You will see a list of apps on your iPad that support file sharing. Choose the app from which you want to transfer files.
- Click on the “Add File” or “Add Folder” button to select the files or folders you want to transfer from your computer to your iPad, or you can simply drag and drop the files into the app’s Documents list.
- Wait for the transfer to complete, and then disconnect your iPad from the computer.
Similarly, you can also transfer files from your iPad to your computer by selecting the app from the “File Sharing” section in iTunes and clicking on the “Save to” button to save the files to a location on your computer.
Using iTunes provides a reliable and secure way to transfer files between your iPad and your Mac or PC. However, it requires a USB connection and the use of the iTunes software, which may not be as convenient as other options.
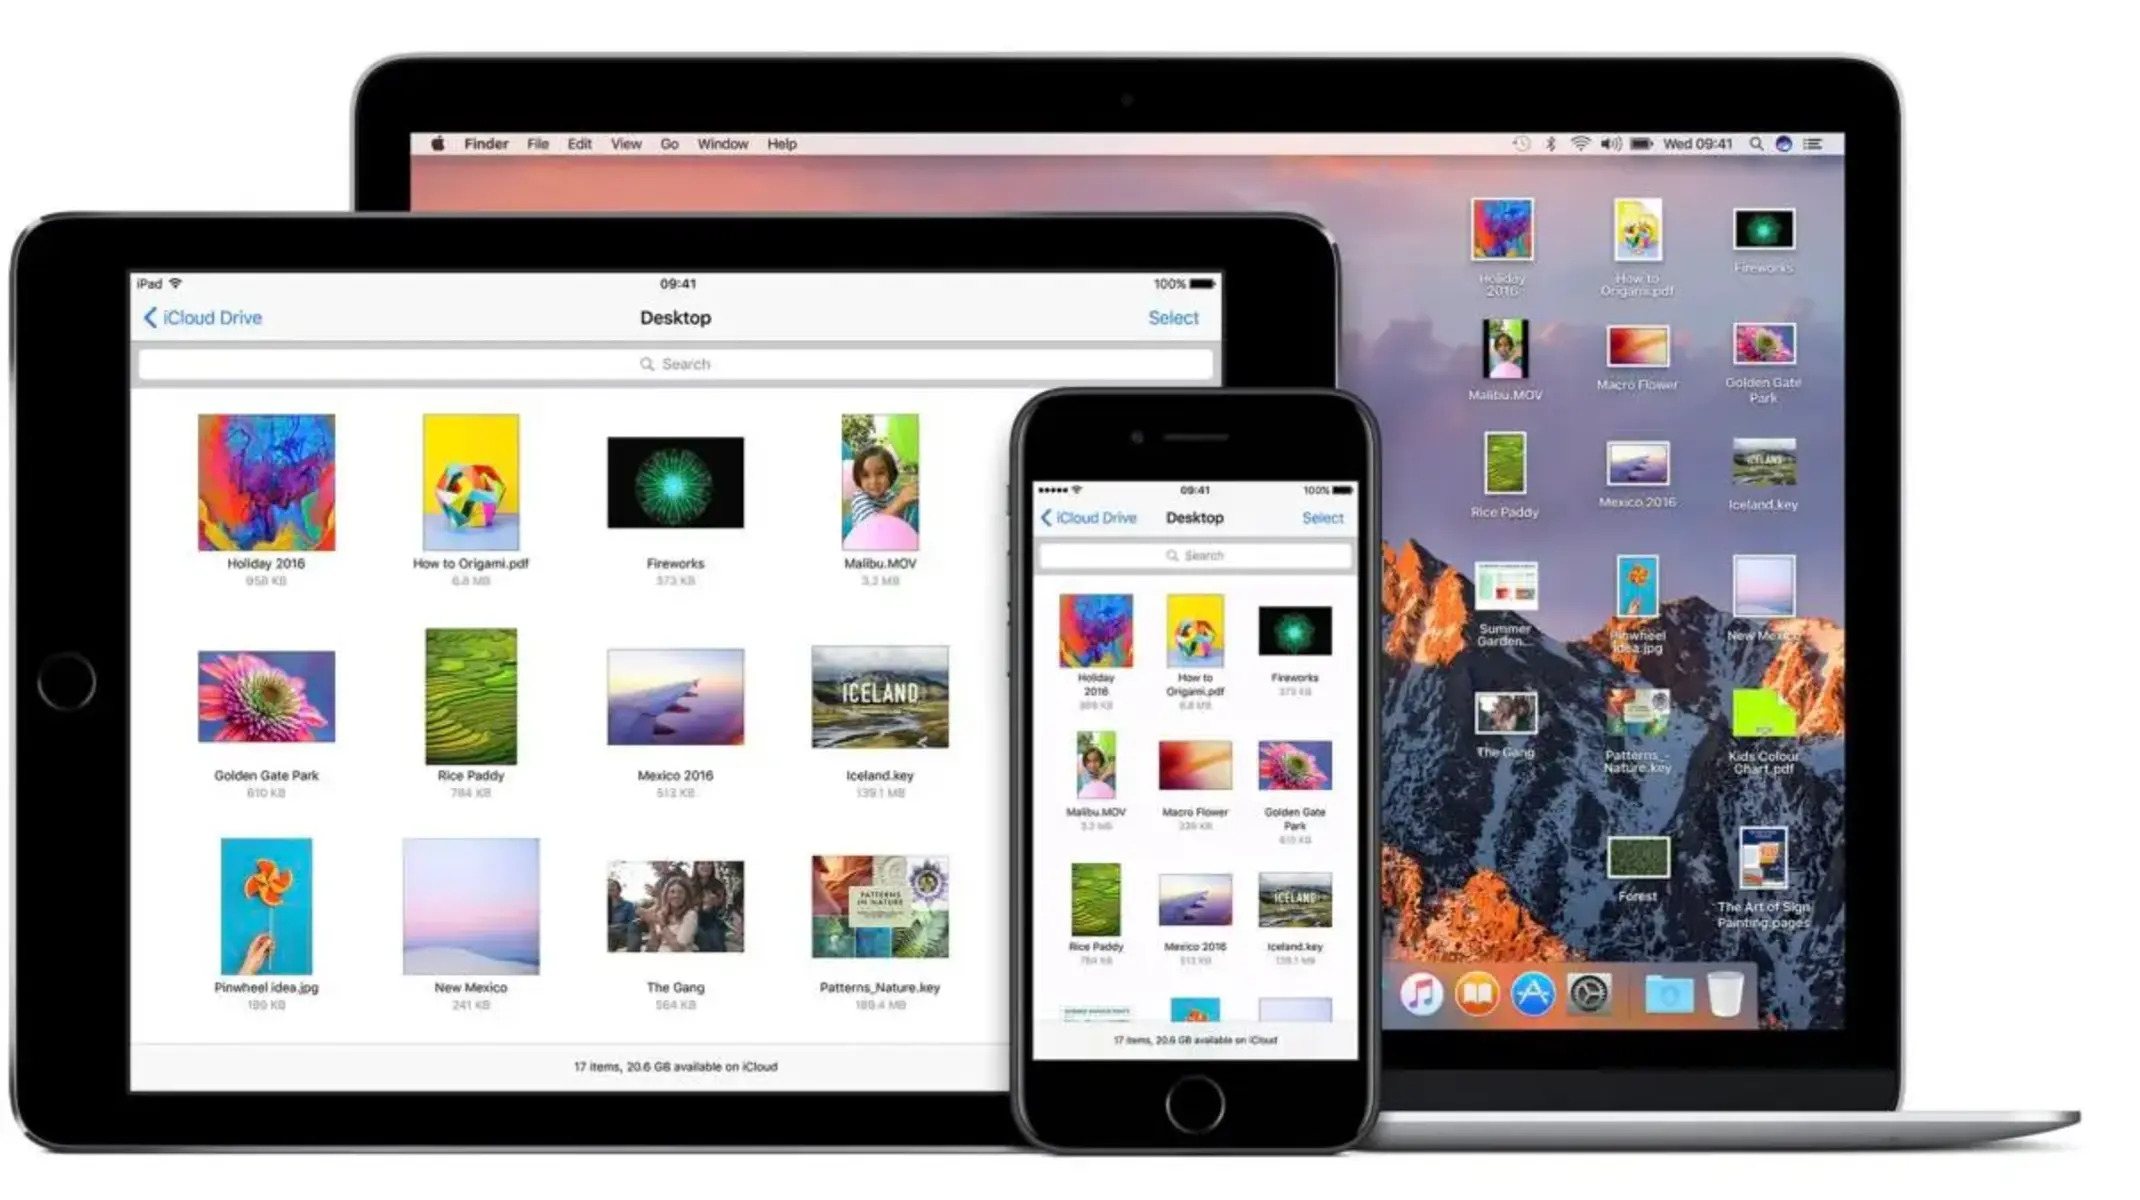
Option 2: Using iCloud to Transfer Files
iCloud is Apple’s cloud-based storage and syncing service that allows you to access your files from multiple devices, including your iPad and Mac or PC.
To transfer files using iCloud, you’ll need to follow these steps:
- Make sure you have iCloud enabled on both your iPad and your Mac or PC. You can do this by going to the settings on your iPad and selecting your Apple ID, then navigating to the iCloud section. On your Mac or PC, you can enable iCloud through the System Preferences or Control Panel.
- On your iPad, open the app that contains the files you want to transfer.
- Select the files you want to transfer by tapping on them, or you can select multiple files by tapping and holding on the first file and then tapping on the others.
- Tap on the Share button, which is usually represented by an arrow pointing up or a square with an arrow coming out of it.
- Choose the option to “Save to Files” or “Save to iCloud Drive” from the share menu.
- On your Mac or PC, open a web browser and go to iCloud.com. Sign in with your Apple ID.
- Click on the iCloud Drive icon to access your files.
- Locate and download the files you transferred from your iPad by clicking on them and choosing the download option.
Using iCloud to transfer files offers the advantage of wireless syncing and accessibility across multiple devices. However, it requires a stable internet connection and sufficient iCloud storage space.
Option 3: Using AirDrop to Transfer Files
AirDrop is a convenient feature available on Apple devices that allows for the seamless and wireless transfer of files between compatible devices.
To transfer files using AirDrop, you’ll need to follow these steps:
- Ensure that both your iPad and your Mac or PC have AirDrop enabled. On your iPad, swipe up from the bottom of the screen to access the Control Center and check if AirDrop is turned on. On your Mac, open the Finder and click on the AirDrop option in the sidebar.
- Open the app that contains the files you want to transfer on your iPad.
- Select the files you want to transfer by tapping on them, or you can select multiple files by tapping and holding on the first file and then tapping on the others.
- Tap on the Share button, which is usually represented by an arrow pointing up or a square with an arrow coming out of it.
- From the share menu, select the device you want to transfer the files to. The device should appear in the AirDrop section. Make sure that the recipient device is nearby and has AirDrop enabled.
- On the recipient device, a notification will appear asking if they want to accept the file transfer. Once accepted, the files will be transferred wirelessly through AirDrop.
AirDrop offers a quick and easy way to transfer files between your iPad and your Mac or PC without the need for cables or internet connection. However, it is important to note that AirDrop is only available on Apple devices, so it may not be a viable option if you are transferring files to a non-Apple device.
Option 4: Using Third-Party Apps to Transfer Files
If you prefer more flexibility and customization in transferring files between your iPad and your Mac or PC, you can explore various third-party apps designed specifically for file transfer.
These apps provide a range of features, such as wireless transfer, cloud storage integration, and support for different file formats. Here are the general steps to transfer files using third-party apps:
- Search for file transfer apps on the App Store that are compatible with both your iPad and your Mac or PC. Some popular options include Dropbox, Google Drive, and OneDrive.
- Download and install the app on your iPad and on your Mac or PC.
- Open the app on your iPad and follow the instructions to set up an account or sign in.
- Upload the files you want to transfer from your iPad to the app’s cloud storage, if applicable.
- Open the app on your Mac or PC and sign in using the same account information.
- Access the files you uploaded from your iPad and download them to your Mac or PC.
- Alternatively, some third-party apps may offer direct device-to-device transfer options, similar to AirDrop. Follow the app’s instructions to initiate the transfer process.
Using third-party apps can be beneficial for transferring various types of files, including documents, photos, videos, and more. However, it is important to choose reliable and reputable apps to ensure the privacy and security of your files.
Additionally, keep in mind that some third-party apps may have file size limitations or require a subscription for advanced features.
Option 5: Using Email or Messaging Apps to Transfer Files
If you only need to transfer smaller files or documents, using email or messaging apps can be a simple and convenient option.
Here are the steps to transfer files using email or messaging apps:
- Open the app that contains the file you want to transfer on your iPad.
- Locate the file and tap on the sharing option, which is usually represented by an icon with an arrow pointing up.
- Choose the option to share using email or messaging app, such as Mail, Messages, or a third-party app like WhatsApp or Slack.
- Enter the recipient’s email address or select the contact from your address book.
- Add a subject and any additional message if desired.
- Tap on the send button to transfer the file.
- The recipient will then receive the file in their email or messaging app and can download it from there.
This method is particularly useful for sharing documents, photos, or smaller files with individuals or small groups. However, keep in mind that email and messaging apps may have file size limits, so larger files may not be suitable for this method.
Additionally, it is important to ensure that the recipient’s email or messaging app supports the file format you are trying to transfer.
Option 6: Using File Transfer Apps to Transfer Files
If you are looking for a dedicated solution for file transfer between your iPad and your Mac or PC, using file transfer apps can provide an efficient and streamlined process.
File transfer apps are specifically designed to facilitate the smooth transfer of files across different devices and platforms. These apps often offer advanced features such as high-speed transfers, wireless connectivity, and support for various file formats.
To transfer files using a file transfer app, follow these general steps:
- Search for reputable file transfer apps on the App Store that are compatible with both your iPad and your Mac or PC. Examples include FileBrowser, Documents by Readdle, and FileApp.
- Download and install the app on your iPad and your Mac or PC.
- Open the app on both devices and follow the instructions to set up an account or establish a connection between the devices.
- Browse the files on your iPad and select the ones you want to transfer.
- Choose the option to transfer or send the files, either through a direct device-to-device connection or via a cloud storage service integrated into the app.
- On your Mac or PC, open the file transfer app and access the transferred files for download or further organization.
File transfer apps provide a convenient and reliable way to transfer files of various sizes and formats. They often have user-friendly interfaces and advanced features to enhance the transfer experience.
Keep in mind that some file transfer apps may require a paid subscription or offer additional in-app purchases for premium features. It is recommended to review the app’s features and pricing structure before making a decision.
Option 7: Using a Cloud Storage Service to Transfer Files
A cloud storage service provides a convenient and versatile option for transferring files between your iPad and your Mac or PC. With cloud storage, your files are stored remotely on servers, allowing you to access and manage them from any device with an internet connection.
To transfer files using a cloud storage service, follow these steps:
- Choose a reputable cloud storage service that is compatible with both your iPad and your Mac or PC. Popular options include Dropbox, Google Drive, Microsoft OneDrive, and iCloud Drive.
- Download and install the cloud storage app on your iPad and on your Mac or PC.
- Create an account or sign in to your existing account.
- Upload the files you want to transfer from your iPad to the cloud storage service. Most cloud storage apps allow you to simply select the files and choose the “Upload” option.
- On your Mac or PC, open the cloud storage app or access the service through a web browser.
- Sign in to your account and navigate to the location where you uploaded the files.
- Download the files to your Mac or PC by selecting them and choosing the “Download” option.
Using a cloud storage service offers several benefits, including the ability to access your files from any device, automatic syncing of files across devices, and the option to share files with others.
However, keep in mind that the transfer speed may depend on your internet connection and the file size. It’s also important to consider the storage limits and pricing plans of the cloud storage service you choose.
Option 8: Using a USB Cable to Transfer Files
If you prefer a direct and reliable method of transferring files between your iPad and your Mac or PC, using a USB cable is a straightforward solution.
To transfer files using a USB cable, follow these steps:
- Connect your iPad to your Mac or PC using a USB cable. Ensure that the cable is compatible with both devices.
- On your iPad, you may be prompted to trust the connected computer. Follow the on-screen instructions to establish the connection.
- On your Mac or PC, the iPad should appear as a connected device. You may need to unlock your iPad and enter your passcode if prompted.
- Open a file explorer or Finder window on your Mac or PC to browse the contents of your iPad.
- Navigate to the location on your iPad where the files you want to transfer are stored.
- Select the files you want to transfer and drag them to the desired location on your Mac or PC.
- Wait for the transfer process to complete, and then safely disconnect your iPad from the USB cable.
Using a USB cable provides a secure and stable connection for transferring files. It is particularly useful when transferring large files or a large number of files.
However, keep in mind that a physical connection is required, and you may need specific software or drivers installed on your Mac or PC for the devices to recognize each other.