
Overview
When working with Microsoft Word, you may come across the need to apply borders to specific parts of your document to enhance its visual appeal or to highlight important information. Borders can be added to paragraphs, sections, images, and objects in Word, allowing you to customize the appearance of your document to suit your needs.
Applying borders to different elements within your document can help improve its readability and organization. By using borders, you can make certain sections stand out, create dividers between paragraphs, or draw attention to specific images or objects. Borders can be customized in terms of style, thickness, color, and more, giving you the flexibility to create a document that matches your desired aesthetic.
In this article, we will explore how to insert borders to paragraphs and sections, customize border styles, remove borders from your document, and apply borders to images or objects. We will also address common issues related to borders and provide troubleshooting tips to overcome them.
Whether you are writing a report, designing a flyer, or creating a professional document, being able to apply borders effectively can make a significant difference in the overall presentation. Let’s explore the various techniques and options available in Microsoft Word to apply borders and enhance your document’s visual appeal.
Inserting a Border to a Paragraph
Adding a border to a paragraph can help draw attention to important information or create visual separation between different sections of your document. Microsoft Word provides an easy and efficient way to insert borders to paragraphs.
To apply a border to a paragraph, follow these steps:
- Select the paragraph to which you want to add a border. You can do this by clicking and dragging your cursor across the text or by placing your cursor within the desired paragraph.
- On the Word toolbar, navigate to the “Home” tab.
- In the “Paragraph” group, locate the “Borders” button. It looks like a square divided into four smaller squares.
- Click on the “Borders” button to open the drop-down menu with various border options.
- From the drop-down menu, choose the desired border style. You can select different border styles such as solid lines, dashed lines, double lines, or customized styles.
- If you want to customize the border further, choose “Borders and Shading” from the drop-down menu. A new dialog box will open up, allowing you to adjust the border color, line thickness, and other formatting options.
- Once you have selected the desired border style, it will be applied to the selected paragraph immediately. You can now see the border around the paragraph.
Inserting a border to a paragraph can help organize and structure your document while making specific sections more visually appealing. You can experiment with different border styles and customize them according to your preference to create a unique and professional-looking document.
Applying a Border to a Section
In Microsoft Word, you have the option to apply borders not only to individual paragraphs but also to entire sections of your document. This feature allows you to visually separate different parts of your document or highlight specific sections for emphasis.
To apply a border to a section in Microsoft Word, follow these steps:
- Select the section of text to which you want to add a border. You can do this by clicking and dragging your cursor across the desired section or by placing your cursor at the beginning of the section and holding down the Shift key while clicking at the end.
- Go to the “Layout” or “Page Layout” tab on the Word toolbar, depending on your version of Microsoft Word.
- In the “Page Setup” group, click on the small arrow in the bottom right corner to open the “Page Setup” dialog box.
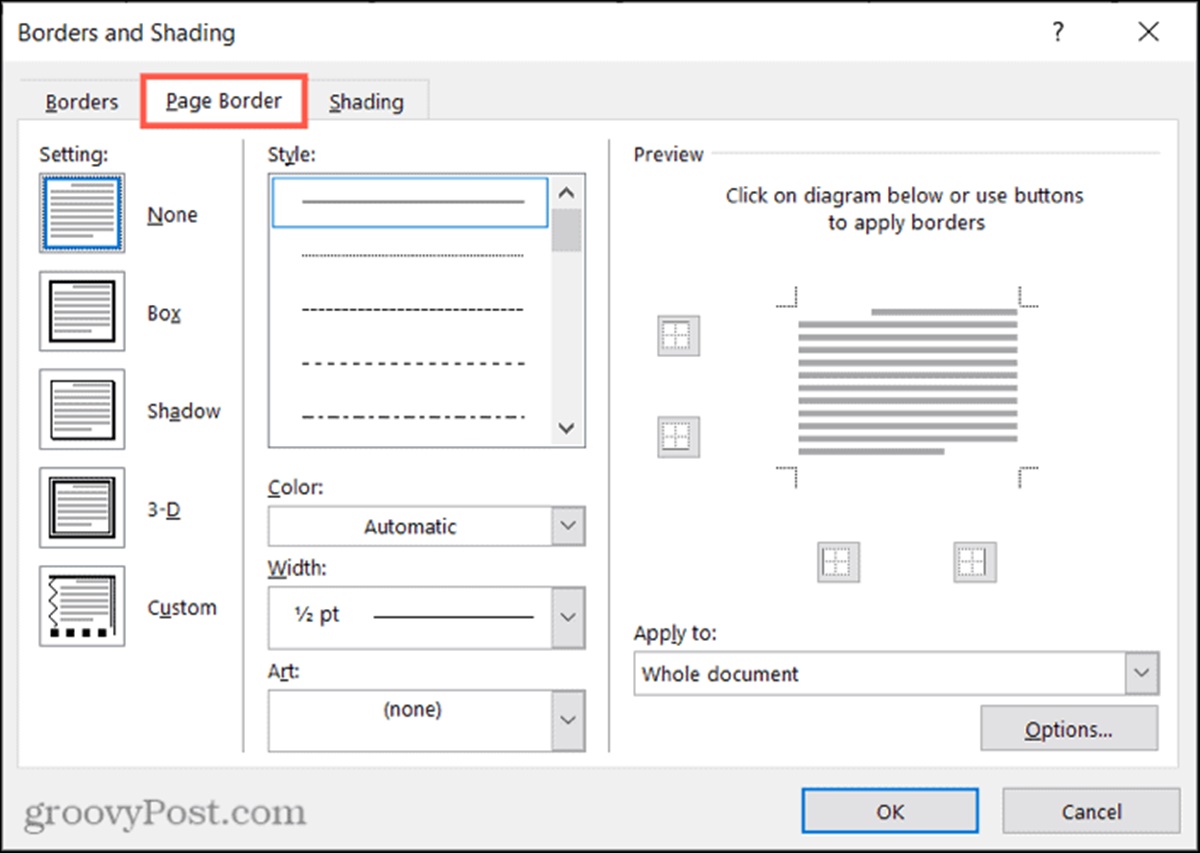
- In the “Borders” tab of the dialog box, choose the desired border style from the options available. You can select from various preset styles such as solid lines, dotted lines, or choose the “Custom” option to create a unique border style.
- If you want to further customize the border, you can adjust the color, thickness, and other formatting options using the available controls in the dialog box.
- Once you are satisfied with the border settings, click “OK” to apply the border to the selected section. The border will now appear around the section.
Applying a border to a section can help visually separate different parts of your document, making it easier to navigate and understand. Whether you want to highlight a specific section or create a distinct visual division between different parts of your document, the ability to apply borders to sections in Word gives you the flexibility to customize the appearance of your document to your liking.
Customizing the Border Style
When applying borders to paragraphs or sections in Microsoft Word, you have the option to customize the border style according to your preferences. Customizing the border style allows you to add a personal touch to your document and create a unique visual representation.
Here are some ways to customize the border style in Microsoft Word:
- Border Types: Word offers a variety of border types to choose from. You can select solid lines, dashed lines, double lines, or even create your own custom line style.
- Border Width: You can adjust the thickness or width of the border to make it more or less prominent. Word provides options for thin, medium, or thick borders, as well as the ability to specify a custom width.
- Border Color: Customize the color of your border to match the overall design of your document or to create a visually striking contrast. Word offers a range of color options to choose from, including standard colors and the ability to select a custom color.
- Border Padding: It’s possible to adjust the spacing between the border and the content within it. Increasing or decreasing the padding can affect the visual balance and overall appearance of the border.
- Border Placement: In addition to applying borders to the usual top, bottom, left, and right sides, you can also choose to apply borders to specific sides only or create custom border placements.
- Border Effects: Word provides additional border effects to enhance the style and impact of the border, such as shadow effects or 3D effects, allowing you to create more visually appealing borders.
To access these border customization options, navigate to the “Borders and Shading” menu under the “Paragraph” or “Page Setup” tabs. Here, you can modify the border style, color, width, padding, placement, and effects to achieve the desired visual effect on your document.
By customizing the border style, you can add a touch of creativity and uniqueness to your document, making it visually appealing and tailored to your specific needs. Experiment with different combinations and settings to find the perfect border style that enhances the overall presentation of your document.
Removing a Border from a Document
While applying borders can enhance the visual appeal of your document, there may be instances where you want to remove a border that you previously applied. Microsoft Word provides easy ways to remove borders from specific paragraphs, sections, or the entire document.
To remove a border from a document in Microsoft Word, follow these steps:
- If you want to remove a border from a specific paragraph, select the paragraph by clicking and dragging your cursor across the text or by placing your cursor within the paragraph.
- On the Word toolbar, navigate to the “Home” tab.
- In the “Paragraph” group, locate the “Borders” button, which looks like a square divided into four smaller squares.
- Click on the arrow next to the “Borders” button to open the drop-down menu.
- From the drop-down menu, choose “No Border” or “Remove Border” option. This will remove the border from the selected paragraph.
- If you want to remove a border from a section, select the section of text by clicking and dragging your cursor across the desired section or by placing your cursor at the beginning of the section and holding down the Shift key while clicking at the end.
- Open the “Page Setup” dialog box by going to the “Layout” or “Page Layout” tab on the Word toolbar and clicking on the small arrow in the bottom right corner of the “Page Setup” group.
- In the “Borders” tab of the dialog box, choose the option to remove the border. This can be “None” or “No Border,” depending on your version of Microsoft Word.
- Click “OK” to save the changes and remove the border from the selected section.
If you want to remove borders from the entire document, you can follow the same steps as mentioned above, but make sure to select the entire document before accessing the “Borders” or “Page Setup” options.
Removing borders from your document is useful when you want to simplify the design, change the formatting, or eliminate distractions. By following these simple steps, you can easily remove borders from specific paragraphs, sections, or the entire document in Microsoft Word.
Applying Borders to Images or Objects
In addition to applying borders to paragraphs and sections, Microsoft Word also allows you to add borders to images or other objects within your document. This feature can be particularly useful when you want to highlight or frame an image, create visual separation between different objects, or enhance the overall visual appeal of your document.
To apply a border to an image or object in Microsoft Word, follow these steps:
- Select the image or object to which you want to add a border. You can do this by clicking on the image or object once it is inserted in your document.
- On the Word toolbar, go to the “Format” tab.
- In the “Picture Styles” or “Drawing Tools” group, locate the “Borders” button. It looks like a square divided into four smaller squares or may have a different icon, depending on the version of Microsoft Word you are using.
- Click on the “Borders” button to open the drop-down menu with various border options.
- From the drop-down menu, choose the desired border style. You can select solid lines, dashed lines, double lines, or customized styles.
- If you want to further customize the border, select the “More Borders” or “Format Picture” option. A dialog box will appear, allowing you to adjust the border color, line thickness, and other formatting options.
- Once you have selected the desired border style and customized it, the border will be applied to the selected image or object immediately.
By applying borders to images or objects, you can add visual interest and make them stand out within your document. This can be particularly useful when creating flyers, documents with images, or presentations where you want to emphasize specific visual elements.
Experiment with different border styles, colors, and thicknesses to find the perfect border that enhances the overall appearance of your images or objects while complementing the design and theme of your document.
Troubleshooting Common Border Issues
While applying borders to your documents in Microsoft Word can enhance the visual appeal and organization, you may encounter some common issues related to borders. Understanding how to troubleshoot these issues can save you time and frustration. Here are some tips to address common border problems:
- Missing Borders: If you apply borders to a paragraph or section but they don’t appear, ensure that the borders are not hidden. Go to the “Home” or “Layout” tab, click on the small arrow in the “Borders” button, and select “View Gridlines” or “View All Borders.” This will reveal any hidden borders.
- Uneven Borders: Sometimes, the borders may appear uneven or misaligned. To fix this, make sure the paragraph or section is fully selected, go to the “Borders” or “Page Setup” options, and ensure that the border settings (style, thickness, and placement) are consistent.
- Overlapping Borders: When applying borders to adjacent paragraphs or sections, they may overlap and create a confusing visual. To resolve this, adjust the border settings or insert additional spacing between the paragraphs or sections.
- Border Applied to the Wrong Element: If a border is applied to the wrong paragraph or section, ensure that the correct element is selected before applying the border. You can click and drag to select the desired text or use the arrow keys to navigate to the correct location.
- Formatting and Compatibility Issues: When sharing a document with others who have different versions of Microsoft Word or using different software, border formatting may not appear as intended. To mitigate such compatibility issues, consider using simpler border styles and straightforward formatting options.
- Undoing Border Changes: If you accidentally apply a border and want to undo it, press the “Ctrl + Z” keys (Windows) or “Command + Z” keys (Mac) to undo the previous action. Alternatively, you can remove the border by following the steps mentioned in the “Removing a Border from a Document” section.
By troubleshooting common border issues, you can ensure that your document appears polished and professional. Remember to double-check the border settings, select the correct elements, and consider compatibility factors when sharing your document with others.
If you encounter persistent issues or need more advanced solutions, referring to Microsoft Word’s official documentation or seeking support from the Microsoft Office community can be helpful.