
Adding Pictures in Word
Microsoft Word allows you to easily enhance your documents by adding pictures and clip art. Whether you want to insert images from your computer or search for online sources, Word provides a range of options to help you make your documents visually appealing. In this section, we will explore how to insert pictures in Word.
To insert pictures from your computer, open the Word document and place the cursor where you want to add the image. Next, go to the ‘Insert’ tab and click on the ‘Pictures’ button. This will open a file explorer window where you can browse and select the image file you want to insert. Once you have selected the image, click on the ‘Insert’ button, and the picture will be placed in your document.
Alternatively, you can also insert pictures from online sources. With the ‘Insert’ tab still active, click on the ‘Online Pictures’ button. This will open a dialog box where you can search for images using keywords. You can select images from various sources such as Bing Image Search, OneDrive, or SharePoint. Once you find the desired image, click on the ‘Insert’ button to add it to your document.
After inserting a picture, you may need to adjust its size to fit your document. To resize a picture, click on it to reveal the ‘Picture Tools’ tab. Here, you can manually drag the corners of the picture to make it larger or smaller. Additionally, Word provides pre-defined options for picture size, such as ‘Small’, ‘Medium’, and ‘Large’, which you can select from the ‘Size’ drop-down menu.
When working with pictures, you may also want to wrap the text around them. This can be done by selecting the picture and clicking on the ‘Wrap Text’ button in the ‘Picture Tools’ tab. Choose the desired text wrapping option, such as ‘Square’, ‘Tight’, or ‘Through’, to adjust how the text flows around the picture.
In addition to adjusting the size and text wrapping, Word also offers various picture styles and effects to enhance the visual appearance of your images. With the picture selected, go to the ‘Picture Tools’ tab and explore the ‘Styles’ and ‘Effects’ options to customize the look of your picture.
If you need to crop or rotate a picture, select the image and click on the ‘Crop’ or ‘Rotate’ button in the ‘Picture Tools’ tab. With the crop tool, you can trim the edges of the picture to remove unwanted parts, while the rotate tool allows you to rotate the image clockwise or counterclockwise.
To provide additional context or information about a picture, you can add captions. Select the picture, click on the ‘Insert Caption’ button in the ‘References’ tab, and enter the desired caption text.
Lastly, Word offers picture layout options that allow you to align pictures with text and adjust their position. To access these options, select the picture and click on the ‘Layout Options’ button in the ‘Picture Tools’ tab. From here, you can choose how the picture interacts with the surrounding text.
By following these steps, you can easily add and customize pictures in Microsoft Word, making your documents more visually engaging and professional.
Inserting Pictures from Your Computer
If you have images stored on your computer that you want to add to your Microsoft Word document, you can easily do so by following these steps:
- Open your Word document and position the cursor where you want to insert the picture.
- Go to the ‘Insert’ tab in the ribbon.
- Click on the ‘Pictures’ button in the ‘Illustrations’ group. This will open a file explorer window.
- Navigate to the folder where your desired image is saved.
- Select the image file and click on the ‘Insert’ button.
Once you click ‘Insert’, the selected picture will appear in your document at the designated location. You can now resize, position, and format the picture as needed.
After inserting the picture, you may want to make adjustments to its size. To do this, click on the picture to select it, and then use the sizing handles that appear at the corners and sides of the image. Simply click and drag these handles to resize the picture proportionally.
If you prefer to maintain the picture’s aspect ratio while resizing, hold down the Shift key on your keyboard while dragging the sizing handles. This ensures that the image remains scaled proportionally without distortion.
In addition to resizing, you can also move the picture to a different location within your document. Click and drag the picture to the desired position, and the surrounding text will automatically adjust to accommodate the new image placement.
Furthermore, you can apply various formatting options to the inserted picture for improved visual appeal. With the image selected, head to the ‘Picture Tools’ tab that appears in the ribbon upon selection.
From the ‘Picture Tools’ tab, you can explore different options such as ‘Picture Styles’, ‘Picture Effects’, and ‘Artistic Effects’. These features allow you to add borders, shadows, reflections, and other artistic enhancements to your pictures.
Remember to save your document after inserting and formatting the picture to ensure that all changes are preserved. This way, you can easily update or modify your document in the future without losing any changes made to the inserted pictures.
By following these steps, you can effortlessly insert pictures from your computer into your Microsoft Word document, creating visually captivating and professional-looking content.
Inserting Pictures from Online Sources
If you don’t have pictures saved on your computer or prefer to use images from the internet, Microsoft Word provides a convenient option to insert pictures from online sources. Here’s how you can do it:
- Open your Word document and navigate to the desired location where you want to insert the picture.
- Switch to the ‘Insert’ tab in the ribbon.
- Click on the ‘Online Pictures’ button in the ‘Illustrations’ group.
- A dialog box will appear, allowing you to search for images online. You can type in keywords related to the image you’re looking for.
- Select the search engine you’d like to use, such as Bing Image Search or OneDrive, from the drop-down menu next to the search box.
- Hit the ‘Enter’ key or click on the ‘Search’ button to begin the search.
- Scroll through the search results and click on the desired image to select it.
- Click on the ‘Insert’ button to add the selected image to your Word document.
Once you insert the picture from an online source, it will be placed in your document at the specified location. You can adjust the size, position, and formatting of the image using the available tools and options in Word.
Keep in mind that when using images from online sources, it’s important to ensure that you have the necessary permissions or that the images are licensed for free use. Always give proper attribution to the source of the image if required.
Additionally, Word allows you to insert images from your OneDrive or SharePoint account directly. Simply select the desired online source from the drop-down menu in the ‘Online Pictures’ dialog box, and proceed with the search and selection process as mentioned above.
By using the online picture insertion feature in Word, you have access to a vast array of images to enhance the visual appeal of your documents. Whether you’re creating a professional report, a marketing brochure, or a personal project, adding relevant and engaging pictures from online sources can help grab the reader’s attention and bring your content to life.
Adjusting the Picture Size
Microsoft Word provides several options for resizing pictures to fit your document’s layout and design. By adjusting the picture size, you can ensure that your images are displayed exactly the way you want them. Here’s how you can easily resize pictures in Word:
- Select the picture that you want to resize by clicking on it.
- Once the picture is selected, you will notice small, square-shaped handles around its edges and corners. These handles allow you to resize the picture.
- To resize the picture proportionally, click and drag one of the corner handles while holding down the Shift key. This keeps the picture’s original aspect ratio intact, ensuring that it doesn’t appear stretched or distorted.
- If you want to change the picture’s size without maintaining the aspect ratio, simply click and drag any of the side handles. This will stretch or compress the image horizontally or vertically.
- Alternatively, you can also use the ‘Size’ group in the ‘Picture Tools’ tab to resize the picture. With the picture selected, go to the ‘Format’ tab, click on the ‘Size’ drop-down menu, and choose from the predefined options, such as ‘Small’, ‘Medium’, ‘Large’, or ‘Custom’.
- If none of the predefined sizes suit your needs, select the ‘Size’ option at the bottom of the drop-down menu. This will open a dialog box where you can specify the exact width and height values for the picture.
Keep in mind that resizing a picture in Word only affects its appearance within the document and does not alter the original image file. The file itself remains unchanged.
It’s important to consider the overall layout and design of your document when resizing pictures. Ensure that the pictures are not too large or too small relative to the surrounding text and other elements. Properly sized pictures can help improve the readability and visual appeal of your document.
By utilizing the resizing options in Word, you can easily adjust and fine-tune the size of your pictures to create visually pleasing and professional-looking documents.
Wrapping Text Around a Picture
Microsoft Word allows you to wrap text around pictures, giving your documents a more dynamic and visually appealing layout. This feature makes it easy to integrate pictures seamlessly with your text. Here’s how you can wrap text around a picture in Word:
- Insert the picture into your Word document by clicking on the ‘Insert’ tab and selecting ‘Pictures’ or ‘Online Pictures’.
- Position the picture in the desired location within your document.
- Select the picture by clicking on it.
- Go to the ‘Format’ tab that appears when the picture is selected.
- In the ‘Arrange’ group, click on the ‘Wrap Text’ button to access the text wrapping options.
- Choose the wrapping style that best suits your needs. The available options include:
- ‘In Line with Text’: This option removes any text wrapping and places the picture on its own line, in line with the surrounding text.
- ‘Square’: This option wraps the text around the picture, maintaining a rectangular shape.
- ‘Tight’: This option closely wraps the text around the contours of the picture.
- ‘Through’: This option allows the text to flow through transparent areas of the picture.
- ‘Top and Bottom’: This option places the picture above and below the text, with the text not wrapping around the sides.
Once you have selected a text wrapping option, the text in your document will automatically adjust to accommodate the picture placement. Depending on the wrapping style chosen, you may need to fine-tune the positioning of the picture to achieve the desired layout effect.
If you find that the picture is not aligned precisely with the text or that gaps or overlaps occur, you can adjust the picture’s position manually. Simply click and drag the picture to move it to the desired location.
Additionally, Word provides further customization options for text wrapping. To access these options, click on the small arrow in the ‘Wrap Text’ button’s dropdown menu. This will open the ‘Layout Options’ menu, allowing you to fine-tune the distance between the picture and the surrounding text and make additional adjustments for a more precise layout.
Using the text wrapping feature, you can create visually engaging documents by seamlessly integrating pictures with your text content. Whether you want to add illustrations to a report or include images in a brochure, text wrapping in Word provides flexibility and enhances the overall visual appeal of your documents.
Applying Picture Styles and Effects
Microsoft Word offers a range of picture styles and effects that allow you to enhance the appearance of your inserted images. With these options, you can add a touch of creativity and professionalism to your documents. Here’s how you can easily apply picture styles and effects in Word:
- Select the picture you want to modify by clicking on it.
- Head to the ‘Format’ tab that appears when the picture is selected.
- In the ‘Picture Styles’ group, you will find a gallery of pre-designed styles to choose from. Simply click on a style to apply it to the selected picture. The style will change the border, shadow, and reflection of the image, giving it a polished and refined look.
- If you want to further customize the picture’s appearance, click on the ‘Picture Effects’ button located next to the ‘Picture Styles’ gallery.
- In the ‘Picture Effects’ menu, you will find various options to enhance your picture. You can add effects such as shadows, reflections, glow, soft edges, bevels, and more. Simply click on the effect you want to apply, and Word will instantly update the picture accordingly.
As you apply different picture styles and effects, you can instantly see the changes in real-time, allowing you to preview and choose the best combination of styles and effects to suit your document’s theme and purpose.
Furthermore, Word provides additional customization options for picture styles and effects. If you click on the ‘Picture Border’, ‘Picture Effects’, or ‘Picture Layout’ buttons in the ‘Picture Styles’ group, a drop-down menu will appear. From this menu, you can access even more options and settings to fine-tune the appearance of your pictures.
Remember that the picture styles and effects you apply in Word are non-destructive, meaning they do not permanently alter the original image file. You can freely remove or change the styles and effects without affecting the underlying picture.
By utilizing the picture styles and effects in Word, you can transform your ordinary images into visually stunning elements that elevate the overall look and feel of your documents. Whether you’re creating a presentation, a promotional flyer, or a portfolio, applying picture styles and effects adds a professional touch to your visual content.
Cropping and Rotating Pictures
Microsoft Word provides convenient tools for cropping and rotating pictures, allowing you to adjust the composition and orientation of your images within your documents. These features help you achieve the desired visual impact and improve the overall presentation of your content. Here’s how you can easily crop and rotate pictures in Word:
- Select the picture that you want to crop or rotate by clicking on it.
- Once the picture is selected, the ‘Picture Tools’ tab will appear in the ribbon.
- In the ‘Picture Tools’ tab, click on the ‘Crop’ button in the ‘Size’ group.
- Click and drag any of the black crop handles that appear on the picture’s edges or corners to crop the image. Remove the unwanted portions by dragging the handles inward.
- To maintain the original aspect ratio of the picture while cropping, hold down the Shift key while dragging the crop handles.
- To remove the cropping and revert to the original size and proportions of the picture, click on the ‘Crop’ button again and select the ‘Crop’ command from the drop-down menu.
In addition to cropping, you can also rotate pictures in Word to achieve the desired orientation. Here’s how:
- Select the picture by clicking on it.
- In the ‘Picture Tools’ tab, click on the ‘Rotate’ button in the ‘Arrange’ group.
- Choose one of the predefined rotation options from the drop-down menu, such as 90 degrees clockwise, 90 degrees counterclockwise, or 180 degrees.
- If the predefined rotation options do not meet your needs, click on the ‘More Rotation Options’ at the bottom of the drop-down menu. This will open a new dialog box where you can specify the precise rotation angle.
By using the cropping and rotation tools in Word, you have the flexibility to adjust the composition and orientation of your pictures to fit your document’s layout. Whether you want to remove unwanted elements, focus on specific details, or create a unique visual impact, cropping and rotation help you achieve the desired outcome.
Remember that the changes you make to cropping and rotation in Word are non-destructive and only affect the appearance of the picture within the document. The original image file remains unaltered.
By taking advantage of the cropping and rotation features in Word, you can enhance the visual appeal and professionalism of your documents, ensuring that your images are presented in the most effective and visually engaging way.
Adding Captions to Pictures
In Microsoft Word, you have the option to add captions to your pictures, providing additional context or information about the images in your document. Captions are especially helpful when you need to describe or reference specific pictures within your content. Here’s how you can easily add captions in Word:
- Insert the picture into your Word document by clicking on the ‘Insert’ tab and selecting ‘Pictures’ or ‘Online Pictures’.
- Position the picture at the desired location within your document.
- Click on the picture to select it.
- Switch to the ‘References’ tab in the ribbon.
- In the ‘Captions’ group, click on the ‘Insert Caption’ button.
- A dialog box will appear, allowing you to enter the text for the caption.
- Type the desired caption text into the ‘Caption’ field.
- Choose the label for the caption by using the ‘Label’ drop-down menu. Common options include ‘Figure’, ‘Table’, or ‘Equation’.
- Tick the ‘Exclude label from caption’ checkbox if you want to remove the label from the actual caption.
- If you want to change the numbering style or customize the format of the captions, click on the ‘Numbering’ button within the ‘Caption’ dialog box. This will open a new window where you can make the desired adjustments.
- Click on the ‘OK’ button to insert the caption into your document.
The caption will be added below the picture, automatically numbered and formatted according to your settings. Word will also create a reference within the caption, allowing you to easily refer to the picture within your document by its caption number.
It’s essential to keep captions concise and descriptive, capturing the main message or purpose of the picture. Captions can provide clarity, enhance comprehension, and improve the overall user experience for readers.
Additionally, if you decide to move or adjust the position of the picture, the caption will remain associated with the picture and adjust accordingly, ensuring that the caption remains next to the picture in your document.
By adding captions to your pictures in Word, you can provide valuable context and information, enhancing the understanding and impact of your images, particularly when used in technical documents, reports, presentations, or any other content where visual references are crucial.
Using the Picture Layout Options
Microsoft Word provides picture layout options that allow you to control the positioning and alignment of pictures within your documents. These options help you ensure that the pictures are integrated seamlessly with the surrounding text and other elements. Here’s how you can utilize the picture layout options in Word:
- Insert the picture into your Word document by clicking on the ‘Insert’ tab and selecting ‘Pictures’ or ‘Online Pictures’.
- Position the picture at the desired location within your document.
- Click on the picture to select it.
- Switch to the ‘Format’ tab in the ribbon, which appears when the picture is selected.
- In the ‘Arrange’ group, click on the ‘Wrap Text’ button to access the text wrapping options.
- From the drop-down menu that appears, select the desired picture layout option.
- The available picture layout options include:
- ‘In Line with Text’: This option removes any text wrapping and places the picture on its own line.
- ‘Square’: This option wraps the text around the picture in a rectangular shape.
- ‘Tight’: This option wraps the text closely around the contours of the picture.
- ‘Through’: This option allows the text to flow through transparent areas of the picture.
- ‘Behind Text’: This option places the picture behind the text, similar to a watermark.
- ‘In Front of Text’: This option positions the picture in front of the text, allowing the text to wrap around it.
Once you select a picture layout option, the text in your document will automatically adjust to accommodate the picture placement, based on the selected layout. You can experiment with different options to find the one that best suits your document’s design and content flow.
Furthermore, Word provides additional control over the picture layout through the ‘Layout Options’ feature. To access these options, right-click on the picture and select ‘Wrap Text’ → ‘More Layout Options’. This will open a dialog box where you can fine-tune the picture’s position, alignment, and distance from the surrounding text.
By utilizing the picture layout options in Word, you can ensure that your pictures are effectively integrated with the text and other elements in your document. Whether you want a picture to stand out as a focal point or seamlessly blend in with the flow of your content, these layout options provide the flexibility to achieve the desired visual impact.
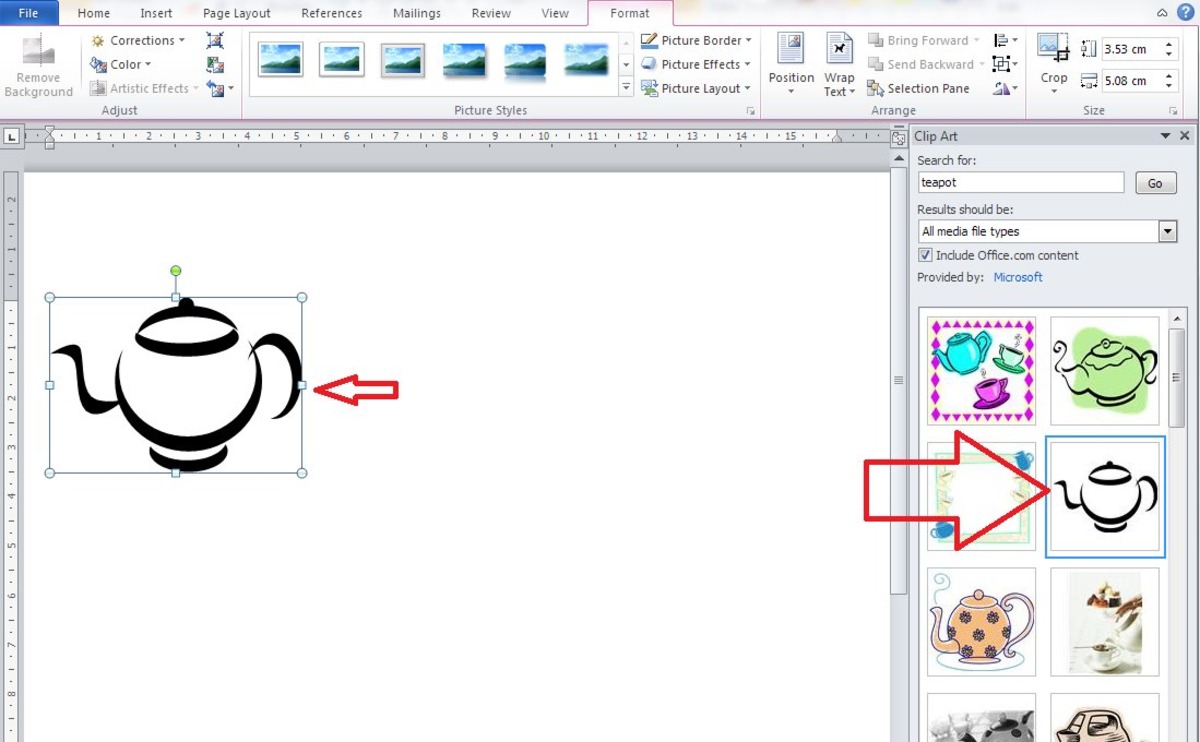
Inserting Clip Art in Word
In Microsoft Word, you have the option to enhance your documents by inserting clip art. Clip art is a collection of pre-designed images that you can easily insert into your document to convey ideas, decorate your content, or add visual interest. Here’s how you can insert clip art in Word:
- Open your Word document and navigate to the location where you want to insert the clip art.
- Go to the ‘Insert’ tab in the ribbon.
- Click on the ‘Clip Art’ button in the ‘Illustrations’ group. This will open the ‘Clip Art’ task pane on the right side of the document.
- In the ‘Clip Art’ task pane, enter keywords related to the type of image you’re looking for into the search box.
- Click on the ‘Go’ button or press Enter to initiate the search.
- Word will display a selection of clip art images based on your search keywords. Preview the images and select the one you want to insert into your document.
- Double-click on the chosen clip art image, and it will be inserted at the cursor’s location in your document.
Once you have inserted the clip art, you can resize, reposition, and format it to suit your document’s layout and design. You can also apply styles and effects to the clip art to further enhance its appearance.
Keep in mind that clip art in Word is organized into categories, making it easier to find the specific type of image you need. You can browse the categories in the ‘Clip Art’ task pane or refine your search using additional filters such as ‘All media file types’, ‘Photographs’, ‘Illustrations’, or ‘Graphics’.
By utilizing clip art in Word, you can quickly and easily enhance the visual appeal of your documents. Whether you’re creating a presentation, a newsletter, or a flyer, inserting clip art allows you to add engaging images that support your content and make it more visually appealing.
Searching for Clip Art Online
In addition to the built-in clip art collection, Microsoft Word also provides the option to search for clip art online. This feature allows you to access a wide range of images and graphics from online sources directly within Word. Here’s how you can search for clip art online in Word:
- Open your Word document and position the cursor where you want to insert the clip art.
- Switch to the ‘Insert’ tab in the ribbon.
- Click on the ‘Online Pictures’ button in the ‘Illustrations’ group. This will open the ‘Insert Pictures’ dialog box.
- In the ‘Insert Pictures’ dialog box, enter relevant keywords related to the clip art you’re looking for into the search box.
- Click on the ‘Insert’ button to begin the search.
- Word will connect to the internet and search for clip art images based on your keywords. It will display a variety of images from different online sources.
- Preview the images and select the clip art you want to insert into your document by clicking on it.
- Click on the ‘Insert’ button, and the selected clip art image will be inserted at the cursor’s location in your document.
When searching for clip art online, Word allows you to filter the results according to the type of media, such as photographs, illustrations, or line art. Additionally, you can narrow down the search by selecting a specific online source, such as Bing Image Search, OneDrive, or SharePoint.
It is important to note that when searching for clip art online, the images are retrieved from the web, so you should ensure that you have the necessary permissions or that the images are licensed for free use. Always give proper attribution to the source of the image if required.
The ability to search for clip art online in Word provides you with a vast library of images to choose from, giving you flexibility and variety in your document design. Whether you’re creating a presentation, a poster, or a brochure, searching for clip art online allows you to find and incorporate visually appealing graphics that complement your content.
Customizing Clip Art Appearance
Microsoft Word allows you to customize the appearance of clip art to better suit your document’s style and design. By applying various formatting options, you can make the clip art blend seamlessly with your content or create a specific visual effect. Here’s how you can customize the appearance of clip art in Word:
- Insert the clip art into your Word document by clicking on the ‘Insert’ tab and selecting ‘Clip Art’ or ‘Online Pictures’.
- Position the clip art at the desired location within your document.
- Click on the clip art image to select it.
- Switch to the ‘Format’ tab in the ribbon, which appears when the clip art is selected.
- In the ‘Picture Styles’ group, you will find various pre-designed styles to choose from. These styles will change the border, shadow, and other visual aspects of the clip art. Simply click on a style to apply it to the selected clip art.
- If you want to further customize the clip art’s appearance, click on the ‘Picture Effects’ button located next to the ‘Picture Styles’ gallery.
- In the ‘Picture Effects’ menu, you will find a range of options to enhance your clip art, such as shadows, reflections, glows, and more. Click on the desired effect to apply it.
As you apply different styles and effects, you can instantly see the changes in real-time, allowing you to preview and choose the best combination of formats to suit your document’s theme and content.
Furthermore, Word provides additional customization options for clip art appearance. If you click on the ‘Picture Border’, ‘Picture Effects’, or ‘Picture Layout’ buttons in the ‘Picture Styles’ group, you can access more options and settings to fine-tune the clip art’s appearance.
Remember that the changes you apply to the clip art’s appearance in Word are non-destructive and only affect its display within the document. The original clip art file remains unaltered.
By customizing the appearance of clip art in Word, you can seamlessly integrate it with your content and create visually compelling documents. Whether you’re enhancing a presentation, designing promotional materials, or creating educational resources, customizing clip art allows you to add a personal touch and make your documents more engaging and visually appealing.
Inserting Bing Images as Clip Art
In addition to the built-in clip art and the option to search for clip art online, Microsoft Word also allows you to insert Bing images directly as clip art. This feature enables you to access a vast collection of images from the Bing search engine and use them as visual elements in your documents. Here’s how you can insert Bing images as clip art in Word:
- Open your Word document and navigate to the location where you want to insert the clip art.
- Switch to the ‘Insert’ tab in the ribbon.
- Click on the ‘Online Pictures’ button in the ‘Illustrations’ group. This will open the ‘Insert Pictures’ dialog box.
- In the ‘Insert Pictures’ dialog box, enter keywords related to the type of image you’re looking for into the search box.
- Click on the arrow next to the ‘Search’ button and select ‘Bing Image Search’ from the drop-down menu.
- Click on the ‘Insert’ button to initiate the search using Bing.
- Word will connect to the internet and perform a Bing image search based on your keywords. It will display a collection of images from the Bing search engine.
- Preview the images and select the one you want to insert as clip art by clicking on it.
- Click on the ‘Insert’ button, and the selected Bing image will be inserted at the cursor’s location in your document as clip art.
Once inserted, you can resize, reposition, and format the Bing image clip art just like any other image in Word. You can also apply styles and effects to enhance its appearance and ensure it fits seamlessly with your document’s layout and design.
Note that Bing image search retrieves images from the web, so ensure you have the necessary permissions or that the images are licensed for free use. Always provide proper attribution to the source of the image if required.
By leveraging the option to insert Bing images as clip art in Word, you gain access to an extensive range of visual content to enhance your documents. Whether you’re creating presentations, reports, or any other type of document, integrating Bing images as clip art allows you to effectively communicate your ideas and make your content more visually appealing.