
What are text boxes?
A text box in Microsoft Word is a versatile tool that allows you to insert and manipulate text within a specifically defined area. It is a graphical element that can be placed anywhere on a page and used to contain text, graphics, or a combination of both. Text boxes are commonly used to add captions, callouts, side notes, or to highlight important information in a document.
Text boxes can be customized to match the overall style and design of your document. They can be resized, moved, formatted, and linked together to create a continuous flow of content. Whether you’re creating a professional document, a presentation, or a personal project, understanding how to use text boxes effectively can greatly enhance the visual appeal and organization of your work.
With text boxes, you have the freedom to position text anywhere on a page, allowing you to create dynamic layouts and designs. They can be placed within the margins, as headers or footers, or even inserted within tables or other objects in your document. The flexibility of text boxes makes them a valuable tool for creating visually appealing and well-structured documents.
Text boxes can also be used to highlight specific sections of a document or draw attention to important information. By placing text within a text box, you can apply different formatting styles, such as bold, italics, or colors, to make the text stand out. This can be particularly useful when you want to emphasize key points or create a visual hierarchy within your content.
In addition to text, you can also insert images, shapes, and other graphical elements into text boxes. This allows you to create visually engaging documents by combining text and visuals in a single element. By utilizing text boxes, you can add creativity and visual interest to your documents, making them more engaging and captivating for your readers.
How to insert a text box
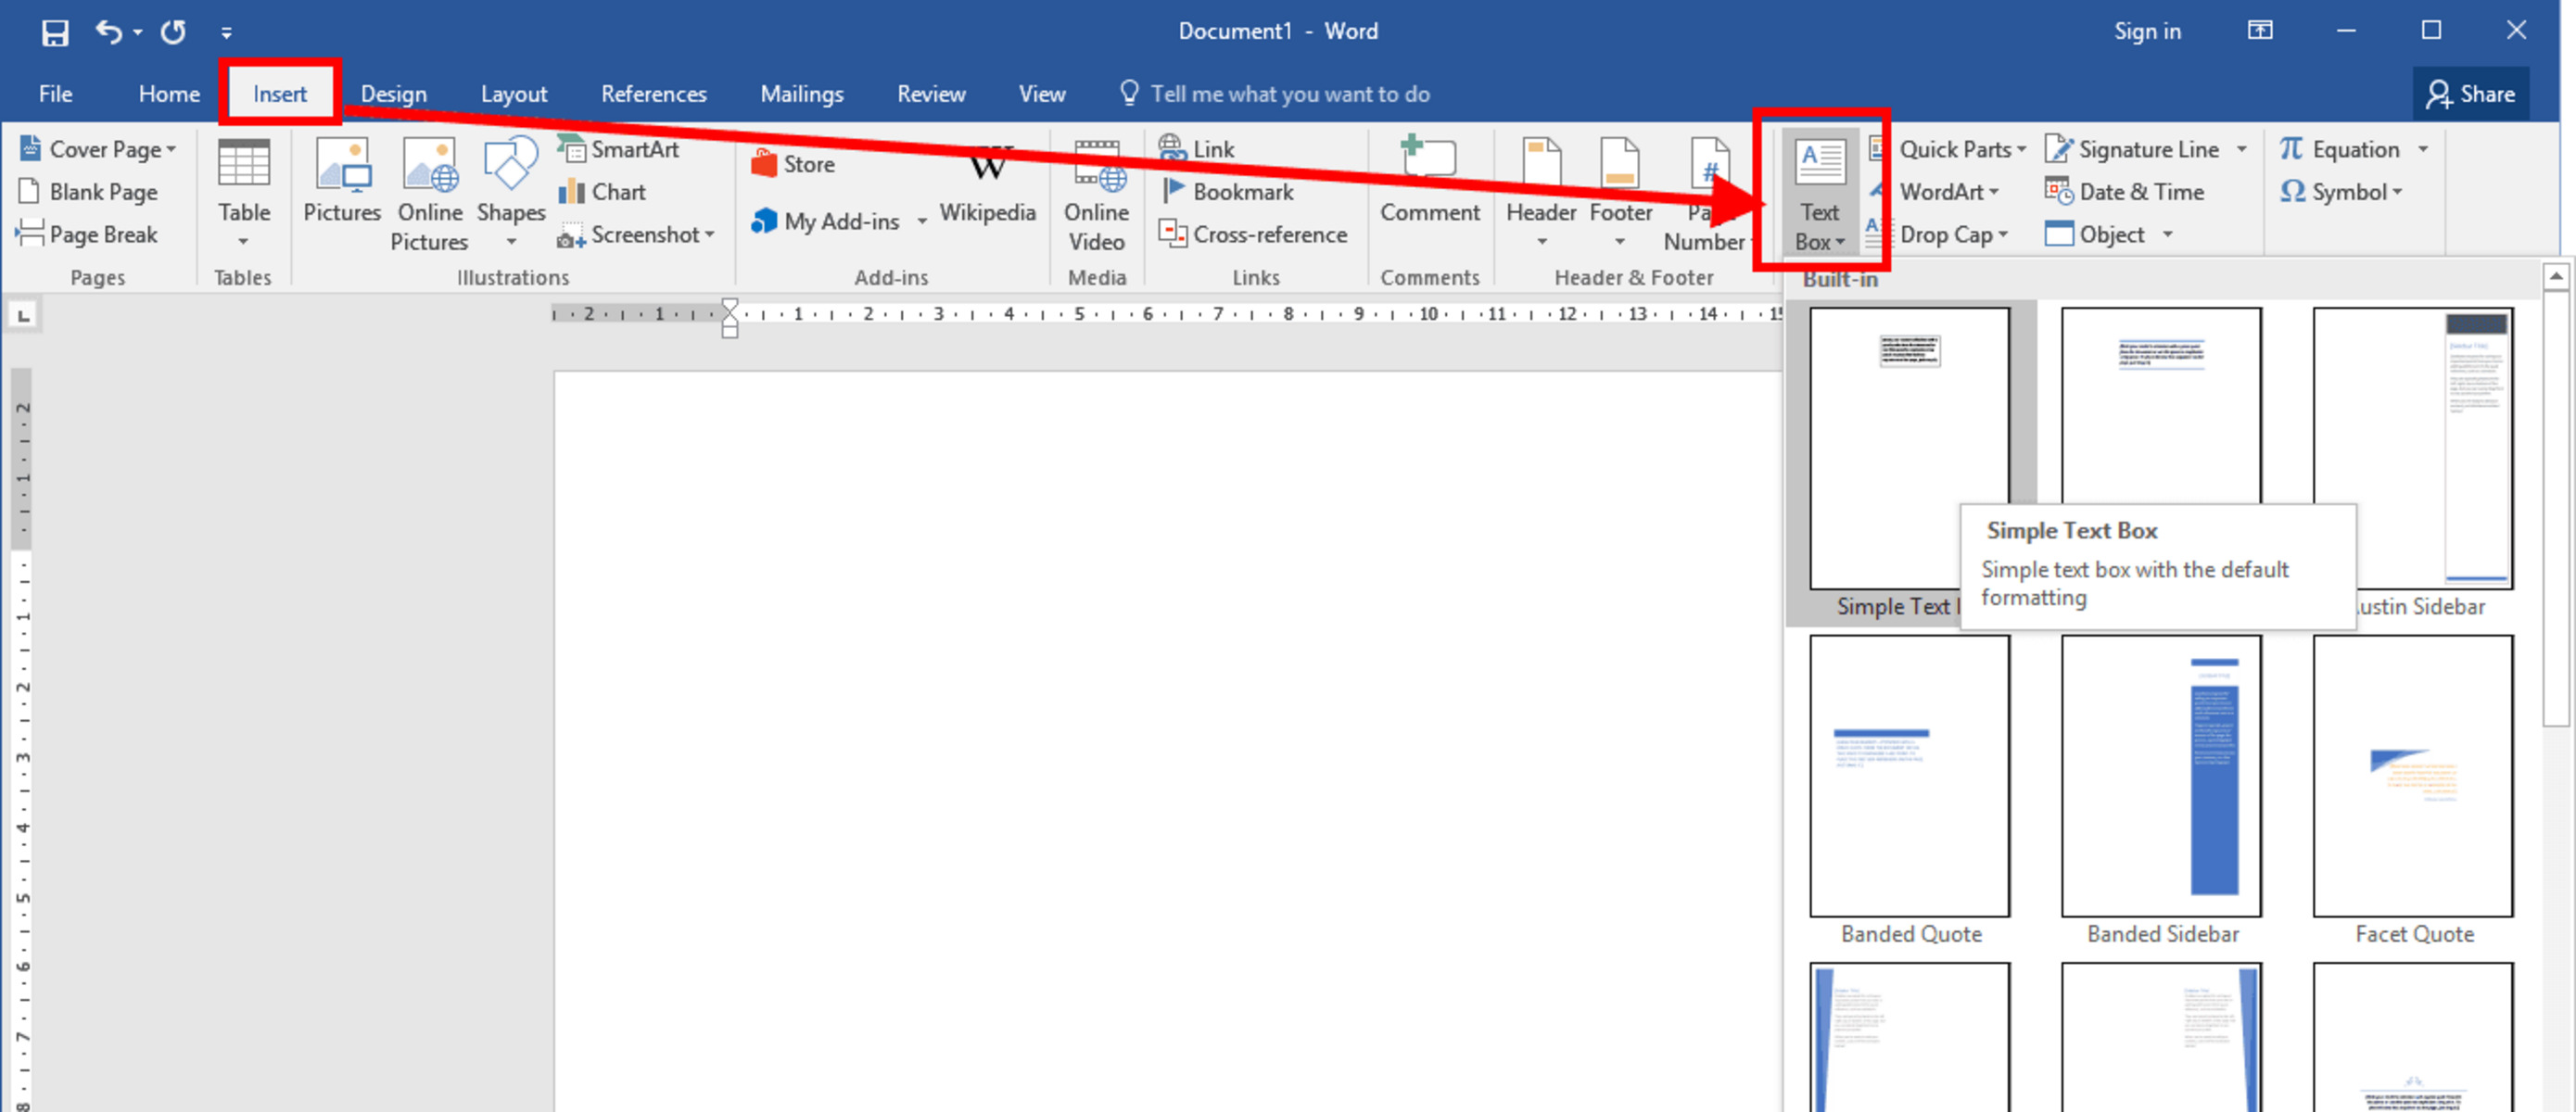
Inserting a text box into your Microsoft Word document is a straightforward process. Follow the steps below to add a text box:
- Open your Word document and navigate to the page where you want to insert the text box.
- Click on the “Insert” tab located in the top menu bar.
- In the “Text” group, you will find the “Text Box” button. Click on it to reveal a drop-down menu.
- Select the type of text box you want to insert. You can choose from pre-designed text box styles or simply click on “Draw Text Box” to manually create your own shape.
- The cursor will change to a crosshair. Click and drag on the page to define the area where you want the text box to appear. Release the mouse button once you have the desired size and shape.
- A text box will now appear on the page, ready for you to start typing.
Alternatively, you can also use the keyboard shortcut by pressing “Ctrl + Shift + F” to quickly insert a text box.
Once the text box is inserted, you can customize its appearance and position by moving and resizing it. You can also apply different formatting options to make the text box match the style and theme of your document.
Remember to save your document regularly to avoid losing any changes you have made. Practice inserting text boxes and experimenting with their customization features to become familiar with this useful tool.
How to resize and move a text box
Resizing and moving a text box in Microsoft Word allows you to adjust its size and position according to your document layout. Follow the steps below to resize and move a text box:
- Click on the edge of the text box to select it. The edges of the text box will be highlighted, indicating that it is selected.
- You will notice small handles or dots located at the corners and sides of the text box. Hover your cursor over these handles until it turns into a double-headed arrow.
- Click and drag any of the handles to resize the text box. Dragging a corner handle will resize the text box proportionally, while dragging a side handle will only change one dimension of the text box.
- To move the text box to a different location on the page, simply click on any part of the text box (not the handles) and drag it to the desired position.
- Release the mouse button once you have resized or moved the text box to your satisfaction.
Alternatively, you can also use the arrow keys on your keyboard to nudge the selected text box into the desired position.
When resizing the text box, it’s important to ensure that the content inside remains visible and legible. If the text is too long to fit within the box after resizing, you can adjust the font size or use the auto-fit feature to automatically resize the text to fit the box.
By resizing and moving text boxes, you can create dynamic layouts and position them precisely where you want them on the page. Experiment with different sizes and positions to find the most visually pleasing arrangement for your document.
Applying formatting to a text box
Formatting a text box in Microsoft Word allows you to customize its appearance to match the style and design of your document. Follow the steps below to apply formatting to a text box:
- Click on the edge of the text box to select it. The edges of the text box will be highlighted, indicating that it is selected.
- On the “Format” tab that appears at the top of the screen, you will find various options to format the text box.
- Use the “Shape Styles” drop-down menu to select a predefined style for your text box. This includes options for colors, borders, and effects.
- Explore the “Text Fill” and “Text Outline” options to change the color and appearance of the text inside the text box.
- You can also apply special effects, such as shadows or 3D effects, to give your text box a more visually appealing look.
- Under the “Size” section, you can adjust the dimensions of the text box by entering specific values for width and height.
- Within the “Position” section, you have the option to align the text box to the left, right, center, or justify the text inside it.
- Experiment with different formatting options until you achieve the desired look and feel for your text box.
Additionally, you can also apply formatting to the text within the text box itself. Select the text within the text box and use the formatting options available on the “Home” tab, such as bold, italic, underline, font size, font color, and more.
Remember that the formatting you apply to a text box can be adjusted at any time, so feel free to make changes and experiment with different styles until you find the perfect fit for your document.
Adding content to a text box
Adding content to a text box in Microsoft Word allows you to include text, images, or a combination of both within the defined area of the box. Follow the steps below to add content to a text box:
- Click on the edge of the text box to select it. The edges of the text box will be highlighted, indicating that it is selected.
- Double-click inside the text box or simply start typing to add text. You can also copy and paste text from another source directly into the text box.
- If you want to add images or other graphic elements, go to the “Insert” tab and select the appropriate option. You can insert images, shapes, or even create charts within the text box.
- Resize or reposition the content within the text box as needed. You can click and drag the content to move it, or use the handles to resize the images or shapes.
- To format the content within the text box, select the text or image and use the formatting options available on the “Home” tab. This includes options for font style, size, color, alignment, and more.
- Continue adding and formatting content until the text box contains the desired information.
Remember to keep the amount of content within the text box manageable and readable. If the text box becomes too crowded or the images too large, consider resizing or repositioning them to maintain a balanced and visually appealing layout.
You can also link multiple text boxes together for a continuous flow of content throughout your document. This is especially useful when working with lengthy documents or creating newsletters and brochures.
By adding content to text boxes, you can create visually engaging and organized documents that present information in a clear and concise manner.
Editing and manipulating text within a text box
Editing and manipulating text within a text box in Microsoft Word allows you to make changes, apply formatting, and rearrange the content. Follow the steps below to edit and manipulate text within a text box:
- Click on the edge of the text box to select it. The edges of the text box will be highlighted, indicating that it is selected.
- Double-click inside the text box to activate the text editing mode. Alternatively, click once to select the text box, and then click inside the text box to start editing.
- Use the keyboard to navigate through the text and make changes. You can insert, delete, or replace text as needed.
- To format the text, select the desired portion or the entire text and use the formatting options available on the “Home” tab. This includes options for bold, italic, underline, font size, alignment, and more.
- If you want to move a piece of text within the text box, simply highlight it and drag it to the desired location.
- Copy and paste text from within the text box or from external sources into the text box by using the standard copy (Ctrl + C) and paste (Ctrl + V) commands.
- If you need to undo or redo any changes, use the “Undo” (Ctrl + Z) and “Redo” (Ctrl + Y) commands respectively.
Remember to proofread and review your text after making changes to ensure accuracy and coherence. It’s a good practice to preview the appearance of your text box in the final document to ensure that the content is legible and visually pleasing.
By editing and manipulating text within a text box, you have full control over the content and can make adjustments to ensure your message is effectively conveyed in your document.
Changing text box styles and colors
Changing the styles and colors of a text box in Microsoft Word allows you to customize its appearance and make it visually appealing. Follow the steps below to change the styles and colors of a text box:
- Click on the edge of the text box to select it. The edges of the text box will be highlighted, indicating that it is selected.
- On the “Format” tab that appears at the top of the screen, you will find various options to modify the text box style.
- Click on the “Shape Styles” drop-down menu to browse through different predefined styles for your text box. This includes options for colors, borders, and effects.
- Hover over each style to see a live preview of how it would look on your text box. Click on the style you like to apply it.
- To further customize the text box, you can manually change the fill color, line color, and line weight using the “Shape Fill” and “Shape Outline” options available on the “Format” tab.
- Experiment with different styles and colors until you achieve the desired look and feel for your text box.
Changing the styles and colors of your text box can help you create a consistent and visually appealing document. It can also help you emphasize important information and make your content more engaging.
Remember that you can always adjust the styles and colors of your text box at any time, so feel free to explore different options and find the best fit for your document.
Wrapping text around a text box
Wrapping text around a text box in Microsoft Word allows you to create visually appealing layouts by integrating the text box seamlessly into the flow of your document. Follow the steps below to wrap text around a text box:
- Click on the edge of the text box to select it. The edges of the text box will be highlighted, indicating that it is selected.
- On the “Format” tab that appears at the top of the screen, click on the “Wrap Text” button.
- In the drop-down menu, select the wrapping option that best suits your desired layout. Common options include “Square”, “Tight”, “Through”, and “Top and Bottom”. Each option affects how the text flows around the text box.
- Once you choose a wrapping option, the text will automatically adjust and wrap around the text box accordingly.
You can fine-tune the position of the text box by clicking and dragging it to different locations on the page. The text will dynamically adjust to wrap around the text box in real-time.
It’s important to note that the wrapping feature works best when there is sufficient space in the surrounding area for the text to flow. If there isn’t enough space, the text may overlap or become cramped. In such cases, you may need to rearrange the elements on the page or resize the text box to accommodate the desired text wrapping effect.
By wrapping text around a text box, you can create visually appealing documents with improved readability and a more professional appearance.
Grouping and ungrouping text boxes
Grouping and ungrouping text boxes in Microsoft Word provides a convenient way to manage multiple text boxes as a single unit. This feature is particularly useful when you want to move, resize, or format multiple text boxes simultaneously. Follow the steps below to group and ungroup text boxes:
- Select one text box by clicking on its edge. The edges of the text box will be highlighted, indicating that it is selected.
- Hold down the Shift key on your keyboard and select the other text boxes you want to group. Each selected text box will have its edges highlighted.
- On the “Format” tab that appears at the top of the screen, click on the “Group” button in the “Arrange” group.
- The selected text boxes will now be grouped together. You can move, resize, or format the entire group as a single object.
To ungroup the text boxes, follow these steps:
- Select the grouped text boxes by clicking on any part of the group. The entire group will be selected, and the edges of each text box will be highlighted.
- On the “Format” tab, click on the “Group” button, which will now change to “Ungroup”.
- Click on the “Ungroup” button to break apart the grouped text boxes.
By grouping text boxes, you can work with them as a single entity, making it easier to position them, apply formatting consistently, or manage them as a group during document editing. This feature is particularly advantageous when designing complex layouts or consistent branding for your documents.
Remember that once text boxes are grouped, any changes made to one text box in the group will affect all the text boxes within the group. Ungrouping them allows you to modify individual text boxes independently.
Utilizing the grouping and ungrouping functionality simplifies the management and customization of multiple text boxes, enhancing your ability to create visually appealing and well-organized documents.
Linking text boxes for continuous flow of content
Linking text boxes in Microsoft Word enables you to create a seamless and continuous flow of text across multiple boxes. This is particularly beneficial when working with lengthy documents, such as newsletters, brochures, or multi-page reports. Follow the steps below to link text boxes:
- Select the first text box by clicking on its edge. The edges of the text box will be highlighted, indicating that it is selected.
- On the “Format” tab that appears at the top of the screen, click on the “Create Link” button in the “Text” group.
- The cursor will change to a pitcher and a small linking arrow will appear. Click on the next text box where you want the flow of text to continue.
- The second text box will now be linked to the first text box, and you will notice an arrow indicating the direction of the flow.
- Continue this process to link additional text boxes, creating a chain of linked text boxes.
When the text within a text box exceeds its boundaries, it will automatically flow into the next linked text box, ensuring a continuous and uninterrupted reading experience for your audience.
To unlink text boxes, follow these steps:
- Select the text box to be unlinked by clicking on its edge.
- On the “Format” tab, click on the “Break Link” button in the “Text” group.
Breaking the link between text boxes allows you to further modify and edit the content within each individual box without affecting the flow of text in other linked boxes.
Linking text boxes provides flexibility when working with large amounts of text that extends beyond the capacity of a single box. It allows you to present information in a cohesive and organized manner, ensuring the readability and comprehension of your document.
Remember to test the flow of text and make adjustments as needed to ensure a smooth and logical progression from one text box to another.
Using text boxes in document layouts and templates
Text boxes play a crucial role in document layouts and templates in Microsoft Word, offering versatility and enhancing the overall design. Whether you’re creating a professional report, a flyer, or a resume, text boxes can help you organize and present information effectively. Here are some ways you can utilize text boxes in document layouts and templates:
- Section headings and titles: Use text boxes to create visually appealing and prominent section headings or titles within your document. You can apply different formatting styles, such as bold or larger font sizes, to make them stand out.
- Callouts and side notes: Incorporate text boxes to highlight important information or provide additional explanations in the margins or beside relevant content. This can be useful for providing context or drawing attention to key points.
- Captions and labels: Add text boxes to provide captions or labels for images, charts, or tables used in your document. This adds clarity and ensures that the reader understands the purpose or significance of the visual element.
- Text-based graphics: Create visually appealing graphics, such as quotes, statistics, or testimonials, by using text boxes. Combine different font styles, colors, and shapes to make these elements visually engaging.
- Form fields: Incorporate text boxes as form fields in templates where users can input their information. This is helpful for creating standardized templates for surveys, feedback forms, or any document that requires user input.
- Newsletter layouts: Design multi-column layouts for newsletters using text boxes. This allows you to easily insert and arrange text and images in a visually pleasing manner while maintaining a consistent structure throughout the document.
By strategically using text boxes, you can create visually appealing layouts, improve readability, and make your documents more engaging and professional. Experiment with different styles, colors, and placements to find the most effective options for your specific document layout or template.
Keep in mind that when designing document layouts and templates, it’s essential to consider factors such as readability, visual hierarchy, and overall visual appeal. Ensure that the text boxes enhance the content and do not overpower or distract from the main message.
Working with multiple text boxes in a document
Working with multiple text boxes in Microsoft Word allows you to create complex and visually appealing layouts. Whether you’re designing a brochure, a poster, or any document with multiple content sections, here are some tips for effectively managing and arranging multiple text boxes:
- Organize and plan: Before inserting multiple text boxes, plan the layout of your document. Consider the overall structure, the order of content sections, and how the text boxes will interact with each other.
- Consistency: Maintain consistency in the size, style, and formatting of your text boxes throughout the document. This creates a cohesive and professional appearance.
- Alignment: Ensure that your text boxes align properly with each other and with other elements in your document. Use alignment guides or the alignment tools in Word to achieve precise alignment.
- Grouping: When working with multiple related text boxes, consider grouping them together. Grouping allows you to easily manage and manipulate the text boxes as a single unit, making it simpler to adjust their position, formatting, or other properties.
- Order layers: If text boxes overlap or if you want to control the stacking order, use the “Bring Forward” and “Send Backward” options to adjust the layering of the text boxes. This ensures that the desired text box is displayed in front or in the background as needed.
- Spacing: Pay attention to the spacing between text boxes to create an aesthetically pleasing layout. Ensure sufficient whitespace for readability and avoid overcrowding the page.
- Content flow: If your document has a sequential flow of information, consider linking the text boxes to maintain a continuous flow of text. This is particularly useful for documents with multiple pages or sections.
- Reusability: Save time by saving a group of text boxes as a template or by copying and pasting them to other sections of your document. This is helpful for maintaining consistent design elements or repeating content sections.
Working with multiple text boxes requires careful consideration of layout, alignment, and the overall visual impact of your document. Take the time to test and preview your layout to ensure that it meets your design goals and provides a pleasant reading experience for your audience.
Remember, practice and experimentation will help you refine your skills in working with multiple text boxes and enable you to create stunning and well-organized document layouts.
Tips and tricks for using text boxes in Word
When working with text boxes in Microsoft Word, there are several tips and tricks that can help you enhance your document’s visual appeal and improve your workflow. Consider the following tips to make the most out of text boxes:
- Shortcut keys: Learn the keyboard shortcuts for commonly used text box actions. For example, press “Alt + Shift + D” to duplicate a selected text box or use “Ctrl + Shift + + (plus)” to increase the font size within a text box.
- Alignment guides: Utilize Word’s alignment guides to achieve precise alignment between text boxes or with other elements in your document. Drag a text box close to an existing element, and alignment guides will appear to help you position it accurately.
- Text box styles: Customize and save your own text box styles to maintain consistency in formatting across your document. Once you’ve formatted a text box to your liking, right-click on it and select “Set as Default Text Box” to save the style for future use.
- AutoFit text: Automatically adjust the text size to fit within a text box by enabling the AutoFit feature. Right-click on the text box, select “AutoFit,” and choose whether you want the text to shrink, grow, or do nothing when the box size is changed.
- SmartArt integration: Combine text boxes with SmartArt graphics to create visually appealing diagrams or flowcharts. Insert a SmartArt graphic, and then add text boxes within the graphic to provide descriptions or supporting information.
- Reposition anchor point: If you want the text in a text box to reflow as you adjust its size, reposition the anchor point within the text box. Click on the box-shaped icon at the top left corner of the text box and drag it to a different location.
- Wise use of white space: Take advantage of white space around text boxes to create a clean and well-organized document. Be mindful of the spacing between text boxes and other elements to achieve a visually balanced layout.
- Text box borders: Apply borders to your text boxes to make them stand out or blend in with the document design. Right-click on the text box, select “Format Shape,” go to the “Line Style” option, and choose the desired border style, color, and thickness.
- Linked styles: To ensure consistency across multiple text boxes, consider creating linked styles. Select a formatted text box, click on the “Linked Style” button in the “Format” tab, and choose “Create a New Linked Style.” This allows you to apply the same formatting to subsequent text boxes with a single click.
By utilizing these tips and tricks, you can work more efficiently and create visually appealing documents that effectively communicate your message. Practice incorporating these techniques into your document creation process to master the art of using text boxes in Word.