
Adding Rows and Columns in Excel
Adding rows and columns in Excel is a necessary skill for managing and organizing data in spreadsheets. Whether you need to accommodate additional information or restructure your data, Excel provides multiple methods to insert rows and columns effortlessly.
To add rows in Excel, follow these steps:
- Select the row below where you want to insert the new row. If you want to insert a row at the top of the sheet, you can select the first row.
- Right-click on the selected row and choose “Insert” from the context menu. Alternatively, you can use the keyboard shortcut “Ctrl” + “+” (plus sign) to insert a row.
- A new row will be inserted above the selected row, shifting the existing rows downwards.
Adding columns in Excel is just as simple:
- Select the column to the right of where you want to insert the new column. If you want to insert a column at the beginning, you can select the first column.
- Right-click on the selected column and choose “Insert” from the context menu. You can also use the keyboard shortcut “Ctrl” + “Shift” + “+” (plus sign) to insert a column.
- A new column will be inserted to the left of the selected column, pushing the existing columns to the right.
It’s worth noting that when you insert a row or a column, Excel maintains the formulas, formatting, and data validation rules from the adjacent rows or columns, ensuring the integrity of your spreadsheet.
Adding rows and columns in Excel can significantly improve the organization and readability of your data. Whether you’re working with a small dataset or a complex spreadsheet, utilizing these features will help you maintain a structured and efficient workflow.
Deleting Rows and Columns in Excel
Deleting unnecessary rows and columns in Excel is crucial for keeping your spreadsheets clean and removing redundant data. Excel offers different methods to delete rows and columns efficiently.
To delete a row in Excel, follow these steps:
- Select the entire row that you want to delete by clicking on the row header.
- Right-click on the selected row and choose “Delete” from the context menu. Alternatively, you can use the keyboard shortcut “Ctrl” + “-” (minus sign) to delete the row.
- The selected row will be deleted, and the rows below will shift up to fill the gap.
Deleting a column in Excel is equally straightforward:
- Select the entire column that you want to delete by clicking on the column header.
- Right-click on the selected column and choose “Delete” from the context menu. You can also use the keyboard shortcut “Ctrl” + “Shift” + “-” (minus sign) to delete the column.
- The selected column will be deleted, and the columns to the right will shift left to fill the space.
When deleting rows or columns in Excel, keep in mind that any data or formatting within the deleted range will be permanently removed from the spreadsheet. Therefore, it is essential to double-check your selections and ensure you are deleting the correct rows or columns.
By efficiently deleting rows and columns in Excel, you can maintain a clutter-free and organized spreadsheet, making it easier to analyze data and present information effectively. Regularly clearing out unnecessary data will improve the overall performance of your Excel workbook as well.
Inserting Multiple Rows or Columns at Once
Excel provides a convenient way to insert multiple rows or columns simultaneously, saving you time and effort when working with large datasets. Whether you need to add several rows for new data or create additional columns for analysis, these steps will guide you through the process.
To insert multiple rows at once in Excel:
- Select the same number of contiguous rows as the number of new rows you want to insert. For example, if you want to add five new rows, select five existing rows.
- Right-click on one of the selected rows, and choose “Insert” from the context menu.
- The selected number of rows will be inserted above the first selected row, shifting the remaining rows downwards accordingly.
Similarly, to insert multiple columns at once in Excel:
- Select the same number of contiguous columns as the number of new columns you want to insert. For instance, if you want to add three new columns, select three existing columns.
- Right-click on one of the selected columns, and choose “Insert” from the context menu.
- The selected number of columns will be inserted to the left of the first selected column, pushing the remaining columns to the right.
This feature is particularly useful when you need to expand your data range or when you want to add extra space for additional information. By inserting multiple rows or columns at once, you can efficiently adjust the layout of your spreadsheet to accommodate new data or make room for additional calculations without the need for repetitive manual insertions.
Keep in mind that when inserting multiple rows or columns, Excel will inherit the formatting, formulas, and data validation rules from the adjacent rows or columns, ensuring the consistency of your spreadsheet.
By leveraging the ability to insert multiple rows or columns at once, you can streamline your workflow and maintain an organized and dynamic Excel spreadsheet.
Deleting Multiple Rows or Columns at Once
When working with large datasets in Excel, you may find the need to remove multiple rows or columns at once to streamline your data or clean up unnecessary information. Excel offers efficient ways to delete multiple rows or columns simultaneously, ensuring a seamless editing experience.
To delete multiple rows at once in Excel:
- Select the same number of contiguous rows as the number of rows you want to delete. For example, if you want to remove four rows, select four consecutive rows.
- Right-click on one of the selected rows, and choose “Delete” from the context menu.
- The selected rows will be deleted, and the remaining rows will shift up to fill the empty space.
To delete multiple columns at once in Excel:
- Select the same number of contiguous columns as the number of columns you want to delete. For instance, if you want to remove three columns, select three consecutive columns.
- Right-click on one of the selected columns, and choose “Delete” from the context menu.
- The selected columns will be deleted, and the remaining columns will shift left to fill the gap.
By being able to delete multiple rows or columns simultaneously, you can efficiently remove unnecessary data or clear out entire sections of your spreadsheet. This not only helps in streamlining your data but also improves the overall performance and readability of your Excel workbook.
It’s important to note that when deleting multiple rows or columns, Excel permanently removes the data within the selected range, so double-check your selection to avoid unintentional deletion of essential information.
Whether you’re tidying up your data, restructuring your spreadsheet, or simplifying your analysis, using the capability to delete multiple rows or columns at once in Excel can significantly enhance your workflow and productivity.
Adding and Deleting Rows or Columns in a Table
Tables in Excel provide a structured way to organize and analyze data. Adding and deleting rows or columns within a table is crucial for maintaining a well-structured and dynamic dataset. Excel offers specific features and shortcuts for efficiently managing rows and columns in a table.
To add a row to a table in Excel:
- Click inside the last cell of the last row in the table.
- Press the “Tab” key to move to the next cell in the same column.
- A new row will automatically be added to the table, and the cursor will move to the first cell of the new row.
To delete a row from a table in Excel:
- Select any cell within the row you wish to delete.
- Right-click on the selected row and choose “Delete” from the context menu.
- The selected row will be removed from the table, and the remaining rows will adjust accordingly to maintain the structure of the table.
Adding a column to a table in Excel follows a similar process:
- Click inside the last cell of the last column in the table.
- Press the “Tab” key to move to the next cell in the same row.
- A new column will automatically be added to the table, and the cursor will move to the first cell of the new column.
To delete a column from a table in Excel:
- Select any cell within the column you wish to delete.
- Right-click on the selected column and choose “Delete” from the context menu.
- The selected column will be deleted, and the remaining columns will adjust accordingly within the table.
When you add or delete rows or columns within a table, Excel will automatically adjust the table structure, including formulas, formatting, and data validation rules, to ensure the integrity and consistency of the data.
By utilizing the specific features designed for managing rows and columns within a table, you can maintain a well-structured and dynamic dataset in Excel, empowering you to effectively organize and analyze your data.
Adding or Deleting Rows or Columns with Keyboard Shortcuts
Excel provides a range of keyboard shortcuts that allow you to add or delete rows and columns quickly without relying on the mouse or context menus. These shortcuts can help improve your efficiency when working with data and navigating through your spreadsheets.
To add rows using keyboard shortcuts:
- Select the row below where you want to insert the new row.
- Press “Ctrl” + “+” (plus sign) on your keyboard.
- A new row will be inserted above the selected row.
To delete rows using keyboard shortcuts:
- Select the row you want to delete.
- Press “Ctrl” + “-” (minus sign) on your keyboard.
- The selected row will be deleted, and the rows below will shift up to fill the space.
To add columns using keyboard shortcuts:
- Select the column to the right of where you want to insert the new column.
- Press “Ctrl” + “Shift” + “+” (plus sign) on your keyboard.
- A new column will be inserted to the left of the selected column.
To delete columns using keyboard shortcuts:
- Select the column you want to delete.
- Press “Ctrl” + “Shift” + “-” (minus sign) on your keyboard.
- The selected column will be deleted, and the columns to the right will shift left to fill the gap.
Using keyboard shortcuts for adding or deleting rows and columns can save you time and make your spreadsheet editing process more efficient. Once you become familiar with these shortcuts, you can seamlessly perform these actions as needed without interrupting your workflow.
Note that these keyboard shortcuts work both inside and outside of tables in Excel, allowing you to quickly modify your data regardless of the structure or formatting of your spreadsheet.
By incorporating keyboard shortcuts into your Excel usage, you can streamline your data manipulation tasks and navigate through your spreadsheets with ease.
Adding or Deleting Rows or Columns with Right-click Menu
The right-click menu in Excel provides a convenient way to add or delete rows and columns without the need for memorizing keyboard shortcuts or navigating through different menu options. By utilizing this menu, you can quickly modify your spreadsheet structure and adapt it to your changing data requirements.
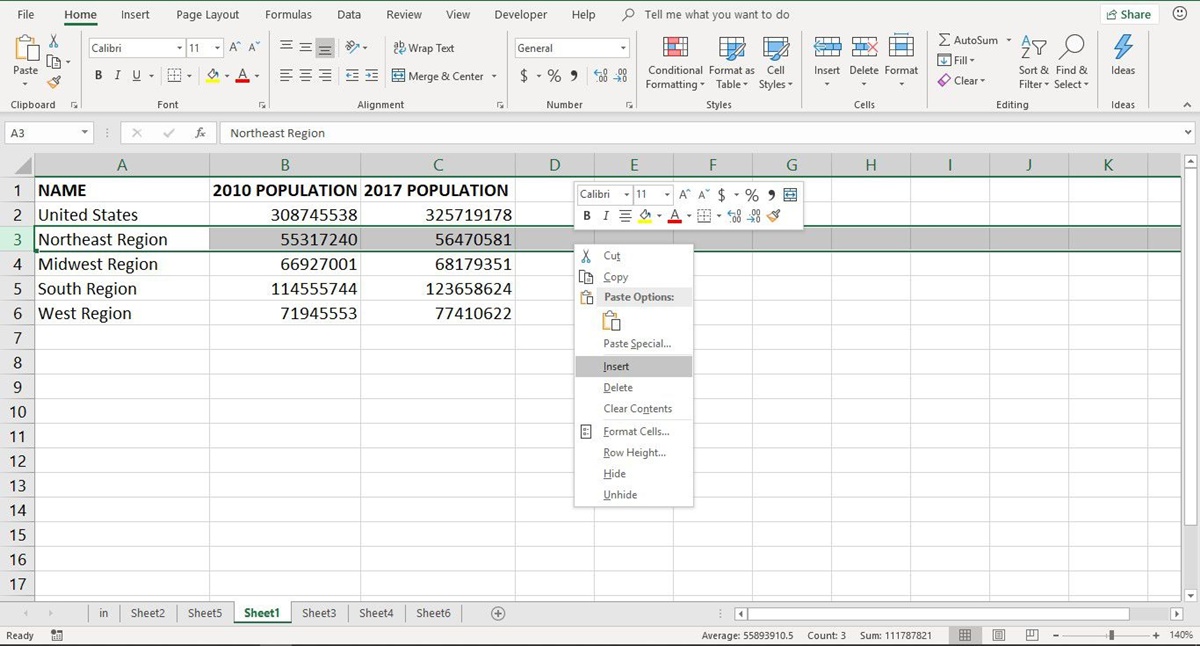
To add rows using the right-click menu:
- Select the row below where you want to insert the new row.
- Right-click on the selected row, and a context menu will appear.
- Click on the “Insert” option from the menu.
- A new row will be inserted above the selected row.
To delete rows using the right-click menu:
- Select the row you want to delete.
- Right-click on the selected row to open the context menu.
- Choose the “Delete” option from the menu.
- The selected row will be deleted, and the rows below will shift up to fill the space.
To add columns using the right-click menu:
- Select the column to the right of where you want to insert the new column.
- Right-click on the selected column, and the context menu will appear.
- Click on the “Insert” option from the menu.
- A new column will be inserted to the left of the selected column.
To delete columns using the right-click menu:
- Select the column you want to delete.
- Right-click on the selected column to open the context menu.
- Select the “Delete” option from the menu.
- The selected column will be deleted, and the columns to the right will shift left to fill the gap.
Using the right-click menu for adding or deleting rows and columns provides a visual and straightforward approach to modifying your spreadsheet structure. This method is especially useful when you prefer a mouse-driven interface or want to access the necessary options with just a few clicks.
By incorporating the right-click menu into your Excel workflow, you can efficiently manage your data and adjust the layout of your spreadsheet to accommodate changes or improve the organization of your information.
Adding or Deleting Rows or Columns with Ribbon Commands
The ribbon in Excel offers a range of commands that allow you to add or delete rows and columns with just a few clicks. This menu-driven approach provides an intuitive way to modify your spreadsheet structure and optimize your data organization.
To add rows using ribbon commands:
- Select the row below where you want to insert the new row.
- Navigate to the “Home” tab on the ribbon.
- In the “Cells” group, click on the “Insert” button.
- A drop-down menu will appear. Choose the “Insert Sheet Rows” option.
- A new row will be inserted above the selected row.
To delete rows using ribbon commands:
- Select the row you want to delete.
- Navigate to the “Home” tab on the ribbon.
- In the “Cells” group, click on the “Delete” button.
- A drop-down menu will appear. Choose the “Delete Sheet Rows” option.
- The selected row will be deleted, and the rows below will shift up to fill the space.
To add columns using ribbon commands:
- Select the column to the right of where you want to insert the new column.
- Navigate to the “Home” tab on the ribbon.
- In the “Cells” group, click on the “Insert” button.
- A drop-down menu will appear. Choose the “Insert Sheet Columns” option.
- A new column will be inserted to the left of the selected column.
To delete columns using ribbon commands:
- Select the column you want to delete.
- Navigate to the “Home” tab on the ribbon.
- In the “Cells” group, click on the “Delete” button.
- A drop-down menu will appear. Choose the “Delete Sheet Columns” option.
- The selected column will be deleted, and the columns to the right will shift left to fill the gap.
With the ribbon commands, you have a visual representation of the options available to add or delete rows and columns. This method allows for easy access to these commands, giving you a convenient way to modify your spreadsheet structure and accommodate changes in your data.
By utilizing the ribbon commands, you can efficiently organize and manage your data in Excel, enhancing the overall structure and clarity of your spreadsheets.
Adding or Deleting Rows or Columns with Formulas
In Excel, you can add or delete rows and columns using formulas, providing a dynamic and automated way to modify your spreadsheet structure based on specific criteria or conditions. This method is particularly useful when you want to incorporate logical or conditional rules to control the addition or deletion of rows or columns.
To add rows with formulas:
- Create a formula that determines the condition for adding a new row.
- In a new row, use the formula to check if the condition for adding a row is met.
- If the condition is true, the formula will return a value that triggers the addition of a new row.
- The new row will be inserted automatically, and the formula will recalculate accordingly.
To delete rows with formulas:
- Create a formula that evaluates the condition for deleting a row.
- In each row, use the formula to check if the condition for deletion is satisfied.
- If the condition is true, the formula will return a value that triggers the deletion of the respective row.
- The selected rows will be deleted automatically, and the formula will adjust accordingly.
The same approach can be applied to columns as well. By using formulas to determine the conditions for adding or deleting columns, you can dynamically adjust your spreadsheet structure based on the specified logic.
Adding or deleting rows or columns with formulas allows you to create more intelligent and automated spreadsheets. You can incorporate complex rules and conditions to control the modification of your data layout, ensuring that your spreadsheets respond dynamically to changes in your data.
By leveraging formulas for adding or deleting rows and columns, you can streamline your data management process and maintain a flexible and adaptable spreadsheet structure.
Adding or Deleting Rows or Columns with VBA Macros
Excel’s VBA (Visual Basic for Applications) allows you to create powerful macros to automate various tasks, including adding or deleting rows and columns. By utilizing VBA macros, you can customize your spreadsheet manipulation, add complex logic, and perform advanced data management functions.
To add rows with VBA macros:
- Open the VBA Editor by pressing “Alt” + “F11” in Excel.
- Write a macro that includes the logic for adding rows based on specific criteria or conditions.
- Execute the macro, which will trigger the addition of new rows according to the defined rules.
- The new rows will be inserted automatically, preserving the structure and calculations within your spreadsheet.
To delete rows with VBA macros:
- Within the VBA Editor, create a macro that determines the condition for deleting rows.
- Upon executing the macro, the defined logic will be applied, identifying and deleting the rows that meet the specified criteria.
- The selected rows will be removed from the worksheet, and the remaining rows will adjust accordingly.
VBA macros can be similarly used to add or delete columns based on custom conditions or rules.
Adding or deleting rows or columns with VBA macros provides a high level of customization and control over your spreadsheet manipulation. You can create dynamic and intelligent solutions tailored to your specific needs, automating repetitive tasks and streamlining your data management process.
Using VBA macros requires some programming knowledge, but once mastered, this approach opens up a world of possibilities for advanced data manipulation and customization in Excel.
By harnessing the power of VBA macros, you can create dynamic and efficient Excel workbooks that serve your unique requirements and simplify your data analysis and management tasks.