
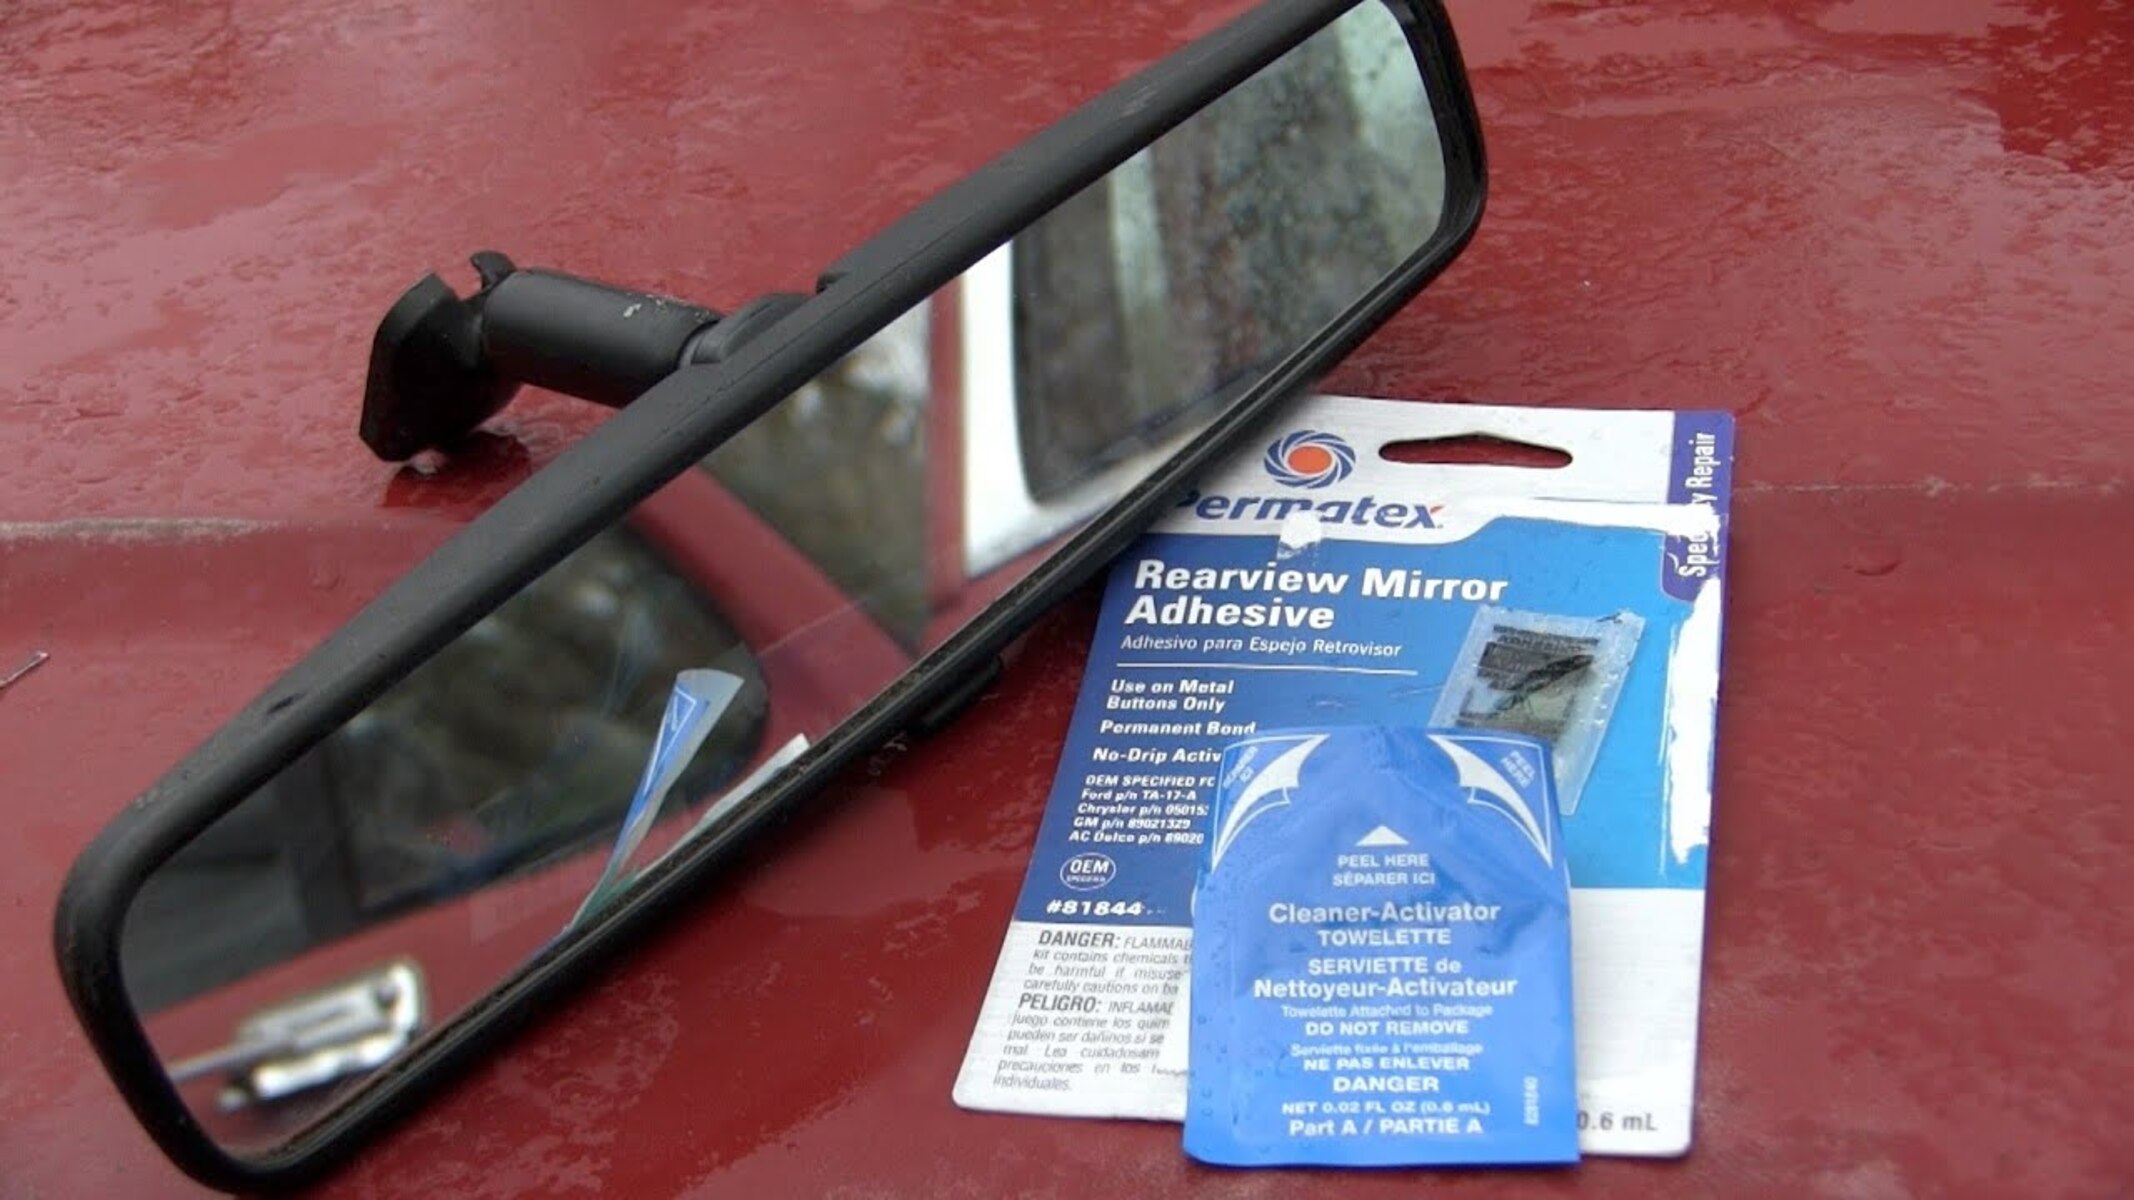
Importance of Choosing the Right Glue
When it comes to attaching a rear view mirror to your vehicle, choosing the right glue is of utmost importance. The adhesive you select will determine the durability and stability of the mirror, ensuring it remains securely in place even under harsh driving conditions.
Using the wrong type of glue can lead to a weak bond, causing the mirror to fall off while you are driving. This can not only be a nuisance but also a safety hazard. A loose mirror can obstruct your view, increasing the risk of accidents and compromising your ability to navigate the road effectively.
Moreover, a poorly attached mirror can vibrate or fall off completely, resulting in damage to the mirror itself or the windshield. This can lead to expensive repairs or replacement costs.
By using the correct glue specifically designed for rear view mirror installation, you can ensure a secure and long-lasting bond. The right adhesive will provide sufficient strength to withstand vibrations, temperature changes, and other challenges that may arise during your journeys.
Choosing the appropriate glue is crucial, whether you are replacing a broken mirror or installing a new one. So, let’s explore the different types of glue that are suitable for attaching rear view mirrors and which one may be the best fit for your needs.
Types of Glue Suitable for Rear View Mirrors
When it comes to choosing the right glue for attaching a rear view mirror, there are several options available. Each type of adhesive has its own unique properties and advantages. Here are three common types of glue that are suitable for rear view mirror installation:
- Epoxy Adhesive: Epoxy adhesive is known for its exceptional bonding strength and durability. It consists of two components, a resin and a hardener, which need to be mixed together before application. Once mixed, the epoxy creates a strong bond that can withstand vibrations and temperature variations. It also provides excellent resistance to moisture, making it suitable for outdoor applications. However, epoxy adhesive sets relatively slowly, so it requires some patience during the installation process.
- Silicone Adhesive: Silicone adhesive is a versatile option that is commonly used for attaching rear view mirrors. It is easy to apply and has a relatively quick curing time. Silicone adhesives offer good flexibility, allowing for some movement without compromising the bond. They also provide good resistance to moisture and temperature fluctuations. However, silicone may not have the same level of strength as epoxy adhesive, making it more suitable for smaller and lighter rear view mirrors.
- UV Cure Adhesive: UV cure adhesive is a fast and efficient option for rear view mirror installation. This type of adhesive cures quickly when exposed to ultraviolet light, allowing for rapid bonding. UV cure adhesive provides excellent strength and is resistant to vibration and temperature changes. It is also convenient to use as it does not require any mixing or special curing conditions. However, UV cure adhesives may not have the same level of flexibility as silicone adhesive, so they may be less suitable for mirrors that are subject to constant movement or vibrations.
When selecting the appropriate adhesive for your rear view mirror, consider factors such as the size and weight of the mirror, the materials it will be attached to, and your specific installation requirements. It is essential to carefully follow the instructions provided by the manufacturer to ensure proper application and maximum bond strength.
Epoxy Adhesive: The Reliable Choice
When it comes to choosing the right adhesive for attaching a rear view mirror, epoxy adhesive is often considered the go-to option. Its exceptional bonding strength and durability make it a reliable choice for ensuring a secure attachment.
Epoxy adhesive consists of two components: a resin and a hardener. These two components need to be mixed together in the correct proportions before application. Once mixed, the epoxy begins to chemically react, forming a strong and permanent bond.
One of the key advantages of epoxy adhesive is its outstanding strength. It can create a firm grip between the rear view mirror and the windshield or mounting bracket, ensuring that the mirror remains securely in place even under challenging conditions such as vibrations or temperature fluctuations.
In addition to its strength, epoxy adhesive offers excellent resistance to moisture. This makes it ideal for outdoor applications, where the mirror may be exposed to rain, humidity, or other wet conditions. The moisture resistance helps prevent the adhesive from deteriorating over time, ensuring the longevity of the bond.
While epoxy adhesive provides a reliable and strong bond, it is important to note that it sets relatively slowly compared to other adhesives. This means that you need to be patient during the installation process. It is recommended to follow the instructions provided by the manufacturer to ensure proper mixing ratios and curing times.
To apply epoxy adhesive, clean and dry the surfaces that will be bonded together. Then, mix the resin and hardener according to the instructions and apply the adhesive to both the mirror and the mounting surface. Press the mirror firmly in place and allow the epoxy to cure for the recommended duration.
It is essential to note that once epoxy adhesive is cured, it forms a strong and permanent bond. Therefore, before applying the adhesive, ensure that the mirror is properly aligned and in the desired position.
Overall, epoxy adhesive is a reliable choice for attaching rear view mirrors. Its exceptional strength, durability, and moisture resistance make it an excellent option for ensuring a secure attachment that stands the test of time.
Silicone Adhesive: A Versatile Option
When it comes to choosing an adhesive for attaching a rear view mirror, silicone adhesive is a popular and versatile option. Known for its flexibility and ease of use, silicone adhesive can provide a reliable bond for your mirror installation needs.
One of the advantages of silicone adhesive is its ease of application. It is typically available in a ready-to-use form, eliminating the need for mixing or measuring different components. This makes it convenient and time-saving, especially for quick installations.
Another benefit of silicone adhesive is its relatively quick curing time. Once applied, the adhesive will start to cure and form a bond within a short period. This allows for faster installation and reduces the waiting time before the mirror can be safely used.
Flexibility is another key characteristic of silicone adhesive. It allows for some movement and flexibility without compromising the bond’s strength. This is important for rear view mirrors that may experience vibrations or minor impacts while driving. The flexibility of silicone adhesive can help absorb these movements, ensuring that the bond remains intact.
Silicone adhesive also offers good resistance to moisture and temperature variations. This is particularly beneficial for outdoor applications where the rear view mirror may be exposed to rain, sunlight, or other weather conditions. The moisture resistance helps prevent the adhesive from deteriorating over time and ensures the longevity of the bond.
It is important to note that while silicone adhesive offers many advantages, it may not have the same level of bonding strength as epoxy adhesive. This means that silicone adhesive is more suitable for smaller or lighter rear view mirrors. For larger and heavier mirrors, epoxy adhesive may be a more reliable choice to ensure a secure attachment.
To apply silicone adhesive, clean and dry the surfaces that will be bonded together. Apply the adhesive evenly to both the mirror and the mounting surface, ensuring full coverage. Press the mirror firmly in place and allow the silicone to cure according to the manufacturer’s instructions.
Overall, silicone adhesive is a versatile option for attaching rear view mirrors. Its ease of use, quick curing time, flexibility, and resistance to moisture make it a popular choice among DIY enthusiasts and professionals alike.
UV Cure Adhesive: Quick and Effective
When it comes to attaching a rear view mirror, UV cure adhesive offers a quick and effective solution. This type of adhesive is designed to cure rapidly when exposed to ultraviolet light, providing a fast and reliable bond for your mirror installation.
One of the key advantages of UV cure adhesive is its quick curing time. Unlike other adhesives that require hours or even days to fully set, UV cure adhesive cures within seconds or minutes when exposed to UV light. This allows for faster installation and minimizes the waiting time before the mirror can be safely used.
The speed of UV cure adhesive makes it especially useful in production lines or situations where quick installation is required. It allows for efficient mounting of rear view mirrors, reducing production time and increasing productivity.
In addition to its quick curing time, UV cure adhesive provides excellent strength and bonding properties. Once cured, it forms a strong and durable bond that can withstand vibrations, temperature changes, and other demanding conditions.
UV cure adhesive is also known for its resistance to moisture. This makes it suitable for outdoor applications where the rear view mirror may be exposed to rain, humidity, or other wet conditions. The moisture resistance helps maintain the integrity of the bond and prevents deterioration over time.
Another advantage of UV cure adhesive is its ease of application. Unlike other adhesives that require mixing or special curing conditions, UV cure adhesive is ready to use right out of the bottle. Simply apply the adhesive to the mirror and mounting surface, ensure proper alignment, and expose it to UV light to initiate the curing process.
It is important to note that while UV cure adhesive offers many benefits, it may not have the same level of flexibility as other adhesive types, such as silicone adhesive. This means that it may be less suitable for rear view mirrors that are subject to constant movement or vibrations. For such situations, silicone adhesive or epoxy adhesive may be a better choice.
How to Remove an Old Rear View Mirror Glue?
If you need to replace your rear view mirror or remove it for any reason, it is important to properly remove the old adhesive to ensure a clean surface for the new installation. Here are the steps to remove an old rear view mirror glue:
- Gather the necessary tools: You will need a razor blade or a plastic scraper, adhesive remover or rubbing alcohol, a clean cloth, and gloves for protection.
- Protect the windshield: Place a cloth or some masking tape around the surrounding area to protect the windshield from any accidental scratches or damage while removing the old glue.
- Loosen the mirror: Carefully slide a razor blade or plastic scraper under the edge of the mirror where it is attached to the mounting bracket. Gently pry the mirror away from the bracket using a wiggling motion to loosen it. Be cautious not to apply too much force to avoid any damage to the mirror or bracket.
- Remove the adhesive: Once the mirror is detached, use the razor blade or plastic scraper to carefully scrape off the old adhesive from both the mirror and the mounting bracket. Take your time and be cautious not to scratch the surface of the mirror or the bracket.
- Clean the surfaces: Apply a small amount of adhesive remover or rubbing alcohol to a clean cloth. Wipe down the mirror and the mounting bracket to remove any remaining adhesive residue. Make sure to thoroughly clean both surfaces to ensure a strong bond for the new adhesive.
- Dry and prepare for installation: Allow the surfaces to dry completely before proceeding with the new adhesive. Ensure that both the mirror and the mounting bracket are clean and free from any debris or residue.
It is important to follow the manufacturer’s instructions when using adhesive removers or rubbing alcohol, as some products may have specific application methods or safety precautions.
Remember to always wear gloves and exercise caution when handling sharp tools or chemicals. If you are uncertain about the removal process or feel uncomfortable doing it yourself, it is recommended to seek professional assistance.
By properly removing the old rear view mirror glue, you can ensure a clean and smooth surface for the new adhesive, resulting in a secure and long-lasting installation for your replacement or reattachment.
Tips on Applying Glue for Rear View Mirror Installation
Properly applying the glue for rear view mirror installation is essential to ensure a secure and long-lasting bond. Here are some tips to consider when applying the adhesive:
- Clean and prepare the surfaces: Before applying the glue, make sure that both the mirror and the mounting surface are clean and free from any dirt, debris, or residue. Use a mild detergent or glass cleaner to get rid of any contaminants and allow the surfaces to dry completely.
- Follow the manufacturer’s instructions: Each adhesive may have specific instructions regarding mixing, curing time, and application. It is important to carefully read and follow the manufacturer’s guidelines to ensure optimal bonding performance. Failure to do so may result in a weak bond or adhesive failure.
- Apply the adhesive evenly: To promote a strong and uniform bond, apply the adhesive evenly to both the mirror and the mounting surface. Use a spatula or a small brush to spread the adhesive in a thin and consistent layer. Too little adhesive may result in a weak bond, while too much adhesive may cause the excess to squeeze out and create a messy appearance.
- Position the mirror correctly: Take the time to properly align the rear view mirror in the desired position before the adhesive sets. Once the adhesive cures, it will form a strong bond, making any adjustments difficult. Ensure that the mirror is parallel to the windshield and located in the ideal position for optimal visibility while driving.
- Allow proper curing time: Different adhesives have varying curing times. It is crucial to allow the recommended curing time before using or moving the vehicle. Premature disturbance may compromise the bond’s strength and result in a loose or unstable mirror.
- Exercise caution during the curing process: While the adhesive is curing, avoid any excessive vibration, impact, or temperature extremes that may affect the bond. This includes avoiding car washes, extreme heat, or exposure to direct sunlight during the curing period to ensure the adhesive fully sets.
By following these tips, you can ensure a proper application of the adhesive for your rear view mirror installation. This will help create a strong and reliable bond, ensuring your mirror remains securely attached while driving.
Important Considerations for Glue Selection
When selecting a glue for rear view mirror installation, it is crucial to consider several important factors to ensure the suitability and effectiveness of the adhesive. Here are some key considerations to keep in mind when choosing the right glue:
- Bonding strength: The strength of the bond required for your specific rear view mirror is an important factor to consider. Larger and heavier mirrors may require stronger adhesives, such as epoxy, to ensure a secure attachment. Smaller and lighter mirrors may be adequately handled by silicone or UV cure adhesive. Assess the weight and size of the mirror to determine the appropriate bonding strength required.
- Surface compatibility: Consider the materials of both the mirror and the mounting surface. Make sure that the chosen adhesive is compatible with these materials to ensure a proper and effective bond. Different adhesives work better on certain surfaces, so check the manufacturer’s recommendations for compatibility.
- Environmental conditions: Take into account the environmental conditions that the rear view mirror will be exposed to. Factors such as temperature fluctuations, humidity, and UV exposure should be considered when choosing an adhesive. Some adhesives have better resistance to extreme temperatures or moisture, so select one that can withstand the environmental conditions your vehicle will be subjected to.
- Curing time: Evaluate the curing time of the adhesive, particularly if you need a quick installation. Some adhesives, like UV cure adhesive, offer rapid curing, while others may require additional curing time. Consider your installation timeline and choose an adhesive that aligns with your needs.
- Application method: Consider the ease of application of the adhesive. Some adhesives come ready-to-use, while others require mixing or specific application techniques. Choose an adhesive that suits your comfort level and expertise in handling and applying the glue.
- Longevity and durability: Assess the durability and longevity of the adhesive. You want the rear view mirror to remain firmly attached over time, so select an adhesive that provides a durable and long-lasting bond. Pay attention to factors such as resistance to vibrations, moisture, and other potential challenges that may affect the integrity of the bond.
Make sure to thoroughly research the adhesives available on the market, read product descriptions, and consult with professionals if needed, to make an informed decision regarding the glue selection. Additionally, always follow the manufacturer’s instructions for proper application and safety guidelines to achieve the best results.
Precautions to Ensure a Secure Rear View Mirror Glue Attachment
Attaching a rear view mirror with glue requires taking certain precautions to ensure a secure and reliable bond. By following these precautions, you can enhance the effectiveness and longevity of the adhesive attachment. Here are some important precautions to consider:
- Clean the surfaces: Before applying the glue, thoroughly clean the mirror and the mounting surface. Remove any dirt, debris, or residue that could interfere with the adhesive bond. Cleaning the surfaces will promote better adhesion and ensure a stronger attachment.
- Properly align the mirror: Take the time to properly align the rear view mirror before the adhesive sets. Once the adhesive cures, it becomes difficult to make any adjustments. Ensure the mirror is positioned parallel to the windshield and in the optimal spot for clear visibility while driving.
- Use the recommended amount of adhesive: Follow the manufacturer’s instructions regarding the amount of adhesive to use. Applying too little adhesive may result in a weak bond, while using excess adhesive can cause it to squeeze out and create a messy appearance. Strike the right balance by using the recommended amount for a secure attachment.
- Allow adequate curing time: Different adhesives have different curing times, and it is crucial to allow the adhesive enough time to fully cure before using the vehicle or putting stress on the mirror. Premature disturbance can weaken the bond and jeopardize the mirror’s stability. Follow the manufacturer’s recommended curing time for optimal results.
- Avoid excessive movement during curing: While the adhesive is curing, minimize any excessive vibration or movement that can impact the bond. Avoid driving on rough roads, hitting potholes, or subjecting the mirror to unnecessary jolts during the curing process. Excessive movement can compromise the adhesive attachment and stability of the mirror.
- Consider temperature conditions: Temperature can affect the adhesive’s performance, so it is essential to consider temperature conditions during and after the installation. Some adhesives may require specific temperature ranges for optimal bonding. Avoid exposing the newly glued mirror to extreme heat or cold during the curing period to maintain the integrity of the bond.
- Regularly inspect the attachment: Periodically check the rear view mirror attachment to ensure it remains secure. Look for any signs of loosening, movement, or damage. If you notice any issues, take prompt action to reinforce or repair the attachment to maintain a secure bond.
By taking these precautions, you can ensure a secure rear view mirror glue attachment that will withstand vibrations, temperature fluctuations, and other challenges on the road. Remember to adhere to the manufacturer’s instructions for the specific adhesive you are using and consult with professionals if you have any concerns or questions.