
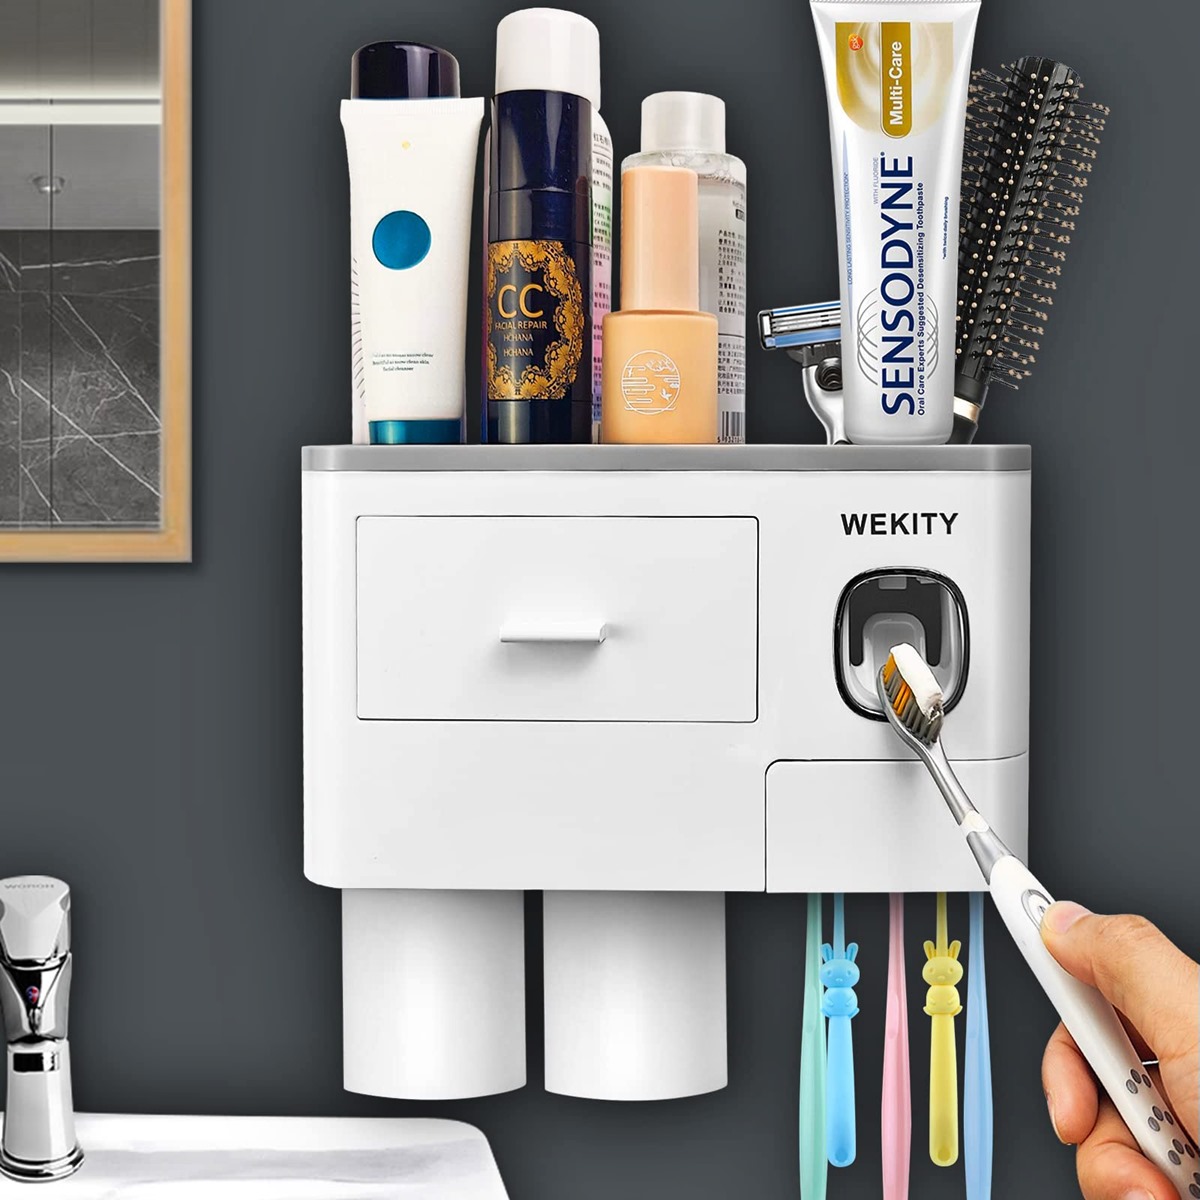
Reasons to Remove the Wekity Toothbrush Holder
There are several reasons why you might consider removing the Wekity toothbrush holder from your bathroom. While it may have served its purpose initially, there are a few factors that could contribute to the need for removal. Understanding these reasons will help you make an informed decision about whether or not to remove the toothbrush holder.
1. Damage or wear: Over time, the Wekity toothbrush holder may start to show wear and tear. The plastic or metal may become cracked or faded, making it look unattractive and compromising its functionality. Additionally, if the toothbrush holder was poorly installed or is made of low-quality materials, it may have started to come loose from the wall or become unstable.
2. Hygiene concerns: While a toothbrush holder is meant to keep your toothbrushes organized and clean, if it is not regularly cleaned, it can become a breeding ground for bacteria. This is especially true if the toothbrush holder has hard-to-reach crevices or if it is difficult to remove for thorough cleaning. If you have noticed that your toothbrushes are not as clean as they should be, it might be time to remove the Wekity toothbrush holder.
3. Changing bathroom decor: As your personal style and bathroom decor preferences evolve, you may decide that the current Wekity toothbrush holder no longer matches your aesthetic or desired theme. Whether you are seeking a more modern, minimalist look or a different color scheme, removing the existing toothbrush holder can be a step towards achieving the new look you desire.
4. Upgrade or replacement: If you are considering upgrading your bathroom fixtures or simply want to replace the Wekity toothbrush holder with a different model or brand, removing the existing holder is necessary. Upgrading to a new toothbrush holder may offer additional features or better durability, improving your overall experience with organizing and storing your toothbrushes.
5. Renovations or repairs: If you are planning to renovate your bathroom or make repairs to the walls, removing the Wekity toothbrush holder is often a necessary step. By removing the holder before starting any renovations, you can ensure that it doesn’t get damaged during the construction process.
Before removing the Wekity toothbrush holder, it’s important to assess your specific situation and consider the factors mentioned above. By doing so, you can determine whether removing the holder is necessary and plan accordingly for any replacements or repairs.
What You’ll Need to Remove the Wekity Toothbrush Holder
Before you begin the process of removing the Wekity toothbrush holder from your bathroom, it’s important to gather all the necessary tools and materials. Having everything prepared beforehand will make the removal process smoother and more efficient. Here’s a list of what you’ll need:
1. Screwdriver: Depending on the type of mounting brackets used, you may need either a Phillips or flat-head screwdriver to remove the screws holding the toothbrush holder in place. Check the screws on the holder and select the appropriate screwdriver.
2. Bucket or basin: You’ll need a bucket or basin to catch any water that may still be in the water supply lines. This will prevent any water from spilling onto the floor while disconnecting the lines.
3. Pliers or adjustable wrench: If the water supply lines are connected to the toothbrush holder with compression fittings, you’ll need a pair of pliers or an adjustable wrench to loosen the nuts and disconnect the lines. Make sure the pliers or wrench are appropriate for the size of the fittings.
4. Caulk remover tool (optional): If the toothbrush holder is caulked to the wall, a caulk remover tool can be useful in removing the caulk without damaging the wall surface. This tool helps you scrape away the caulk more efficiently.
5. Cleaning supplies: Depending on the condition of the wall and surrounding area, you may need cleaning supplies such as a mild detergent, sponge, and clean cloth to clean the surface after removing the toothbrush holder. This will ensure that your bathroom remains clean and free from any residue.
6. New toothbrush holder (optional): If you plan on replacing the Wekity toothbrush holder with a new one, make sure you have the new holder ready to install after removing the old one. This will minimize any downtime in organizing and storing your toothbrushes.
By gathering these tools and materials before starting the removal process, you’ll be well-prepared and equipped to successfully remove the Wekity toothbrush holder from your bathroom. Once you have everything ready, you can proceed with the step-by-step instructions to remove the holder effectively.
Step 1: Prepare the Area
Before you begin removing the Wekity toothbrush holder, it’s essential to prepare the area to ensure a smooth and hassle-free process. Taking a few minutes to adequately prepare will prevent any unnecessary damage to surrounding fixtures or surfaces. Follow these steps to prepare the area:
1. Clear the surrounding space: Remove any items or obstructions near the toothbrush holder. This includes toothbrushes, holders, soap dispensers, or any other bathroom accessories that might hinder your access to the holder.
2. Protect the countertop or sink: To avoid any accidental scratches or damage to the countertop or sink, place a soft cloth or towel over the surface where you’ll be working. This will act as a protective barrier and provide cushioning for any tools that may accidentally come in contact with the surface.
3. Turn off the bathroom light: It’s a good practice to turn off the bathroom light to minimize any distractions and allow you to focus on the task at hand. This will also help prevent any accidental mishaps while removing the toothbrush holder.
4. Have a flashlight handy: Depending on the lighting conditions in your bathroom, it might be helpful to have a flashlight nearby. This will ensure proper visibility during the removal process, especially if there are no windows or if the bathroom lacks sufficient lighting.
5. Put on protective gloves (optional): If you prefer, you can wear disposable gloves to protect your hands from any sharp edges, dirt, or cleaning agents that you may come into contact with during the removal process. This is particularly useful if you have sensitive skin or if you are using abrasive cleaning products.
By taking the time to prepare the area before removing the Wekity toothbrush holder, you’ll create a safer and more organized work environment. This will make the entire process more efficient and help ensure a successful removal without any unintended damage to your bathroom fixtures or surfaces.
Step 2: Turn off the Water Supply
Before you can proceed with removing the Wekity toothbrush holder, it’s crucial to turn off the water supply to prevent any water leakage or accidents during the removal process. Follow these steps to turn off the water supply:
1. Locate the water shut-off valve: Look for the water shut-off valve, typically located under the sink or near the toilet. It may be a small handle or lever that you can turn or a valve that you can twist.
2. Turn off the water: Once you’ve located the shut-off valve, turn it clockwise or in the direction instructed by the manufacturer to shut off the water supply. Turning off the valve will stop the flow of water to the toothbrush holder and prevent any potential leaks or water damage.
3. Check for water flow: After turning off the water, run the bathroom sink or flush the toilet to ensure that the water has been successfully shut off. If there is no water flow or minimal flow, it means that the water supply has been successfully stopped.
4. Test the toothbrush holder: Double-check that the water supply to the toothbrush holder has been effectively shut off by trying to use the toothbrush holder. If there is no water coming out or minimal water flow, it confirms that the water supply has been correctly turned off.
Turning off the water supply is a crucial step to prevent any water leakage or accidents during the removal process. It ensures your safety and minimizes the risk of water damage to your bathroom. By following these steps, you can confidently proceed with the next steps of removing the Wekity toothbrush holder.
Step 3: Remove the Toothbrush Holder from the Wall
With the water supply turned off, you can now proceed to remove the Wekity toothbrush holder from the wall. This step requires careful handling to avoid any damage to the holder or the wall surface. Follow these steps to successfully remove the toothbrush holder:
1. Inspect the mounting brackets: Take a close look at the mounting brackets that secure the toothbrush holder to the wall. Determine if they are held in place with screws or adhesive. This will guide you in the removal process.
2. Remove the screws: If the toothbrush holder is held in place by screws, use the appropriate screwdriver to carefully unscrew them. Turn the screwdriver counterclockwise to loosen and remove the screws one by one. Place the screws in a safe spot to avoid misplacing them.
3. Detach the adhesive: If the toothbrush holder is attached to the wall with adhesive, gently pry it away from the wall using a putty knife or a similar tool. Start at one edge and slowly work your way around, applying gentle pressure to separate the holder from the wall surface. Be cautious not to exert too much force to prevent damaging the wall.
4. Remove any remaining adhesive: Once the toothbrush holder is detached, you may notice some adhesive residue on the wall. Use an adhesive remover or rubbing alcohol and a soft cloth or sponge to gently scrub away the adhesive. Be gentle to avoid damaging the wall surface, especially if it is painted or has a delicate finish.
5. Set aside the removed toothbrush holder: After successfully removing the toothbrush holder from the wall, set it aside in a safe location. Depending on its condition, you may consider cleaning it or determining if it can be reused or needs to be replaced with a new one.
By following these steps, you can confidently remove the Wekity toothbrush holder from the wall without causing any damage. Remember to handle the holder with care and take your time to ensure a smooth removal process. Once the holder is removed, you can proceed to the next steps in the process of replacing or reinstalling a new toothbrush holder if desired.
Step 4: Disconnect the Water Supply Lines
With the Wekity toothbrush holder removed from the wall, the next step is to disconnect the water supply lines. This is necessary to ensure a complete removal and allow for potential replacement or repairs. Follow these steps to safely disconnect the water supply lines:
1. Locate the water supply lines: Identify the water supply lines that are connected to the back of the toothbrush holder. These typically consist of small hoses or pipes that provide water to the holder. They may be connected with compression fittings or other types of connectors.
2. Place a bucket or basin underneath: To catch any residual water that may be in the lines, position a bucket or basin directly below where the water supply lines are connected to the holder. This will prevent any water from spilling onto the floor or countertop.
3. Loosen the compression fittings: If the water supply lines are connected with compression fittings, use pliers or an adjustable wrench to loosen the nuts that secure the fittings. Turn the nuts counterclockwise to gradually loosen them until they can be easily removed by hand. Be cautious not to apply excessive force to avoid damaging the fittings.
4. Disconnect other types of connectors: If the water supply lines are connected with different types of connectors, such as push-fit or threaded fittings, follow the manufacturer’s instructions to safely disconnect them. This may involve pressing a release button or unscrewing the connectors by hand.
5. Check for any remaining water flow: After disconnecting the water supply lines, check for any remaining water flow by turning on the bathroom sink or flushing the toilet. If water continues to flow, it indicates that the water supply lines have not been successfully disconnected. Double-check the connections and ensure they are fully loosened and disconnected.
By following these steps, you can safely disconnect the water supply lines from the Wekity toothbrush holder. This will allow for a complete removal and provide you with the opportunity to replace or repair the lines if necessary. Continue to the next steps to complete the removal process and prepare for potential installation of a new toothbrush holder.
Step 5: Remove the Mounting Brackets
After disconnecting the water supply lines, the next step in removing the Wekity toothbrush holder is to remove the mounting brackets. These brackets secure the holder to the wall and may require specific actions to detach them. Follow these steps to successfully remove the mounting brackets:
1. Inspect the mounting brackets: Take a close look at the mounting brackets to understand how they are secured to the wall. They may have screws, bolts, or other fasteners that need to be removed.
2. Remove any screws or bolts: If the mounting brackets are held in place with screws or bolts, use the appropriate screwdriver or wrench to remove them. Turn the screwdriver counterclockwise or loosen the bolts until they can be easily removed. Keep these screws or bolts in a safe place to avoid misplacement.
3. Determine the attachment method: If the mounting brackets are attached with adhesive, determine the type of adhesive that was used. You may need to gently pry the brackets away from the wall using a putty knife or similar tool. Apply gentle pressure and work your way around the brackets until they are completely detached.
4. Clean the wall surface: Once the mounting brackets are removed, you may notice some adhesive residue or marks on the wall surface. Clean the area using a mild detergent, warm water, and a soft cloth or sponge. Gently scrub the surface until it is clean and free from any remnants of the brackets.
5. Inspect the wall for any damage: Take a moment to inspect the wall for any damage that may have occurred during the removal process. If there are any holes, scratches, or dents, you may need to repair or patch them before installing a new toothbrush holder.
By following these steps, you can successfully remove the mounting brackets of the Wekity toothbrush holder. Take care to avoid any damage to the wall during the process. Once the brackets are removed and the wall surface is clean, you can move on to the next steps of cleaning and potentially installing a new toothbrush holder if desired.
Step 6: Clean the Wall Surface
After removing the mounting brackets of the Wekity toothbrush holder, it’s important to clean the wall surface to ensure a fresh and tidy appearance. This step will help prepare the area for potential installation of a new toothbrush holder or leave it clean and ready for other purposes. Follow these steps to effectively clean the wall surface:
1. Gather cleaning supplies: Prepare the necessary cleaning supplies, such as a mild detergent, warm water, a soft cloth or sponge, and a bucket. Having these items at hand will facilitate the cleaning process.
2. Create a cleaning solution: Fill the bucket with warm water and add a small amount of mild detergent. Mix the solution gently until it forms a soapy mixture. Avoid using harsh chemicals or abrasive cleaning agents, as they may damage the wall surface.
3. Dip the cloth or sponge into the solution: Immerse the cloth or sponge into the cleaning solution, making sure it is thoroughly dampened but not dripping excessively. Wring out any excess liquid to prevent water from running down the wall.
4. Gently scrub the wall surface: Starting at the top of the wall, use the damp cloth or sponge to gently scrub the area where the Wekity toothbrush holder was installed. Apply moderate pressure and use circular motions to remove any residue or marks left behind by the holder or mounting brackets.
5. Rinse with clean water: Once you’ve cleaned the wall surface, rinse the cloth or sponge with clean water. Wipe down the area again to remove any remaining soap or detergent residue. This will ensure that the wall is left clean and free from any cleaning product remnants.
6. Allow the wall to dry: Allow the wall surface to air dry naturally or use a clean towel or cloth to gently pat it dry. Avoid using excessive force or rubbing, as this can cause damage to the wall or paint finish.
By following these steps, you can effectively clean the wall surface after removing the Wekity toothbrush holder. The clean surface will provide a fresh canvas for potential installation of a new toothbrush holder or maintain a clean and neat appearance in your bathroom.
Step 7: Install a New Toothbrush Holder (Optional)
If you have decided to replace the Wekity toothbrush holder with a new one, you can now proceed with the installation process. Installing a new toothbrush holder can help restore functionality and organization to your bathroom. Here are the steps to follow to install a new toothbrush holder:
1. Select a suitable toothbrush holder: Choose a toothbrush holder that fits your needs and complements your bathroom decor. Consider factors such as size, design, and material when making your selection.
2. Read the manufacturer’s instructions: Familiarize yourself with the installation instructions provided by the manufacturer of the new toothbrush holder. Each holder may have specific requirements and guidance for proper installation.
3. Position the toothbrush holder: Decide on the desired location for the new toothbrush holder. Ensure it is easily accessible and convenient for everyone using the bathroom. Consider proximity to the sink and other bathroom fixtures.
4. Mark the mounting holes: Place the new toothbrush holder against the wall in the desired position. Use a pencil or marker to mark the mounting hole positions on the wall. Ensure the markings are level and evenly spaced.
5. Prepare the wall: If necessary, clean the marked areas on the wall to remove any dirt or residue that could affect the adhesion or installation of the new toothbrush holder. Use a mild cleanser and a clean cloth or sponge for this purpose.
6. Install the mounting brackets or adhesive: Follow the manufacturer’s instructions to install the mounting brackets or apply adhesive to the back of the toothbrush holder. Ensure proper alignment with the marked mounting holes and firmly press the brackets or holder against the wall.
7. Secure the holder: If using mounting brackets, insert screws through the holes in the toothbrush holder and tighten them using a screwdriver or appropriate tool. Be careful not to overtighten the screws, as this can damage the holder or wall. If using adhesive, press and hold the toothbrush holder against the wall for a few minutes to allow the adhesive to bond.
8. Wait for proper adhesion (if using adhesive): If adhesive is used, wait for the recommended time specified by the manufacturer to allow the adhesive to fully cure and ensure the toothbrush holder is securely attached to the wall.
By following these steps, you can successfully install a new toothbrush holder in your bathroom. A properly installed toothbrush holder will provide a convenient and organized space for storing your toothbrushes and maintaining a clutter-free bathroom.