
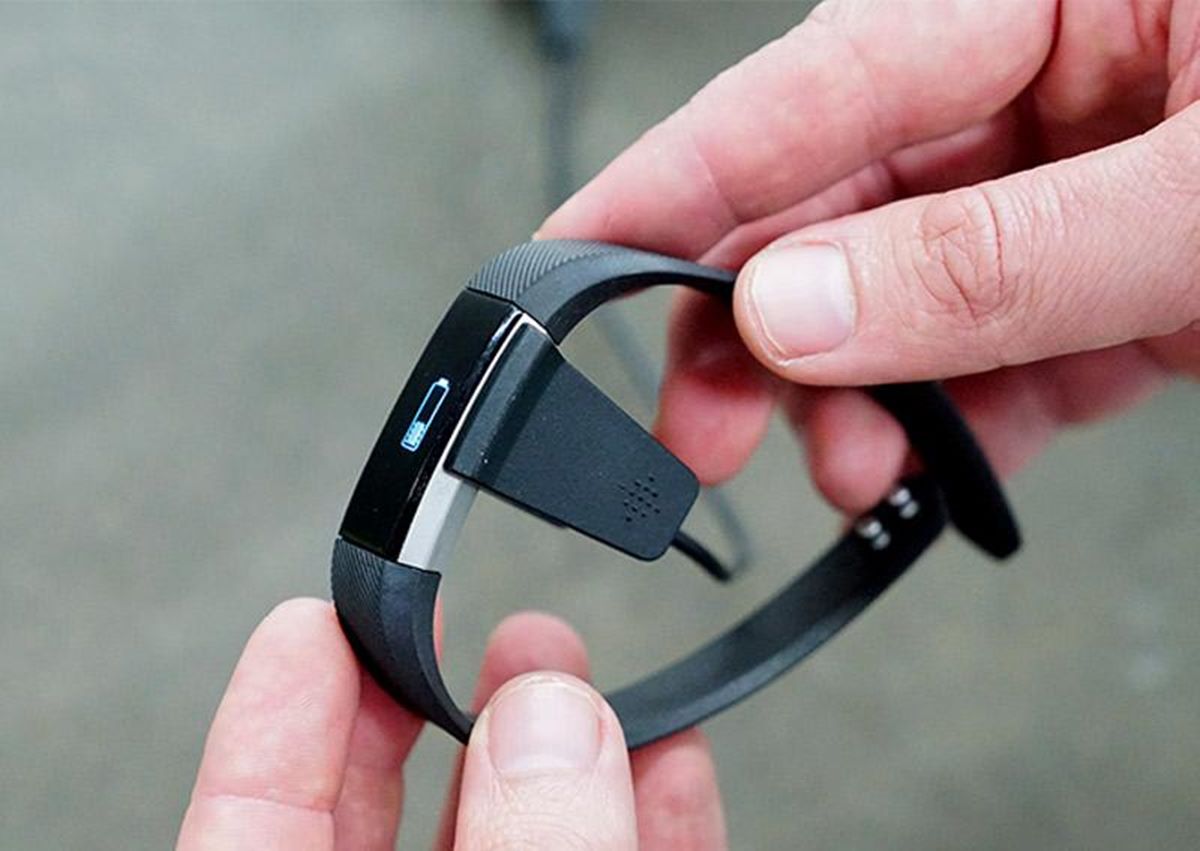
Checking the Battery Level
One of the first steps to charging your Fitbit watch is to check the battery level. By doing so, you can determine how much charge your watch currently has and estimate how long it will take to fully recharge.
To check the battery level on most Fitbit watches, follow these steps:
- On the main screen of your Fitbit watch, swipe down from the top to access the settings menu.
- Scroll through the settings menu until you find the battery icon.
- Select the battery icon to view the current battery level.
The battery level is usually displayed in a percentage format, indicating how much charge remains. A higher percentage means more charge is available, while a lower percentage indicates that the battery is running low.
It is advisable to charge your Fitbit watch when the battery level is below 20% to ensure uninterrupted usage. This will prevent your watch from completely running out of battery during daily use.
In addition to checking the battery level on your watch, you can also monitor the battery level through the Fitbit mobile app. To do this:
- Open the Fitbit app on your smartphone or tablet.
- Go to the “Devices” section.
- Select your Fitbit watch.
- View the battery level displayed on the screen.
Monitoring the battery level through the app allows you to keep track of your watch’s charge even when it’s not in use.
By regularly checking the battery level of your Fitbit watch, you can ensure that it’s always ready for use and avoid any inconvenient moments of the battery dying during important activities. Now that you know how to check the battery level, let’s move on to the next step: using the charger to power up your Fitbit watch.
Using the Charger
Now that you’ve checked the battery level of your Fitbit watch, it’s time to use the charger to power it up. Follow these simple steps to ensure a successful charging process:
1. Start by locating the charger that came with your Fitbit watch. It usually consists of a charging cable and a charging dock or cradle.
2. Before connecting the charger to your Fitbit watch, make sure both the charging cable and the watch are clean and free from any debris or dust.
3. Take the charging dock or cradle and plug the smaller end of the charging cable into it. Ensure that the cable is securely connected to the dock.
4. Once the charging cable is connected to the dock, insert the other end of the cable into a USB port or a USB wall adapter. Make sure the power source is functioning properly.
5. Now, carefully place your Fitbit watch onto the charging dock or cradle. Ensure that the pins on the back of the watch align with the connectors on the dock.
6. Gently press the watch onto the dock to secure the connection. You should see a small indicator light or charging symbol on your watch, indicating that it’s successfully connected to the charger.
7. During the charging process, it’s important to avoid moving or disturbing the watch on the dock. This will ensure a stable connection and a consistent flow of power.
8. Leave your Fitbit watch on the charger until it reaches a full charge. The time it takes to fully charge the watch can vary depending on the model and battery level.
Remember, it’s best to charge your Fitbit watch in a cool, dry place, away from direct sunlight or extreme temperatures. This will help maintain the battery’s longevity and overall performance.
Using the charger correctly is essential to ensuring the proper functioning and longevity of your Fitbit watch’s battery. Once your watch is fully charged, it’s time to disconnect it from the charger and enjoy using it to track your fitness goals and activities. Next, we’ll explore how to safely disconnect the charger from the power source.
Connecting the Charger to a Power Source
Once you have your charger and Fitbit watch ready, the next step is to connect the charger to a power source. Follow these steps to ensure a safe and efficient connection:
1. Identify the type of charging cable that came with your Fitbit watch. It could be a USB-A to USB cable or a proprietary charging cable specific to your model.
2. If you have a USB-A to USB charging cable, locate an available USB port on your computer, laptop, or USB wall adapter. For a proprietary cable, find the corresponding power source (e.g., wall adapter) that came with your watch.
3. Plug the USB end of the charging cable into the USB port or the proprietary end of the cable into the respective power source. Ensure that the connection is secure.
4. Before plugging the charger into a power source, ensure that the power source is functioning correctly. You can do this by testing it with another device or checking if it has an LED indicator light that shows it’s receiving power.
5. Carefully insert the other end of the charging cable into the charging dock or cradle of your Fitbit watch. Ensure that the connection is firm and aligned properly.
6. Once the charger is connected to both the power source and your Fitbit watch, you should see a visual indicator on the watch, such as a charging symbol or LED light, confirming that the connection is successful.
7. It’s essential to place the charger and watch on a stable surface to prevent any accidental disconnections during the charging process. Avoid bending the cable or putting unnecessary strain on the connection.
8. Monitor the charging process to ensure that power is flowing consistently. If you notice any issues or abnormalities, such as the watch not charging or the charger feeling unusually warm, disconnect the charger immediately and seek assistance from Fitbit support.
By following these steps, you can confidently connect the charger to a power source and ensure reliable and safe charging for your Fitbit watch. Now that you’ve successfully connected the charger, let’s move on to the next step: attaching the Fitbit watch to the charger.
Attaching the Fitbit Watch to the Charger
Now that you have connected the charger to a power source, it’s time to attach your Fitbit watch to the charger. Follow these steps to ensure a secure and proper connection:
1. Locate the charging dock or cradle that came with your Fitbit watch. This is the part that will hold and charge your watch.
2. Ensure that both the charging dock and the back of your Fitbit watch are clean and free from any dust or debris. This will help maintain a good connection between the charger and the watch.
3. Take the charging dock and position it so that the pins or connectors on the dock align with the corresponding contacts on the back of your Fitbit watch.
4. Carefully place your Fitbit watch onto the charging dock, ensuring that the pins on the back of the watch fit into the corresponding holes or connectors on the dock.
5. Gently press down on the watch to secure it to the charging dock. You should feel a slight click or see a visual indication on the watch’s screen that it is attached correctly.
6. Make sure that the watch is centered and aligned properly on the charging dock. This will ensure that the connection is stable and that the watch is receiving a consistent charge.
7. Avoid moving or disturbing the watch while it’s attached to the charger. Any unnecessary movement can disrupt the charging process, leading to a slower or incomplete charge.
8. It’s a good practice to periodically check the connection between the watch and the charger to ensure that it remains secure. This is especially important if you are charging your watch overnight or for an extended period.
By following these steps, you can confidently attach your Fitbit watch to the charger and ensure a secure and reliable charging experience. Now that your watch is properly connected, let’s move on to the next step: checking the charging status.
Checking the Charging Status
Once your Fitbit watch is securely attached to the charger, it’s important to periodically check the charging status to monitor the progress. Here are the steps to check the charging status:
1. Glance at your Fitbit watch’s screen. You should see a visual indication that the watch is charging. This could be a battery icon, a charging symbol, or a progress bar.
2. Some Fitbit watches have a built-in LED or a flashing light on the charger itself to indicate the charging status. Refer to your watch’s manual to identify if it has any charging indicators.
3. If your Fitbit watch has a touch screen, you can navigate to the charging status by swiping to the appropriate screen. Look for a battery icon or a charging animation to confirm that the watch is charging.
4. It’s recommended to periodically check the charging status, especially if you are charging your watch for an extended period. This will help you ensure that the watch is receiving a steady charge and that the battery is progressing towards a full charge.
5. Note that the charging time may vary depending on your watch model, the current battery level, and the charging conditions. Generally, it takes around 1-2 hours to charge most Fitbit watches from a low battery level to a full charge.
6. While your Fitbit watch is charging, you can still use some of its functions, such as checking the time or tracking your heart rate. However, keep in mind that certain features may be limited during the charging process.
7. Avoid disconnecting and reconnecting the charger frequently, as this can interrupt the charging process and potentially damage the connectors on both the watch and the charger.
By periodically checking the charging status, you can ensure that your Fitbit watch is charging properly and estimate how much longer it may take to reach a full charge. Now that you know how to check the charging status, let’s move on to the final step: letting your Fitbit watch charge fully.
Letting the Fitbit Watch Charge Fully
Once you have connected your Fitbit watch to the charger and checked the charging status, it is crucial to allow the watch to charge fully to ensure optimal battery performance. Follow these steps to ensure your watch charges to its maximum capacity:
1. Leave your Fitbit watch connected to the charger without interruption until it reaches a full charge. Most Fitbit watches require approximately 1-2 hours to charge from a low battery level to 100%.
2. Avoid using or interacting with the watch excessively while it is charging. Minimizing usage allows the watch to prioritize the charging process and prevents any potential battery drain.
3. Keep the charging area clean and free from any obstructions during the charging process. This will ensure proper airflow and prevent overheating, which can affect the charging speed and overall battery health.
4. It’s a good practice to charge your Fitbit watch in a cool, well-ventilated area, away from direct sunlight or extreme temperatures. High temperatures can negatively impact the battery’s performance and overall lifespan.
5. Occasionally check the charging status or the battery level to track the progress. This can help you estimate how much longer it will take for the watch to charge fully. Remember, it’s normal for the charging speed to vary at different battery levels.
6. Once your Fitbit watch reaches a full charge, disconnect it from the charger promptly. Leaving it connected for an extended period beyond a full charge can potentially overcharge the battery, which is not recommended.
7. After disconnecting the charger, take a moment to ensure that the watch is functioning properly. Check the battery level to confirm that it is indeed at 100%.
By allowing your Fitbit watch to charge fully, you ensure that its battery is optimized for a longer usage time and better performance. Remember, regular charging and letting the battery fully deplete from time to time can help maintain its overall health and longevity. Now that you understand the importance of letting your Fitbit watch charge fully, you’re ready to enjoy all the features and benefits it has to offer!