
Sign in to Multiple Gmail Accounts
Managing multiple Gmail accounts can be a hassle, especially when you constantly need to switch between them. But fear not, there are several easy ways to streamline this process and access all your accounts with ease. Let’s explore some convenient methods:
1. Multiple Browser Windows or Tabs: One simple method is to open multiple browser windows or tabs, each signed in to a different Gmail account. This allows you to switch between accounts quickly by switching tabs or windows.
2. Incognito or Private Browsing Mode: Most modern browsers offer an incognito or private browsing mode. You can use this feature to sign in to another Gmail account without interfering with your primary account. Simply open a new incognito window or private browsing session and sign in to the additional account.
3. Add Accounts in Gmail Settings: Gmail provides a feature that allows you to add multiple accounts directly within your main account. Open Gmail settings, go to the “Accounts and Import” tab, and click on “Add another email address.” Follow the prompts to add your additional Gmail accounts and switch between them using the account dropdown in the top right corner.
4. Gmail App for Mobile Devices: Download the Gmail app on your smartphone or tablet and sign in to all your Gmail accounts. The app provides a user-friendly interface that allows you to switch between accounts effortlessly with just a few taps.
5. Google Account Picker: Another convenient method is to use the Google Account Picker. When signing in to any Google service, you will see a list of all your linked accounts. Simply select the desired account from the dropdown, and you will be directed to that account’s inbox.
Remember to ensure that you are signed out of all accounts before attempting to sign in to a new one, as this can cause conflicts and errors. Additionally, it’s essential to keep a handle on your passwords and utilize secure sign-in methods to protect the confidentiality of your accounts.
By utilizing these various methods, you can easily manage multiple Gmail accounts and switch between them effortlessly. Find the method that works best for you and never miss an important email again!
Accessing Multiple Gmail Accounts with Account Switcher
Are you tired of constantly logging in and out of your Gmail accounts? Account Switcher is a handy feature that can simplify your life by allowing you to access multiple Gmail accounts without the hassle of signing in and out. Let’s dive into how to use this feature:
1. Enable Multiple Account Sign-in: Before you can use Account Switcher, you need to ensure that multiple account sign-in is enabled in your Gmail settings. Go to your Gmail account, click on the gear icon in the top right corner, and select “Settings.” Under the “General” tab, scroll down to the “Multiple sign-in” section and enable the option to allow multiple accounts.
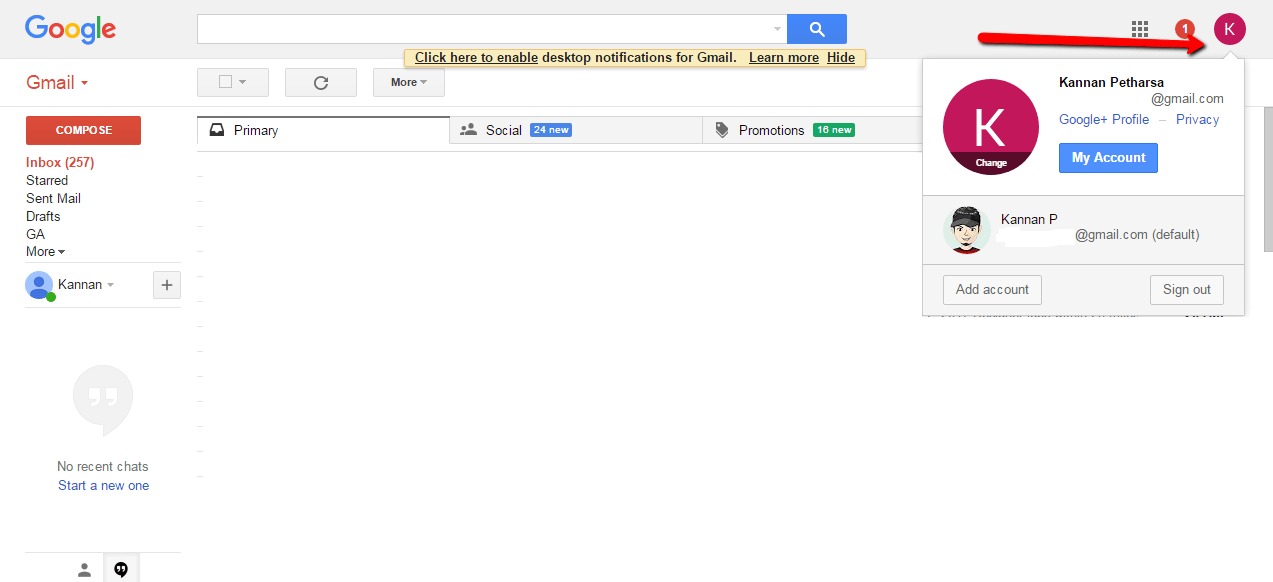
2. Adding Accounts to Account Switcher: Once you’ve enabled multiple account sign-in, you can add your additional Gmail accounts to the Account Switcher by going back to the gear icon, selecting “Add another account,” and following the prompts to sign in to your additional accounts. These accounts will now be accessible through the Account Switcher drop-down menu located in the top right corner next to your profile picture.
3. Switching Between Accounts: To switch between your Gmail accounts using Account Switcher, simply click on the drop-down menu in the top right corner and select the account you want to access. You will be redirected to the inbox of the selected account, allowing you to seamlessly navigate between multiple accounts without the need to enter credentials repeatedly.
4. Notifications and Email Forwarding: Account Switcher maintains separate notification settings and allows you to set up email forwarding for each of your Gmail accounts. This means you can receive email notifications for specific accounts or automatically forward emails from one account to another, streamlining your email management process.
Remember to exercise caution when using Account Switcher, especially when accessing sensitive information or performing account-specific actions. Make sure to log out of your accounts properly, especially if you are using a shared device, to maintain the security and privacy of your Gmail accounts.
Account Switcher is an incredibly useful feature for anyone managing multiple Gmail accounts. It saves time and effort by providing a seamless transition between different accounts, allowing you to stay organized and on top of your email game. Take advantage of this feature today and streamline your Gmail experience!
Using Chrome Profiles to Easily Switch Between Gmail Accounts
If you are a frequent Gmail user and prefer using the Google Chrome browser, Chrome Profiles can be a game-changer for managing multiple Gmail accounts. Chrome Profiles allow you to create separate browsing environments with individual sets of bookmarks, history, and saved login information, making it effortless to switch between different Gmail accounts. Here’s how you can set it up:
1. Create a Chrome Profile: Open your Google Chrome browser and click on the profile icon in the top right corner. Select “Manage People” and click on “Add person.” Name the profile according to the Gmail account you want to associate it with.
2. Add Gmail Account to the Chrome Profile: Once you’ve created a Chrome profile, sign in to the associated Gmail account. This will ensure that the browsing environment for this profile is linked to the specific Gmail account.
3. Switch Between Chrome Profiles: To switch between Chrome profiles and access different Gmail accounts, click on the profile icon in the top right corner of the Chrome window. A dropdown menu will appear, displaying all the profiles you’ve created. Select the profile associated with the desired Gmail account, and a new Chrome window will open with that account’s settings and saved login information.
4. Using Profile Icons for Quick Access: Chrome allows you to customize the profile icons with different colors and images. Take advantage of this feature by assigning unique icons to each profile, representing your different Gmail accounts. This visual distinction can make it even easier to identify and switch between profiles quickly.
5. Syncing Chrome Settings: To make the switching experience even smoother, enable Chrome Sync for each profile. This will sync your browsing history, bookmarks, extensions, and settings across different devices. When you switch between profiles, you’ll have access to the same personalized Chrome experience regardless of the device you’re using.
Chrome Profiles provides a seamless and organized way to handle multiple Gmail accounts. With a few clicks, you can switch between accounts without the need to log in and out repeatedly, saving you time and effort throughout the day. Take advantage of this handy feature to maintain efficient control over your Gmail accounts and enjoy a personalized browsing experience with Chrome!
Using Extensions to Switch Between Gmail Accounts
If you’re looking for a convenient and efficient way to switch between multiple Gmail accounts, using browser extensions can be a game-changer. These extensions provide quick access to your different Gmail accounts without the need to navigate through various login pages. Here’s how you can utilize extensions to streamline your Gmail management:
1. Install a Gmail Account Switcher Extension: Search for and install a reliable Gmail account switcher extension for your preferred browser. Some popular options include “Checker Plus for Gmail,” “Multi-Account Containers” for Firefox, and “Simplify Gmail” for Chrome.
2. Configure the Extension: After installation, configure the extension to add your Gmail accounts. Typically, you’ll find an option within the extension’s settings or in the browser’s toolbar to add accounts. Enter the login credentials for each account you want to access.
3. Accessing Gmail Accounts: Once your accounts are added, you can easily switch between them by clicking on the extension icon in your browser’s toolbar. You’ll see a dropdown menu displaying all the added email accounts. Simply select the account you want to access, and it will open in a new tab or window.
4. Customize and Organize: Many Gmail account switcher extensions offer customization options, allowing you to personalize the appearance and behavior of the extension. You might have the option to assign different colors or icons to each account, making it easier to visually distinguish between them. Additionally, you can arrange the order in which your accounts appear in the dropdown menu for quicker access.
5. Additional Features: Some extensions offer additional features to enhance your Gmail experience. These may include desktop notifications for incoming emails, the ability to read and reply to emails without opening the Gmail interface, and shortcuts for composing new emails or opening specific folders.
Remember to prioritize security when using extensions. Make sure to install extensions from trusted sources and regularly update them to avoid any potential vulnerabilities. It’s also a good practice to review the permissions requested by the extension and only grant access to the necessary Gmail account information.
Using extensions to switch between Gmail accounts can vastly improve your productivity and efficiency. With just a few clicks, you can effortlessly access and manage multiple accounts, saving valuable time and streamlining your email workflow. Explore the available Gmail account switcher extensions for your browser and find the one that best suits your needs!
Setting Up Gmail Offline for Multiple Accounts
Gmail Offline is a powerful feature that allows you to access and compose emails even when you don’t have an internet connection. If you have multiple Gmail accounts, you’ll be pleased to know that you can set up Gmail Offline to work with all your accounts. Here’s how to do it:
1. Enable Gmail Offline: Start by enabling Gmail Offline in your Chrome browser. Open Gmail, click on the gear icon in the top right corner, and select “Settings.” In the “Offline” tab, check the box that says “Enable offline mail” and click “Save changes.”
2. Switch Between Accounts: To access multiple accounts in Gmail Offline, you will need to switch between them. When you’re online, sign out of the current Gmail account and sign in to the next one. Make sure to repeat this process for all the accounts you want to access while offline.
3. Sync Data for Offline Access: After signing in to each account, navigate to the offline settings again and click on “Download or remove data stored for this account.” Select the appropriate option to download the necessary data for offline access. Repeat this process for each Gmail account.
4. Accessing Gmail Offline: Once you’ve set up Gmail Offline for multiple accounts, you can access them even when you don’t have an internet connection. Open a new tab in Chrome, type “mail.google.com” in the address bar, and press enter. You’ll be directed to the Gmail Offline interface, where you can view and compose emails for all your synced accounts.
5. Sync Changes When Online: When you regain internet connectivity, all your offline changes and email drafts will automatically sync with your Gmail accounts. This ensures that your offline work seamlessly integrates with your online Gmail experience.
Remember to periodically go online with each account to keep your offline data up to date. Gmail Offline is a fantastic tool for staying productive even when you’re offline, allowing you to work on multiple Gmail accounts without interruption.
It’s worth noting that the ability to use Gmail Offline varies depending on your operating system and browser. Ensure that you are using the latest versions of Chrome and that you have the necessary offline data storage available on your device.
By setting up Gmail Offline for multiple accounts, you’ll have the flexibility to work on your emails regardless of your internet connection. Take advantage of this feature to manage your Gmail accounts efficiently, even when Wi-Fi is scarce!
Using Mobile Apps to Switch Between Gmail Accounts
Gmail has dedicated mobile apps for both iOS and Android devices, providing a convenient way to access and manage multiple Gmail accounts on the go. Here’s how you can use these mobile apps to easily switch between your Gmail accounts:
1. Download the Gmail App: Start by downloading the Gmail app from the App Store (iOS) or Google Play Store (Android) and installing it on your device.
2. Sign in to Your Accounts: Once the app is installed, launch it and sign in to your primary Gmail account. To add additional accounts, tap on your profile picture or initials in the top right corner, then select “Add another account.” Follow the prompts to sign in to the additional Gmail accounts you want to access.
3. Switch Between Accounts: To switch between your Gmail accounts using the mobile app, tap on your profile picture or initials in the top right corner. This will open a dropdown menu displaying all the signed-in accounts. Simply tap on the account you want to switch to, and you’ll be directed to that account’s inbox.
4. Notifications for Multiple Accounts: By default, the Gmail app will send notifications for all your signed-in accounts. However, you can customize this behavior in the settings. Go to the app settings, find the notifications section, and adjust the settings for each account to receive notifications or select specific accounts for which you want to receive notifications.
5. Using the Unified Inbox: The Gmail app also offers a unified inbox feature, which allows you to view emails from multiple accounts in a single view. To access the unified inbox, tap on the menu icon (typically three lines) in the top left corner, scroll down, and select “All inboxes.” This view combines all your account inboxes into one, making it easier to manage and respond to emails from different accounts.
Remember to protect your mobile device with a strong passcode or biometric authentication to ensure the security of your Gmail accounts. It’s also a good practice to regularly update the Gmail app to benefit from the latest security patches and features.
Gmail’s mobile apps offer a seamless and user-friendly experience for managing multiple accounts on your smartphone or tablet. Take advantage of these apps to stay connected and switch between your Gmail accounts effortlessly, no matter where you are!
Best Practices for Managing Multiple Gmail Accounts
Managing multiple Gmail accounts can be a challenge, but with the right strategies in place, you can stay organized and efficient. Here are some best practices to help you effectively manage your multiple Gmail accounts:
1. Create Descriptive Labels: Labels are a powerful tool in Gmail that can help you categorize and organize your emails. Create descriptive labels specific to each account to easily identify and sort emails. For example, you can use labels like “Work,” “Personal,” or “Business” to differentiate between account-related emails.
2. Utilize Filters: Gmail allows you to create filters to automate email management. Set up filters based on criteria like sender, subject, or keywords to automatically categorize incoming messages. This way, emails from specific accounts can be automatically labeled or archived, saving you time and reducing clutter.
3. Sync Calendars: If you use Google Calendar, synchronize the calendars from all your Gmail accounts. This ensures that you can view and manage all your appointments, events, and reminders in one place, regardless of which account they are associated with.
4. Use Multiple Browser Profiles: If you frequently switch between Gmail accounts, consider using multiple browser profiles, as mentioned earlier. This allows you to keep each account in a separate browser environment, making it easier to manage and avoiding the need to sign in and out repeatedly.
5. Set Email Signatures: Customize the email signatures for each of your Gmail accounts to identify which account you are using. This can help you differentiate between accounts when composing and sending emails.
6. Regularly Clean Up: Take some time to declutter your Gmail accounts regularly. Archive or delete unnecessary emails, unsubscribe from unwanted newsletters, and keep your inbox organized. This reduces the chances of missing important emails and ensures that your Gmail accounts stay manageable.
7. Keep Security a Priority: As you manage multiple accounts, it’s crucial to prioritize security. Use strong and unique passwords for each account, enable two-factor authentication, and be cautious of phishing attempts. Regularly review your account security settings to ensure your information is protected.
8. Take Advantage of Gmail Features: Gmail offers a variety of features and shortcuts to streamline your email management. Familiarize yourself with features like keyboard shortcuts, smart compose, and advanced search filters to work more efficiently across multiple accounts.
Remember to customize these best practices to suit your specific needs and preferences. Find a system that works best for you and helps you stay organized, productive, and in control of your multiple Gmail accounts.
By implementing these best practices, you can effectively manage your multiple Gmail accounts, optimize your workflow, and stay on top of your emails with ease.