
What is a Dialog Box in Excel?
A dialog box is a graphical user interface element in Excel that allows users to interact with the program and perform various tasks. It provides a convenient way to access and modify specific settings or options within Excel, making it easier for users to customize their experience and enhance their productivity.
When you open a dialog box in Excel, a separate window appears on the screen, often containing a combination of text, input fields, checkboxes, dropdown menus, and buttons. This window allows you to input or modify data, select options, and execute commands related to the specific task or feature you are working with.
Dialog boxes are used in Excel to perform a wide range of functions, such as formatting cells, inserting charts, modifying page setup, managing data connections, and more. They provide a structured and organized way to access and manage the numerous settings and features available in Excel.
Dialog boxes in Excel can be accessed through various means, including keyboard shortcuts, menu options, and toolbar buttons. Once open, they provide a user-friendly interface that guides you through the necessary steps to complete your desired task.
Dialog boxes are an integral part of Excel’s functionality and are designed to make the software more accessible and user-friendly. They provide a seamless way to navigate through Excel’s extensive range of features and settings, allowing users to customize their worksheets and perform complex operations with ease.
How to Open the Dialog Box
Opening a dialog box in Excel is a straightforward process and can be done using several methods. Here are some common ways to open a dialog box:
- Keyboard shortcuts: Excel provides various keyboard shortcuts to quickly open specific dialog boxes. For example, pressing Ctrl + Shift + F opens the Format Cells dialog box, Alt + F11 opens the Visual Basic for Applications (VBA) editor, and Ctrl + 1 opens the Format Cells dialog box for the selected range.
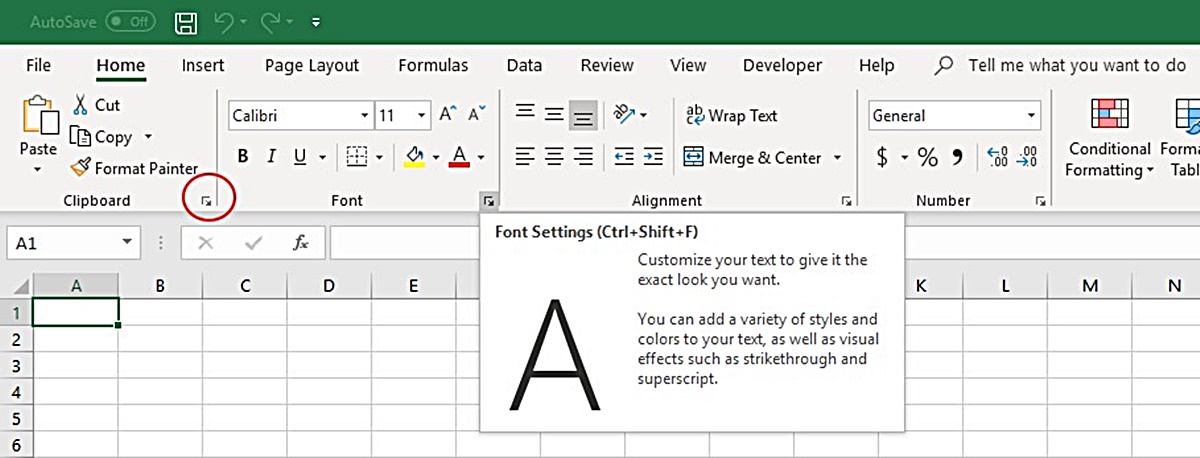
- Menu options: Dialog boxes can also be accessed through Excel’s menu options. Simply click on the relevant tab in the ribbon, such as “Home” or “Page Layout,” and locate the command group that corresponds to your desired action. Then, click on the small arrow icon (usually labeled as “More” or “Options”) in the bottom-right corner of the command group to open the associated dialog box.
- Toolbar buttons: The Quick Access Toolbar, located above the ribbon in Excel, can be customized to include frequently used commands. By adding the Dialog Box Launcher to the toolbar, you can quickly access the dialog box associated with a specific command. Simply click on the icon shaped like a small square with an arrow in it, usually located at the end of a command group, to open the respective dialog box.
Regardless of which method you choose, opening a dialog box in Excel provides you with a comprehensive interface to modify settings, customize formatting, manage data, and perform various other tasks.
By familiarizing yourself with the keyboard shortcuts, menu options, and toolbar buttons that open dialog boxes, you can streamline your workflow in Excel and gain quick access to the specific settings and features you need to work efficiently.
Anatomy of a Dialog Box
A dialog box in Excel consists of various components that work together to provide a user-friendly interface for modifying settings and performing tasks. Understanding the different parts of a dialog box can help you navigate and use them effectively. Let’s explore the anatomy of a typical dialog box:
Title: Located at the top of the dialog box, the title provides a brief description of the purpose of the dialog box. It helps you identify which settings or options you are about to modify.
Sections or Tabs: Many dialog boxes in Excel are organized into sections or tabs, each focusing on a specific category of settings or options. These sections can be accessed by clicking on the corresponding tabs present within the dialog box.
Options and Input Fields: Within each section, you will find various options and input fields that allow you to customize specific settings. These can include checkboxes, radio buttons, dropdown menus, sliders, text fields, and more. Depending on the dialog box, you may encounter different types of inputs suitable for the task at hand.
Buttons: Dialog boxes contain buttons that enable you to perform actions or confirm your selections. Common buttons include “OK” to apply the changes and close the dialog box, “Cancel” to discard any changes made, and “Apply” to apply the changes without closing the dialog box immediately. Additional buttons may be provided based on the specific dialog box functionality.
Help and Information: Many dialog boxes include a Help button or link that provides context-sensitive assistance, guiding you through the options and providing additional information. This feature can be useful when you are unsure about the purpose or usage of a specific setting.
By understanding the anatomy of a dialog box, you can quickly locate the settings you need and efficiently make adjustments to suit your requirements. The organized layout and intuitive design of dialog boxes enhance your user experience and make it easier to navigate through Excel’s numerous features and settings.
Common Dialog Boxes in Excel
Excel offers a wide range of dialog boxes, each designed for specific tasks and features. These dialog boxes provide a comprehensive interface to customize settings, manage data, and perform various operations. Here are some common dialog boxes you are likely to encounter in Excel:
- Format Cells: This dialog box allows you to modify the formatting of cells, such as adjusting the number format, applying borders, changing font styles, and more.
- Page Setup: The Page Setup dialog box enables you to customize the layout and print settings of your worksheets. You can adjust margins, set page orientation, add headers and footers, and control print scaling.
- Insert Chart: When you want to create a chart in Excel, the Insert Chart dialog box provides a range of chart types and customization options. You can choose the chart type, select data sources, and configure various chart elements.
- Data Validation: The Data Validation dialog box allows you to impose rules and restrictions on data entry in specific cells. You can define criteria, such as numeric limits, date ranges, or custom formulas, to validate user input.
- Sort: This dialog box provides options for sorting data in your worksheet. With it, you can specify the sorting criteria, sort by multiple columns, and choose between ascending or descending order.
- Conditional Formatting: When you want to apply conditional formatting to highlight specific data based on certain conditions, the Conditional Formatting dialog box is your go-to tool. You can set rules, choose formatting styles, and specify the formatting options.
- Data Connection Properties: This dialog box helps you manage data connections to external sources, such as databases or web services. You can configure connection settings, including authentication, refresh intervals, and query options.
These are just a few examples of the many dialog boxes available in Excel. Each dialog box serves a specific purpose and enables you to customize and control different aspects of your worksheets, making your work more efficient and tailored to your needs.
Customizing the Quick Access Toolbar with the Dialog Box Launcher
The Quick Access Toolbar in Excel is a customizable toolbar located at the top of the Excel window, providing quick access to frequently used commands. One useful feature of the Quick Access Toolbar is the Dialog Box Launcher, which allows you to access dialog boxes associated with specific commands. Here’s how you can customize the Quick Access Toolbar with the Dialog Box Launcher:
- Right-click on the Quick Access Toolbar. A dropdown menu will appear.
- Select “Customize Quick Access Toolbar” from the dropdown menu. This will open the Excel Options dialog box.
- In the Excel Options dialog box, you will see two columns. The left column displays all the available commands, while the right column displays the commands currently on the Quick Access Toolbar.
- Under the left column, select the command for which you want to add the Dialog Box Launcher.
- Click on the “Add > >” button to move the selected command to the right column, which represents the Quick Access Toolbar.
- After adding the command, you can further customize its position on the toolbar by using the “Up” and “Down” buttons to rearrange the order.
- Once you have added the command, it will appear as a small icon on the Quick Access Toolbar. Clicking on this icon will open the associated dialog box for that command.
By customizing the Quick Access Toolbar with the Dialog Box Launcher, you can quickly access the dialog box associated with a specific command without having to navigate through various menus or ribbons. This saves time and allows you to modify settings or perform tasks more efficiently.
Remember, you can add multiple commands with their respective Dialog Box Launchers to the Quick Access Toolbar, giving you easy access to a variety of dialog boxes for different actions and settings.
Benefits of Using the Dialog Box and Dialog Box Launcher in Excel
The dialog box and dialog box launcher in Excel offer several benefits that enhance your user experience and streamline your workflow. Here are some key advantages of using these features:
- Efficient Access to Settings: The dialog box provides a consolidated and organized interface to access and modify specific settings in Excel. It eliminates the need to navigate through various menus and ribbons, allowing you to make changes directly from a single window.
- User-Friendly Interface: Dialog boxes are designed to be user-friendly, with clear labels, intuitive controls, and guided steps. They provide a structured layout that makes it easy to input data, select options, and execute commands, even for complex tasks.
- Centralized Management of Features: Excel’s dialog boxes bring together related features and settings in one place, making it easier to manage and customize various aspects of your worksheets. This centralization saves time and effort by providing a comprehensive view of available options.
- Improved Productivity: With the dialog box, you can quickly modify settings or perform tasks without interrupting your workflow. Its efficient design and predefined options enable you to make changes swiftly and accurately, boosting your productivity.
- Customizability with Dialog Box Launcher: The Dialog Box Launcher in the Quick Access Toolbar adds an extra layer of customization to your Excel experience. By adding the Dialog Box Launcher to the toolbar, you can access dialog boxes associated with specific commands in just one click. This feature provides quick access to advanced settings and options.
- Consistency and Standardization: Dialog boxes in Excel follow a consistent structure and design, ensuring a standardized experience when accessing different features. This consistency makes it easier to adapt to new dialog boxes and reduces the learning curve when exploring unfamiliar settings.
By leveraging the benefits of the dialog box and dialog box launcher, you can efficiently manage settings, customize features, and accomplish tasks more effectively in Excel. These features contribute to a smoother and more seamless user experience, resulting in enhanced productivity and satisfaction with the software.
Tips and Tricks for Using the Dialog Box and Dialog Box Launcher
Utilizing the dialog box and dialog box launcher effectively can help you optimize your Excel workflow and maximize productivity. Here are some useful tips and tricks to enhance your experience:
- Explore Shortcut Keys: Excel provides shortcut keys to quickly access specific dialog boxes. Learning these shortcuts can save you time by instantly opening the desired dialog box without navigating through menus or ribbons.
- Use the Search Bar: Some dialog boxes in Excel have a search bar or filter option. Take advantage of this feature to quickly locate specific settings or options within the dialog box, especially in cases where the options are extensive.
- Save Dialog Box Settings: If you frequently use a particular combination of settings in a dialog box, consider saving it as a custom setting or template. This will allow you to apply the same settings in future tasks without having to manually adjust each option.
- Experiment with Options: Don’t be afraid to explore and experiment with different options within the dialog box. Familiarize yourself with the available settings and their effects to customize Excel according to your specific needs.
- Check Help and Documentation: If you are unsure about the purpose or usage of a particular setting within a dialog box, refer to the Excel Help documentation or search online resources. Understanding the functionality of each option will help you make informed choices and optimize your workflow.
- Organize the Quick Access Toolbar: Consider customizing the Quick Access Toolbar with frequently used dialog box commands. Arrange them based on your workflow to have quick and convenient access to the associated dialog boxes.
- Double-Click to Open: In some cases, you can double-click on certain elements within a worksheet to open a related dialog box. Experiment with double-clicking on headers, objects, or elements to see if it opens a relevant dialog box for further customization.
By implementing these tips and tricks, you can make the most of the dialog box and dialog box launcher in Excel. They will help you navigate the interface efficiently, customize settings to suit your needs, and ultimately optimize your productivity when working with Excel.