
Remove Non-Printable Characters
When working with Microsoft Excel, you may encounter a situation where the TRIM function doesn’t seem to be effective in removing unwanted spaces. In some cases, this issue may be caused by non-printable characters that are hidden within the cell’s content.
To address this problem, you can utilize different techniques to remove these non-printable characters. One method is to make use of the SUBSTITUTE function in combination with other functions.
Here’s how you can achieve it:
- Identify the cell or range of cells that contain the non-printable characters.
- Create a new column or use an empty column to store the modified values.
- In the first row of the new column, enter the formula:
=SUBSTITUTE(A1,CHAR(1), "") - Replace
A1with the cell reference you want to remove non-printable characters from. - Drag the formula down to apply it to the remaining cells in the column.
- The result will be the original cell content but without the non-printable characters.
This method works by utilizing the CHAR function, which returns the character with the specified character code. In this case, CHAR(1) represents the non-printable character that you want to remove. By substituting this character with an empty string, you effectively remove it from the cell’s content.
By following these steps, you can successfully remove non-printable characters from your Excel data and ensure that the TRIM function works accurately.
Check for Leading and Trailing Spaces
Another common reason why the TRIM function might not work as expected is if there are leading or trailing spaces in the cell’s content. These spaces are not visible, but they can interfere with the TRIM function’s ability to remove spaces.
To check for leading and trailing spaces in Excel, you can follow these steps:
- Select the cell or range of cells that you suspect may contain leading or trailing spaces.
- Click on the “Home” tab in the Excel ribbon.
- In the “Editing” group, click on the “Find & Select” dropdown button.
- Choose the “Replace” option from the dropdown menu.
- In the “Find what” field, enter a single space (press the spacebar once).
- Keep the “Replace with” field empty.
- Click on the “Replace All” button.
- If any leading or trailing spaces are found, Excel will remove them.
This process helps to visually identify and remove any leading or trailing spaces from the selected cells. Once these spaces are removed, the TRIM function should work correctly to eliminate any remaining spaces within the cell’s content.
By taking the time to check for leading and trailing spaces, you can ensure that the TRIM function functions properly and provides accurate results. This simple step can save you from potential data inconsistencies and errors in your Excel spreadsheets.
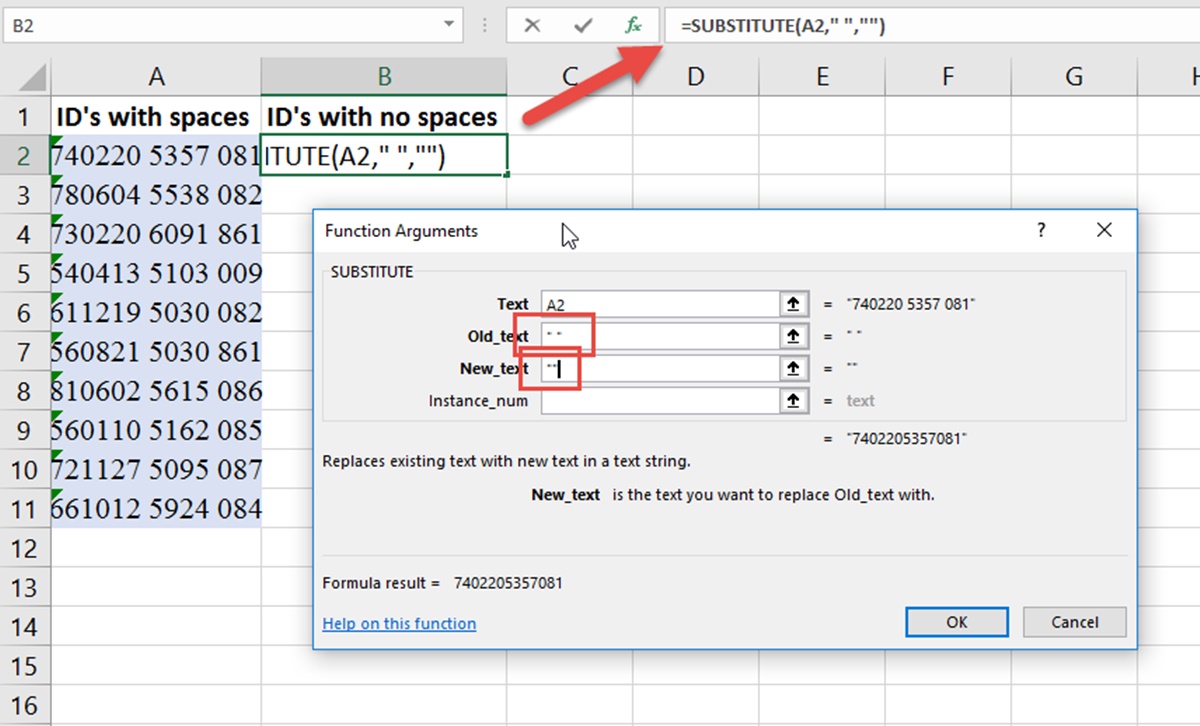
Use SUBSTITUTE Function to Remove Extra Spaces
If the TRIM function is not effective in removing extra spaces within a cell’s content, you can consider using the SUBSTITUTE function in combination with other functions to achieve the desired result.
The SUBSTITUTE function allows you to replace a specific character or a sequence of characters within a text string. By utilizing this function, you can replace multiple spaces with a single space, effectively removing the extra spaces.
Here’s how you can use the SUBSTITUTE function to remove extra spaces:
- Identify the cell or range of cells that contain extra spaces.
- Create a new column or use an empty column to store the modified values.
- In the first row of the new column, enter the formula:
=SUBSTITUTE(A1, " ", " ") - Replace
A1with the cell reference you want to remove extra spaces from. - Drag the formula down to apply it to the remaining cells in the column.
- The result will be the original cell content, but with extra spaces removed.
This method works by replacing consecutive spaces with a single space. The first argument in the SUBSTITUTE function represents the cell reference, while the second argument is the character or characters you want to replace (in this case, a space). The third argument is the replacement character or characters (also a space in this case).
By using the SUBSTITUTE function, you can effectively remove extra spaces from your Excel data and ensure that the TRIM function works accurately by eliminating any remaining spaces within the cell’s content.
Try Using CLEAN Function
If the TRIM function is not working as expected and you still encounter issues with unwanted characters or spaces in your Excel data, another option to consider is using the CLEAN function.
The CLEAN function is designed to remove non-printable characters from text strings. These non-printable characters can include line breaks, carriage returns, and other special characters that may be hidden within the cell’s content.
To use the CLEAN function to remove these unwanted characters, follow these steps:
- Select the cell or range of cells that you suspect may contain non-printable characters.
- Create a new column or use an empty column to store the modified values.
- In the first row of the new column, enter the formula:
=CLEAN(A1) - Replace
A1with the cell reference you want to clean. - Drag the formula down to apply it to the remaining cells in the column.
- The result will be the original cell content, but with non-printable characters removed.
The CLEAN function helps to eliminate any non-printable characters that may be causing issues with the TRIM function. This can include characters that are not visible in the cell, but are affecting the proper functioning of other functions applied to the data.
By utilizing the CLEAN function, you can effectively clean your Excel data and ensure that unwanted characters are removed, allowing the TRIM function to work accurately and provide the desired results.
Consider Using VBA Code
If the TRIM function, SUBSTITUTE function, and other built-in Excel functions are not able to remove unwanted spaces or characters from your data, you can explore the option of using VBA (Visual Basic for Applications) code to achieve the desired result.
VBA is a programming language that allows you to automate tasks and manipulate data in Excel. With VBA, you can create custom functions or macros to handle specific requirements and address data cleansing issues that cannot be resolved using built-in functions alone.
Here’s an example of using VBA code to remove spaces within a cell:
Sub RemoveSpaces()
    Dim cell As Range

    For Each cell In Selection
        cell.Value = WorksheetFunction.Trim(cell.Value)
    Next cell
End Sub
Here’s how you can use this VBA code:
- Select the range of cells that you want to remove spaces from.
- Press
ALT + F11to open the Visual Basic Editor. - Insert a new module.
- Copy and paste the above VBA code into the module.
- Close the Visual Basic Editor.
- Press
ALT + F8to open the macro dialog box. - Select the
RemoveSpacesmacro and click “Run”.
This VBA code will iterate through each cell in the selected range and use the TRIM function to remove any leading, trailing, or extra spaces within the cell’s content.
By leveraging VBA, you can customize your data cleansing process, ensuring that it is tailored to your specific requirements. This can be particularly useful when dealing with complex data manipulation tasks or when the built-in Excel functions fall short.
Check for Non-Breaking Spaces
When dealing with spaces in Excel that cannot be removed using the TRIM function or other methods, it’s important to consider the presence of non-breaking spaces. Non-breaking spaces, represented by the Unicode character code 160, can cause issues as they appear similar to regular spaces but behave differently.
To check for non-breaking spaces in your Excel data, follow these steps:
- Select the cell or range of cells that you suspect may contain non-breaking spaces.
- Open the “Find and Replace” dialog box by pressing “Ctrl + H”.
- In the “Find what” field, enter
Ctrl + Shift + 2on the number pad to insert a non-breaking space character. - Leave the “Replace with” field empty.
- Click on the “Replace All” button.
- If any non-breaking spaces are found, Excel will remove them.
By checking for non-breaking spaces, you can ensure that you are effectively addressing all possible types of spaces in your data. Removing non-breaking spaces can help resolve issues where the TRIM function is not working as expected.
It’s important to note that non-breaking spaces are often introduced when copying and pasting text from external sources, such as web pages or other documents. These spaces can affect data integrity and cause inconsistencies in spreadsheet calculations, so it’s crucial to identify and remove them as needed.
By being thorough in your space-checking process, you can ensure that all types of spaces, including non-breaking spaces, are properly handled and eliminated from your Excel data.
Reset Page Setup Options
In some cases, the TRIM function may not be working as expected due to the page setup options in your Excel file. These options can affect the display and formatting of the content, including spaces within cells. Resetting the page setup options can help resolve any issues related to the TRIM function not removing spaces.
Here’s how you can reset the page setup options in Excel:
- Click on the “Page Layout” tab in the Excel ribbon.
- In the “Page Setup” group, click on the “Page Setup” dialog box launcher (a small arrow at the bottom-right corner of the group).
- In the “Page Setup” dialog box, navigate to the “Sheet” tab.
- Ensure that the “Print” category is selected on the left side of the tab.
- Under the “Print” category, uncheck the “Gridlines” option.
- Check the “Draft quality” option to disable features such as background images or watermarks that can affect the appearance of cells.
- Click the “OK” button to apply the changes.
By resetting the page setup options, you are adjusting the display and printing settings of your Excel file. This can help eliminate any formatting issues, including spaces, that may be interfering with the functionality of the TRIM function.
It’s worth noting that changing the page setup options won’t affect the actual content of the cells or the data within them. Instead, it focuses on modifying how the data is displayed and printed, ensuring that any unwanted spaces don’t interfere with the TRIM function or other calculations.
By ensuring that your page setup options are appropriately configured, you can overcome any issues that may arise when using the TRIM function in Excel.
Remove Formatting Characters with CODE and CHAR Functions
If you’re still encountering issues with unwanted spaces even after using the TRIM function, it’s possible that there may be formatting characters or special Unicode characters embedded within the cell’s content. These characters can interfere with the TRIM function’s ability to remove spaces. By utilizing the CODE and CHAR functions in Excel, you can identify and eliminate these formatting characters.
Here’s how you can remove formatting characters using the CODE and CHAR functions:
- Select the cell or range of cells that you suspect may contain formatting characters.
- Create a new column or use an empty column to store the modified values.
- In the first row of the new column, enter the formula:
=SUBSTITUTE(A1, CHAR(CODE("A")), "") - Replace
A1with the cell reference you want to remove formatting characters from. - Drag the formula down to apply it to the remaining cells in the column.
- The result will be the original cell content, but with formatting characters removed.
In this example, the SUBSTITUTE function is used to replace a specific character with an empty string. The CODE function is used to return the numeric Unicode value of the character “A”, which is a known formatting character. By replacing this character and others with an empty string, you effectively remove them from the cell’s content.
It’s important to note that you may need to adjust the CODE functions and provide the appropriate Unicode values for the formatting characters you want to remove. You can use the CHAR function to determine the character associated with a specific Unicode value, helping you identify the formatting characters you need to target.
By using the CODE and CHAR functions in combination with SUBSTITUTE, you can successfully remove formatting characters from your Excel data and ensure that the TRIM function works accurately.
Use a Different Text Editor
If you have tried all the previous methods but are still facing issues with removing unwanted spaces in Excel, you may consider using a different text editor to manipulate your data. While Excel provides several built-in functions for text manipulation, there are dedicated text editors that can offer more advanced features and flexibility in handling data.
By exporting your Excel data to a text editor, you can take advantage of its powerful search and replace functionalities specifically designed for handling text. These editors often have various options to remove spaces, special characters, and formatting automatically.
Here are the steps you can follow to use a different text editor:
- Save your Excel data in a CSV (Comma Separated Values) format. Go to “File” -> “Save As” and choose the CSV format.
- Open your preferred text editor, such as Notepad++, Sublime Text, or Atom.
- Import the saved CSV file into the text editor.
- Utilize the text editor’s search and replace functionality to remove unwanted spaces or characters. This can often be done using regular expressions or other advanced search options.
- Save the modified file from the text editor.
- Import the modified CSV file back into Excel.
Using a different text editor can provide more advanced text manipulation capabilities, allowing you to apply complex search and replace operations to your data. These editors often have powerful functionality and customization options that can help you overcome any limitations you may encounter in Excel.
Remember to ensure that your data remains intact and properly formatted after transferring it between Excel and the text editor. You may need to adjust cell formats or data type conversions to retain the original structure and formatting.
By using a different text editor, you can have more control over manipulating and removing unwanted spaces in your Excel data, ultimately achieving the desired results.