
What is the Actions Palette?
The Actions Palette is a powerful feature in Adobe Photoshop that allows users to record and play back a series of commands or operations. These recorded actions can then be applied to multiple images to automate repetitive tasks, saving a significant amount of time and effort.
Think of the Actions Palette as a set of instructions or a script that tells Photoshop exactly what you want it to do. It allows you to streamline your workflow, apply the same adjustments or effects to multiple images, and achieve consistent results efficiently.
The Actions Palette is an incredibly versatile tool that can be used for a wide range of tasks. For example, you can create an action to resize and optimize a batch of images for web use, apply a specific set of adjustments to enhance the lighting and colors, or even create complex effects with just a click of a button.
By utilizing the Actions Palette, you can automate repetitive tasks and free up time for more creative endeavors. It’s a valuable tool for photographers, graphic designers, and anyone who works extensively with image editing and manipulation.
Additionally, the Actions Palette allows you to organize and manage your actions effectively. You can create sets or folders to categorize related actions, making it easier to find and apply the specific actions you need for a particular project.
The Actions Palette is a feature that truly enhances the efficiency and productivity of Photoshop users. Whether you’re a professional or an enthusiast, mastering the use of actions can greatly optimize your workflow and help you achieve consistent and high-quality results.
How to open the Actions Palette
Opening the Actions Palette in Adobe Photoshop is a simple and straightforward process. Here are the different methods to access the Actions Palette:
- Using the Menu Bar: Click on the “Window” menu at the top of the screen and navigate to “Actions” to open the Actions Palette.
- Using the Keyboard Shortcut: Press the “Alt” key (Windows) or the “Option” key (Mac) and simultaneously press the “F9” key to open the Actions Palette.
- Using the Panels Dock: If the Actions Palette is not currently visible, you can access it by clicking on the “Window” menu, selecting “Workspace,” and then choosing “Essentials” or “Default” to display the Panels Dock. From there, click on the “Actions” tab to open the Actions Palette.
Once the Actions Palette is open, it will appear as a separate panel within the Photoshop interface. It can be docked with other panels or placed as a floating window, depending on your preference.
Having the Actions Palette readily accessible allows you to efficiently access and utilize your recorded actions. It provides a centralized location to manage, edit, and organize the actions according to your needs.
With the Actions Palette open, you can maximize the potential of Photoshop’s automation capabilities and streamline your workflow by easily recording, playing, and applying actions to single or multiple images.
Now that you know how to open the Actions Palette, you can start exploring its features and unleash its power in automating repetitive tasks and enhancing your efficiency in Adobe Photoshop.
Creating a new action
The process of creating a new action in the Actions Palette is a fundamental step in harnessing the power of automation in Adobe Photoshop. Follow these steps to create a new action:
- Open the Actions Palette: Access the Actions Palette by following the methods mentioned earlier in this guide.
- Create a New Action Set (Optional): Before creating a new action, you can choose to create a new action set to organize your actions. To do this, click on the folder icon at the bottom of the Actions Palette. Give the set a name and click “OK.”
- Create a New Action: To create a new action, click on the “New Action” button at the bottom of the Actions Palette. A dialog box will appear, allowing you to name the action and assign it to a set. Enter a descriptive name for your action to keep it easily identifiable.
- Choose Recording Options: In the same dialog box, you have the option to set various recording options. You can choose to assign a function key or a keyboard shortcut to activate the action, and you can also choose to enable or disable dialog boxes during the recording process, depending on the requirements of your specific task.
- Start Recording: Click “Record” to start the recording process. Every action you perform from this point forward will be recorded. Be cautious, as all your actions will be captured, including any mistakes or unwanted changes.
- Perform Desired Actions: Begin performing the operations and commands that you want to include in your action. This can include applying filters, adjusting layers, resizing, cropping, or any other operation available in Photoshop.
- Stop Recording: To stop recording, click the “Stop” button in the Actions Palette. The recording will cease, and your new action will be saved.
Congratulations! You have successfully created a new action in Photoshop. Your action is now ready to be applied to single or multiple images to automate the same sequence of operations.
Remember, the flexibility of the Actions Palette allows you to create a wide range of actions to suit your specific needs. Spend some time experimenting with different operations and adjustments to maximize the potential of this powerful tool.
The ability to create custom actions in Photoshop empowers you to streamline your workflow, save time, and achieve consistent results. Take advantage of this feature to optimize your productivity and efficiency in image editing and manipulation.
Recording actions
Recording actions in the Actions Palette is the key to automating repetitive tasks in Adobe Photoshop. By recording a series of operations, you can create a reusable action that can be applied to multiple images, saving you time and effort. Here’s how to record actions:
- Open the Actions Palette: Make sure the Actions Palette is open as explained earlier in this guide. This is where your recorded actions will be stored.
- Select the Action Set: If you have created multiple action sets, choose the set where you want to store the recorded action. Click on the set to select it.
- Create a New Action: Click the “New Action” button at the bottom of the Actions Palette. Give your action a name that represents the task or operation it will perform.
- Start Recording: Once you’ve named your action, click the “Record” button. The recording process will begin, and every action you perform from this point forward will be captured and saved as part of the action.
- Perform the Desired Operations: Now that the recording has started, go ahead and perform the operations you want to include in your action. This can involve adjusting settings, applying filters, cropping, resizing, or any other action available in Photoshop.
- Utilize the Actions Palette: While recording, the Actions Palette is your guide. It displays every step you take, allowing you to review and modify your actions if needed. You can also add pauses, insert commands, or make adjustments directly in the Actions Palette.
- Stop Recording: To stop recording, click the “Stop” button in the Actions Palette. The recording process will end, and your newly recorded action will be saved within the selected action set.
Recording actions enables you to automate repetitive processes and apply them to multiple images with just a few clicks. It eliminates the need to manually perform the same steps over and over again, saving you significant time and effort.
Remember to keep your actions organized within sets, as this makes it easier to locate and apply the relevant actions for specific tasks. You can also edit and refine your actions, and even share them with others or import actions created by fellow Photoshop users to expand your automation capabilities.
With the ability to record actions, you have unlocked one of the most powerful features in Photoshop, allowing you to streamline your workflow and achieve consistent results with ease.
Playing back actions
Playing back actions in the Actions Palette is a simple and efficient way to automate repetitive tasks in Adobe Photoshop. Once you have recorded actions, you can easily apply them to single or multiple images, saving you time and effort. Here’s how to play back actions:
- Open the Actions Palette: Ensure that the Actions Palette is visible by following the methods explained earlier in this guide.
- Select the Action Set: Choose the appropriate action set in which the desired action is stored. Click on the set to select it.
- Expand the Action: Click on the arrow next to the action name in the Actions Palette to expand the recorded steps within the action set.
- Preview the Action (Optional): You can preview the action by clicking on any step within the expanded action set. This allows you to see the changes or adjustments that will be applied to your images.
- Play the Action: To apply the action to a specific image, select the image in Photoshop. Then, click on the “Play” button at the bottom of the Actions Palette. The action will be executed, and the specific operations recorded in the action will be performed on the selected image.
- Apply Actions to Multiple Images: To apply the action to a batch of images, open the “File” menu and choose “Automate,” then select “Batch.” In the Batch dialog box, choose your action set and action from the dropdown menus. Select the source folder or files you want to apply the action to, and designate a destination folder for the modified images. Click “OK” to begin the batch processing. Photoshop will automatically apply the selected action to all the images in the designated folder or files.
- Sit Back and Watch: During the playback process, you can view the progress through a series of status indicators in the Actions Palette and the main Photoshop interface. Sit back and let Photoshop do the work for you.
Playing back actions is a powerful way to automate your workflow and achieve consistent results in Photoshop. It eliminates the need to manually perform repetitive tasks, allowing you to focus on more creative aspects of your work.
Experiment with different actions and apply them to various images to see the amazing time-saving benefits that playing back actions can offer. It’s a feature that will enhance your efficiency and productivity in Photoshop.
Batch processing with actions
Batch processing with actions is a valuable feature in Adobe Photoshop that allows you to apply recorded actions to a large number of images in a single operation. By automating the repetitive tasks across multiple files, you can save valuable time and effort. Here’s how to perform batch processing with actions:
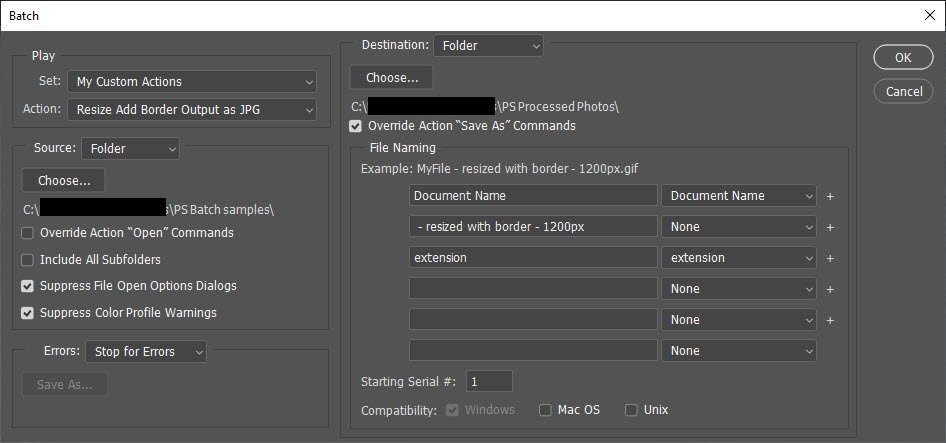
- Access the Batch Processing Dialog: Go to the “File” menu, select “Automate,” and then choose “Batch.” This will open the Batch Processing dialog box.
- Select the Action Set and Action: In the Batch dialog box, choose the action set and the specific action you want to apply to the batch of images. Ensure that the desired action is organized and accessible within the Actions Palette.
- Choose the Source and Destination: Specify the source of the images you want to process. You can choose to process a folder of images, a set of files, or even an entire folder hierarchy. Click the “Choose” button to navigate to the appropriate source location.
- Designate a Destination: Decide on the folder where the modified images will be saved. You can choose an existing folder or create a new one. Click the “Choose” button to select the destination location.
- Set File Naming Options (Optional): If you want to rename the processed files, you can specify the file naming options in the Batch dialog box. This allows you to maintain consistency in naming conventions and organize the output files effectively.
- Choose Other Options: The Batch dialog box provides additional options to tailor the batch processing to your specific requirements. You can choose to suppress file open options, override action “Open” commands, include subfolders when processing a folder, or even stop for errors if necessary.
- Start the Batch Process: Once you have configured all the necessary settings, click the “OK” button to begin the batch processing. Photoshop will automatically apply the selected action to each image in the designated source folder or files.
- Monitor the Progress: During the batch processing, Photoshop will display a progress bar to indicate the completion status. You can also monitor the progress and any potential issues in the Batch dialog box.
Batch processing with actions is a game-changer when dealing with a large number of images that require the same adjustments or operations. It streamlines your workflow, saves time, and ensures consistency across the entire batch.
Experiment with different actions and explore the possibilities of batch processing to optimize your productivity in Photoshop. Whether you’re a photographer, graphic designer, or digital artist, this feature will undoubtedly enhance your efficiency and streamline your image processing tasks.
Automating repetitive tasks with actions
Automating repetitive tasks is a key benefit of using actions in Adobe Photoshop. With actions, you can record a series of operations and apply them to multiple images, eliminating the need to manually perform the same steps over and over again. Here’s how you can automate repetitive tasks using actions:
- Record the Action: Start by recording the desired action in the Actions Palette. This involves performing the operations and commands that you want to automate. As you perform each step, Photoshop records it as part of the action.
- Refine the Action (Optional): After recording the initial action, you can refine it by opening the action set and modifying individual steps. This allows you to fine-tune the recorded operations and ensure that the automated task meets your requirements accurately.
- Apply the Action to Single Images: To apply the action to a single image, open the image in Photoshop and select the desired action from the Actions Palette. Click on the “Play” button, and the recorded steps will be executed, instantly applying the changes to the image.
- Apply the Action to Multiple Images: For batch processing, select the desired action and choose the “Batch” option from the “Automate” submenu in the “File” menu. Specify the source folder or files, and designate a destination folder for the modified images. Photoshop will then automatically apply the action to each image in the batch.
- Save Time and Increase Efficiency: By automating repetitive tasks with actions, you can save a significant amount of time and effort. Actions allow you to streamline your workflow, achieve consistent results, and focus on more creative aspects of your work.
- Expand Your Automation Capabilities: Take advantage of advanced features in the Actions Palette, such as conditional statements and batch renaming, to further enhance your automation capabilities. These features allow you to create more sophisticated actions that adapt to specific conditions or perform complex tasks.
- Share and Import Actions: The Actions Palette also allows you to share your actions with others or import actions created by fellow Photoshop users. This provides an opportunity to learn from others and expand your library of actions, opening up new possibilities for increased automation.
By automating repetitive tasks with actions, you can streamline your workflow and increase your productivity in Adobe Photoshop. It empowers you to work more efficiently and consistently, ultimately allowing you to focus on the creative aspects of your work.
Explore the various automation possibilities with actions and experiment with creating and applying different actions to achieve the best results. The more you use actions, the more you’ll discover their invaluable role in optimizing your Photoshop workflow.
Organizing actions into sets
Organizing actions into sets is a helpful practice to keep your Actions Palette neat, tidy, and efficiently structured in Adobe Photoshop. Creating sets allows you to group related actions together, making it easier to find and apply the appropriate actions for specific tasks. Here’s how you can organize actions into sets:
- Open the Actions Palette: Start by ensuring that the Actions Palette is visible in Photoshop. If it isn’t, you can open it by navigating to the “Window” menu and selecting “Actions”.
- Create a New Set: To create a new set, click on the folder icon at the bottom of the Actions Palette. This will prompt a dialog box where you can enter a name for the set.
- Name the Set: Choose a descriptive name for the set that reflects the theme or purpose of the actions it will contain. For example, you could create sets for specific photo editing techniques, design effects, or workflow automation.
- Add Actions to the Set: With the set created, you can begin categorizing your existing actions or creating new ones to add to the set. Simply drag and drop the actions onto the set folder in the Actions Palette to organize them accordingly.
- Create Sub-Sets (Optional): For further organization, you can create sub-sets within a set. Right-click on a set folder and select “New Set” to create a sub-set. This allows you to organize actions within a hierarchical structure for even easier navigation and management.
- Reorder Sets and Actions: If needed, you can rearrange the order of sets and actions within the Actions Palette. Simply click and drag the sets or actions to the desired position to rearrange them according to your workflow and preferences.
- Delete Sets or Actions (Optional): If you no longer need a set or an action, you can right-click on it and select “Delete” to remove it from the Actions Palette. Exercise caution when deleting sets or actions, as this action cannot be undone.
Organizing actions into sets provides several benefits. It allows you to maintain a clean and organized workspace, making it easier to locate and apply the specific actions you need for a particular project. Additionally, it enhances efficiency by reducing the time spent searching for actions and allows for a more intuitive and streamlined workflow.
Developing a systematic approach to organizing actions into sets ensures that you can effectively manage and utilize the vast array of actions available in Photoshop. It is worth the initial investment of time and effort as it leads to increased efficiency and enhances your overall productivity when working with actions.
Take advantage of the flexibility offered by organizing actions into sets to suit your specific requirements. Continuously evaluate and refine your organization system to accommodate any new actions or changes to your workflow in order to maximize the benefits of this organizational feature.
Editing actions
Editing actions in the Actions Palette gives you the flexibility to modify and customize recorded actions to better suit your specific needs and preferences in Adobe Photoshop. Whether you need to make minor adjustments or add new steps, editing actions allows you to refine and optimize your automated workflow. Here’s how you can edit actions:
- Open the Actions Palette: Start by making sure that the Actions Palette is visible in Photoshop. If not, you can open it by navigating to the “Window” menu and selecting “Actions”.
- Select the Action: Choose the action you want to edit by clicking on its name in the Actions Palette. The selected action will be highlighted.
- Expand the Action Set: If the action is within a set, click on the arrow next to the set folder to expand the list of actions.
- Review the Recorded Steps: Once the desired action is expanded, examine the series of steps that were recorded. These steps represent the operations that will be applied when the action is played back.
- Edit the Steps: To make changes to individual steps, double-click on the step you want to modify. A dialog box will appear, allowing you to adjust the settings or parameters according to your requirements.
- Add or Remove Steps: If you need to add or remove steps, right-click on the action or step within the Actions Palette and select the appropriate option. To add a new step, record the desired operations as you would when creating a new action.
- Modify the Action Name (Optional): To change the name of the action, double-click on the action’s name in the Actions Palette and enter the new name.
- Save the Changes: Once you have made the necessary edits, the changes will be automatically saved within the action. It is important to note that any changes you make will affect all instances of the action that you have recorded.
Editing actions allows you to adapt and refine your automation process as per your evolving requirements. By making modifications, you can tailor the recorded steps to produce the desired results effectively.
Regularly reviewing and updating your actions enhances your efficiency and optimizes your workflow. It enables you to maintain consistency, improve the quality of your automated tasks, and adapt to new techniques or developments in Photoshop.
Experimentation and iteration are key when it comes to editing actions. Continuously explore and refine your actions to ensure they align with your evolving workflow and creative vision.
Keyboard shortcuts for actions
Keyboard shortcuts provide an efficient way to access and execute actions in Adobe Photoshop, allowing you to streamline your workflow and save time. By assigning keyboard shortcuts to frequently used actions, you can quickly apply them with a simple keystroke. Here’s how you can utilize keyboard shortcuts for actions:
- Open the Actions Palette: Ensure that the Actions Palette is visible in Photoshop. If not, you can open it by navigating to the “Window” menu and selecting “Actions”.
- Select the Action: Choose the action to which you want to assign a keyboard shortcut by clicking on its name in the Actions Palette.
- Open the Context Menu: Right-click on the action or step within the Actions Palette to open the context menu.
- Assign a Keyboard Shortcut: In the context menu, select “Insert Menu Item” or “Insert Menu Item (Keyboard Shortcut)” to assign a keyboard shortcut to the action. A dialog box will appear, allowing you to enter the desired keyboard shortcut.
- Assign Modifier Keys (Optional): If you want to assign a keyboard shortcut with modifier keys, such as Shift, Ctrl (Command on Mac), or Alt (Option on Mac), you can specify the modifier keys in the dialog box. This allows for more intricate and personalized keyboard shortcut combinations.
- Create Custom Keyboard Shortcuts: If the desired keyboard shortcut is already assigned to another action or menu item, Photoshop will prompt you to create a custom keyboard shortcut. Follow the instructions to enter a unique keyboard shortcut for the selected action.
- Test the Keyboard Shortcut: Once the keyboard shortcut is assigned, close the context menu and use the assigned keystroke combination to quickly execute the action. This provides a swift and efficient way to apply common operations or commands.
- Modify Keyboard Shortcuts (Optional): If you want to modify or remove a keyboard shortcut, navigate to the “Edit” menu, select “Keyboard Shortcuts,” and then choose the “Shortcuts for Actions” option. From there, you can make changes to the assigned keyboard shortcuts as needed.
Utilizing keyboard shortcuts for actions allows you to access and execute your most commonly used actions with ease. It eliminates the need to navigate through menus or manually search for actions, resulting in a more seamless and efficient workflow.
Customizing keyboard shortcuts to match your preferences and workflow strengthens your efficiency, enabling you to work more quickly and effectively in Adobe Photoshop. By assigning shortcuts that align with your muscle memory and habits, you can optimize your productivity and achieve more consistent results.
Keep in mind to document and regularly review your assigned keyboard shortcuts. This will help you remember them and make adjustments if necessary, ensuring that you can fully leverage the power of keyboard shortcuts in Photoshop.
Importing and exporting actions
The ability to import and export actions in Adobe Photoshop allows you to easily share your customized actions with others or utilize actions created by fellow Photoshop users. Importing actions allows you to expand your library and access new automation possibilities, while exporting actions enables you to share your own creations. Here’s how you can import and export actions:
- Importing Actions:
- Locate the Action File: Obtain the action file (.atn) that you want to import. This can be received from another user, downloaded from online resources, or taken from a backup.
- Open the Actions Palette: Ensure that the Actions Palette is visible in Photoshop. If not, you can open it by navigating to the “Window” menu and selecting “Actions”.
- Access the Actions Menu: Click on the Actions Palette menu icon (the small right-facing arrow at the top right corner) to open the actions menu.
- Select “Load Actions”: From the actions menu, choose “Load Actions” or “Replace Actions.” A file dialog box will appear.
- Choose the Action File: In the file dialog box, locate and select the action file (.atn) that you want to import. Click “Load” to import the actions into Photoshop.
- Confirm the Import: Once the file is loaded, the imported actions will be displayed in the Actions Palette, ready for use.
- Exporting Actions:
- Open the Actions Palette: Ensure that the Actions Palette is visible in Photoshop.
- Select the Actions to Export: Choose the action set or specific actions you want to export by clicking on them in the Actions Palette. To select multiple actions, hold down the Ctrl (Command on Mac) key while clicking.
- Access the Actions Menu: Click on the Actions Palette menu icon to open the actions menu.
- Select “Save Actions”: From the actions menu, choose “Save Actions.” A file dialog box will appear.
- Choose the Save Location: In the file dialog box, select the folder where you want to save the action file (.atn). Provide a name for the file and click “Save” to export the actions.
- Confirmation: After saving the file, you can share it with others, back it up for yourself, or use it to import the actions into another Photoshop installation.
Importing and exporting actions opens up a world of possibilities for sharing and utilizing customized actions in Adobe Photoshop. It allows you to benefit from the expertise and creativity of others, while also being able to contribute and share your own innovative actions.
By importing actions, you can access new techniques, styles, or automation scripts developed by experienced Photoshop users. Exporting actions, on the other hand, lets you share your unique actions with colleagues, clients, or the broader Photoshop community.
Whether you’re importing or exporting actions, this functionality enhances your workflow by expanding your toolkit and fostering collaboration within the Photoshop community. Take advantage of this feature to explore new possibilities and enhance your creative endeavors.
Troubleshooting common issues with actions
While working with actions in Adobe Photoshop, you may encounter some common issues that can hinder the smooth execution and optimal performance of your automated tasks. Understanding and troubleshooting these issues will help you resolve them efficiently. Here are some common issues you may encounter with actions and how to troubleshoot them:
- Action Not Playing Back Correctly:
- Check Compatibility: Ensure that the action you recorded is compatible with the version of Photoshop you are using.
- Adjust Preferences: Some actions rely on specific preferences or settings. Check your Photoshop preferences to ensure they are correctly configured for the action to function as intended.
- Layer or Selection Dependencies: If the action refers to specific layers or selections, make sure those elements are present and correctly named or selected in the files you are applying the action to.
- Repair or Rerecord the Action: If the issue persists, you may need to repair or rerecord the action, ensuring that all necessary steps are properly captured.
- Review Actions Log (Window > Actions): Use the Actions Log to identify any error messages or warnings that could indicate the cause of playback issues.
- Action Not Available or Missing:
- Check Sets and Actions: Verify that the action you are looking for is located in the correct action set or folder.
- Reload Actions: Try reloading or reimporting the actions that are missing to ensure they are properly registered within the Actions Palette.
- Reset Actions: In some cases, resetting the Actions Palette can help resolve issues related to missing or unavailable actions. To do this, click on the Actions Palette menu icon, choose “Reset Actions,” and confirm the reset.
- Actions Not Working on Batch Processing:
- Check File Compatibility: Ensure that the file formats and properties of the images you are batch processing are compatible with the actions being applied.
- Confirm File Naming and Location Settings: Verify that you have correctly designated the source and destination folders, including specifying any subfolder options, when setting up the batch processing.
- Combine Actions: In some cases, combining multiple actions into a single action set or action can help resolve issues with batch processing.
- Test on Individual Images: Try applying your actions on a few individual images first to confirm their proper functioning and identify any issues.
- Unexpected Results or Errors:
- Review Recorded Steps: Carefully examine the recorded steps within the action to identify any inconsistencies, incorrect selections, or missing commands that could be causing unexpected results or errors.
- Adjust Action Settings: Modify the settings or attributes of individual steps in the action to fine-tune their behavior and resolve any unexpected results.
- Recreate the Action: As a last resort, if the issue cannot be resolved, consider recreating the action from scratch, ensuring that you capture all necessary steps accurately.
- Seek Community Help: If you are unable to resolve the issue on your own, reach out to the Photoshop community forums or seek assistance from experienced users who may have encountered similar problems.
Troubleshooting common issues with actions requires a systematic approach and attention to detail. By understanding and addressing these issues, you can ensure the smooth execution of your actions and maximize the efficiency of your workflow in Adobe Photoshop.
Be patient and persistent when troubleshooting, as it may take some trial and error to identify and resolve the root cause of the problem. Don’t hesitate to seek help and guidance from the Photoshop community or online resources to expedite the troubleshooting process.
Remember, troubleshooting is a valuable skill that will help you overcome obstacles and unleash the full potential of actions for automation in Photoshop.