
What is the Save for Web Tool in Photoshop?
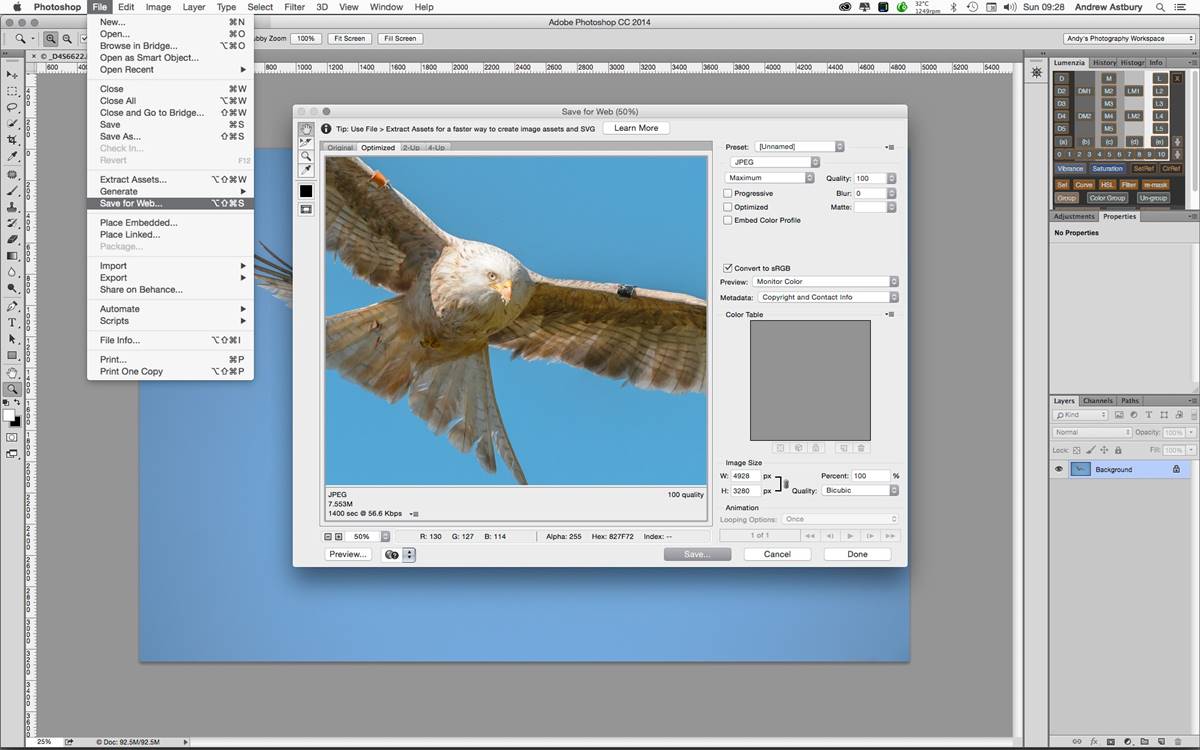
The Save for Web tool in Photoshop is a powerful feature that allows you to optimize and export images specifically for use on the web. It provides a variety of options to help you balance image quality with file size, ensuring that your web images load quickly and look visually appealing.
When you create an image in Photoshop and save it using the Save for Web tool, you can choose the appropriate file format, adjust image quality, optimize colors, and even crop or resize the image to fit specific web requirements. This tool is especially useful when you need to enhance website performance by reducing the file size without compromising image quality.
One of the key advantages of using the Save for Web tool is the ability to select the optimal file format for your web graphics. Depending on the nature of the image, you can choose between JPEG, PNG, and GIF formats. Each format has its own strengths and is suitable for different types of graphics. For example, JPEG is ideal for photographs and complex images with many colors, while PNG is best for graphics with transparent backgrounds or sharp edges. GIF, on the other hand, is commonly used for animated images or simple graphics with limited colors.
Another important aspect of the Save for Web tool is the ability to adjust image quality and file size. By balancing these two factors, you can achieve the optimal combination that ensures your images look good but load quickly. If the file size is too large, it can cause your website to load slowly, resulting in a poor user experience. The Save for Web tool lets you find that sweet spot by adjusting the image quality and reducing the file size while maintaining acceptable visual quality.
In addition to adjusting image quality and file size, the Save for Web tool allows you to optimize colors and apply dithering. Sometimes, when you reduce the number of colors in an image, it can result in banding or artifacts. Dithering adds a subtle pattern of colors to the image, which helps to smooth out these transitions and maintain visual fidelity.
Furthermore, the Save for Web tool enables you to crop and resize images. This can be particularly useful when working with images that need to fit within specific dimensions on a web page. Instead of using a separate image editing software, you can easily make these adjustments directly in Photoshop while saving for the web.
Previewing can be another valuable feature of the Save for Web tool. It allows you to see how your image will look in different web browsers and on various devices. This helps to ensure that your images are optimized for a wide range of users, regardless of the device or browser they are using.
Overall, the Save for Web tool in Photoshop is an essential tool for any web designer or developer. It provides the necessary tools and options to optimize your images for the web, ensuring faster loading times and a better user experience.
The Benefits of Using the Save for Web Tool
The Save for Web tool in Photoshop offers numerous benefits to web designers and developers. Here are some of the key advantages of utilizing this tool:
1. Optimized image quality: The Save for Web tool allows you to balance image quality with file size, ensuring that your images maintain visual appeal while still loading quickly on the web. By adjusting the image quality settings, you can find the perfect balance that meets your specific needs.
2. Reduced file size: Large file sizes can significantly impact website loading times, leading to a poor user experience and potentially affecting search engine rankings. The Save for Web tool offers various compression options to reduce the file size without compromising image quality, resulting in faster page load times.
3. Flexible file format choices: With the Save for Web tool, you have the flexibility to choose the ideal file format for your web graphics. Whether it’s JPEG for photographs, PNG for images with transparency, or GIF for animated graphics, you can optimize each image to suit its specific requirements.
4. Customizable color optimization: Optimizing colors is crucial for web graphics. The Save for Web tool enables you to adjust color settings, reducing the number of colors if needed, while still maintaining visual fidelity. It also provides the option to apply dithering, which helps to smooth out color transitions and minimize banding.
5. Efficient cropping and resizing: Instead of using a separate image editing tool, the Save for Web tool allows you to crop and resize images directly within Photoshop. This streamlines your workflow and saves time, ensuring that your images fit perfectly within the dimensions of your web design.
6. Cross-browser and device compatibility: Previewing your images in different web browsers and devices is essential to ensure consistent visual presentation. With the Save for Web tool, you can easily preview how your images will appear on various browsers and devices, making it easier to optimize them for a wide range of users.
7. Integrated workflow: As part of Photoshop, the Save for Web tool seamlessly integrates with your overall design workflow. By having all the necessary optimization features within one software, you can save time and effort, eliminating the need for additional tools or software.
8. Enhanced user experience: By using the Save for Web tool to optimize your images, you contribute to a better user experience on your website. Faster loading times, visually appealing graphics, and compatibility across devices all contribute to a positive user experience that keeps visitors engaged and encourages them to explore your site further.
Understanding the Different File Formats
When using the Save for Web tool in Photoshop, it’s important to understand the different file formats available and their suitability for different types of web graphics. Here’s a breakdown of the most common file formats:
1. JPEG (Joint Photographic Experts Group): JPEG is a widely used file format for web graphics, especially photographs or images with complex color gradients. It supports millions of colors and uses lossy compression, which means it reduces file size by discarding some image information. While JPEG compression can lead to a slight loss in quality, it allows for a significant reduction in file size with minimal visible artifacts.
2. PNG (Portable Network Graphics): PNG is a versatile file format that is commonly used for images with transparency or sharp edges, such as logos or icons. It supports lossless compression, meaning that no image data is lost during compression. This results in higher quality images but with larger file sizes compared to JPEG. PNG also supports different levels of transparency, including full transparency, making it ideal for creating graphics with a transparent background.
3. GIF (Graphics Interchange Format): GIF is often associated with animated images, but it is also suitable for simple web graphics with limited colors or areas of flat color. GIF supports a maximum of 256 colors and uses lossless compression. It is commonly used for buttons, icons, and line art. Additionally, GIF supports animation, allowing for the creation of small animated graphics or banners.
When choosing between these file formats, consider the characteristics of your image and the purpose it serves on your website. If your graphic is a photograph or has complex colors, such as a product image or a landscape photograph, JPEG is typically the best choice. For graphics with transparency, sharp edges, or a need for lossless compression, PNG is the recommended option. Finally, if you have a simple graphic with limited colors or require animation, GIF is the appropriate format.
It’s worth noting that the Save for Web tool in Photoshop provides specific settings for each file format. You can customize parameters such as transparency, color depth, dithering, and more to optimize the final output according to your needs.
By understanding the different file formats and their characteristics, you can make informed decisions when saving images for the web. This ensures that your graphics maintain optimal quality, load quickly, and are well-suited for their intended purpose on your website.
Adjusting the Image Quality and File Size
When using the Save for Web tool in Photoshop, one of the key considerations is finding the right balance between image quality and file size. This balance ensures that your web graphics look visually appealing while still loading quickly. Here’s how you can adjust the image quality and file size:
1. Image quality settings: The Save for Web tool allows you to control the level of image compression. JPEG compression, for example, offers a quality slider that ranges from low to high. By moving the slider, you can find the optimal balance between file size and image quality. Keep in mind that increasing compression leads to smaller file sizes but may result in a slight loss of visual fidelity. Experiment with different settings to find the sweet spot where image quality remains acceptable while reducing file size.
2. Compression techniques: In addition to adjusting the image quality, the Save for Web tool offers various compression techniques to further optimize file size. These techniques, such as subsampling and progressive encoding, help to reduce the amount of information stored in the file, resulting in smaller file sizes. Experiment with these techniques to see how they affect the image quality and file size, and choose the ones that best suit your needs.
3. Resolution adjustment: Resizing your image can also impact file size. The Save for Web tool allows you to specify the output dimensions for your web graphic. By reducing the resolution, or pixel dimensions, of the image, you can significantly decrease the file size without sacrificing too much quality. The key is to find the right balance between file size reduction and maintaining the necessary level of detail for your graphic.
4. Removing unnecessary metadata: Metadata, such as camera information or creation date, can add unnecessary weight to the file size of your web graphics. The Save for Web tool allows you to remove or significantly reduce metadata, further reducing the overall file size without affecting the visual quality of the image.
5. Previewing and optimizing: The Save for Web tool provides real-time previews of your image with different quality and file size settings. Take advantage of this feature to compare the different options and choose the one that meets your desired balance of image quality and file size. Regularly previewing and optimizing your images can help ensure faster loading times without compromising the visual integrity of your graphics.
6. Batch processing: If you have multiple images that need to be saved for the web, the Save for Web tool allows you to process them in batches. This feature saves time and allows for consistent optimization across all your web graphics, ensuring a seamless and efficient workflow.
By adjusting the image quality and file size using the Save for Web tool in Photoshop, you can optimize your web graphics for fast loading times while still maintaining a visually appealing appearance. Striking the right balance allows your website visitors to enjoy your content without delays, resulting in an enhanced user experience.
Optimizing Colors and Dithering
Optimizing colors is an important aspect of preparing web graphics with the Save for Web tool in Photoshop. By adjusting colors and applying dithering, you can ensure that your images look their best while minimizing file size. Here’s how you can optimize colors and utilize dithering:
1. Color reduction: The Save for Web tool allows you to reduce the number of colors used in an image. This can be especially useful for graphics with limited color palettes, such as logos or icons. By reducing the number of colors, you can significantly decrease the file size without compromising image quality. Experiment with different color reduction settings to find the optimal balance between file size and visual fidelity.
2. Color settings: The Save for Web tool provides options to control color settings such as color table size and color depth. The color table size determines the number of colors that can be used in an image, while color depth specifies the number of bits used to store each pixel’s color information. Adjusting these settings can help you achieve the right balance between color accuracy and file size. Higher color depth results in more accurate color representation but increases file size, while lower color depth reduces file size but can lead to color approximation.
3. Previewing color adjustments: To ensure that the color optimizations are visually acceptable, the Save for Web tool provides real-time previews of how the image will look with different color settings. Utilize this feature to compare the results and select the color options that best suit your needs, taking into account both aesthetics and file size considerations.
4. Dithering: Dithering is a technique used to simulate colors that are not present in the color palette by using small patterns of existing colors. When reducing colors in an image, dithering can help smooth out color transitions and minimize banding or visible artifacts. The Save for Web tool offers dithering options such as diffusion, pattern, and noise, allowing you to choose the one that achieves the best visual result for your image. Be mindful that excessive dithering can increase file size, so adjust the dithering settings accordingly.
5. Color profiles: When working with color-sensitive images, such as photographs or graphics with precise color accuracy requirements, it’s essential to consider color profiles. The Save for Web tool supports different color profiles, allowing you to maintain the intended color appearance of your image across different devices and web browsers. By choosing the appropriate color profile, you can ensure consistent and accurate color representation.
6. Exporting as an indexed image: If your image contains limited colors or is suitable for the indexed color format, consider exporting it as an indexed image. Indexed images use a color table to represent the image’s colors, resulting in smaller file sizes and more efficient color optimization. This can be particularly useful for graphics with solid color regions or graphics with a specific color scheme.
By optimizing colors and utilizing dithering effectively, you can ensure that your web graphics look visually appealing while keeping file sizes optimized for fast loading times. Experiment with different color settings and dithering options to achieve the best balance between color accuracy and file size for each specific graphic.
Cropping and Resizing Images
The Save for Web tool in Photoshop not only allows you to optimize image quality and file size, but it also provides the capability to crop and resize images to fit specific web requirements. Here’s how you can take advantage of the cropping and resizing features:
1. Cropping: Cropping an image involves removing unwanted parts of the image to focus on a specific subject or to fit within a certain aspect ratio. With the Save for Web tool, you can easily crop an image by selecting the Crop tool and defining the desired area. This allows you to remove unnecessary elements or emphasize the main subject of the image, ensuring that your web graphics are visually compelling and well-composed.
2. Resizing: Resizing an image involves adjusting its dimensions to fit specific requirements, such as the dimensions of a web page or the maximum width of a blog post. The Save for Web tool allows you to set the output dimensions by specifying pixel values in the Image Size settings. Resizing an image to an appropriate size ensures that it fits seamlessly into your website layout, preventing the need for the browser to resize the image, which can negatively impact both the loading time and the visual quality.
3. Maintaining aspect ratio: When resizing an image, it’s important to maintain the aspect ratio to avoid distorting the image’s proportions. With the Save for Web tool, you can ensure that the aspect ratio remains intact by enabling the “Constrain Proportions” option. This proportionate resizing ensures that the image maintains its original dimensions relative to the width or height, preserving the integrity and intended visual representation of the image.
4. Previewing the changes: The Save for Web tool provides a real-time preview of the image as you make cropping and resizing adjustments. This allows you to visualize how the changes will impact the final output, ensuring that the image fits perfectly within the desired dimensions and maintains its visual appeal. Use this preview feature to fine-tune the cropping or resizing until you achieve the desired result.
5. Batch processing: If you have multiple images that need to undergo cropping and resizing, the Save for Web tool offers the ability to process images in batches. This efficient feature saves time and allows for consistent cropping and resizing across your web graphics, ensuring a cohesive and professional look throughout your website.
By leveraging the cropping and resizing features of the Save for Web tool, you can ensure that your web graphics fit seamlessly into your website design while maintaining their visual integrity. Whether it’s cropping out distractions, highlighting key elements, or resizing to the appropriate dimensions, these functionalities enable you to present your images in the best possible way, enhancing the overall user experience of your website visitors.
Previewing the Image in Different Browsers and Devices
One of the significant advantages of using the Save for Web tool in Photoshop is the ability to preview how your images will look in different web browsers and on various devices. This feature allows you to ensure that your web graphics are optimized for a wide range of users and provide a consistent visual experience. Here’s how you can take advantage of the previewing capabilities:
1. Browser compatibility: Different web browsers may render images slightly differently, so it’s crucial to preview your images in multiple browsers to ensure consistent visual presentation. The Save for Web tool offers a preview feature that allows you to switch between different web browsers, such as Chrome, Firefox, Internet Explorer, and Safari. By checking how your images appear across these browsers, you can identify any compatibility issues and make adjustments as necessary to ensure a consistent look.
2. Device responsiveness: With the proliferation of various devices, including smartphones, tablets, and desktop computers, it’s essential to ensure that your web graphics adapt well to different screen sizes and resolutions. The Save for Web tool enables you to preview your images on different devices, such as iPhone, iPad, Android devices, and desktop screens. By doing so, you can ensure that your images scale properly and maintain their visual impact across a range of devices.
3. Color accuracy: Different devices and browsers may vary in terms of color rendering. Previewing your images in different environments allows you to verify that the colors appear as intended. If you notice any discrepancies, you can make color adjustments or choose appropriate color profiles to ensure consistent color representation across devices and browsers.
4. Check for artifacts and compression issues: Previewing your images also helps you identify any compression artifacts or quality issues that may occur due to optimization settings. By carefully examining the previewed images, you can determine whether further adjustments are necessary to optimize the image quality while maintaining an acceptable file size.
5. Iterative optimization: The preview feature of the Save for Web tool allows you to make iterative adjustments to fine-tune your web graphics. By previewing the images after each adjustment, you can compare the results and ensure that the changes made have the desired impact on visual quality and compatibility.
6. User experience optimization: The ability to preview your images in different browsers and devices helps ensure that your website provides a seamless and enjoyable user experience. By optimizing your images for various platforms, you enhance accessibility and engagement for users across different devices, contributing to an overall positive browsing experience.
By utilizing the previewing capabilities of the Save for Web tool, you can proactively address compatibility issues, optimize image quality, and create a cohesive visual experience for users across different browsers and devices. Regularly previewing your images will help you identify any issues and make necessary adjustments to ensure that your web graphics are accessible, visually appealing, and optimized for the best user experience possible.
Utilizing the Slice Tool for Web Graphics
The Slice tool in Photoshop is a powerful feature that allows you to divide an image into smaller sections called slices. This tool is especially useful for optimizing web graphics that contain multiple elements or interactive components. By utilizing the Slice tool effectively, you can enhance the performance and visual appeal of your web graphics. Here’s how you can make the most of the Slice tool:
1. Dividing the image: With the Slice tool, you can easily divide your image into separate sections or slices. This is particularly beneficial when designing graphics for websites that require interactive elements, such as buttons, navigation menus, or image maps. By dividing your image into smaller slices, you can optimize each section individually, ensuring that only necessary elements are loaded when displayed or interacted with, resulting in improved performance and faster page load times.
2. Defining slice properties: Once you have created the slices, you can specify properties for each slice, such as URL links, alt text, and optimization settings. This allows you to create clickable areas within the image or specify alternative text for screen readers and visually impaired users. Moreover, you can customize optimization settings for each slice, choosing the appropriate file format and compression settings based on the content of each section.
3. Optimizing individual slices: By optimizing each slice individually, you can ensure that the level of compression, file format, and other settings align with the content of that specific part of the image. For example, if a slice contains text or high-detail graphics, you may want to choose a file format that provides higher image quality, such as PNG, while sections with simple graphics or solid colors can be saved as a JPEG with higher compression to reduce file size. Optimizing individual slices allows for greater control over the presentation and performance of different components within the image.
4. Exporting optimized slices: Once you have defined the properties and optimized each slice, you can export them individually. The Save for Web tool in Photoshop allows you to export the slices as separate image files or as an HTML file with the necessary code to display the slices on a web page. This provides flexibility in how you use and implement the optimized slices within your web design.
5. Creating rollover effects: The Slice tool can also be utilized to create rollover effects, where an image changes or transitions when a user hovers over it. By creating separate slices for each state of the rollover effect (e.g., normal and hover), you can define properties and optimize them individually. This allows you to create interactive and engaging visuals on your website using CSS or JavaScript, enhancing user interaction and user experience.
6. Efficient prototyping: The Slice tool is instrumental in the prototyping phase of web graphics design. It enables you to divide the design into functional elements and simulate their behavior or interactivity by linking slices to different pages or sections. This creates an interactive prototype that can be shared and tested with stakeholders or clients before final implementation, ensuring that all functionality and desired visual effects are achieved.
By effectively utilizing the Slice tool in Photoshop, you can optimize your web graphics by dividing them into smaller sections, customizing optimization settings for each slice, and creating interactive elements. This results in improved performance, faster loading times, enhanced user experience, and the ability to showcase engaging designs on your website.
Photoshop Save for Web vs. Save As: Which is the Better Option?
When it comes to saving images for the web in Photoshop, you have two primary options: Save for Web and Save As. While both methods serve the purpose of saving images, they differ in functionality and intended use. Let’s compare the two to determine which option is the better choice:
Save for Web: The Save for Web tool in Photoshop is specifically designed for optimizing images for use on the web. It offers a wide range of features and settings to help you strike the right balance between image quality and file size. With Save for Web, you can choose the appropriate file format, adjust image quality settings, optimize colors, and even crop or resize the image to fit web requirements. This tool provides real-time previews and allows you to optimize each slice individually, resulting in optimized images that load quickly without sacrificing visual appeal.
Save As: The Save As option in Photoshop allows you to save images in various file formats, including JPEG, PNG, GIF, and more. Unlike Save for Web, Save As does not offer the same level of optimization and customization for web graphics. It saves the image with the selected file format and compression settings, but it does not provide the same control over image quality, color optimization, or file size reduction. Save As is more suitable for general image saving purposes, such as archiving or preparing images for print.
So, which option is better? It depends on your specific needs and the intended use of the image. If you are designing or developing for the web and require optimized images with fast load times, Save for Web is the preferred choice. It provides more flexibility and control over image optimization, allowing you to fine-tune settings to achieve the ideal balance between image quality and file size. Save for Web ensures that your web graphics look their best and perform optimally on a wide range of devices and browsers.
On the other hand, if you are not concerned with web optimization or you need to save images for purposes other than the web, such as print or archival purposes, then Save As is the more suitable option. It allows you to choose a file format and compression settings without the same level of optimization customization offered by Save for Web.
It’s important to note that while Save for Web is a powerful tool for optimizing web graphics, it may not be suitable for all images. If you have high-resolution photos or images with complex details, it might be better to use Save As to preserve image quality. However, for most web-oriented graphics such as icons, logos, or website images, Save for Web is the superior option for achieving optimal performance and visual appeal.
Ultimately, the choice between Save for Web and Save As depends on your specific needs and the purpose of the image. Assess the requirements of your project and consider the level of optimization and customization you require to determine which option is the better fit for your particular situation.
Tips and Tricks for Efficiently Using the Save for Web Tool
The Save for Web tool in Photoshop offers many powerful features for optimizing web graphics. To make the most of this tool and streamline your workflow, here are some tips and tricks to efficiently use the Save for Web tool:
1. Understand the different file formats: Familiarize yourself with the different file formats available, such as JPEG, PNG, and GIF. Understand the strengths and use cases for each format to choose the most suitable option for your specific web graphic.
2. Use keyboard shortcuts: Utilize keyboard shortcuts to speed up your workflow. For example, you can press Ctrl + Shift + Alt + S (Command + Option + Shift + S on a Mac) to quickly access the Save for Web dialog box.
3. Set up custom presets: Save time by creating custom presets for commonly used optimization settings. This allows you to quickly apply the same settings to multiple images without having to manually adjust each time.
4. Preview images with different optimization settings: Use the preview feature to compare how your web graphics look with different image quality and compression settings. This helps you find the optimal balance between file size and visual quality.
5. Optimize colors using color tables: Experiment with color tables to reduce the number of colors used in an image. This can significantly reduce file size without impacting the visual appeal of your web graphics.
6. Utilize the built-in slicing feature: If your web graphic contains interactive elements or buttons, take advantage of the slicing feature. It allows you to divide the image into smaller sections, optimize them individually, and add interactivity or links to each slice.
7. Minimize metadata: Remove unnecessary metadata from your web graphics to reduce file size. Metadata such as camera information or creation date can add unnecessary weight to the file without providing any benefit for web display.
8. Optimize images for responsive design: If you are designing for responsive websites, consider optimizing images for different breakpoints and screen sizes. This ensures that your web graphics look their best across various devices and resolutions.
9. Experiment with dithering: Dithering can help reduce banding and improve the visual quality of images with limited color palettes. Experiment with different dithering options to achieve the desired result.
10. Regularly check browser compatibility: With the ever-evolving web landscape, it’s essential to regularly test your web graphics in different web browsers and devices. This helps identify any compatibility issues, allowing you to make necessary adjustments and optimizations.
11. Keep the balance between file size and visual quality: Remember that the ultimate goal is to strike a balance between file size and visual quality. Prioritize optimizations that significantly reduce file size without compromising the overall visual appeal of your web graphics.
By incorporating these tips and tricks into your workflow, you can efficiently utilize the Save for Web tool in Photoshop. This will not only save you time but also lead to optimized web graphics that load quickly and provide an exceptional visual experience for your website visitors.