
Choosing the Right File Format in GIMP
When saving an image in GIMP, it’s important to choose the right file format to ensure optimal quality and compatibility. While GIMP supports a wide range of file formats, one of the most commonly used formats for saving images is JPEG.
JPEG, short for Joint Photographic Experts Group, is a popular file format for images due to its small file size and good compression capabilities. It is ideal for photographs and images with complex color gradients, as it maintains a relatively high level of detail while keeping the file size manageable. However, it is important to note that JPEG is a lossy file format, meaning that it compresses the image by discarding some data, which can result in a slight decrease in image quality.
Another advantage of using JPEG is that it is widely supported by various software applications and platforms, making it easy to share and view the images on different devices. Whether you want to post your image on social media, send it via email, or print it, saving it as a JPEG file ensures that it can be easily opened and viewed by others.
However, it’s also worth considering other file formats depending on your specific needs. For example, if your image contains transparency or requires a lossless compression, you might want to consider saving it as a PNG file. PNG provides high-quality compression without sacrificing transparency, making it a suitable choice for logos, graphics, and other images that require a transparent background.
If you’re working with images that contain multiple layers, such as when creating digital artwork or editing photographs, you may want to save the image in GIMP’s native file format, XCF. XCF preserves all the layers, channels, paths, and other elements of the image, allowing you to retain full editing capabilities even after saving and reopening the file in GIMP.
Ultimately, the choice of file format depends on your specific requirements. If you’re unsure, it’s always a good idea to create a backup copy of your image in XCF or another lossless format before saving it as a JPEG or any other compressed format. This way, if you need to make further edits or require a higher quality version in the future, you’ll have the original, uncompressed version of the image to work with.
Opening the Image in GIMP
Before you can start editing or saving an image in GIMP, you’ll need to open it in the program. Here are the steps to open an image in GIMP:
1. Launch GIMP on your computer and click on “File” in the menu bar.
2. From the dropdown menu, select “Open” or use the shortcut Ctrl+O (Command+O on a Mac).
3. In the file selection window, navigate to the location where your image is stored.
4. Select the image file you want to open and click on “Open” to load it into GIMP.
GIMP supports a wide range of image file formats, including JPEG, PNG, TIFF, GIF, and many more. When opening an image, GIMP automatically detects the file format and adjusts its settings accordingly.
If you have multiple images you want to work on simultaneously, you can open them in separate tabs within GIMP. Simply repeat the steps above for each image you want to open, and they will appear as individual tabs at the top of the GIMP interface.
GIMP also offers the option to import images from digital cameras or scanners. To do so, follow these additional steps:
1. Click on “File” in the menu bar and select “Import” from the dropdown menu.
2. Choose the appropriate import option based on your device, such as “From Scanner” or “From Camera”.
3. Follow the on-screen instructions to connect and import the image from your device.
Once you have opened your image in GIMP, you are ready to start editing, adjusting, and saving it. GIMP provides a wide range of tools and features to enhance and customize your images, regardless of their complexity.
Remember to save your work regularly to avoid data loss. GIMP supports its native XCF file format, which preserves all layers and editing capabilities. Additionally, you can save your edited image in various formats, such as JPEG or PNG, depending on your intended use and desired image quality.
Adjusting the Image if Necessary
Once you have opened an image in GIMP, you may find that some adjustments are needed to enhance its appearance. GIMP provides a range of tools and features to help you make these adjustments, allowing you to achieve the desired results. Here are some common adjustments you can make in GIMP:
1. Brightness and Contrast: If your image appears too dark or lacks contrast, you can easily adjust these attributes in GIMP. Navigate to the “Colors” menu and select “Brightness-Contrast”. From there, you can move the sliders to increase or decrease the brightness and contrast levels of the image.
2. Color Correction: GIMP offers various ways to correct colors in an image. You can use the “Color Balance”, “Colorize”, or “Curves” tools to modify the overall color tone or adjust specific color channels. Experiment with these tools to achieve the desired color balance and vibrancy in your image.
3. Cropping and Straightening: If your image has unwanted areas or requires alignment, you can use the Crop and Rotate tools in GIMP. Select the crop tool from the toolbar and drag a selection around the portion of the image you want to keep. Once selected, press Enter to crop the image. For straightening, use the Rotate tool to adjust the image’s orientation.
4. Sharpening and Smoothing: GIMP provides tools like “Unsharp Mask” and “Gaussian Blur” to enhance image sharpness or create a more smooth and soft effect. These tools are especially useful when working with photographs or images that may have slight blurriness or noise.
5. Removing Blemishes or Unwanted Objects: GIMP offers several tools for retouching and removing blemishes or unwanted objects from an image. The “Clone Stamp” tool allows you to sample a part of the image and paint over areas you wish to remove or correct. The “Healing Tool” enables you to quickly and seamlessly remove imperfections, such as dust spots or skin blemishes.
Remember, the adjustments you make to an image in GIMP are non-destructive, meaning that the original image data remains intact. You can always undo or modify your adjustments without permanently altering the image itself.
It’s important to strike a balance when adjusting an image. Be mindful not to overdo the modifications, as it can result in an unrealistic or unnatural look. Take the time to experiment and make adjustments in small increments, observing the impact on the overall image quality.
Once you are satisfied with the adjustments you have made, it’s time to save the image in its updated form. In the next section, we will explore the steps to save an image in GIMP and ensure its compatibility with different platforms and devices.
Resizing or Cropping the Image
Resizing or cropping an image can greatly impact its composition and visual appeal. Whether you need to adjust the dimensions for a specific purpose or remove unnecessary elements, GIMP provides the tools necessary to accomplish these tasks.
Resizing: To resize an image in GIMP, follow these steps:
1. Select the “Image” menu and choose “Scale Image”.
2. In the “Image Size” dialog box, you can adjust the width and height dimensions of the image by entering new values.
3. Ensure that the “Constrain Aspect Ratio” checkbox is selected to maintain the image’s original proportions. This prevents distortion when you resize the image.
4. Click on “Scale” to apply the new dimensions to the image.
By carefully resizing an image, you can ensure that it fits within specific requirements, such as for web or print purposes, or to reduce file size without compromising quality.
Cropping: Cropping an image allows you to remove unwanted areas and focus on a particular subject or composition. Follow these steps to crop an image in GIMP:
1. Select the “Rectangle Select Tool” from the toolbar or press the “R” key.
2. Drag your mouse over the area you want to keep in the image.
3. Once you have made the selection, go to the “Image” menu and choose “Crop to Selection”.
4. The image will be cropped to the selected area, discarding the rest.
GIMP also provides additional refining options after cropping. For example, you can adjust the position of the cropped area by selecting the “Move” tool and dragging it to the desired position.
When resizing or cropping an image, it’s essential to strike a balance between preserving the image’s quality and achieving the desired composition. Avoid excessive resizing, as it can lead to pixelation and loss of detail. Similarly, be careful when cropping to ensure that the essential elements of the image remain intact.
Once you have resized or cropped the image to your satisfaction, it’s time to consider applying filters, effects, or adding text or graphics. We will explore these options in the next sections.
Applying Filters or Effects
GIMP offers a wide range of filters and effects that allow you to transform the look and feel of your images. Whether you want to add artistic flair, enhance colors, or create unique visual effects, GIMP has the tools to help you achieve your desired results. Here are some ways to apply filters and effects in GIMP:
1. Filter Gallery: GIMP’s Filter Gallery is a collection of pre-built filters that can be applied to your image with a single click. You can access the Filter Gallery by going to the “Filters” menu and selecting “Filter Gallery”. From there, you can choose from a variety of categories such as blur, distortion, artistic, and more, each containing multiple filters to experiment with.
2. Color Adjustments: GIMP provides various tools to adjust and enhance the colors in your image. The “Colorize” tool allows you to change the overall color tone, while the “Hue-Saturation” tool lets you selectively adjust specific color ranges. Additionally, you can apply the “Curves” or “Levels” tools to fine-tune the tonal range and contrast of your image.
3. Special Effects: GIMP offers a range of special effects filters that can add a creative touch to your image. You can simulate film grain, apply a fisheye effect, add a vignette or lens flare, or experiment with other artistic effects. These filters can be found in the “Filters” menu under the “Artistic” or “Distort” categories.
4. Blurs and Sharpening: GIMP includes several options for blurring or sharpening your image. The “Gaussian Blur” filter allows you to soften or blur areas, while the “Unsharp Mask” filter enhances sharpness and detail. Experiment with different settings to achieve the desired level of blur or sharpening.
5. Textures and Patterns: GIMP allows you to apply textures and patterns to your image to give it a unique look. You can use the “Texturize” filter to apply a texture overlay, or utilize the “Pattern” tool to fill an area with a predefined pattern. These options can be found under the “Filters” menu in the “Map” or “Render” categories.
Remember, the filters and effects available in GIMP are highly customizable. You can adjust the intensity, opacity, and blending mode of the applied filters to achieve the desired look. Additionally, GIMP supports the use of layers, allowing you to apply filters to specific layers or create complex compositions with multiple effects.
Experiment and explore the various filters and effects in GIMP to add your personal touch to your images. Once you are satisfied with the adjustments and effects, it’s time to move on to adding text or graphics, which we will explore in the next section.
Adding Text or Graphics to the Image
GIMP provides powerful tools and features that allow you to add text or graphics to your images, giving them a personalized touch or conveying important information. Whether you want to create a poster, add a watermark, or include captions, GIMP offers flexibility and creative options for incorporating text and graphics. Here’s how you can add text or graphics in GIMP:
Adding Text:
1. Select the “Text” tool from the GIMP toolbar or press the “T” key.
2. Click on the image where you want to insert the text. A text entry box will appear.
3. Type in the desired text and customize the font, size, color, and alignment options from the text tool options in the dialog window.
4. Once you have made your text adjustments, click outside the text entry box to apply the changes.
GIMP allows you to manipulate the text further by resizing it, rotating it, or transforming it using the various tools available in the software.
Adding Graphics:
GIMP also provides the ability to add graphics or images to your composition:
1. Open the image or graphic you want to add to your main image in GIMP.
2. Use the “Select” tool to make a selection around the desired area of the graphic you want to include.
3. Right-click within the selection and choose “Edit” > “Copy” to copy the selected portion.
4. Switch to the main image you want to add the graphic to and select “Edit” > “Paste” to paste the copied graphic.
Once pasted, you can manipulate the graphic by resizing, repositioning, and applying various filters or effects to blend it seamlessly into your image.
GIMP offers additional capabilities for working with text and graphics, such as layering and blending options, which allow you to create more complex and visually appealing compositions. You can also explore GIMP’s extensive collection of brushes, patterns, and gradients to further enhance your designs.
Remember to consider the overall layout and composition of your image when adding text or graphics. Ensure that the text or graphic does not distract from the main subject and that it complements the overall visual aesthetic.
Once you have successfully added text or graphics to your image in GIMP, you can proceed to save the final version of your edited image, which we will discuss in the next section.
Saving the Image as a JPEG File
Once you have finished editing your image in GIMP, it’s time to save it in a compatible file format. One of the most commonly used formats for saving images is JPEG (Joint Photographic Experts Group). JPEG is known for its good compression capabilities and wide compatibility across different platforms and devices. Here’s how to save your image as a JPEG file in GIMP:
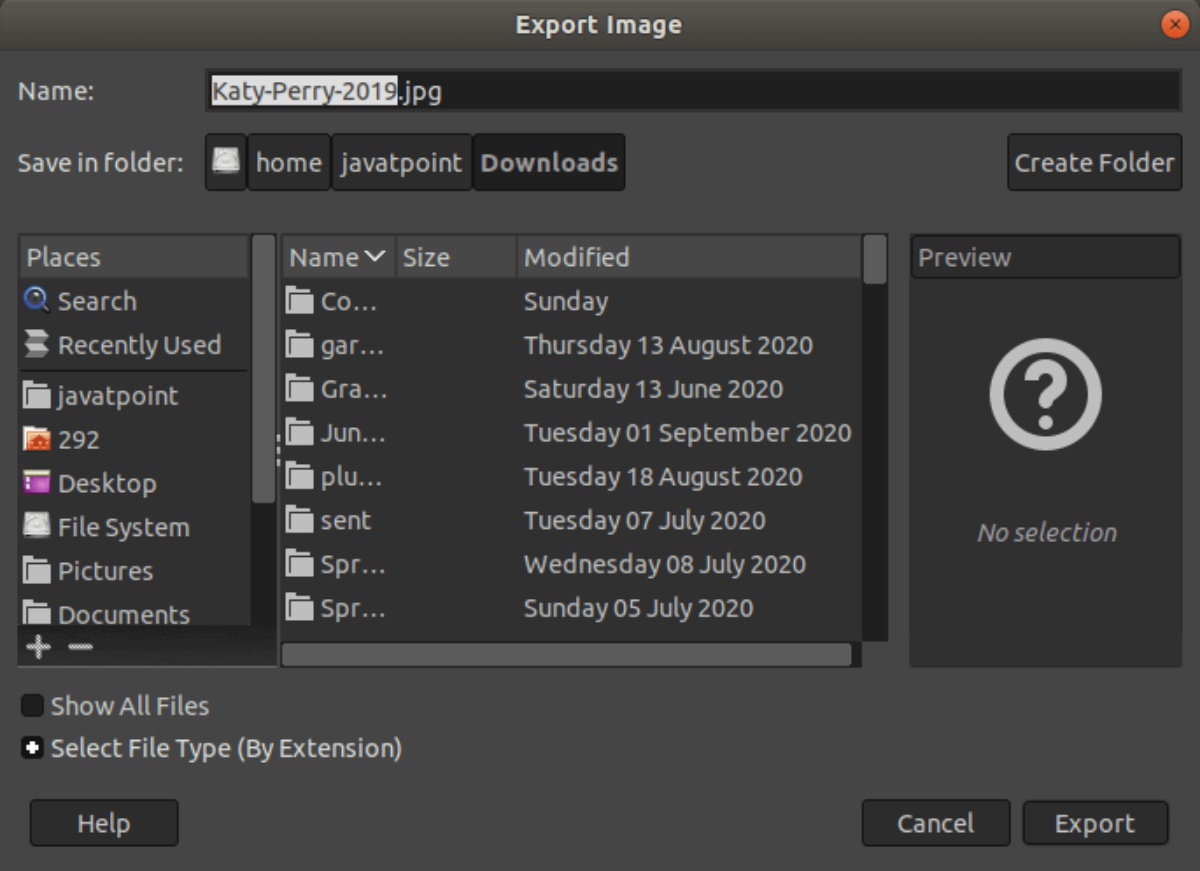
1. Go to the “File” menu at the top of the GIMP interface and select “Export As”.
2. In the “Export Image” dialog box, choose the location where you want to save the file.
3. Provide a suitable file name for your image.
4. Select “JPEG image” from the drop-down list of file formats.
5. Optionally, adjust the image quality using the quality slider. Higher quality values result in larger file sizes but better image fidelity.
6. Click the “Export” button to save the image as a JPEG file.
GIMP will export the image in JPEG format, applying the selected quality settings. It’s worth noting that JPEG is a lossy file format, which means that some quality may be sacrificed due to the compression process. If you need to preserve the highest quality possible, consider saving a copy of your image in GIMP’s native XCF format or another lossless format before exporting it as a JPEG.
When saving your image as a JPEG, you might encounter additional options or settings, depending on the version of GIMP you’re using or any installed plugins. Take a moment to review these options, such as metadata settings, color profiles, or EXIF data preservation, and adjust them according to your requirements.
Once your image is saved as a JPEG, you can easily share it online, send it via email, or print it, as JPEG files are widely supported and can be opened on various devices and software applications.
Remember to keep a backup of your original, unedited image or the GIMP XCF file in case you need to make further edits or preserve the highest quality version in the future.
Now that you have successfully saved your image as a JPEG file, you can consider adjusting export settings and choosing a suitable destination folder, which we will explore in the next section.
Adjusting Export Settings
When saving an image in GIMP, you have the option to adjust export settings to customize the output according to your specific needs. These settings allow you to fine-tune various aspects of the exported image, such as format-specific options, metadata, and color profiles. Here’s how you can adjust export settings in GIMP:
1. Format-Specific Options:
When exporting an image in GIMP, the format-specific options can vary depending on the file format you choose. For example, if you’re saving the image as a JPEG, you have the option to adjust the image quality using a quality slider. Higher quality settings result in larger file sizes but maintain better image fidelity. Other file formats may offer options like transparency, compression level, or interlacing, providing you with additional control over the exported image.
2. Metadata:
GIMP allows you to include metadata when exporting an image. Metadata refers to additional information about the image, such as the author’s name, copyright details, or keywords. You can choose to include or exclude certain metadata fields depending on your requirements. Simply check or uncheck the appropriate options in the export dialog box to adjust the metadata settings according to your needs.
3. Color Profiles:
GIMP provides the ability to assign and adjust color profiles when exporting an image. A color profile is a set of instructions that defines how colors are displayed on different devices or in different color spaces. By default, GIMP uses the sRGB color profile, which is widely supported and suitable for most web and digital applications. However, if you’re working on professional print projects or require specific color accuracy, you can choose a different color profile from the options available in the export dialog box.
By adjusting these export settings, you can ensure that the exported image meets your specific requirements in terms of file format, image quality, metadata, and color accuracy. It’s important to consider the intended purpose and use of the image when making these adjustments to achieve the desired output.
Once you have adjusted the export settings to your satisfaction, you can choose a suitable file name and destination folder for the exported image, which we will explore in the next section.
Choosing a Suitable File Name and Destination Folder
When saving an image in GIMP, choosing a suitable file name and destination folder is essential for organization and easy retrieval of your files in the future. Here are some tips for selecting a fitting file name and destination folder:
1. File Name:
Give your image a descriptive and meaningful file name that reflects its content or purpose. Incorporate relevant keywords to make it easily searchable. Be mindful of any specific naming conventions or guidelines you need to follow, especially if you’re creating the image for a specific project or client. Avoid special characters or spaces in the file name, as these can cause issues with compatibility on different operating systems or platforms.
2. Destination Folder:
Choose a destination folder that makes sense for the image. If you’re working on a specific project, consider creating a dedicated folder for all the related images and assets. This helps keep your files organized and accessible. Select a destination folder that is easy to locate and navigate so that you can find your saved images quickly.
In addition to selecting a suitable folder, it’s also a good practice to create a logical directory structure within your chosen folder. Consider organizing your images by date, project, or other relevant categorizations to further streamline file management.
It’s important to establish a consistent and standardized file naming and folder organization system for your images. This will not only save you time and effort but also ensure that your files are stored in a logical and accessible manner.
Once you have chosen a file name and destination folder, double-check that they are accurate before saving the image. Verify that the file name is clear and free of any typos, and ensure that the destination folder is correct and easily accessible.
By following these tips, you can efficiently manage your image files, locate them easily, and maintain an organized workflow in GIMP. Now that you have everything in order, it’s time to save the image in GIMP, which we will explore in the next section.
Saving the JPEG File in GIMP
Now that you have adjusted the export settings, chosen a suitable file name, and selected the destination folder, it’s time to save your image as a JPEG file in GIMP. Saving the image in the correct format ensures compatibility and easy sharing across different platforms and devices. Here’s how you can save the JPEG file in GIMP:
1. In the GIMP window, go to the “File” menu at the top and select “Export As”.
2. In the “Export Image” dialog box, navigate to the chosen destination folder where you want to save the file.
3. Provide a specific and descriptive file name for your image, keeping in mind the content or purpose of the image.
4. From the drop-down list of available file formats, select “JPEG image”.
5. Fine-tune the export settings if necessary, such as adjusting the image quality using the quality slider.
6. Click the “Export” button to save the image as a JPEG file in the selected destination folder.
After clicking “Export”, GIMP will finalize the export process and save the image as a JPEG file with the specified file name and settings. The exported JPEG file will be ready for sharing, uploading, or printing, depending on your needs.
It’s vital to note that by default, GIMP will save JPEG files with the “.jpg” extension. However, if desired, you can manually change the file extension to “.jpeg” without affecting the file’s compatibility or content.
It’s a good practice to double-check the saved JPEG file to ensure that it meets your expectations in terms of quality, resolution, and appearance. Open the file in an image viewer or editor to verify that the image looks as intended on different devices. If needed, you can always go back to GIMP, make adjustments, and save a new version of the image.
Saving the JPEG file in GIMP allows you to preserve your edited image in a widely compatible and accessible format. Remember to keep a backup copy of the original image in GIMP’s native XCF format or a lossless file format to retain the highest quality and enable future edits if necessary.
With your image successfully saved as a JPEG file, you can now confidently share, showcase, or utilize it as desired, knowing that it is ready to be viewed and appreciated on various platforms and devices.