
Setting up Screen Recording on iPhone 14
Screen recording on the iPhone 14 is a powerful feature that allows you to capture and share your device's screen activity. Whether you want to create tutorials, demonstrate a process, or simply save memorable moments from your apps, setting up screen recording on your iPhone 14 is a straightforward process. Here's how to get started:
-
Open Settings: Begin by unlocking your iPhone 14 and navigating to the "Settings" app. This is typically represented by a gear icon and is commonly found on the home screen.
-
Locate Control Center: Within the Settings app, scroll down and tap on "Control Center." This is where you can customize the Control Center, which is a convenient panel for accessing various features and shortcuts on your iPhone 14.
-
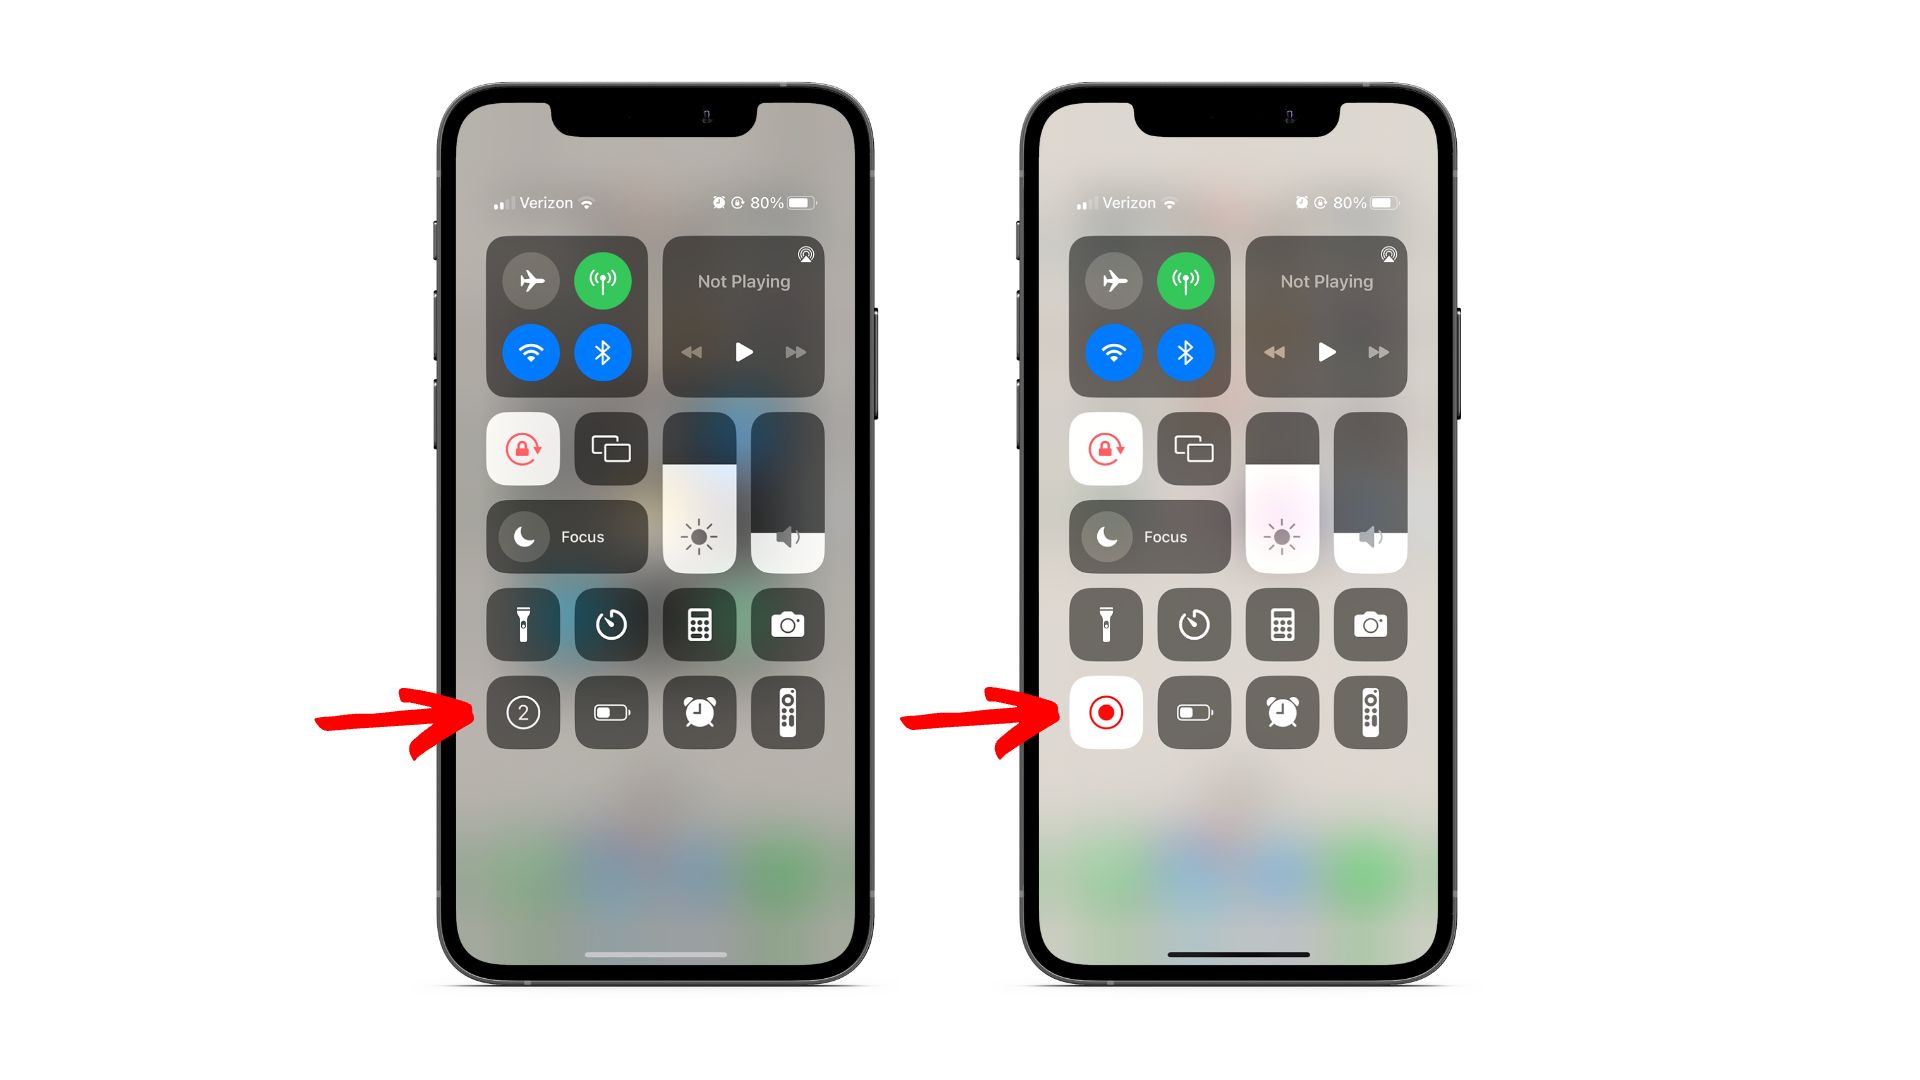
Add Screen Recording: In the Control Center settings, look for "Screen Recording" under the "More Controls" section. Tap the green plus icon next to "Screen Recording" to add it to the Control Center. This action will ensure that the screen recording feature is easily accessible whenever you open the Control Center.
-
Arrange the Position (Optional): If you want to customize the position of the Screen Recording icon in the Control Center, tap and hold the three-lined icon next to "Screen Recording" and drag it to your preferred location under the "Include" section.
-
Exit Settings: Once you have added Screen Recording to the Control Center and arranged its position (if desired), exit the Settings app and return to the home screen of your iPhone 14.
By following these simple steps, you have successfully set up screen recording on your iPhone 14. The next time you need to capture your screen activity, you can easily access the feature from the Control Center and start recording with just a few taps.
Accessing the Control Center for Screen Recording
Accessing the Control Center for screen recording on your iPhone 14 is a fundamental step in utilizing this powerful feature. The Control Center serves as a centralized hub for accessing various functions and shortcuts, including screen recording. Here's a detailed guide on how to access the Control Center for screen recording on your iPhone 14.
To begin, ensure that you are on the home screen or within an app on your iPhone 14. Next, swipe down from the top-right corner of the screen. This action will reveal the Control Center, which is designed for quick access to essential features without having to navigate through multiple menus.
Upon accessing the Control Center, you will notice a set of icons representing different functions and shortcuts. Among these icons, you will find the "Screen Recording" button, which resembles a solid circle within a circle. This is the dedicated icon for initiating screen recording on your iPhone 14.
To start screen recording, simply tap the "Screen Recording" icon. A countdown timer will appear, giving you a brief moment to prepare before the recording begins. Once the countdown concludes, the status bar at the top of the screen will turn red, indicating that the screen recording is in progress.
It's important to note that the Control Center provides quick access to screen recording from any screen or app on your iPhone 14, making it incredibly convenient to capture your device's activity at any time. Whether you're demonstrating a process, capturing gameplay, or saving memorable moments from apps, the Control Center simplifies the process of initiating screen recording with just a swipe and a tap.
In addition to initiating screen recording, the Control Center also allows you to access other essential functions such as adjusting screen brightness, enabling Do Not Disturb mode, and controlling music playback. Its intuitive design and accessibility make it a valuable tool for enhancing the overall user experience on the iPhone 14.
By seamlessly integrating screen recording into the Control Center, Apple has empowered users to effortlessly capture and share their device's screen activity with unparalleled ease. This integration reflects Apple's commitment to providing intuitive and user-friendly features that cater to a wide range of user needs and preferences.
In summary, accessing the Control Center for screen recording on the iPhone 14 is a straightforward process that enhances the device's functionality and versatility. With just a simple swipe and tap, users can unleash the power of screen recording to capture and share their digital experiences with unparalleled convenience.
Customizing Screen Recording Settings
Customizing screen recording settings on your iPhone 14 allows you to tailor the recording experience to suit your specific needs and preferences. Apple has provided users with a range of options to customize various aspects of screen recording, ensuring a personalized and seamless recording process. Here's a comprehensive overview of the customization options available for screen recording settings on the iPhone 14.
Accessing Screen Recording Settings
To access the screen recording settings, begin by opening the Control Center on your iPhone 14. Swipe down from the top-right corner of the screen to reveal the Control Center, then press and hold the "Screen Recording" icon. This action will prompt a pop-up window displaying the available settings for screen recording.
Customization Options
Microphone Audio
One of the key customization options is the ability to include microphone audio during screen recording. This feature is particularly useful when creating tutorials, narrating presentations, or capturing live commentary during gameplay. By enabling microphone audio, you can seamlessly integrate your voice into the screen recording, adding depth and context to the captured content.
Screen Recording Quality
The screen recording quality setting allows you to choose between high-definition (HD) and standard-definition (SD) recording. Selecting the desired quality ensures that the recorded content meets your specific requirements, whether you intend to share it on social media, upload it to a video platform, or preserve it for personal use.
Frame Rate
Adjusting the frame rate of the screen recording enables you to control the smoothness and fluidity of the captured motion. The iPhone 14 offers multiple frame rate options, allowing you to optimize the recording for different types of content, including fast-paced action, detailed demonstrations, or slow-motion effects.
Show Touches
Enabling the "Show Touches" feature overlays a visual indicator on the screen, highlighting your touch gestures and interactions during the recording. This is particularly beneficial for instructional videos, app demonstrations, and user experience testing, as it provides clear visual cues for viewers to follow along with the on-screen actions.
Save To Camera Roll
The "Save To Camera Roll" setting allows you to specify the destination for saving the recorded content. By default, screen recordings are saved to the Photos app on your iPhone 14. However, this setting provides the flexibility to choose an alternative location, such as a specific album or cloud storage service, streamlining the organization and management of recorded content.
Enhancing the Recording Experience
By customizing screen recording settings on the iPhone 14, users can enhance the recording experience and tailor it to their unique requirements. Whether it's integrating microphone audio, adjusting recording quality and frame rate, enabling visual touch indicators, or managing the storage destination, the customization options empower users to capture and share their screen activity with precision and flexibility.
Seamless Integration
Apple's thoughtful integration of customizable screen recording settings reflects its commitment to delivering a seamless and user-centric experience. The intuitive accessibility of these settings within the Control Center underscores Apple's dedication to empowering users with the tools they need to create compelling and engaging content directly from their iPhone 14.
In summary, the ability to customize screen recording settings on the iPhone 14 elevates the recording process, allowing users to personalize their recordings and optimize them for various purposes. Whether it's for educational, professional, or recreational use, the customization options cater to a diverse range of recording needs, reinforcing the iPhone 14 as a versatile and powerful tool for capturing and sharing digital experiences.
Starting and Stopping Screen Recording
Initiating and terminating screen recording on your iPhone 14 is a seamless process that empowers you to capture your device's screen activity with precision and convenience. Whether you're showcasing a new app feature, recording a video call, or preserving a memorable moment from a game, the ability to effortlessly start and stop screen recording enhances the versatility of your iPhone 14. Here's a detailed exploration of the steps involved in starting and stopping screen recording, along with valuable insights into the functionality and benefits of this feature.
Initiating Screen Recording
To commence a screen recording session on your iPhone 14, access the Control Center by swiping down from the top-right corner of the screen. Once the Control Center is visible, locate and tap the "Screen Recording" icon, represented by a solid circle within a circle. Upon tapping the icon, a countdown timer will appear, providing you with a brief moment to prepare before the recording begins. This thoughtful countdown mechanism ensures that you have ample time to set the stage for your recording, whether it's adjusting app settings, positioning the screen content, or preparing your commentary.
Recording in Progress
As the countdown concludes, the status bar at the top of the screen will turn red, indicating that the screen recording is now in progress. This visual cue serves as a clear indicator that your device is actively capturing the on-screen activity, ensuring that you are aware of the recording status at all times. This real-time feedback mechanism enhances the overall recording experience, allowing you to focus on delivering engaging content without any ambiguity regarding the recording status.
Stopping Screen Recording
When you're ready to conclude the screen recording, simply tap the red status bar at the top of the screen. A prompt will appear, confirming your decision to stop the recording. Upon confirming, the screen recording will cease, and the captured content will be saved to your device's Photos app. This streamlined process enables you to seamlessly transition from recording to review, editing, and sharing, ensuring that your captured content is readily accessible for further utilization.
Versatility and Convenience
The ability to effortlessly start and stop screen recording on the iPhone 14 underscores the device's versatility and convenience as a multimedia creation tool. Whether you're a content creator, educator, or enthusiast, the intuitive nature of screen recording empowers you to capture and share your digital experiences with unparalleled ease. From instructional videos and app demonstrations to gameplay highlights and creative projects, the seamless control over screen recording enhances your ability to express and communicate ideas effectively.
Empowering Creativity
By placing the power of screen recording at your fingertips, Apple has empowered users to unleash their creativity and share their unique perspectives with the world. The simplicity of starting and stopping screen recording on the iPhone 14 reflects Apple's commitment to providing intuitive and accessible tools for content creation, fostering a vibrant ecosystem of diverse and engaging digital content.
In summary, the process of starting and stopping screen recording on the iPhone 14 embodies the device's commitment to empowering users with seamless and versatile multimedia capabilities. Whether it's for professional, educational, or personal use, the ability to effortlessly capture and share screen activity amplifies the iPhone 14's role as a dynamic platform for creative expression and storytelling.
Saving and Sharing Screen Recordings
Saving and sharing screen recordings on your iPhone 14 is a pivotal aspect of leveraging this powerful feature to its fullest potential. Once you have captured compelling content or important demonstrations, the ability to seamlessly save and share the recordings enhances their accessibility and amplifies their impact. Let's delve into the comprehensive process of saving and sharing screen recordings, along with the diverse options available for maximizing the reach and utility of your captured content.
Saving Screen Recordings
After concluding a screen recording session, the captured content is automatically saved to your iPhone 14's Photos app. This streamlined process ensures that your recordings are readily accessible for review, editing, and sharing. By leveraging the native Photos app, you can effortlessly organize and manage your screen recordings, creating a centralized repository for your multimedia content.
Accessing Screen Recordings
To access your saved screen recordings, navigate to the Photos app on your iPhone 14. Within the app, locate the "Media Types" section and select "Videos" to view all your recorded content. Your screen recordings will be conveniently listed alongside other video content, allowing for seamless integration with your multimedia library.
Sharing Screen Recordings
Sharing your screen recordings with others is a straightforward process that empowers you to distribute your content across various platforms and communication channels. Within the Photos app, select the desired screen recording and tap the "Share" button. This action will present you with a range of sharing options, including messaging, email, social media, and cloud storage services. Whether you're showcasing a tutorial, sharing a gameplay highlight, or collaborating on a project, the sharing capabilities of the Photos app facilitate effortless dissemination of your screen recordings.
Leveraging Third-Party Apps
In addition to the native sharing options, you can leverage third-party apps and platforms to expand the reach of your screen recordings. Popular video-sharing platforms, social media networks, and cloud storage services offer seamless integration with the Photos app, allowing you to directly upload and distribute your recordings to a wider audience. This flexibility enables you to tailor your sharing strategy to align with your specific goals and audience preferences.
Enhancing Accessibility
By saving and sharing screen recordings on your iPhone 14, you enhance the accessibility and impact of your captured content. Whether it's for educational, professional, or personal purposes, the seamless integration of saving and sharing capabilities empowers you to amplify the reach and utility of your screen recordings. From instructional content and product demonstrations to creative projects and personal moments, the ability to effortlessly save and share screen recordings enriches your digital storytelling capabilities.
In summary, the process of saving and sharing screen recordings on the iPhone 14 embodies the device's commitment to empowering users with seamless and versatile multimedia capabilities. Whether it's for professional, educational, or personal use, the ability to effortlessly capture and share screen activity amplifies the iPhone 14's role as a dynamic platform for creative expression and storytelling.