
Enable Screen Recording on iPhone 13
Screen recording on your iPhone 13 can be incredibly useful for capturing important moments, creating tutorials, or simply sharing your screen activity with others. To enable this feature, follow these simple steps:
-
Open Settings: Begin by tapping the "Settings" app on your iPhone 13's home screen. This will take you to the main settings menu, where you can customize various aspects of your device.
-
Locate Control Center: Within the Settings menu, scroll down and find the "Control Center" option. This is where you can manage the controls and features that appear in the Control Center, a convenient panel for accessing commonly used functions.
-
Customize Controls: Tap "Customize Controls" to view the available controls that can be added to the Control Center. Here, you can add, remove, or rearrange controls based on your preferences.
-
Add Screen Recording: Scroll down to find the "Screen Recording" option and tap the green plus button next to it. This action adds the Screen Recording control to the Control Center, making it easily accessible whenever you swipe down from the top-right corner of the screen to open the Control Center.
-
Verify Addition: After adding Screen Recording to the Control Center, you can confirm its presence by swiping down from the top-right corner of the screen to open the Control Center. The Screen Recording icon should now be visible among the available controls.
By following these straightforward steps, you can enable screen recording on your iPhone 13 and start capturing your screen activity with ease.
Start Screen Recording
To initiate a screen recording on your iPhone 13, you can seamlessly capture your device's display with just a few taps. Whether you want to preserve a memorable moment, demonstrate a process, or save important information, the screen recording feature offers a convenient way to do so. Here's how you can start a screen recording on your iPhone 13:
-
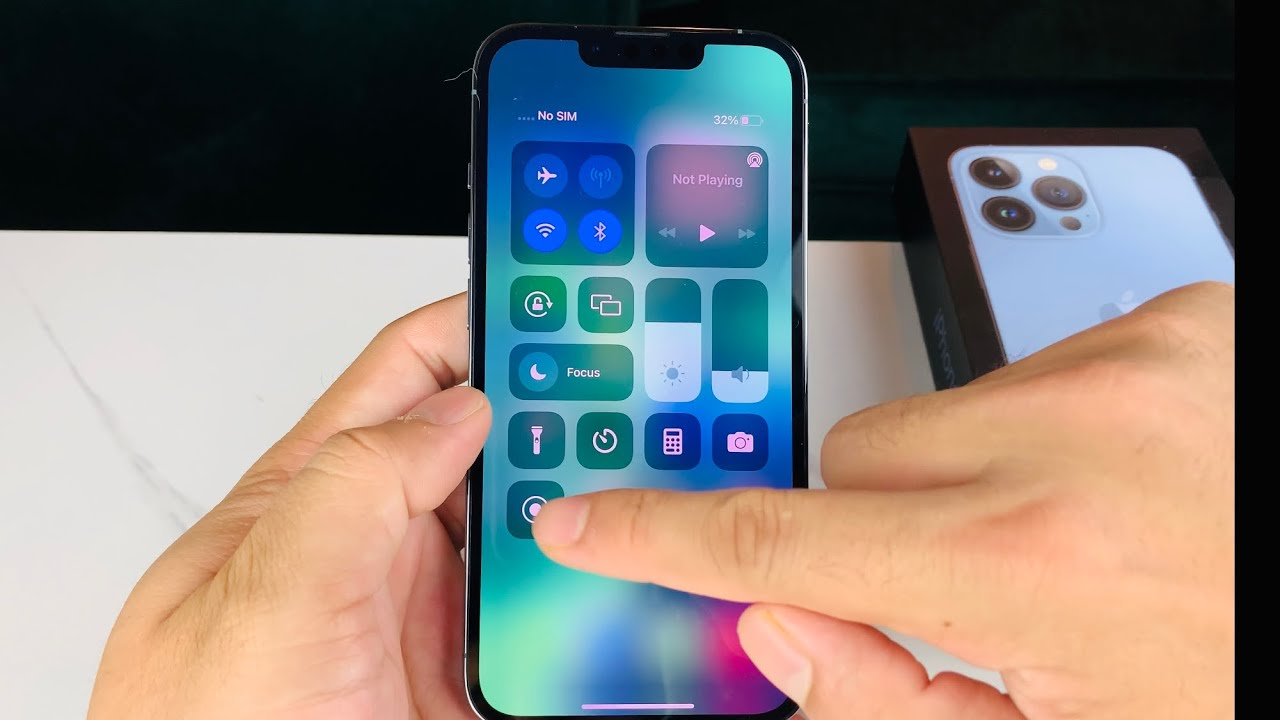
Access the Control Center: Begin by navigating to the screen where you want to start the recording. To access the Control Center, swipe down from the top-right corner of the screen. This action reveals a panel containing various controls and shortcuts.
-
Locate the Screen Recording Icon: Within the Control Center, identify the Screen Recording icon, which resembles a solid circle surrounded by a ring. This icon represents the screen recording function and allows you to initiate the recording process with a simple tap.
-
Start the Recording: Tap the Screen Recording icon to commence the recording. Upon doing so, a countdown timer may appear, providing a brief moment to prepare before the recording officially begins. Once the countdown concludes, the screen recording will initiate, capturing everything displayed on your iPhone 13's screen.
-
Confirmation: To confirm that the screen recording is in progress, observe the status bar at the top of the screen. A red indicator, such as a red bar or a red recording icon, typically appears in the status bar to signify that the screen recording is actively capturing the display.
-
Commence Your Activity: With the screen recording underway, proceed with the activity you wish to capture. Whether it's demonstrating a feature, showcasing a game, or guiding someone through a process, the screen recording function diligently records the on-screen action.
-
End the Recording: Once you've captured the desired content, it's essential to conclude the screen recording. To do this, return to the Control Center and tap the Screen Recording icon once again. Alternatively, you can navigate to the status bar and tap the red recording indicator to prompt the option to stop the recording.
By following these straightforward steps, you can effortlessly initiate a screen recording on your iPhone 13, enabling you to capture and preserve valuable on-screen content with ease.
Stop Screen Recording
When you've successfully captured the desired content through screen recording on your iPhone 13, it's essential to know how to promptly halt the recording process. Whether you've demonstrated a crucial process, showcased an exciting game, or shared valuable information, stopping the screen recording ensures that your captured content is neatly preserved. Here's how you can seamlessly conclude a screen recording on your iPhone 13:
-
Access the Control Center: To stop the screen recording, navigate to the Control Center by swiping down from the top-right corner of the screen. This action reveals the Control Center panel, providing quick access to various controls and shortcuts, including the active screen recording function.
-
Identify the Recording Indicator: Within the Control Center, locate the active screen recording indicator. This indicator typically appears as a red bar or a red recording icon in the status bar at the top of the screen, signifying that the screen recording is actively capturing the display.
-
Halt the Recording: To stop the screen recording, tap the active screen recording indicator in the status bar or return to the Control Center and tap the Screen Recording icon once again. Upon tapping the indicator or the Screen Recording icon, a prompt will appear, asking if you want to stop the recording. Confirm your decision by tapping "Stop" to conclude the screen recording.
-
Confirmation: After stopping the screen recording, a notification banner briefly appears at the top of the screen, confirming that the recording has been saved to your device's Photos app. This notification serves as a reassuring indication that your captured content is now accessible for viewing and sharing.
By following these straightforward steps, you can effortlessly stop a screen recording on your iPhone 13, ensuring that your captured content is neatly preserved and readily available for future reference or sharing. With the ability to seamlessly start and stop screen recordings, you can effectively capture and preserve valuable on-screen content with ease, enhancing your overall iPhone 13 experience.
Access and Edit Screen Recordings
Accessing and editing screen recordings on your iPhone 13 allows you to manage and customize your captured content, ensuring that it meets your specific requirements before sharing or preserving it. Whether you've recorded a tutorial, captured a memorable moment, or documented important information, the ability to effortlessly access and edit screen recordings enhances the overall utility of this feature.
To access your screen recordings, navigate to the Photos app on your iPhone 13. Once there, tap on the "Albums" tab at the bottom of the screen and select "Recents." Your screen recordings will be conveniently accessible within this section, allowing you to effortlessly locate and review your captured content.
Upon accessing your screen recordings, you can proceed to edit them as needed. The Photos app offers various editing tools that enable you to enhance and customize your screen recordings. You can trim the recording to remove any unwanted sections, add annotations or captions to provide context, and even apply filters to adjust the visual appearance. These editing capabilities empower you to refine your screen recordings, ensuring that they effectively convey the intended message or content.
Furthermore, the editing tools within the Photos app allow you to add audio commentary to your screen recordings. This feature is particularly valuable for creating instructional content or providing additional context to the captured activity. By incorporating audio commentary, you can enrich your screen recordings, making them more engaging and informative for your audience.
Once you've edited your screen recordings to your satisfaction, you can effortlessly share them with others. The sharing functionality within the Photos app enables you to distribute your screen recordings via various platforms, including messaging apps, social media, and email. This seamless sharing capability ensures that your meticulously edited screen recordings can reach your intended audience with ease.
In summary, the ability to access and edit screen recordings on your iPhone 13 empowers you to manage and customize your captured content, enhancing its overall impact and utility. By leveraging the editing tools within the Photos app, you can refine your screen recordings, add valuable context, and seamlessly share them with others, maximizing the value of this versatile feature.
Use Screen Recording with Audio
Utilizing screen recording with audio on your iPhone 13 expands the capabilities of this feature, allowing you to capture not only visual content but also accompanying sound, such as commentary, music, or ambient audio. This functionality is particularly valuable for creating comprehensive tutorials, documenting interactive app experiences, or preserving memorable moments with immersive audio accompaniment.
To enable screen recording with audio, you can follow these straightforward steps:
-
Access Control Center: Begin by navigating to the screen from which you intend to initiate the screen recording with audio. Swipe down from the top-right corner of the screen to access the Control Center, where you can conveniently manage various device functions and features.
-
Long-press Screen Recording Icon: Within the Control Center, locate the Screen Recording icon, which resembles a solid circle surrounded by a ring. Long-press this icon to prompt a menu that includes the option to enable microphone audio. Tap the microphone icon to activate audio recording, indicated by the appearance of concentric audio waveforms around the Screen Recording icon.
-
Start the Recording: After enabling audio recording, tap the Screen Recording icon to commence the recording process. A countdown timer may appear, providing a brief moment to prepare before the recording officially begins. Once the countdown concludes, the screen recording, along with audio, will initiate, capturing both visual and auditory content.
By incorporating audio into your screen recordings, you can provide valuable context, commentary, or narration, enhancing the overall impact and educational value of the captured content. Whether you're demonstrating a complex process, showcasing a dynamic app interface, or preserving a memorable interaction, the addition of audio enriches the viewing experience for your audience.
Furthermore, the ability to record audio alongside the screen capture enables you to create engaging and informative content, making your tutorials, presentations, or demonstrations more immersive and compelling. The inclusion of ambient audio also allows you to preserve the atmosphere and interactions associated with the captured content, providing a comprehensive and authentic representation of the recorded experience.
In summary, leveraging screen recording with audio on your iPhone 13 empowers you to capture not only visual content but also accompanying sound, enhancing the overall quality and impact of your recorded material. By seamlessly integrating audio into your screen recordings, you can create more immersive, informative, and engaging content, expanding the utility and versatility of this feature.