
Checking Compatibility
Before you embark on the journey of enabling screen recording on your iPhone 13, it's crucial to ensure that your device is compatible with this feature. Screen recording is a powerful tool that allows you to capture and share your device's screen activity, making it an invaluable asset for various purposes, such as creating tutorials, showcasing gameplay, or troubleshooting technical issues.
The iPhone 13, being a cutting-edge device, is equipped with advanced capabilities, including the ability to perform screen recordings. However, it's essential to verify that your device meets the necessary criteria to support this functionality.
To check the compatibility of your iPhone 13 for screen recording, follow these steps:
-
Device Model: Confirm that you are using an iPhone 13 or an iPhone 13 Pro. These models are equipped with the requisite hardware and software to facilitate seamless screen recording.
-
Operating System: Ensure that your iPhone 13 is running on iOS 15 or later. Screen recording is a feature that may be subject to specific iOS versions, and updating to the latest operating system ensures that you have access to the most advanced functionalities and security enhancements.
-
Storage Space: Check that your device has sufficient available storage space to accommodate screen recordings. Capturing video content can consume a significant amount of storage, so it's important to have ample free space on your device to avoid interruptions during the recording process.
By confirming these aspects, you can ascertain the compatibility of your iPhone 13 for screen recording. Once you've verified that your device meets these requirements, you can proceed with confidence to enable and utilize the screen recording feature to its fullest potential.
Ensuring compatibility is the first step towards harnessing the power of screen recording on your iPhone 13. With this foundational knowledge in place, you can proceed to explore the exciting possibilities that screen recording offers, empowering you to capture and share your device's screen activity with ease and precision.
Updating to the Latest iOS Version
Updating your iPhone 13 to the latest iOS version is a pivotal step in ensuring that you have access to the most advanced features, security enhancements, and performance optimizations. Apple consistently releases new iOS updates to introduce innovative functionalities, address potential vulnerabilities, and refine the overall user experience. By keeping your device up to date, you not only benefit from the latest capabilities but also fortify the security and stability of your iPhone 13.
To initiate the process of updating to the latest iOS version, follow these straightforward steps:
-
Connect to Wi-Fi: Before proceeding with the update, ensure that your iPhone 13 is connected to a stable Wi-Fi network. This is essential as iOS updates are typically large in size, and a Wi-Fi connection ensures a swift and uninterrupted download process.
-
Battery Level: Verify that your device has an adequate battery level or is connected to a power source. It's advisable to have your iPhone 13 sufficiently charged or plugged in during the update to prevent any interruptions due to low battery.
-
Access Settings: Navigate to the "Settings" app on your iPhone 13. This can be easily located on the home screen or through the search function.
-
Select General: Within the Settings menu, locate and select "General." This section encompasses various system-wide settings and configurations for your device.
-
Tap Software Update: Under the General settings, tap on "Software Update." Your iPhone 13 will then check for available updates.
-
Download and Install: If a new iOS version is available, you will be prompted to download and install it. Follow the on-screen instructions to initiate the download and installation process.
-
Agree to Terms and Conditions: During the update process, you may be required to review and agree to the terms and conditions presented by Apple. This is a standard procedure to ensure that users are aware of the implications of the update.
-
Wait for Completion: The update process may take some time, depending on the size of the update and the speed of your internet connection. It's important to exercise patience and allow the update to complete without interruption.
By following these steps, you can seamlessly update your iPhone 13 to the latest iOS version, ensuring that your device is equipped with the most recent enhancements and optimizations. Keeping your device up to date not only unlocks new features, but also enhances the overall performance and security of your iPhone 13, providing you with a refined and secure user experience.
Updating to the latest iOS version is a proactive measure that empowers you to leverage the full potential of your iPhone 13, ensuring that you are equipped with the latest advancements and security protocols. With your device running on the latest iOS version, you can proceed with confidence, knowing that you have access to the most advanced functionalities and the highest level of protection for your iPhone 13.
Enabling Screen Recording in Control Center
Enabling screen recording in the Control Center of your iPhone 13 is a straightforward process that empowers you to effortlessly capture and share your device's screen activity. By adding the screen recording feature to the Control Center, you can conveniently access this functionality with just a few taps, making it readily available whenever the need arises.
To enable screen recording in the Control Center of your iPhone 13, follow these simple steps:
-
Access Settings: Begin by navigating to the "Settings" app on your iPhone 13. This essential hub for device configurations and preferences serves as the gateway to customizing various aspects of your device.
-
Select Control Center: Within the Settings menu, locate and select "Control Center." This section allows you to manage the items that appear in the Control Center, providing you with the flexibility to tailor its contents to suit your specific requirements.
-
Customize Controls: Under the Control Center settings, tap on "Customize Controls." This option enables you to add or remove features from the Control Center, allowing you to personalize its layout and functionality.
-
Locate Screen Recording: Scroll through the list of available controls until you find "Screen Recording." This essential feature, when added to the Control Center, grants you the ability to initiate screen recordings with ease.
-
Add to Control Center: Next, tap the green plus icon next to "Screen Recording" to add it to the Control Center. This action seamlessly integrates the screen recording functionality into the Control Center, ensuring that it is readily accessible whenever you open the Control Center.
By following these steps, you can effectively enable screen recording in the Control Center of your iPhone 13, empowering you to capture and share your device's screen activity with unparalleled convenience. Once added to the Control Center, the screen recording feature becomes a valuable tool at your fingertips, ready to be utilized for a myriad of purposes, including creating instructional videos, capturing memorable moments, or troubleshooting technical issues.
Enabling screen recording in the Control Center enhances the accessibility and usability of this powerful feature, positioning it as a versatile tool that can be effortlessly accessed whenever the need arises. With screen recording seamlessly integrated into the Control Center, you are equipped to harness the full potential of this functionality, empowering you to capture and share your iPhone 13's screen activity with unparalleled ease and precision.
Starting a Screen Recording
Initiating a screen recording on your iPhone 13 is a seamless process that empowers you to capture and preserve your device's screen activity with precision and ease. Whether you intend to create instructional content, showcase gameplay, or document a technical procedure, the screen recording feature offers a versatile tool for capturing dynamic visual content.
To commence a screen recording on your iPhone 13, follow these straightforward steps:
-
Access the Control Center: Begin by navigating to the Control Center on your iPhone 13. This can be achieved by swiping down from the top-right corner of the screen on devices with Face ID, or by swiping up from the bottom of the screen on devices with a Home button.
-
Locate the Screen Recording Icon: Within the Control Center, identify the screen recording icon, which resembles a solid circle within a larger circle. This icon serves as the gateway to initiating a screen recording on your device.
-
Initiate the Screen Recording: Tap the screen recording icon to commence the recording process. Upon tapping the icon, a countdown timer may appear, providing you with a brief moment to prepare before the recording begins.
-
Confirmation Prompt: After the countdown, a confirmation prompt may appear, indicating that the screen recording is about to start. This prompt serves as a final confirmation before the recording commences, ensuring that you are prepared to capture the desired content.
-
Recording Indicator: Once the screen recording begins, a red indicator will appear at the top of the screen, signifying that the recording is in progress. This indicator serves as a visual cue, ensuring that you are aware of the ongoing recording activity.
-
Capture the Desired Content: With the screen recording in progress, navigate to the content or activity that you wish to capture. Whether it's demonstrating a process, showcasing a feature, or narrating a presentation, the screen recording feature allows you to capture a wide range of visual content with ease.
-
End the Recording: When you have captured the desired content, navigate back to the Control Center and tap the screen recording indicator at the top of the screen. A prompt will appear, allowing you to stop the recording and save the captured content to your device.
By following these steps, you can effortlessly initiate a screen recording on your iPhone 13, enabling you to capture and preserve your device's screen activity with precision and convenience. The screen recording feature serves as a versatile tool for creating engaging visual content, empowering you to showcase, demonstrate, and share dynamic on-screen activities with unparalleled ease.
Initiating a screen recording on your iPhone 13 is a straightforward process that grants you the ability to capture and preserve your device's screen activity with precision and ease. Whether you are creating instructional content, showcasing gameplay, or documenting technical procedures, the screen recording feature offers a versatile tool for capturing dynamic visual content.
To commence a screen recording on your iPhone 13, follow these straightforward steps:
-
Access the Control Center: Begin by navigating to the Control Center on your iPhone 13. This can be achieved by swiping down from the top-right corner of the screen on devices with Face ID, or by swiping up from the bottom of the screen on devices with a Home button.
-
Locate the Screen Recording Icon: Within the Control Center, identify the screen recording icon, which resembles a solid circle within a larger circle. This icon serves as the gateway to initiating a screen recording on your device.
-
Initiate the Screen Recording: Tap the screen recording icon to commence the recording process. Upon tapping the icon, a countdown timer may appear, providing you with a brief moment to prepare before the recording begins.
-
Confirmation Prompt: After the countdown, a confirmation prompt may appear, indicating that the screen recording is about to start. This prompt serves as a final confirmation before the recording commences, ensuring that you are prepared to capture the desired content.
-
Recording Indicator: Once the screen recording begins, a red indicator will appear at the top of the screen, signifying that the recording is in progress. This indicator serves as a visual cue, ensuring that you are aware of the ongoing recording activity.
-
Capture the Desired Content: With the screen recording in progress, navigate to the content or activity that you wish to capture. Whether it's demonstrating a process, showcasing a feature, or narrating a presentation, the screen recording feature allows you to capture a wide range of visual content with ease.
-
End the Recording: When you have captured the desired content, navigate back to the Control Center and tap the screen recording indicator at the top of the screen. A prompt will appear, allowing you to stop the recording and save the captured content to your device.
By following these steps, you can effortlessly initiate a screen recording on your iPhone 13, enabling you to capture and preserve your device's screen activity with precision and convenience. The screen recording feature serves as a versatile tool for creating engaging visual content, empowering you to showcase, demonstrate, and share dynamic on-screen activities with unparalleled ease.
Managing Screen Recording Settings
Managing screen recording settings on your iPhone 13 allows you to tailor the recording experience to align with your specific preferences and requirements. By customizing the settings associated with screen recording, you can optimize the quality, audio input, and other essential aspects of the recording process, ensuring that the captured content meets your desired standards.
To manage screen recording settings on your iPhone 13, follow these steps:
-
Access Screen Recording Settings: Begin by opening the Settings app on your iPhone 13. This serves as the central hub for configuring various aspects of your device, including the screen recording settings.
-
Navigate to Control Center: Within the Settings menu, locate and select "Control Center." This section houses the settings related to the items displayed in the Control Center, providing you with the flexibility to customize its contents.
-
Customize Controls: Under the Control Center settings, tap on "Customize Controls." This option allows you to add, remove, or rearrange features in the Control Center, including the screen recording functionality.
-
Adjust Screen Recording Settings: Scroll through the list of available controls until you find "Screen Recording." Tap the green plus icon next to "Screen Recording" to add it to the Control Center if it's not already included.
-
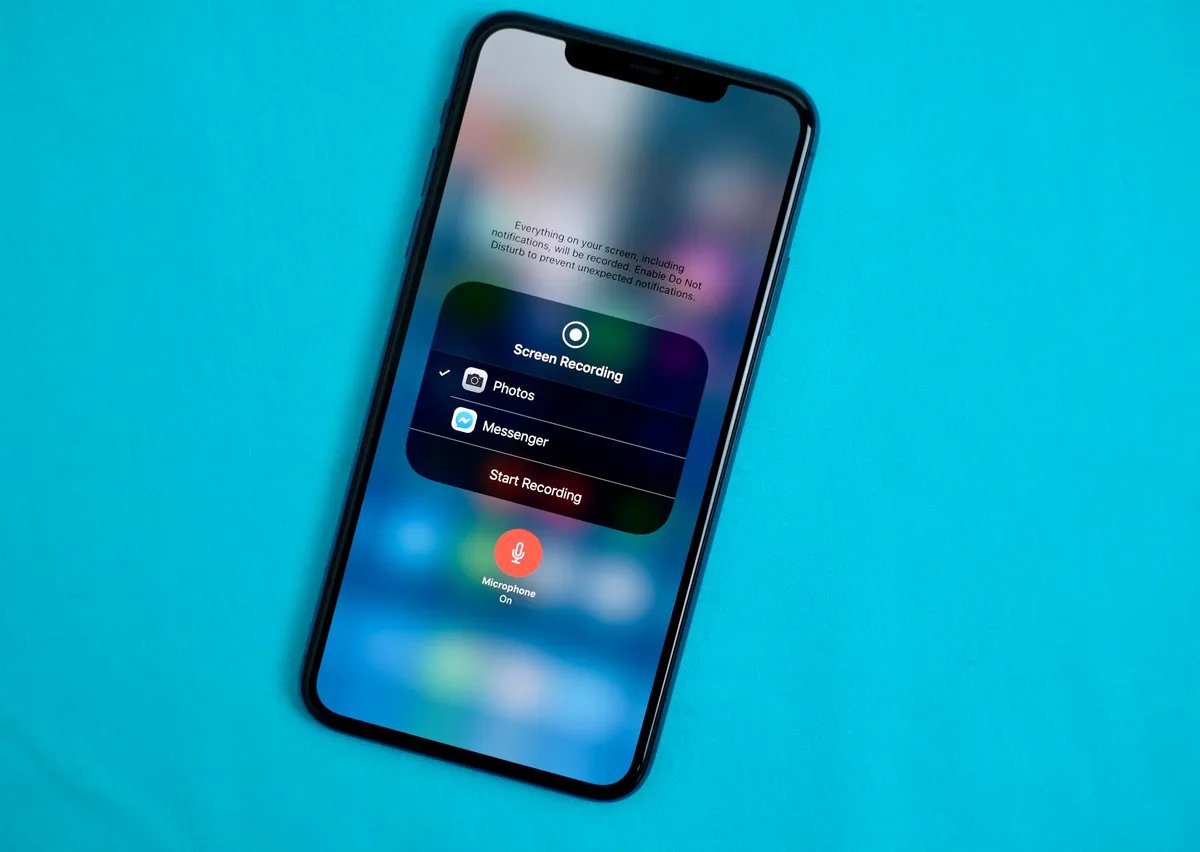
Access Screen Recording Settings: Once "Screen Recording" is added to the Control Center, you can access its settings by opening the Control Center and long-pressing the screen recording icon. This action will reveal additional options and settings related to screen recording.
-
Configure Audio Input: Within the screen recording settings, you have the option to select the audio input source for the recording. This includes the choice to record audio from the device's microphone, enabling you to capture external audio alongside the screen activity.
-
Adjust Microphone Settings: If you opt to record audio using the device's microphone, you can adjust the microphone settings to enhance the audio quality. This includes controlling the microphone input level and managing any additional audio processing features.
-
Set Video Quality: The screen recording settings also allow you to specify the video quality for the recordings. Depending on your preferences and storage considerations, you can choose the desired resolution and frame rate for the captured content.
By managing the screen recording settings on your iPhone 13, you can customize the recording experience to align with your specific preferences and requirements. Whether it's optimizing the audio input, adjusting the video quality, or fine-tuning other essential aspects of the recording process, the ability to manage screen recording settings empowers you to capture and preserve your device's screen activity with precision and control.