
How to Enable Screen Recording on iPhone 14 Pro
Screen recording is a valuable feature that allows you to capture and share the action on your iPhone 14 Pro's screen. Whether you want to create tutorials, demonstrate a process, or simply record a memorable moment, enabling screen recording on your iPhone 14 Pro is a straightforward process.
To enable screen recording on your iPhone 14 Pro, follow these simple steps:
-
Access Control Center: Swipe down from the top-right corner of the screen to open Control Center. Alternatively, on iPhone models with a Home button, swipe up from the bottom of the screen to access Control Center.
-
Locate Screen Recording Icon: In Control Center, you will find a variety of icons representing different functions. Look for the screen recording icon, which resembles a solid circle surrounded by a dotted circle.
-
Initiate Screen Recording: Tap the screen recording icon to initiate the screen recording process. Upon tapping the icon, a countdown will appear, indicating that the screen recording is about to start.
-
Confirmation: After the countdown, the screen recording will commence, and a red indicator will appear at the top of the screen, signifying that the recording is in progress.
-
Stop Screen Recording: To stop the screen recording, simply tap the red indicator at the top of the screen. A confirmation prompt will appear, allowing you to confirm the cessation of the recording.
By following these steps, you can effortlessly enable screen recording on your iPhone 14 Pro and begin capturing the action on your screen.
Enabling screen recording on your iPhone 14 Pro opens up a world of possibilities, allowing you to create engaging content, share experiences, and communicate more effectively. Whether you're a content creator, educator, or simply someone who enjoys sharing moments with others, the ability to record your screen on the iPhone 14 Pro empowers you to express yourself in new and exciting ways.
Using Control Center to Start Screen Recording
Utilizing the Control Center to initiate screen recording on your iPhone 14 Pro is a seamless process that puts the power to capture your screen at your fingertips. The Control Center serves as a centralized hub for accessing various functions and features on your device, including screen recording. By following a few simple steps, you can begin recording your screen and capturing the action with ease.
When you're ready to start screen recording, accessing the Control Center is the first step. On the iPhone 14 Pro, you can open the Control Center by swiping down from the top-right corner of the screen. Alternatively, if you're using an iPhone model with a Home button, simply swipe up from the bottom of the screen to access the Control Center. This intuitive gesture provides quick and convenient access to a range of essential functions, including screen recording.
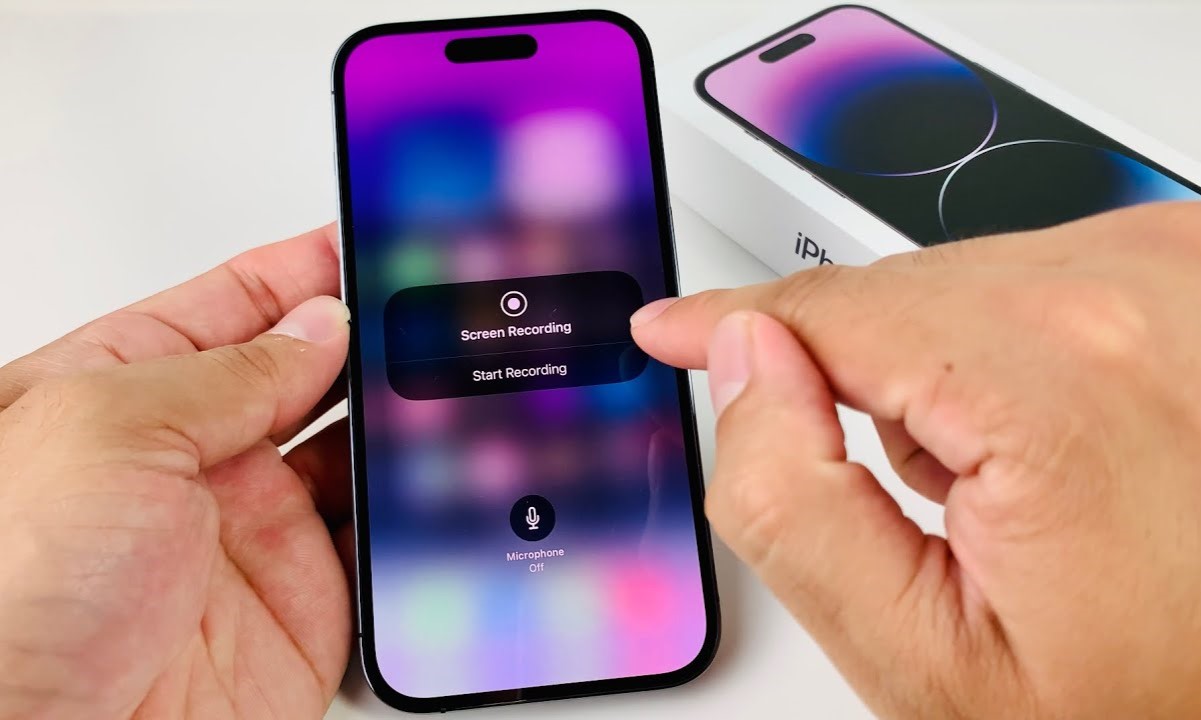
Once you've accessed the Control Center, you'll find an array of icons representing different features and capabilities. Among these icons, the screen recording function is denoted by a distinctive symbol—a solid circle surrounded by a dotted circle. This recognizable icon serves as your gateway to initiating the screen recording process.
With the screen recording icon in sight, a simple tap is all it takes to kickstart the recording. Upon tapping the screen recording icon, a brief countdown will appear, signaling the imminent commencement of the screen recording. This countdown not only prepares you for the recording but also ensures that you have a moment to set up the screen exactly as you want it to appear in the recording.
As the countdown concludes, the screen recording will seamlessly begin, and a conspicuous red indicator will appear at the top of the screen. This indicator serves as a visual cue, clearly indicating that the screen recording is in progress. With the recording underway, you can confidently proceed with capturing the desired content on your screen, whether it's a tutorial, a demonstration, or a memorable interaction.
When you've successfully captured the content you intended to record, stopping the screen recording is a straightforward process. Simply tap the red indicator at the top of the screen, prompting a confirmation prompt to appear. This prompt allows you to confirm the cessation of the recording, ensuring that you have full control over when the screen recording concludes.
By leveraging the Control Center to initiate screen recording on your iPhone 14 Pro, you can effortlessly capture the action on your screen and unlock a world of creative possibilities. Whether you're sharing knowledge, documenting experiences, or communicating ideas, the ability to record your screen empowers you to engage with others in a dynamic and visually compelling manner.
In summary, the Control Center on the iPhone 14 Pro serves as a convenient launchpad for screen recording, offering a user-friendly interface that puts the power to capture your screen right at your fingertips. With just a few taps, you can initiate screen recording, record your desired content, and seamlessly share your experiences with others.
Customizing Screen Recording Settings
Customizing screen recording settings on your iPhone 14 Pro allows you to tailor the recording experience to suit your specific needs and preferences. By accessing the screen recording settings, you can fine-tune various aspects of the recording process, ensuring that you capture content exactly as you envision it. Here's how you can customize screen recording settings to optimize your recording experience:
Accessing Screen Recording Settings
To access the screen recording settings on your iPhone 14 Pro, begin by initiating the screen recording process through the Control Center. Once the screen recording interface is active, press firmly on the screen recording icon to reveal additional options. This action will open a dedicated menu that provides access to various settings related to screen recording.
Customizing Microphone Audio
One of the key settings you can customize during screen recording is the microphone audio. By default, the screen recording feature captures audio from the device's built-in microphone. However, if you wish to include your voiceover or commentary in the recording, you can adjust the microphone audio settings to enable external audio input. This allows you to provide context, narration, or explanations while recording the on-screen action, enhancing the overall quality and informativeness of the recording.
Enabling or Disabling Microphone Audio
Within the screen recording settings menu, you have the option to toggle the microphone audio on or off based on your recording requirements. This flexibility empowers you to adapt the recording setup to different scenarios, whether you're creating a tutorial, capturing a gameplay session, or documenting a process. By customizing the microphone audio settings, you can ensure that the recorded content aligns with your intended presentation style and audience engagement goals.
Adjusting Video Quality
Another aspect of screen recording settings that you can customize is the video quality. The screen recording feature on the iPhone 14 Pro offers the flexibility to adjust the video resolution and frame rate, allowing you to optimize the visual clarity and smoothness of the recorded content. By fine-tuning the video quality settings, you can capture high-definition footage with crisp details and fluid motion, ensuring that your screen recordings maintain a professional and polished appearance.
Selecting Recording Orientation
In addition to adjusting audio and video settings, you can customize the recording orientation to accommodate different screen layouts and content formats. Whether you prefer to record in portrait or landscape mode, the screen recording settings enable you to select the optimal orientation for capturing the on-screen action. This versatility ensures that your recordings are well-suited for various viewing platforms and presentation contexts, enhancing their versatility and visual appeal.
By customizing screen recording settings on your iPhone 14 Pro, you can elevate the quality and versatility of your screen recordings, ensuring that they align with your creative vision and communication objectives. Whether you're producing educational content, sharing experiences, or demonstrating processes, the ability to tailor screen recording settings empowers you to create captivating and impactful recordings that resonate with your audience.
Recording Audio with Screen Recording
Recording audio alongside screen recording on your iPhone 14 Pro adds a layer of depth and context to your captured content. Whether you're narrating a tutorial, providing commentary during a gameplay session, or documenting a process, integrating audio enhances the overall quality and informativeness of your screen recordings.
When initiating screen recording through the Control Center, you have the option to customize the audio settings to include microphone input. By default, the screen recording feature captures audio from the device's built-in microphone, allowing you to record ambient sounds and any audio produced by the apps or content on your screen.
However, if you wish to include your voiceover, commentary, or external audio sources in the recording, you can adjust the microphone audio settings to enable external audio input. This capability is particularly valuable for scenarios where vocal narration or explanatory audio enhances the viewer's understanding and engagement with the recorded content.
The flexibility to toggle the microphone audio on or off within the screen recording settings menu empowers you to adapt the recording setup to different contexts. Whether you're creating a tutorial, capturing a gameplay session, or documenting a process, the ability to customize audio input ensures that your screen recordings align with your intended presentation style and audience engagement goals.
Furthermore, the screen recording feature on the iPhone 14 Pro allows you to adjust the microphone input level, ensuring that your voiceover or commentary is captured with optimal clarity and balance. This level of control over audio input enhances the overall production quality of your screen recordings, allowing you to deliver clear and impactful audio alongside the visual content.
By integrating audio with screen recording, you can create immersive and informative experiences that resonate with your audience. Whether you're sharing knowledge, demonstrating skills, or capturing memorable moments, the ability to record audio alongside the on-screen action empowers you to communicate effectively and engage viewers on a deeper level.
In summary, recording audio with screen recording on your iPhone 14 Pro expands the creative possibilities and communicative impact of your screen recordings. By customizing audio settings and integrating voiceover or commentary, you can elevate the quality and engagement of your recorded content, creating compelling and immersive experiences for your audience.
Editing and Sharing Screen Recordings
After capturing compelling screen recordings on your iPhone 14 Pro, the next step is to leverage editing tools and seamlessly share your content with your intended audience. The built-in editing features and sharing capabilities empower you to refine your recordings and distribute them across various platforms, maximizing their impact and reach.
Editing Screen Recordings
Upon completing a screen recording, you can promptly access the recording in the Photos app, where a range of editing options awaits. The intuitive editing interface allows you to trim the recording, removing any unwanted segments and ensuring that the content flows seamlessly. By precisely adjusting the start and end points of the recording, you can refine the narrative and enhance the overall viewing experience.
Furthermore, the Photos app offers tools to annotate and mark up your screen recordings, enabling you to highlight key points, add explanatory text, or draw attention to specific elements within the content. This annotation capability is particularly valuable for tutorials, demonstrations, and presentations, as it allows you to provide additional context and guidance to your viewers.
Sharing Screen Recordings
Once you've perfected your screen recording, the sharing options available on the iPhone 14 Pro allow you to effortlessly distribute your content. Whether you prefer to share your recordings via messaging apps, social media platforms, or cloud storage services, the sharing functionality streamlines the process, ensuring that your content reaches its intended audience with ease.
The sharing menu within the Photos app provides direct access to a variety of sharing destinations, allowing you to seamlessly send your screen recordings to friends, colleagues, or followers. Additionally, the integration with popular social media platforms enables you to post your recordings directly to your feed, engaging your audience and sparking meaningful interactions.
Furthermore, the option to save screen recordings to cloud storage services facilitates long-term accessibility and collaboration. By uploading your recordings to cloud storage platforms, you can securely store and share your content, ensuring that it remains readily available for future use or collaborative projects.
In summary, the editing and sharing capabilities available for screen recordings on the iPhone 14 Pro empower you to refine your content and connect with your audience in meaningful ways. By leveraging editing tools to enhance your recordings and seamlessly sharing them across various platforms, you can maximize the impact and reach of your screen recordings, creating engaging and informative experiences for your viewers.