
Checking Compatibility
Before replacing the SIM card in your Droid Turbo, it’s crucial to ensure that the new SIM card is compatible with your device. The Droid Turbo utilizes a nano SIM card, which is smaller than the standard SIM card. Therefore, it’s imperative to verify that the new SIM card you intend to use is indeed a nano SIM card. Most modern smartphones, including the Droid Turbo, are designed to accommodate nano SIM cards, but it’s always wise to double-check to avoid any inconvenience.
Additionally, if you’re switching to a new carrier, it’s essential to confirm that the new SIM card is compatible with the network frequencies supported by the Droid Turbo. Different carriers operate on varying frequencies, and using an incompatible SIM card may result in connectivity issues. To address this, you can contact your new carrier or visit their website to ascertain the network frequencies they employ and compare them with the specifications of your Droid Turbo to ensure compatibility.
Furthermore, if you’re unsure about the compatibility of the new SIM card, reaching out to your carrier’s customer support can provide valuable assistance. They can verify the compatibility of the new SIM card and offer guidance on the process of replacing it in your Droid Turbo.
Powering Off the Droid Turbo
Before proceeding with the SIM card replacement process, it’s important to power off your Droid Turbo to prevent any potential damage and ensure a smooth transition. Here’s how to power off your device:
Step 1: Locate the power button on the right-hand side of your Droid Turbo. It’s typically positioned midway along the side of the device for easy access.
Step 2: Press and hold the power button until the power off menu appears on the screen. This may take a few seconds, and you’ll notice the screen dimming as the device begins to power down.
Step 3: Once the power off menu is displayed, tap on the “Power off” option to initiate the shutdown process. Your Droid Turbo will then power down, and the screen will go blank, indicating that the device is successfully turned off.
Step 4: It’s advisable to wait for a few seconds after the screen goes blank to ensure that the device has completely powered off before proceeding to the next step of replacing the SIM card.
By following these steps, you can safely power off your Droid Turbo and prepare it for the subsequent process of locating and replacing the SIM card. Ensuring that the device is powered off minimizes the risk of damage and guarantees a hassle-free SIM card replacement experience.
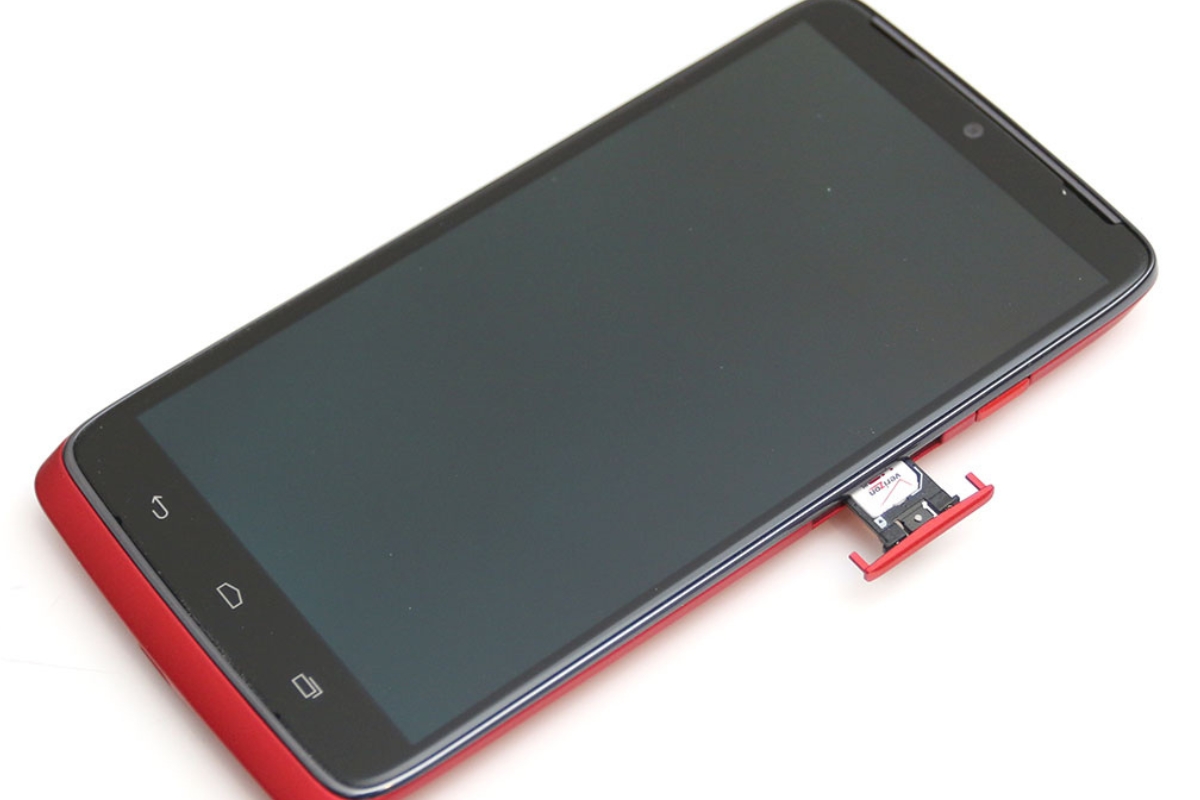
Locating the SIM Card Tray
Locating the SIM card tray is the initial step in the process of replacing the SIM card in your Droid Turbo. The SIM card tray houses the SIM card and is designed for easy access, allowing you to swap out the existing SIM card for a new one. Here’s how to locate the SIM card tray:
Step 1: Examine the sides of your Droid Turbo to identify the SIM card tray slot. On the Droid Turbo, the SIM card tray is typically located on the top edge of the device, adjacent to the headphone jack. It is a small, recessed opening with a pinhole or a small indentation.
Step 2: Once you’ve located the SIM card tray slot, you’ll need to use the SIM card ejection tool that came with your Droid Turbo or a small paperclip to eject the SIM card tray. Insert the tool into the pinhole or indentation and gently apply pressure to release the SIM card tray. The tray will partially protrude from the slot, allowing you to remove it completely.
Step 3: Carefully pull out the SIM card tray from the slot, ensuring that you do so gently to avoid causing any damage to the tray or the device. The SIM card tray will contain the existing SIM card, which you’ll need to remove before inserting the new SIM card.
By successfully locating the SIM card tray, you’ve completed the crucial first step in the SIM card replacement process. This sets the stage for seamlessly proceeding to the subsequent steps of removing the existing SIM card and inserting the new one, ensuring that your Droid Turbo is ready to utilize the updated SIM card.
Removing the SIM Card
After locating the SIM card tray, the next step in replacing the SIM card in your Droid Turbo is to remove the existing SIM card. Here’s how to do it:
Step 1: Carefully examine the SIM card tray that you removed from the Droid Turbo. You will notice that it contains the existing SIM card, which is positioned within a designated slot on the tray. Take note of the orientation of the SIM card within the tray to ensure that you insert the new SIM card correctly.
Step 2: Gently push the existing SIM card from the tray to release it. The SIM card should slide out smoothly, allowing you to remove it from the tray without applying excessive force. Be cautious not to damage the SIM card during this process, as it is a delicate component.
Step 3: Once the existing SIM card has been removed from the tray, place it in a secure location, as it may be needed in the future. It’s advisable to keep the old SIM card in case you need to revert to it for any reason, such as troubleshooting network issues or transferring data to the new SIM card.
By successfully removing the existing SIM card from the SIM card tray, you’ve completed a crucial stage in the process of replacing the SIM card in your Droid Turbo. This paves the way for seamlessly proceeding to the next step of inserting the new SIM card, ensuring that your device is ready to utilize the updated SIM card.
Inserting the New SIM Card
Now that the existing SIM card has been removed from the SIM card tray, it’s time to insert the new SIM card into your Droid Turbo. Here’s a step-by-step guide to successfully inserting the new SIM card:
Step 1: Retrieve the new nano SIM card that is compatible with your Droid Turbo and ensure that it is free from any visible damage. Verify that the new SIM card is oriented correctly by aligning it with the shape of the SIM card tray slot, taking note of the notched corner that matches the tray’s design.
Step 2: Carefully position the new SIM card onto the designated area within the SIM card tray, ensuring that it fits securely and aligns with the tray’s contours. Gently press the SIM card into place, ensuring that it sits flush within the tray without protruding or being misaligned.
Step 3: Once the new SIM card is securely placed within the tray, reinsert the SIM card tray back into the slot on your Droid Turbo. Ensure that the tray slides in smoothly and aligns properly with the device, avoiding any resistance or misalignment during the insertion process.
Step 4: Gently push the SIM card tray back into the slot until it is fully seated, ensuring that it is flush with the edge of the device. Take care not to apply excessive force during this step to avoid damaging the tray or the device.
By successfully inserting the new SIM card into the SIM card tray and reseating the tray in your Droid Turbo, you’ve completed a crucial step in the process of replacing the SIM card. This prepares your device to utilize the new SIM card and ensures that it is ready to establish connectivity with your chosen carrier’s network.
Powering On the Droid Turbo
After successfully inserting the new SIM card into your Droid Turbo, the final step is to power on the device, allowing it to recognize and activate the new SIM card. Here’s how to power on your Droid Turbo:
Step 1: Locate the power button on the right-hand side of your Droid Turbo. It is typically positioned midway along the side of the device for easy access.
Step 2: Press and hold the power button until the Droid Turbo’s screen lights up and the device begins to power on. You’ll notice the manufacturer’s logo appearing on the screen as the device initializes.
Step 3: Once the device has powered on, it will prompt you to enter your PIN or unlock pattern, depending on your security settings. Proceed to unlock your device to access the home screen.
Step 4: After unlocking your Droid Turbo, observe the signal bars or network indicator to ensure that the device has successfully recognized the new SIM card and established connectivity with your carrier’s network. You may also receive a notification confirming the activation of the new SIM card.
Step 5: Test the functionality of your Droid Turbo by placing a test call, sending a text message, or accessing mobile data to verify that the device is operating seamlessly with the new SIM card. If everything is functioning as expected, your Droid Turbo is now fully powered on and ready to use with the new SIM card.
By following these steps, you have successfully powered on your Droid Turbo after replacing the SIM card, ensuring that the device recognizes and activates the new SIM card. Your Droid Turbo is now equipped to leverage the features and services provided by your chosen carrier, allowing you to stay connected and enjoy the full functionality of your smartphone.