
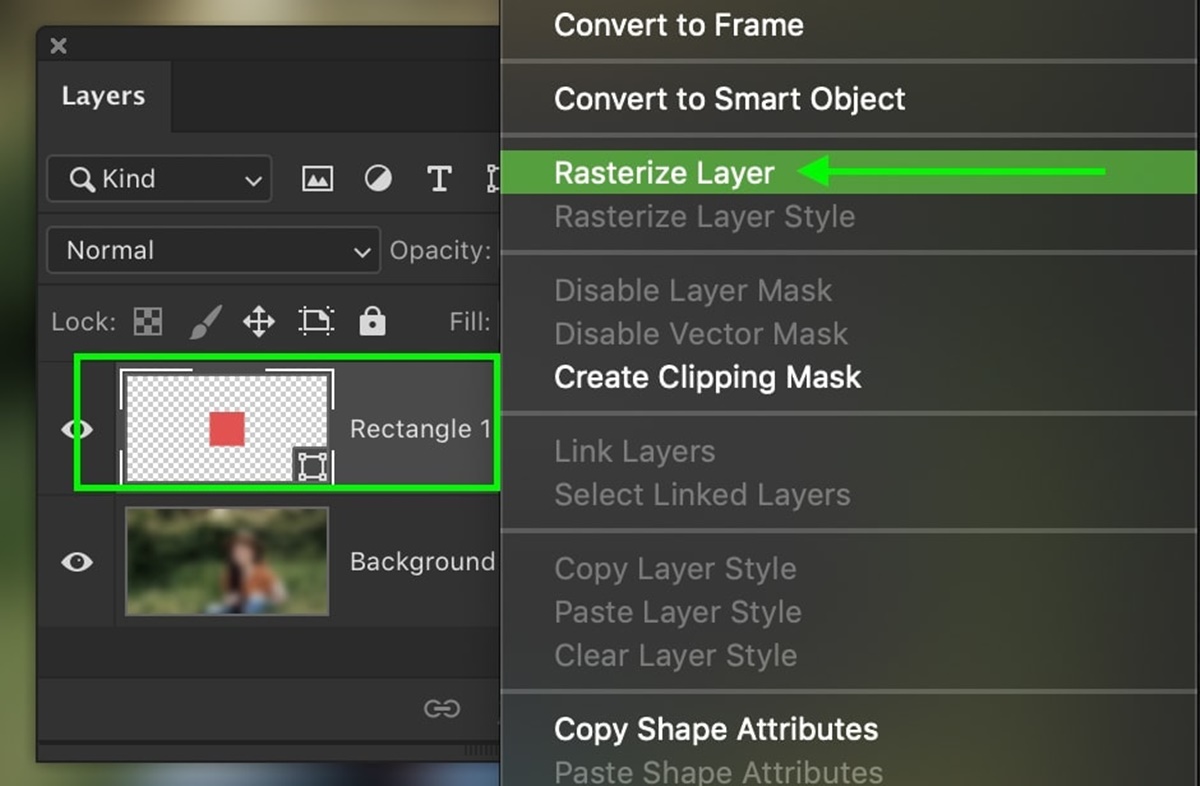
Rasterizing Layer Effects in Photoshop
Layer effects in Photoshop are a powerful tool that allows you to add various visual enhancements to your designs. From drop shadows to bevels, these effects can bring depth and dimension to your artwork. However, there may be instances where you need to rasterize these layer effects. Rasterizing is the process of converting the effects from vector-based to pixels, making them part of the layer itself. This article will guide you through the process of rasterizing layer effects in Photoshop and discuss the benefits and downsides of doing so.
There are several situations where rasterizing layer effects becomes necessary. One common scenario is when you plan to export your design to a file format that doesn’t support layer effects, such as JPEG or GIF. By rasterizing the effects, you ensure that they are preserved in the exported image. Additionally, rasterizing can be useful when applying further adjustments to the layer, such as using filters or blending modes that may not interact well with layer effects.
To rasterize layer effects in Photoshop, follow these simple steps:
Step 1: Selecting the Layer
Begin by selecting the layer containing the effects that you want to rasterize. You can do this by clicking on the desired layer in the Layers panel.
Step 2: Opening the Layer Style Window
Next, go to the “Layer” menu at the top of the screen and select “Layer Style.” This will open the Layer Style window, where you can see and edit the various effects applied to the layer.
Step 3: Rasterizing the Layer Effects
In the Layer Style window, find the checkbox that says “Layer Effects” and uncheck it. This will remove the layer effects from the layer preview, indicating that they are being rasterized. Click “OK” to apply the changes.
Step 4: Saving the Rasterized Layer
Once the layer effects have been rasterized, it’s a good practice to save the rasterized version as a new layer or duplicate the original layer. This way, you can preserve the original layer with its layer effects intact, in case you need to make further adjustments later on.
There are several benefits to rasterizing layer effects. Firstly, it ensures consistent rendering of the effects across different devices and software. This is particularly important when working on web or mobile designs, where the final output may vary depending on the device or browser. Rasterizing the effects eliminates any potential compatibility issues.
However, rasterizing layer effects also has its downsides. Once rasterized, the effects become permanent and cannot be easily edited or modified. If you need to make changes to the effects later on, you’ll have to start from scratch. Additionally, rasterizing can increase the file size, especially if the layer effects are complex or applied to multiple layers. This can impact the overall performance and storage requirements of your Photoshop project.
If you prefer to keep your layer effects intact while still having the flexibility to edit them, there are alternative techniques you can explore. One option is to convert the layer effects to smart objects, which allow for non-destructive editing. Another approach is to use adjustment layers or layer masks to apply effects selectively. These methods provide more flexibility and ease of editing compared to rasterizing layer effects.
Now that you understand how to rasterize layer effects in Photoshop and the various considerations, you can make informed decisions about when and how to use this technique. Remember to weigh the benefits and downsides and choose the method that best suits your specific design needs.
Understanding Layer Effects
Layer effects in Photoshop are a set of powerful tools that allow you to enhance the appearance of your designs. These effects are non-destructive and can be easily applied to individual layers, giving you the ability to add depth, texture, and visual interest to your artwork. Understanding how layer effects work is essential for harnessing their full potential.
Layer effects can be accessed through the Layer Style dialog box in Photoshop. This dialog box includes a variety of effects, such as drop shadows, glows, bevels, gradients, and more. Each effect can be customized with different settings, allowing you to create unique and engaging visuals for your designs.
One of the key advantages of layer effects is their non-destructive nature. This means that you can apply and edit the effects without permanently altering the original content of the layer. For example, you can easily change the color or intensity of a drop shadow, adjust the bevel style of an object, or modify the gradient overlay on a shape, all while preserving the underlying layer.
Layer effects also offer versatility and flexibility in designing. You can apply multiple effects to a single layer, creating complex and layered visual effects. By experimenting with different combinations of effects and adjusting their settings, you can achieve various looks and styles for your designs.
An important concept to understand when working with layer effects is their order of application. The order in which you apply the effects can affect the final outcome. Effects are applied from top to bottom in the Layer Style dialog box, so those at the top will be applied first, followed by those below. This order can impact how the effects interact with each other, and you can rearrange them to achieve the desired result.
Another aspect to consider is the blending options associated with layer effects. Blending options control how the layer effects interact with the layers below. You can choose from various blending modes, such as Multiply, Overlay, Screen, and more, to achieve different blending effects. Experimenting with blending modes can help you create interesting and unique compositions.
Understanding layer effects allows you to unleash your creativity and enhance the visual appeal of your designs. By exploring the various effects and their customization options, you can create stunning graphics, text effects, and visual elements that captivate your audience.
When to Rasterize Layer Effects
While layer effects in Photoshop offer great flexibility and non-destructive editing, there are certain situations where you may need to rasterize these effects. Rasterizing layer effects involves converting the vector-based effects into pixels, making them part of the layer itself. Understanding when to rasterize layer effects can help you optimize your workflow and achieve the desired results.
One common scenario where rasterizing layer effects becomes necessary is when you plan to export your design to a file format that doesn’t support layer effects. Formats like JPEG or GIF do not preserve layer effects, so rasterizing them ensures that the effects are included in the exported image. This is especially important if you are delivering your design to clients or uploading it online.
An advantage of rasterizing layer effects for export is that it ensures consistency across different devices and software. Different devices and software may interpret layer effects differently, leading to variations in the final output. By rasterizing the effects, you eliminate the risk of unintended changes in appearance and ensure that your design looks as intended regardless of where it’s viewed.
Rasterizing layer effects can also be beneficial when you need to apply further adjustments or modifications to the layer. Some features in Photoshop, such as filters and blending modes, may not interact well with layer effects. Rasterizing the effects makes them a permanent part of the layer, allowing you to freely use these features for additional editing without any conflicts.
Furthermore, rasterizing layer effects can help reduce file size and optimize performance, especially if you have complex or multiple layers with effects applied. In some cases, layer effects can consume a significant amount of memory, making your file larger and potentially slowing down the editing process. Rasterizing the effects simplifies the layer structure and reduces the overall file size, making it more manageable.
However, it is important to note that rasterizing layer effects is irreversible. Once the effects are rasterized, they become part of the layer and cannot be modified or edited as individual effects anymore. This means that if you need to make changes to the effects later on, you’ll have to redo the entire process. It’s always recommended to keep a backup of your original layer with the intact effects if you anticipate the need for further adjustments.
How to Rasterize Layer Effects
Rasterizing layer effects in Photoshop is a straightforward process that allows you to convert the effects into pixels and merge them with the layer itself. This can be useful for various reasons, such as ensuring compatibility when exporting files or applying additional adjustments without any conflicts. Follow these simple steps to rasterize layer effects in Photoshop.
Step 1: Selecting the Layer
Start by selecting the layer that contains the effects you want to rasterize. You can do this by clicking on the layer in the Layers panel.
Step 2: Opening the Layer Style Window
Next, go to the “Layer” menu at the top of the screen and select “Layer Style.” This will open the Layer Style window, where you can see and edit the various effects applied to the layer.
Step 3: Rasterizing the Layer Effects
Inside the Layer Style window, look for the checkbox labeled “Layer Effects” and uncheck it. When you uncheck this box, the layer preview will update, and the effects will appear as part of the layer itself, indicating that they are being rasterized.
Step 4: Saving the Rasterized Layer
It is a good practice to save the rasterized version as a new layer or duplicate the original layer. This way, you can preserve the original layer with the layer effects intact in case you need to make further adjustments later on. To save the rasterized layer, right-click on the layer in the Layers panel and choose “Duplicate Layer” or use the “New Layer” option to create a new layer with the rasterized effects.
Once the layer effects have been rasterized, they become a part of the layer itself and cannot be modified as individual effects. It is important to keep this in mind as you make any further adjustments or edits to the layer.
Rasterizing layer effects is a useful technique to ensure compatibility and streamline your workflow. By converting the effects into pixels, you eliminate any potential issues when exporting files to formats that do not support layer effects. Additionally, rasterizing allows you to freely apply filters, blending modes, and other adjustments to the layer without any conflicts.
Remember to keep the original layer with the layer effects intact if you anticipate the need for future modifications. This way, you can always go back to the original layer and make any necessary changes, rather than starting from scratch.
Step 1: Selecting the Layer
The first step in rasterizing layer effects in Photoshop is to select the specific layer that contains the effects you want to rasterize. This is a crucial step as it ensures that the changes are applied only to the intended layer, while preserving the effects on other layers.
To select a layer in Photoshop, open the document that contains the layer effects you wish to rasterize. Locate the Layers panel, usually found on the right side of the workspace, and identify the layer that you want to work with.
You can select a layer by simply clicking on its name or thumbnail in the Layers panel. When a layer is selected, it will be highlighted in the panel, indicating that it is the active layer for any modifications or adjustments.
If you are unsure which layer contains the effects, you can toggle the visibility of the different layers to pinpoint the one you need. Click on the eye icon next to each layer to show or hide it in the document window. This can help you identify the layer with the desired effects more easily.
It’s also worth noting that you can use keyboard shortcuts to select layers quickly. Pressing the “V” key on your keyboard will activate the Move tool, which allows you to click directly on the layer in the canvas window to select it. Alternatively, you can use the arrow keys to navigate through the layers in the Layers panel and press the Enter key to select the desired layer.
By selecting the appropriate layer, you ensure that the rasterization process impacts only the intended layer and preserves the effects on other layers in your Photoshop document. This step sets the foundation for successfully rasterizing layer effects and moving forward with the remaining steps of the process.
Step 2: Opening the Layer Style Window
After selecting the layer with the desired effects, the next step in rasterizing layer effects in Photoshop is to open the Layer Style window. This window provides access to the various effects applied to the selected layer, allowing you to customize and make adjustments as needed.
To open the Layer Style window, navigate to the top menu bar in Photoshop. Click on the “Layer” menu option, and a dropdown menu will appear. From this menu, select the “Layer Style” option. Alternatively, you can also access the Layer Style window by right-clicking on the selected layer in the Layers panel and choosing “Layer Style” from the contextual menu.
Upon opening the Layer Style window, a dialog box will appear, displaying a range of effects and their settings that have been applied to the layer. These effects include but are not limited to drop shadows, glows, bevels, gradients, and overlays.
Within the Layer Style window, you have the ability to select and edit individual effects, adjust their properties, and customize the overall appearance of the layer. Each effect in the Layer Style window is presented as a separate option with its own set of settings. These settings control elements such as opacity, size, color, and blending options.
It’s important to note that the position of the effects within the Layer Style window determines the order in which they are applied to the layer. Effects positioned at the top of the list are applied first, followed by those below. You can rearrange the effects by clicking and dragging them to change their order, providing flexibility and control over the visual outcome.
Opening the Layer Style window is a crucial step in rasterizing layer effects as it provides access to the effects applied to the selected layer. This step enables you to modify and fine-tune the appearance of the effects before rasterization, ensuring that they align with your desired outcome. It sets the stage for the subsequent steps in the rasterization process, allowing you to make informed decisions about which effects to rasterize and how to proceed with the overall design.
Step 3: Rasterizing the Layer Effects
Once you have opened the Layer Style window and made any desired adjustments to the effects, the next step in rasterizing layer effects in Photoshop is to actually rasterize them. Rasterizing converts the vector-based effects into pixels, merging them with the layer and making them a permanent part of it.
To rasterize the layer effects, locate the checkbox labeled “Layer Effects” within the Layer Style window. By default, this checkbox is checked, indicating that the effects are active and visible on the layer.
To begin the rasterization process, simply uncheck the “Layer Effects” checkbox. As you do this, you will notice that the layer preview in the Layer Style window updates, and the effects become integrated with the layer itself. The layer will now display the rasterized version of the effects, blending them seamlessly into the layer’s content.
It’s important to note that rasterizing the layer effects is irreversible. Once you have rasterized them, they become permanent and cannot be individually modified anymore. Be sure that you are satisfied with the appearance of the effects before proceeding with rasterization.
After you have unchecked the “Layer Effects” checkbox to rasterize the effects, click the “OK” button in the Layer Style window to apply the changes. Your layer will now have the rasterized version of the effects, which are now embedded directly into the layer itself.
By rasterizing the layer effects, you simplify the layer structure and make it easier to work with, particularly when exporting the file to formats that do not support layer effects. Rasterization ensures that the effects are preserved and consistently rendered across different devices and software.
Remember, before rasterizing, it is a good practice to save a copy of the original layer with its layer effects intact. This way, you can always revert to the original version if you need to make any further adjustments or modifications to the effects.
Completing step 3 of the rasterization process brings you one step closer to finalizing your design with rasterized layer effects. The next step involves saving the rasterized layer and considering the benefits and downsides of rasterization.
Step 4: Saving the Rasterized Layer
After rasterizing the layer effects in Photoshop, the final step is to save the rasterized layer. This step ensures that you have a preserved version of the layer with the rasterized effects, which can be useful for future edits or as a reference.
To save the rasterized layer, right-click on the layer in the Layers panel and choose the “Duplicate Layer” option. This will create a copy of the rasterized layer in the Layers panel. Alternatively, you can also use the “New Layer” option from the Layer menu to create a new layer with the rasterized effects.
By duplicating or creating a new layer, you ensure that the original layer with its layer effects intact is safely preserved. This way, you can always revert to the original version if needed and make any further adjustments or modifications to the effects without starting from scratch.
When saving the rasterized layer, it is important to consider the naming and organizing of your layers. Giving descriptive names to your layers can help maintain a clear and organized Photoshop document. It is also a good practice to group related layers together, which can make it easier to locate and manage your rasterized layers.
Additionally, consider the format and file type you want to save your rasterized layer in. Depending on your specific needs and project requirements, you can choose from a range of file formats supported by Photoshop, such as JPEG, PNG, or PSD. Keep in mind that when saving in formats like JPEG, which do not support transparency, any areas with transparent pixels will be filled with a solid color upon saving.
Finally, determine the location on your computer where you want to save the rasterized layer file. Choose a location that is easily accessible and aligns with your file organization system. Ensure that you have enough storage space and that the file name is clear and identifiable.
By following step 4 and saving the rasterized layer with descriptive names and in an organized manner, you have successfully completed the rasterization process in Photoshop. The rasterized layer now serves as a standalone version of your original layer with the effects merged into its pixels, providing a solid foundation for further editing or exporting as needed.
Benefits of Rasterizing Layer Effects
Rasterizing layer effects in Photoshop offers several benefits that can enhance your workflow and optimize the visual outcome of your designs. Rasterization converts vector-based effects into pixels, making them part of the layer itself. Understanding the benefits of rasterization can help you make informed decisions about when and how to utilize this technique.
One of the primary advantages of rasterizing layer effects is ensuring consistent rendering across different devices and software. Layer effects, such as drop shadows, glows, and bevels, can be interpreted differently by various devices or software applications. Rasterizing the effects eliminates any potential compatibility issues, ensuring that your design appears as intended, regardless of the platform or software used to view it.
In addition to compatibility, rasterizing layer effects can significantly improve performance and optimize file sizes. Complex or multiple layers with applied effects can consume a considerable amount of memory and increase file sizes. By rasterizing the effects, you simplify the layer structure and reduce the overall file size, making it more efficient to work with and decreasing the impact on system performance.
Rasterizing layer effects can also be beneficial when exporting files to formats that do not support layer effects. Formats like JPEG or GIF do not preserve layer effects, so rasterizing the effects ensures they are included in the final exported image. This is crucial when delivering designs to clients or when uploading images to online platforms that do not support layered files.
Another advantage of rasterizing layer effects is the ability to apply further adjustments and modifications to the layer without any conflicts. Some Photoshop features, such as filters or blending modes, may not interact well with layer effects. Rasterizing the effects makes them a permanent part of the layer, allowing you to comfortably experiment with different adjustments and apply additional effects without any unexpected interactions.
Rasterizing layer effects also provides more control over the appearance of your designs. Once the effects are rasterized, they become pixels and can be altered with standard Photoshop editing tools. This flexibility allows you to make modifications, such as applying filters or layer masks, directly to the rasterized layer, giving you greater creative freedom and control over the final result.
Overall, rasterizing layer effects is a valuable technique that provides consistency, performance optimization, and greater editing control. Understanding the benefits of rasterization empowers you to utilize this tool effectively in your design process, ensuring that your artwork looks its best and meets the requirements of different devices, software, and output formats.
Downsides of Rasterizing Layer Effects
While rasterizing layer effects in Photoshop can offer various advantages, it is important to consider the potential downsides of this process. Rasterization involves converting vector-based effects into pixels, making them a permanent part of the layer. Understanding the limitations of rasterizing layer effects can help you make informed decisions about whether or not to use this technique.
One of the main downsides of rasterizing layer effects is the loss of flexibility and non-destructive editing. Once the effects are rasterized, they become part of the layer and cannot be individually modified or adjusted. This means you lose the ability to fine-tune or make changes to specific effects without having to redo the entire process. It is crucial to have a backup of the original layer with its layered effects intact if you anticipate future modifications.
Another consideration is the increased file size that can result from rasterizing layer effects, especially if the effects are complex or applied to multiple layers. Rasterization converts the effects into pixels, and depending on their complexity, this can significantly increase the file size of your Photoshop document. This can impact the overall performance and storage requirements, particularly if you are working with large or numerous files.
Rasterizing layer effects can also limit the versatility and adaptability of your designs. If your project requires frequent changes or iterations, keeping the effects as non-destructive layers allows for more flexibility and ease of adjustment. This is particularly relevant for collaborative projects or when working with clients who may request modifications to the layer effects at a later stage.
Additionally, rasterizing layer effects can result in a loss of quality if the effects are applied to a low-resolution image. Rasterizing the effects can highlight any imperfections or limitations in the original image, such as pixelation or blurriness. It is important to consider the resolution and quality of your source image before rasterizing the effects to maintain the overall visual appeal.
Lastly, it is worth noting that the process of rasterizing layer effects is irreversible. Once the effects are rasterized, you cannot revert them back to their original vector-based state or make any changes to them directly. If you anticipate the need for future adjustments or non-destructive editing, it may be more prudent to explore alternatives, such as converting the layer effects to smart objects or utilizing adjustment layers and layer masks.
Understanding the downsides of rasterizing layer effects allows you to make informed decisions about the trade-offs involved in the rasterization process. Carefully weigh these considerations against the specific requirements of your project to determine if rasterizing the effects is the most suitable approach for your design workflow.
Alternative Techniques for Applying Effects to Rasterized Layers
While rasterizing layer effects in Photoshop can be a useful technique in certain scenarios, it’s important to explore alternative methods of applying effects to rasterized layers. These alternative techniques offer flexibility, non-destructive editing, and the ability to make adjustments without permanently altering the original layer.
One alternative technique is to convert the layer effects into a smart object. By selecting the layer and right-clicking on it, you can choose the “Convert to Smart Object” option. This converts the layer with its rasterized effects into a smart object, which retains the original layer information. With smart objects, you can continue to apply and edit effects non-destructively while preserving the ability to adjust or remove them at any time.
Another method is to utilize adjustment layers. Adjustment layers allow you to apply effects or modifications to the entire layer or specific areas without changing the original layer pixels. By adding an adjustment layer, such as a curves adjustment or a gradient map, you can achieve similar effects as those applied directly to the layer. This approach provides greater flexibility and the ability to fine-tune adjustments without permanently altering the pixels of the rasterized layer.
Layer masks also offer a non-destructive way to apply effects to rasterized layers. By adding a layer mask, you can selectively reveal or hide specific areas of the layer, allowing you to apply effects only to certain parts of the image. This technique provides precise control over the application of effects and allows for easy adjustments or modifications without altering the underlying layer.
Additionally, you can combine the use of adjustment layers and layer masks to achieve more complex effects. By using adjustment layers with layer masks, you can create targeted effects or adjustments in specific areas of the rasterized layer while maintaining the flexibility to tweak or refine the adjustments as needed.
It’s important to note that these alternative techniques allow for non-destructive editing and greater flexibility compared to rasterizing layer effects. They provide more control over the appearance of the effects and the ability to make adjustments without permanently altering the original layer. However, these methods may require additional layers or increased file complexity, so it’s essential to consider the specific needs of your project and choose the technique that best suits your requirements.
Exploring and utilizing these alternative techniques can enhance your design workflow by providing greater flexibility, non-destructive editing, and the ability to fine-tune and adjust effects applied to rasterized layers. By incorporating these methods into your workflow, you can achieve stunning visual results while maintaining the integrity of your original layer.